How Ratings Work
A vast database of tutorial ratings has been created to study how efficient or inefficient design techniques are.
Ratings Explained – What is the Rating System?
The rating system was developed to assess the efficiency or inefficiency of design techniques. Tutorials are compared, analysed, and professionally graded to provide designers with the best possible tool. Creating such a database allows for a more analytical approach to the creative process.
Related: Meet the team
How Does the Rating System Work?
The “Design Rating System” (DRS) relies on four key pillars: Practice (time), Difficulty, Scalability, and Functionality. Tutorials are graded from 0 to 5, and an average score is calculated.
What is the Design Rating System (DRS)?
The Design Rating System is a comprehensive database of professionally graded tutorials, designed to help designers work more efficiently.
How Are Tutorials Graded?
Tutorials are graded on a score from 0 to 5, based on the following four mechanics:
- Practice (time): How much time is required to practice the technique?
- Difficulty: How challenging is the technique to master?
- Scalability: How often can the technique be applied in day-to-day design work?
- Functionality: How effectively does the technique achieve the desired outcome?
Related: Top Rated Design Tutorials
Assigned Individual Ratings
- 0-2: Bad
- 2-3: Good
- 3-4: Great
- 4-5: Expert
Is 5/5 the Best Score?
No, the ideal score falls within the range of 2.25 to 4.25. This range, called the Optimal Design Range, is where efficiency and creativity align for optimal results. More details on this are covered further in the page.
Related: Understanding Optimal Design Range
Understanding the Key Metrics
What Do Practice (time), Difficulty, Scalability, and Functionality Mean?
- Practice (time): How long does it take to practice the technique?
- Difficulty: How difficult is the technique to master?
- Scalability: How frequently can the technique be used in daily design work?
- Functionality: How well does it serve the intended purpose?
Why Were These Mechanics Chosen?
After years of design experience, these four mechanics were identified as the key factors that influence efficient design work. Whether you’re designing for speed, enjoyment, or learning, these metrics apply.
What Do We Aim to Achieve?
The goal of the rating system is to provide designers with a tool that encourages a more analytical approach to their process. Even if it helps just a little, we consider it a success.
Who Rates the Tutorials?
All tutorials are rated by professionals using the Design Rating System, ensuring consistent and reliable results.
Optimal Design Range (ODR)
What Powers the System?
The system is based on analysing techniques and identifying inefficiencies in design. Through our study, we found two primary insights:
Practice ≡ Difficulty
In most cases, the more time-consuming the technique, the more difficult it is. Although there are exceptions, this correlation generally holds true.
Functional ≡ Scalability
The most functional techniques tend to be the most scalable, meaning they are used frequently in design work. Again, while there are exceptions, the majority of techniques follow this trend.
What is the Optimal Design Range?
The Optimal Design Range is between 2.25 and 4.25. This is the balance point where design techniques are both effective and efficient.
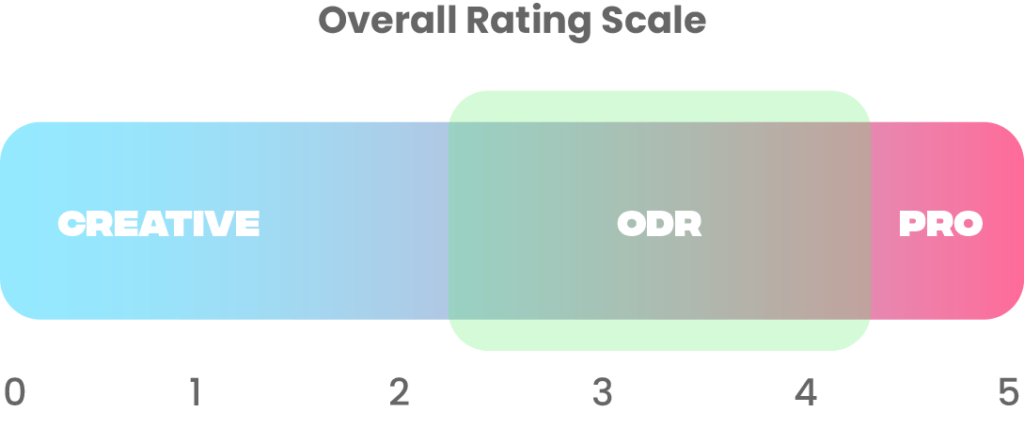
Conclusion: The Rating Spectrum (0-5)
- 0-2: Represents the most creative and experimental phase.
- 2.25-4.25: The ideal range for both professional and creative work.
- 4.25-5: These techniques take more time to master but are valuable skills to have.
What Do Overall Ratings Mean?
- 0-2.25: Techniques in this range don’t take much time to learn but may not be very useful, depending on your design goals.
- 2.25-4.25: This is the Optimal Design Range, ideal for both professional and creative work.
- 4.25-5: These techniques require significant time to master, but once learned, they become valuable assets. For example, 2D designers learning 3D techniques.
Observations and Conclusions: Creative vs Professional Work
Our research shows several scenarios, with the following key insights:
- “Little time but a lot of scale” averages the same as “A lot of time but little scale”.
- Professional Work: Little time but a lot of scale.
- Creative/Personal Work: A lot of time but little scale.
This overlap means that the most optimal range falls around 2.25-4.25, where creative and professional techniques intersect.