How To Draw A Red Arrow Plane | A Simple Guide
We are back with another drawing. Are you guys ready to soar in the sky in the same manner as we did while making a fighter jet? Today, we will draw a red arrow plane used for acrobatics.
The RAF still uses the Hawk T1, a low-wing, two-seat training aircraft capable of complete aerobatics, for various purposes. The Royal Air Force’s aerobatic team, the Red Arrows, fly Hawks as their aircraft. The Red Arrows model of the plane is propelled by a single 5,200-pound-thrust Rolls-Royce Turbomeca Adour Mk 861 turbofan. As a result, the Hawk can cruise at a fantastic maximum speed of 645 mph and achieve a top speed of Mach 1.2 when diving.
What you will need
- A pencil
- An eraser
- A sheet of paper
- Coloring kit
- Ruler
- 30 minutes
How To Draw a Red Arrow Plane
Making a red arrow plane by hand may be a creative and entertaining project. This is a step-by-step tutorial to assist you in drawing one.
Step 1: Draw the main body
We will draw the main body of the red arrow that will be the base for our drawing. To make the main body, draw a horizontal curved line in the center of the page. Make another curved line over the top of the first line. Connect the right side of these lines and make it pointed to make the nose of the plane. For the left side, join these curved lines with a small vertical line. Now that we are done with the basic shape, we will do some modifications. Draw a horizontal line below the upper part of the body and erase the top boundary. This will be the place for the pilot in our plane.
Step 2: Draw the 1st wing
Moving to our second step, we will draw the first wing of our red arrow plane. To make the wing, extend a vertical right-angle triangle (a shape having three sides and a 90-degree angle between its two sides). Make the triangle’s base on the body and curve the corner extending out of the wing. Make a rectangular on the main body such that the base of the rectangle is common with the base of the triangle we drew before for the wing. Also, draw a little curved line on the right side of the wing with the body.
Step 3: Draw the 2nd wing
In this step, we will put the second wing on the other side of the plane so it will be easy to draw. All you have to do is to draw a trapezoid over the middle top of the body. To make this shape, draw two vertical lines slightly bent towards each other and then join these lines with a straight horizontal line. There you have it, the second wing of the plane.
Step 4: Draw the rear fender
An airplane’s empennage, sometimes called the fender or tail assembly, is at the back. In flight, this offers stability and elevation. This is a lot like how an arrow’s feathers provide stability. Indeed, “empennage” is French if this sounds that way. To make the rear fender, draw a triangle extending from the rear part of the body. This shape is similar to the shape we drew for the wing, but this will be smaller in size.
Step 5: Draw the tail
The tail is also part of the empennage, acting as a vertical stabilizer. To make the tail, draw a right-angle triangle on the top of the back part of the body. The base of the triangle will present the plane’s main body and make the triangle’s longer side with a curved line like the image.
Step 6: Draw the cockpit
The area of the airplane where the pilot and co-pilot operate is called the cockpit (same as in the helicopter). The cockpit serves two primary purposes for the pilot: it gives them a good vantage point and allows them to access all control devices easily. The same design principles that apply to all vehicles also apply to planes.
To make the cockpit, draw a curved line to join the upper boundary of the plane over the place that was made for the pilot in our first step while making the main body. Draw some curved lines in the cockpit to add some details.
Step 7: Draw the left rear fender
This is the easiest step of all. Draw the left rear fender on the back side of the plane by making a small triangle on the back of the lower side of the tail.
Step 8: Draw the front nose
The nose cone of most military and commercial aircraft also includes radar and other devices that could be used to track hostile aircraft, detect meteorological events, or send communication messages. To make the front nose, draw two merging horizontal lines on the front of the body.
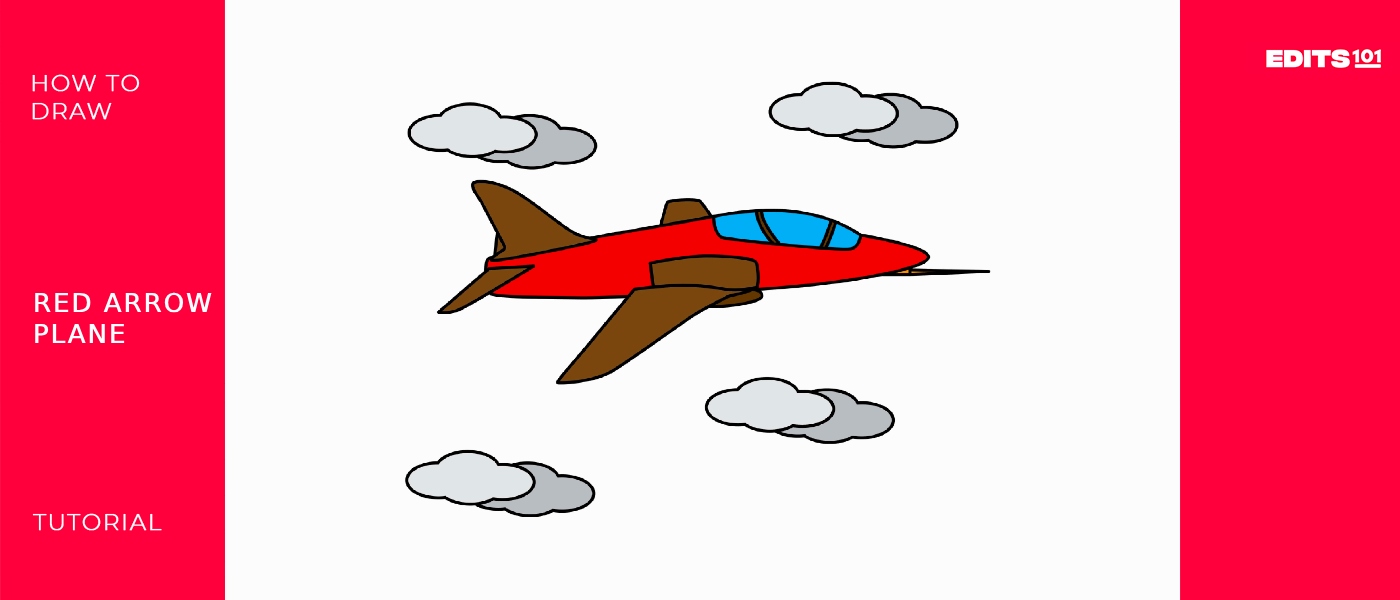
Step 9: The red arrow plane is ready
Congratulations! The red arrow plane is ready to fly high in the sky. You performed a fantastic job. You created your plane, and we’re confident you followed every instruction. We will use a marker to outline the drawing to stand out more. To improve the appearance, we will remove the pencil marks after outlining.
The actual fun is about to start. We are going to improve and add authenticity to our drawing. Are you prepared to use your creativity and imagination to produce a more refined drawing?
Taking your Red Arrow drawing to the next level
Drawing, like any other skill, requires practice. Even if you only have a few minutes to sketch daily, do it. Take heed of your surroundings. This increases comprehension of details, proportions, and shapes. You can start with the basics and work up to more complex topics. Experiment with different drawing tools like charcoal, colored pencils, watercolors, markers, and pencils. Every medium has unique characteristics that can help you discover your preferences.
You can also play with simple cross-hatching, hatching, blending, and shading techniques. Understanding these techniques will significantly increase the depth and realism of your drawings. While drawing, try new ideas and use your imagination.
Adding background to your drawing
Including a background in a drawing is critical for producing a comprehensive and realistic visual experience. It sets the scene for the main subject or action by providing context. An appropriate background can add a feeling of place, period, and atmosphere to the artwork’s narrative. It also aids in establishing an atmosphere or feeling, whether the setting is a tranquil landscape, a bustling urban, or a fanciful universe. A background can also improve the composition by harmonizing the pieces and guiding the viewer’s eye.
You can draw clouds around the plane. A pretty blue sky with some birds. You can also draw mountains at the back of the plane.
As we draw the background, we ensure no line overlaps with our plane drawing. If you notice any line overlapping our plane, erase it carefully.
Adding colors to your drawing
Let’s get to the good stuff. Color your gorgeous image using your imagination to experiment with different colors and tints. As a drawing is colored, it develops depth, realism, and emotion. It can bring a story to life by creating a mood and atmosphere. Furthermore, color choices can provoke specific feelings or connections, improving a picture’s impact and retention. Furthermore, coloring allows for self-expression by allowing the artist to incorporate their unique style and point of view into their creations. The coloring is entirely up to your imagination. Most red arrow planes are red, as from the name, but this is your drawing, and you can color it with any color you prefer. Make sure to color the cockpit blue, which is made of glass. Make the sky blue and the clouds white or grey in the shade.
P.S. Bonus Tips
Our illustration is finished, and we hope you loved it as much as we did. As previously stated, there is no limit to one’s imagination. The illustration can be improved in any way. We changed the backdrop and colors, but there is still more you can modify.
You can draw patterns on the plane or make some designs you like. You can also draw a smoke trail from the rear side of the plane. You can also draw another plane to make it look like a race. Hey! These are just a few ideas for ideas. Don’t limit yourself to these ideas only. Use your creativity and give your drawing a new look. It is a hit-and-trial method. If you won’t get right on the first attempt, practice and try again.
Conclusion
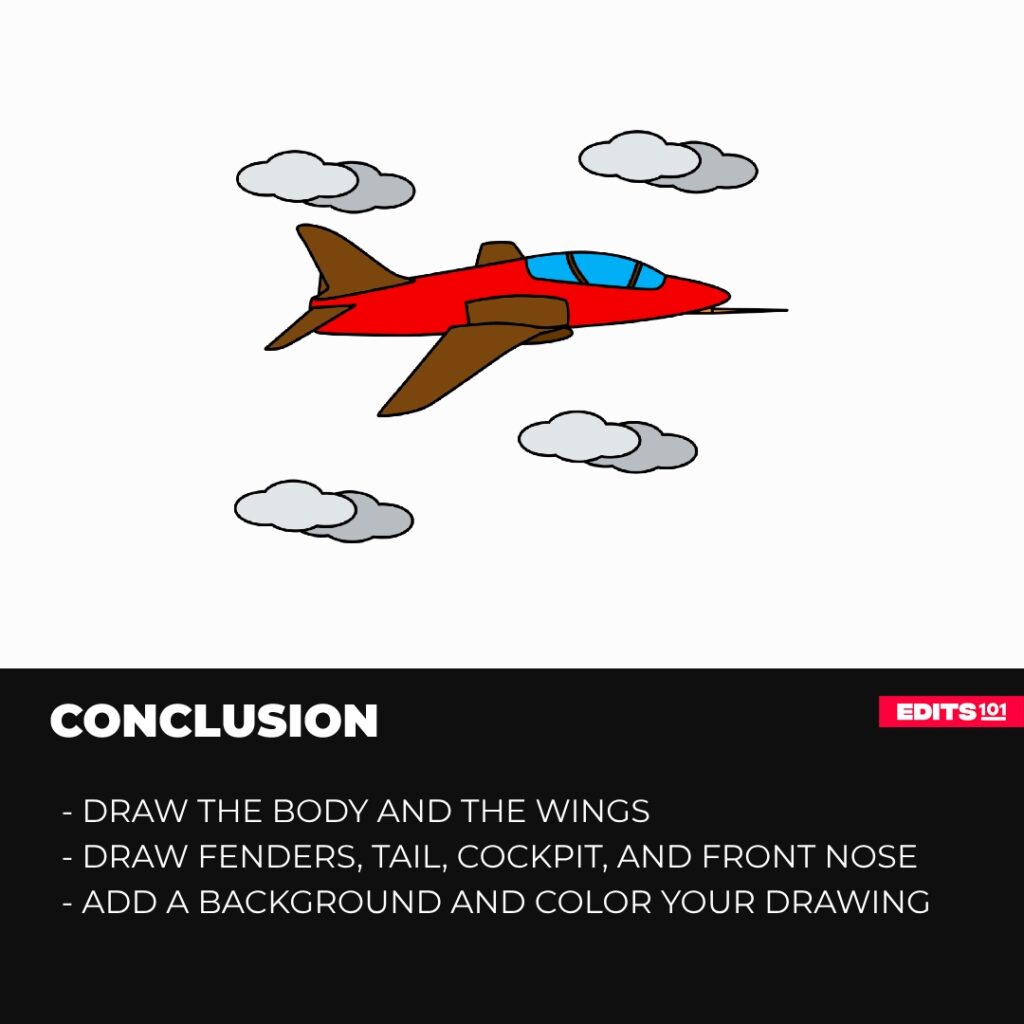
That’s it! Our red arrow plane is ready now. It was a fun and easy process. We’re confident you followed each step without skipping and made a fantastic drawing. We started by making the main body, wings, fenders, cockpit, tail and the front nose.
Don’t be disappointed if your first attempt does not turn out precisely as you hoped. Continue experimenting and perfecting your technique, and you’ll soon be confidently drawing red arrow planes!
Thanks for reading & feel free to check out more of our articles!
Author Rating
Overall Rating
Summary
This guide explains how to draw a red arrow plane in a few minutes. You will also learn a few interesting facts about this vehicle.