
Basically, we’ll be explaining the different types of adjustment layers available in Affinity Photo, and how they can be used to improve your photos.
Certainly, as you edit photos in Affinity Photo, you may want to experiment with different looks by making & using different Adjustments. There are a lot of adjustments, thus why we’ll be going over them in detail.
What are Adjustment Layers in Affinity Photo?
Adjustment Layers allow you to make global changes to your image without affecting the underlying pixels. However, this is perfect for making changes or experimenting with different looks without permanently altering your original image. Adjustment Layers are special layers that contain information on how the layer below should be adjusted.
Meanwhile, Adjustment Layers in Affinity Photo work non-destructively and can be edited, deleted, or re-ordered at any time. They also allow you to create complex effects by stacking multiple Adjustment Layers on top of each other.
There are 3 main different types of Adjustment Layers available in Affinity Photo, each with its own specific purpose. In this tutorial, we’ll be covering the following topics:
- Tonal adjustments
- Color adjustments
- Other adjustments
Here’s an image showing all adjustments available in Affinity Photo.
Now, let’s take a closer look at each of these adjustment layers to see how they might be utilized to enhance your photographs. Firstly, Tonal Adjustments.
Tonal Adjustments in Affinity Photo
Tonal adjustments modifies the brightness of pixels in your image. Affinity Photo’s tonal adjustment layers include Brightness/Contrast, Levels, Curves, Shadows/highlights, as well as Exposure.
- Brightness/Contrast– As the name suggests, this layer allows you to adjust the brightness and contrast of your image.
- Levels- The Levels layer adjusts the black, grey, and white points in your image. This can be useful for correcting an underexposed or overexposed image.
- Curves- The Curves layer allows you to make more precise brightness adjustments than the Levels layer. This is done by adjusting a curve on a graph that represents the tonal range of your image.
- Shadows/Highlights- The Shadows/Highlights layer is enhanced to lighten or darken the shadows and highlights in your image. This can be useful for correcting an image that is too dark or too light.
- Exposure- The Exposure layer allows you to adjust the overall exposure of your image. This can be useful for correcting an underexposed or overexposed image.
Color Adjustments in Affinity Photo
Color adjustments enhance the color of pixels in your image. These consist of Color Balance, Selective Color, Black and White, Channel Mixer, Gradient Map, HSL, Lens Filter, OCIO (OpenColorIO only), Recolor, Split Toning, Threshold, Vibrance, and White balance.
- Color Balance- The Color Balance layer allows you to adjust the colors in your image. This can be useful for correcting an image that has incorrect color casts too…
- Selective Color- The Selective Color layer allows you to adjust the colors of specific objects in your image. This can be useful for isolating and correcting the colors of a specific object by modifying individual RGB, CMYK, and lightness channels.
- Black and White– The Black and White layer allows you to convert your image to black and white. This can be useful for creating a vintage or artistic look.
- Channel Mixer– The Channel Mixer layer allows you to mix the colors of your image. This can be useful for creating custom color effects by modifying individual RGB channels.
- Gradient Map– The Gradient Map layer allows you to map the colors of your image to a gradient. This can be useful for creating a color gradation effect or for isolating specific colors in your image.
- HSL– The HSL layer allows you to adjust the hue, saturation, and lightness of your image. This can be useful for correcting an image that has incorrect color.
- Lens Filter– The Lens Filter layer allows you to add a vignetting filter to your image. Generally, this can be useful for creating a vignetting effect or for adding a color cast to your image.
- OCIO (OpenColorIO only)- The OCIO layer allows you to adjust the colors of your image using the OpenColorIO color management system. This can be useful for correcting an image that has incorrect color.
- Recolor– The Recolor layer allows you to change the colors of your image. This can be useful for creating a new look for your image by converting a color photo to monochrome using the desired tint.
- Split Toning- The Split Toning layer allows you to add a color tint to your image. However, this can be useful for creating a vintage or artistic look.
- Threshold- The Threshold layer allows you to convert your image to black and white by threshold the colors based on pixel lightness. This can be useful for isolating specific colors in your image.
- Vibrance- The Vibrance layer allows you to adjust the saturation of your image. This is useful for correcting an image that is too saturated or for creating a vignetting effect.
- White Balance- The White Balance layer allows you to adjust the colors in your image by setting a white point. Meanwhile, this can be useful for correcting an image that has incorrect color casts.
Other Adjustments in Affinity Photo
The other Adjustment Layers in Affinity Photo modify the pixels in your image in a variety of ways. These include LUT, Invert, Posterize, as well as Soft Proof.
- LUT- The LUT layer allows you to apply a color lookup table to your image. Further, this can be useful for creating a color grading effect or for changing the colors of your image.
- Invert- The Invert layer allows you to invert the colors of your image. This can be useful for creating a negative image effect or for isolating specific colors in your image.
- Posterize- The Posterize layer allows you to reduce the number of colors in your image. This may be useful to convey the image as a collection of solid color blocks.
- Soft Proof- The Soft Proof layer allows you to preview how your image will look when printed with a specific color profile. This can be useful for ensuring that your image will print correctly with a given color profile.
Affinity Photo also provides a variety of other adjustment layers that can be used to improve your photos.
Common adjustments in Affinity Photo
Common adjustments are those that are likely to be used often when editing photos. Affinity Photo provides a variety of common adjustment layers, including Brightness/Contrast, HSL, Levels, Curves, Exposure, Vibrance, as well as White Balance.
Common adjustments fix common issues that can occur with photos and are necessary for getting the best results when editing your photos.
Pre-built mask in Affinity Photo
Masks in Affinity Photo are used to isolate areas of an image for editing. Even more Affinity Photo provides a variety of pre-built masks, including luminosity, color, and depth.
The first thing to remember is, Masks are used to isolate areas of an image for editing. This can be useful for making selective edits or for creating special effects.
In Affinity Photo, there are two types of masking namely pixel masking and vector masking,
- Pixel masking is identical to erase tool, however, it is not destructive(meaning you can hide/reveal freely). It is used to remove, modify, discard, reveal & adjust pixels from an image.
- Vector masking is used to create a mask using vector shapes. This can be useful for creating complex masks or for isolating specific areas of an image.
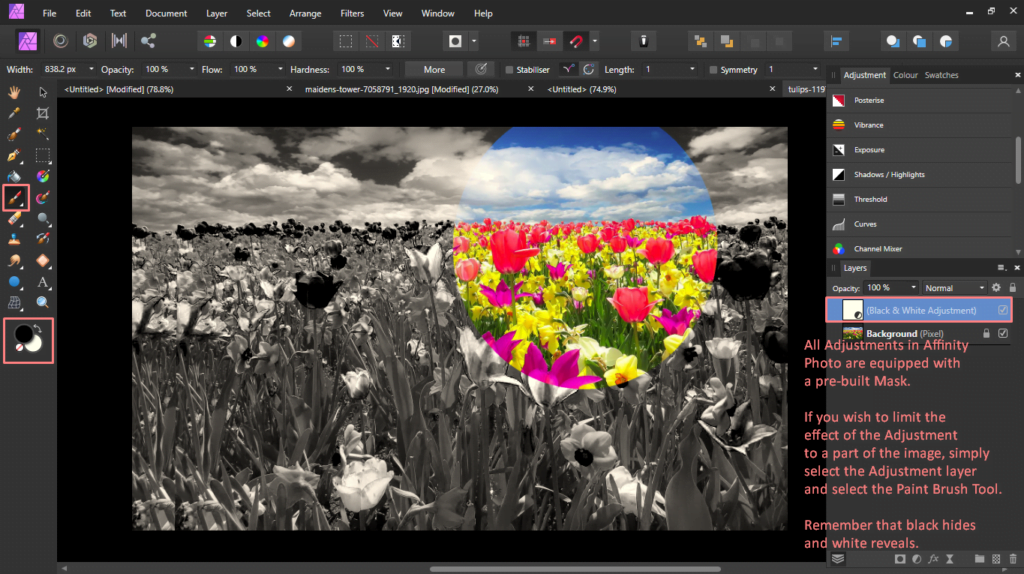
All adjustment layers are equipped with a pixel mask, which can be used to isolate the area that the adjustment layer effects to make selective edits and more controlled designs.
Applying Adjustments in Affinity Photo
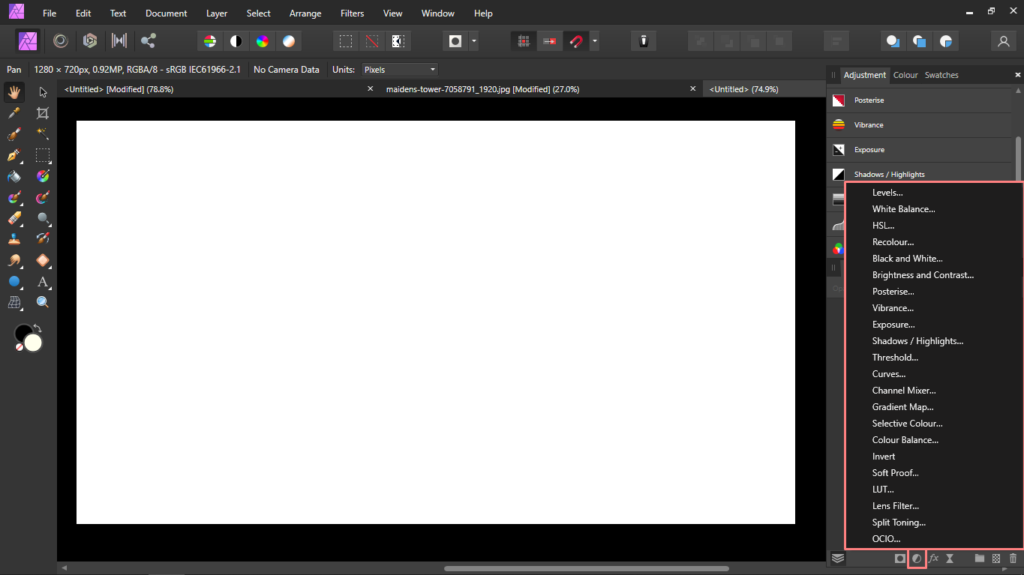
Adjustment Layers in Affinity Photo can be applied to an image in a number of ways. The most common way is to use the Adjustments panel, which can be found in the right-hand sidebar. (If you cannot find the adjustment layer go to ‘view > studio > adjustments’ – this will open up the adjustments panel)
In the Adjustments panel, you will see a list of all the available adjustment layers. To add an adjustment layer, simply click on the layer type that you want to add.
You can also add adjustment layers by going to the Layer menu and selecting New Adjustment Layer. This will bring up a menu of all the available adjustment layers. Simply select the layer type that you want to add.

Once you have added an adjustment layer, you will see a new layer in your Layers panel. To edit the adjustment layer, simply double-click on the layer thumbnail. This will open the Adjustment Layer dialog, where you can make changes to the layer.
You can also adjust the opacity of an adjustment layer to control how strong the effect is. Simply click on the Opacity slider in the Layers panel and drag it to the left or right to decrease or increase the opacity.
You can also control how an adjustment layer affects the layers below it by changing the layer blend mode. The layer blend mode controls how the colors of the two layers are combined. To change the layer blend mode, simply click on the drop-down menu in the Layers panel and select a new blend mode.
There are a variety of ways to apply adjustment layers. Experiment with different methods to see what works best for you.
How a Brightness/Contrast Adjustment works
The Brightness/Contrast layer allows you to adjust the brightness and contrast of your image. To add a Brightness/Contrast layer, go to the Adjustments panel and click on the Brightness/Contrast layer type.
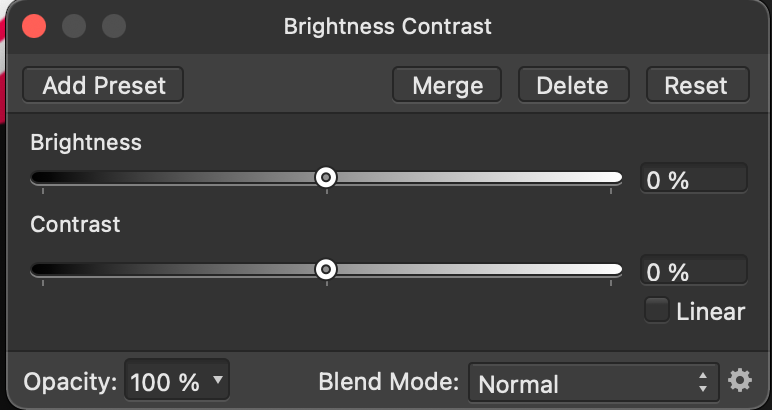
You will see a new layer in your Layers panel. To edit the layer, double-click on the layer thumbnail. This will open the Brightness/Contrast dialog, where you can make changes to the layer.
In the Brightness/Contrast dialog, you can adjust the brightness and contrast of your image by moving the sliders. You can also adjust the midpoint and gamma of your image by checking the boxes next to each option.
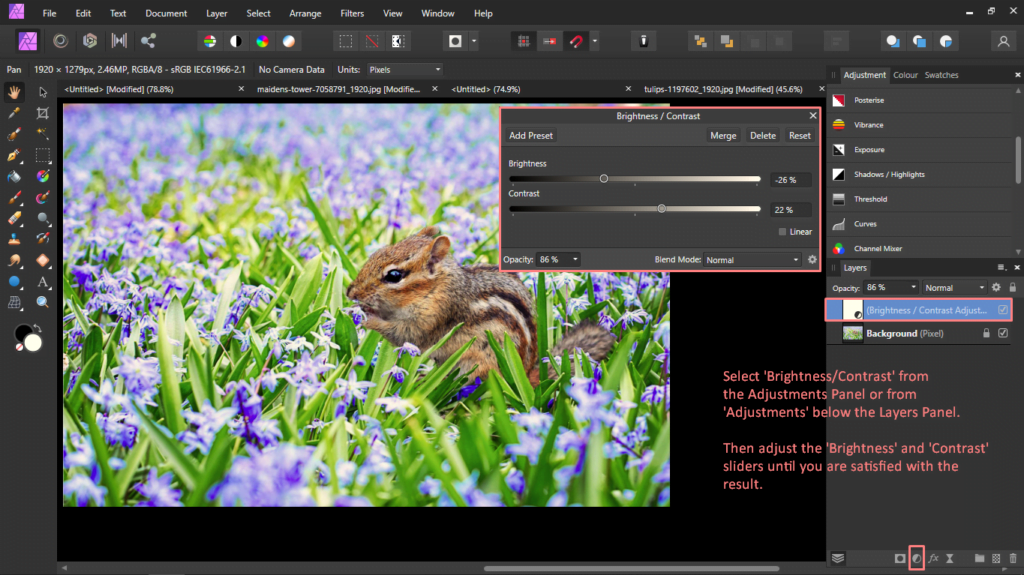
This is how we usually work: When going from light to dark, add contrast. This re-adds detail lost in the image.
When it’s from dark to light, it might be the case where you might want to decrease the contrast as usually detail on white is lost. However, this is very subjective.
How a Levels Adjustment works in Affinity Photo
With Levels, you can set the black point, white point, and midpoint of your image. To add a Levels layer, go to the Adjustments panel and click on the Levels layer type.
You will see a new layer in your Layers panel. To edit the layer, double-click on the layer thumbnail. This will open the Levels dialog, where you can make changes to the layer.
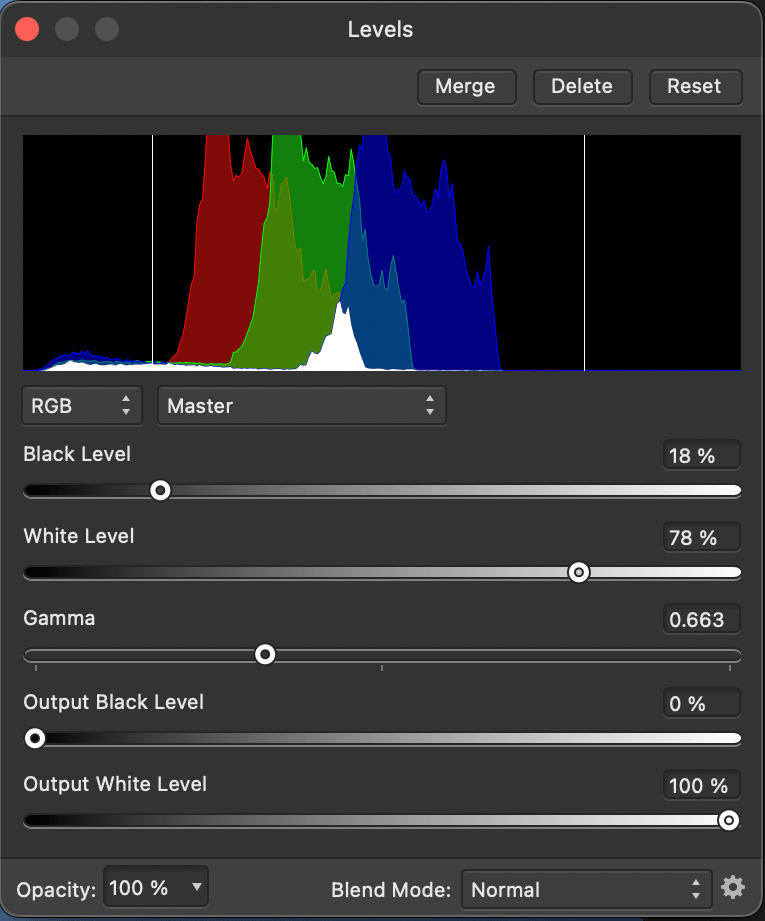
The Levels adjustment is the most common type of modification. It makes subtle changes, in contrast, tone, or color, as well as offers several options to check out which you can see below:
- Black level regulates the black point of your image. The black point is the darkest pixel in your image. Drag the slider to the right to increase the black shadow and to the left to decrease the black shadow.
- White level fine-tunes the white point of your image. The white point is the lightest pixel in your image. Drag the slider to the right to decrease the white shadow and to the left to increase the white shadow.
- Gamma transforms the mid-tone pixels of your image. Drag the slider to the right to distribute pixels towards the white point and to the left to distribute pixels towards the black point.
- Output Black Level enhances the output black level. This is the darkest pixel in the image after the Levels adjustment is applied. Drag the slider to the right to make the image look pale.
- Output White Level balances the output white level. This is the lightest pixel in the image after the Levels adjustment is applied. Drag the slider to the left to less the highlight of the image.
Levels is a great way to balance out the image. Sometimes, an image might get washed/hazed out (Usually it’s when there is a dark subject with some white haze). If this happens, add a levels adjustment & adjust the black point. Bring the white in and this adds balance.
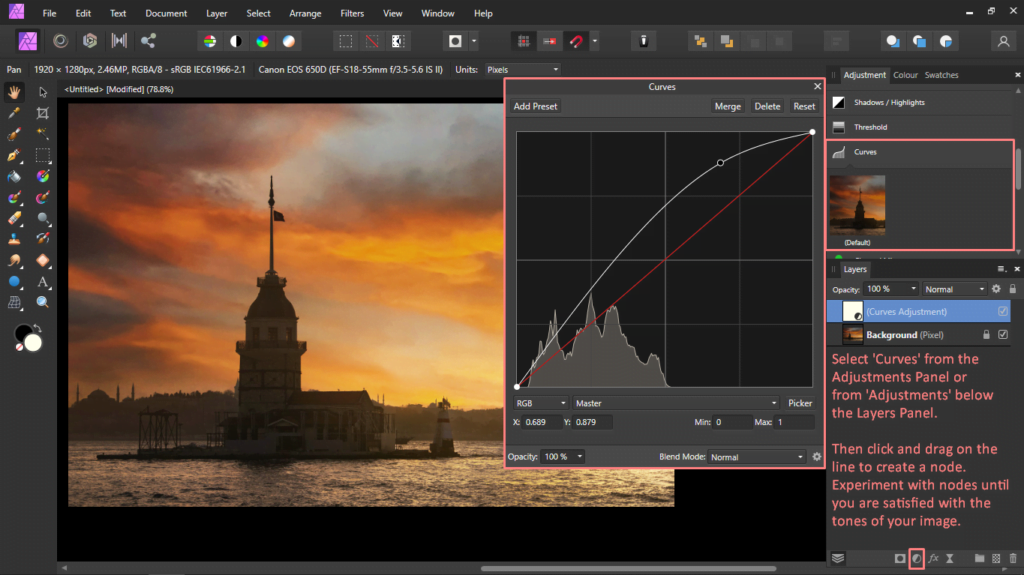
How a Curves Adjustment works in Affinity Photo
Curves allow you to customize the tonal ranges of your image by manipulating the tonal range. To add a Curves layer, go to the Adjustments panel and click on the Curves layer type.
You will see a new layer in your Layers panel. To edit the layer, double-click on the layer thumbnail. This will open the Curves dialog, where you can make changes to the layer.
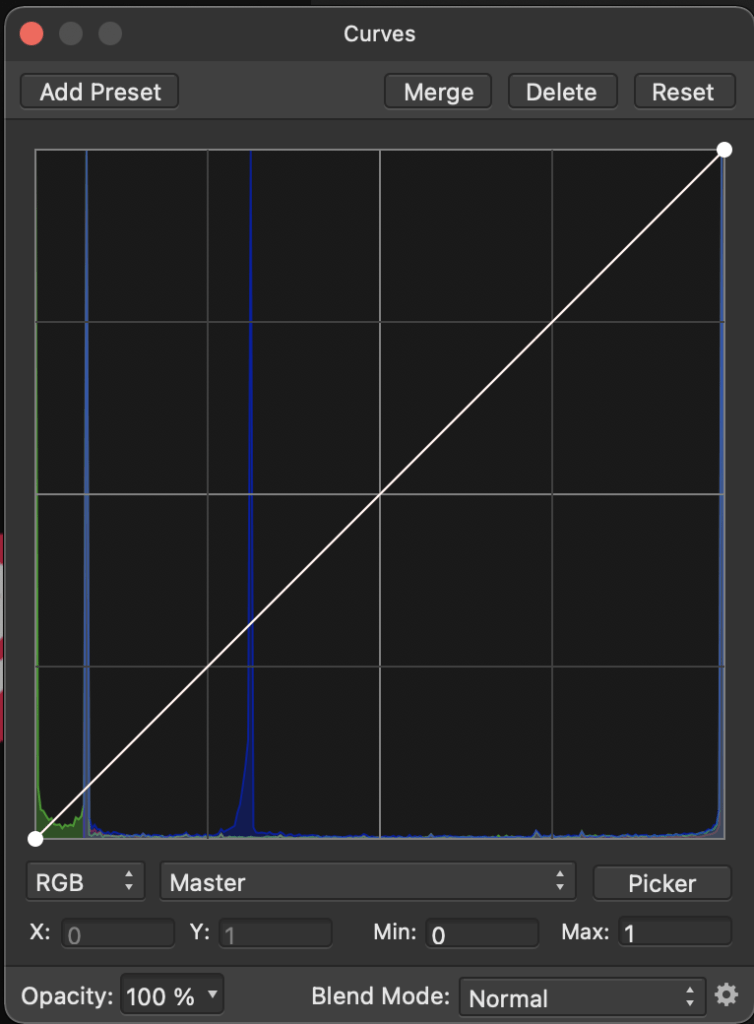
In the Curves dialog, you will see a graph. The horizontal axis represents the input tonal range and the vertical axis represents the output tonal range.
To adjust the tonal range, simply click on the graph and drag it up or down. You can also add points to the graph by clicking on the Add Point button.
Picker helps you to select a specific color in your image. This is useful when you want to adjust the tonal range of a specific color. To use the picker, simply click on the color you want to adjust and drag it up or down.
How an Exposure Adjustment works in Affinity Photo
The Exposure Adjustment layer adjusts the exposure of your image. To add an Exposure layer, go to the Adjustments panel and click on the Exposure layer type.
You will see a new layer in your Layers panel. To edit the layer, double-click on the layer thumbnail. This will open the Exposure dialog, where you can make changes to the layer.
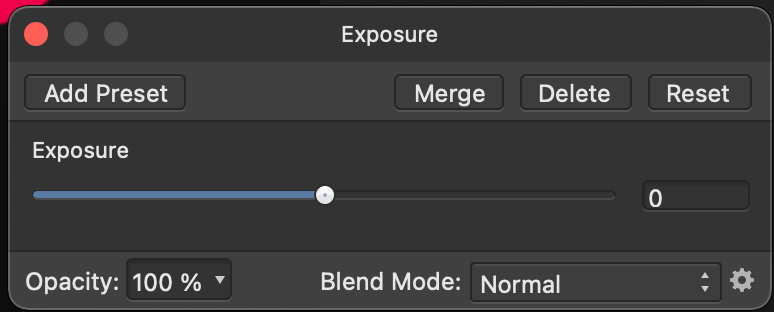
The Exposure adjustment is a simple but effective way to make global changes to the brightness of your image and offers several options to check out which you can see below:
- Exposure is used to fine-tune the overall brightness of your image. Drag the slider to the right to make the image brighter and to the left to make the image darker.
A useful tip is to use the exposure as pin highlight on characters.
What does this mean?
- Add an exposure adjustment and clip it to the character/subject.
- Push the adjustment (exposure slider) very high until it washes out & invert the exposure mask.
- Paint gently with the brush tool along the edges using a soft brush.
- Enjoy the new hack 🙂
How a Vibrance Adjustment works in Affinity Photo
The Vibrance Adjustment lets you control the saturation and vibrance of your image. To add a Vibrance layer, go to the Adjustments panel and click on the Vibrance layer type.
You will see a new layer in your Layers panel. To edit the layer, double-click on the layer thumbnail. This will open the Vibrance dialog, where you can make changes to the layer.
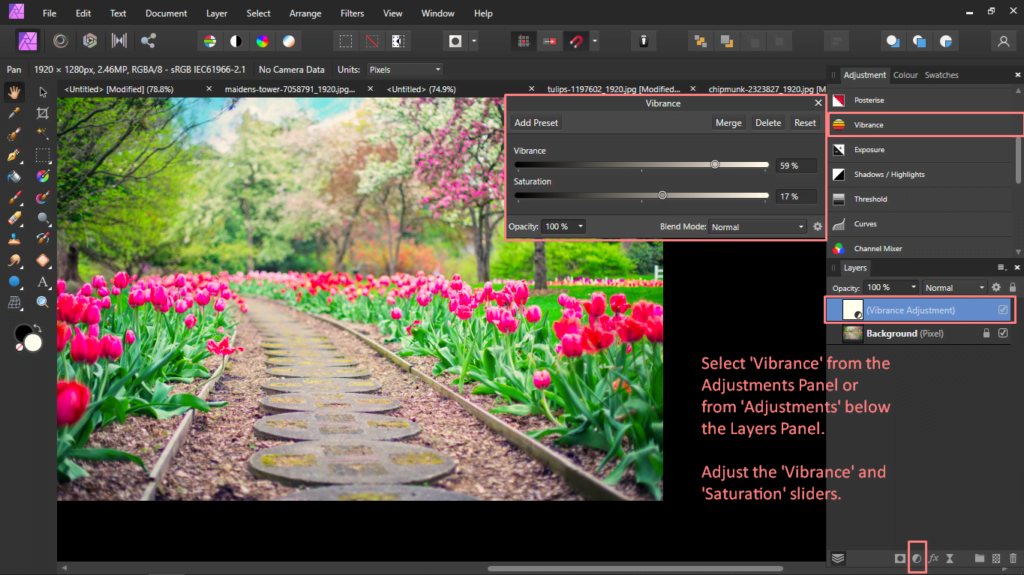
The Vibrance adjustment is a great way to boost the colors in your image without over-saturating them. It offers two options:
- Saturation adjusts the overall saturation of your image. Drag the slider to the right to increase the saturation and to the left to decrease the saturation.
- Vibrance relates to managing the vibrance of your image. Vibrance is a measure of the intensity of the colors in your image. Drag the slider to the right to increase the vibrance and to the left to decrease the vibrance. I like to call this a more conservative saturation adjustment, as it protects the colours more by not clipping as much.
How a White Balance Adjustment works in Affinity Photo
The White Balance layer allows you to set the white balance of your image. To add a White Balance layer, go to the Adjustments panel and click on the White Balance layer type.
You will see a new layer in your Layers panel. To edit the layer, double-click on the layer thumbnail. This will open the White Balance dialog, where you can make changes to the layer.
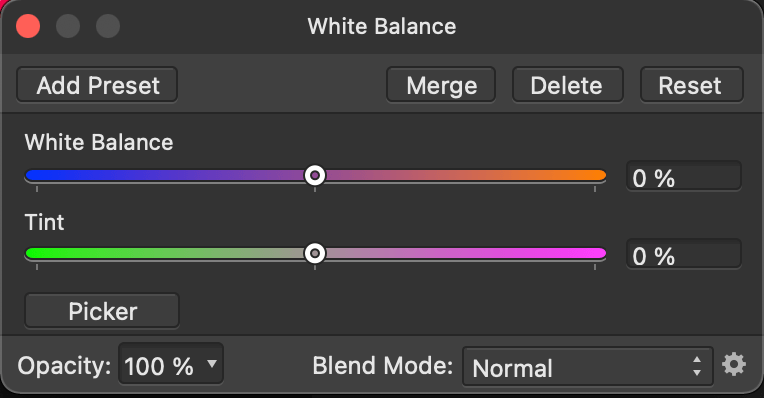
The White Balance adjustment is a great way to correct the color cast of your image. It offers two options:
- White Balance takes care of the overall white balance of your image. Drag the slider to the right to make the image cooler and to the left to make the image warmer.
- Tint is used to adjust the overall tint and color cast of your image. The tint is the amount of green or magenta in your image. Drag the slider to the right to add green and to the left to add magenta.
- Picker adjusts the white balance of your image using a color picker. The picker tool allows you to select a specific color in your image and then adjust the white balance accordingly.
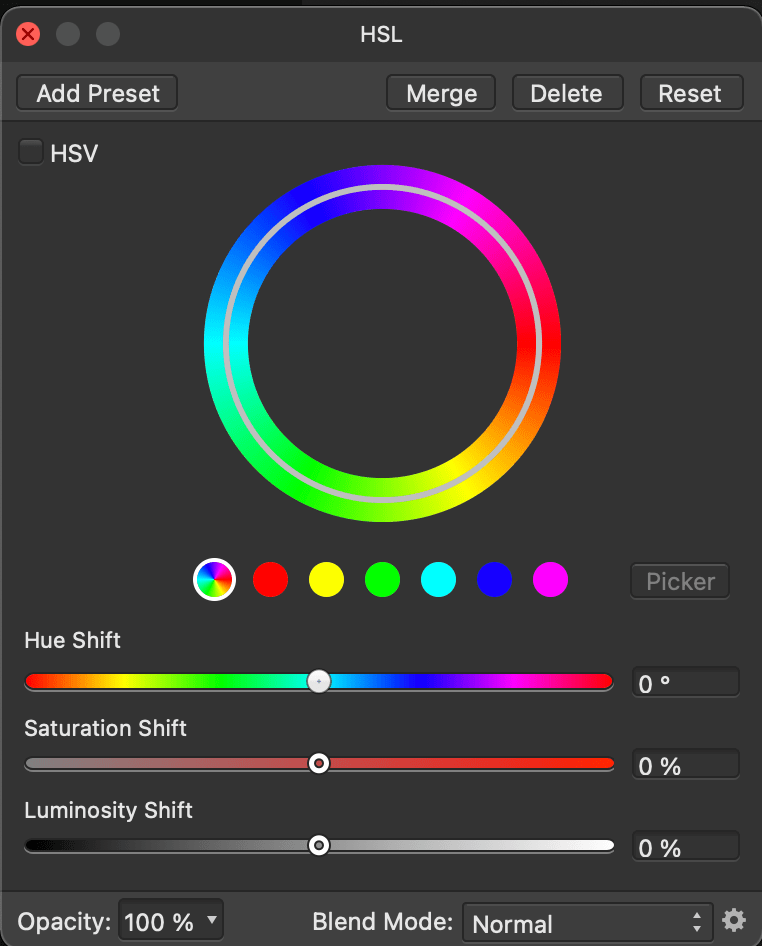
How an HSL Adjustment works in Affinity Photo
As the name suggests, this Adjustment adjusts the hue, saturation, as well as luminance of your image. To add an HSL layer, go to the Adjustments panel and click on the HSL layer type.
Generally, you will see a new layer in your Layers panel. To edit the layer, double-click on the layer thumbnail. This will open the HSL dialog, where you can make changes to the layer.
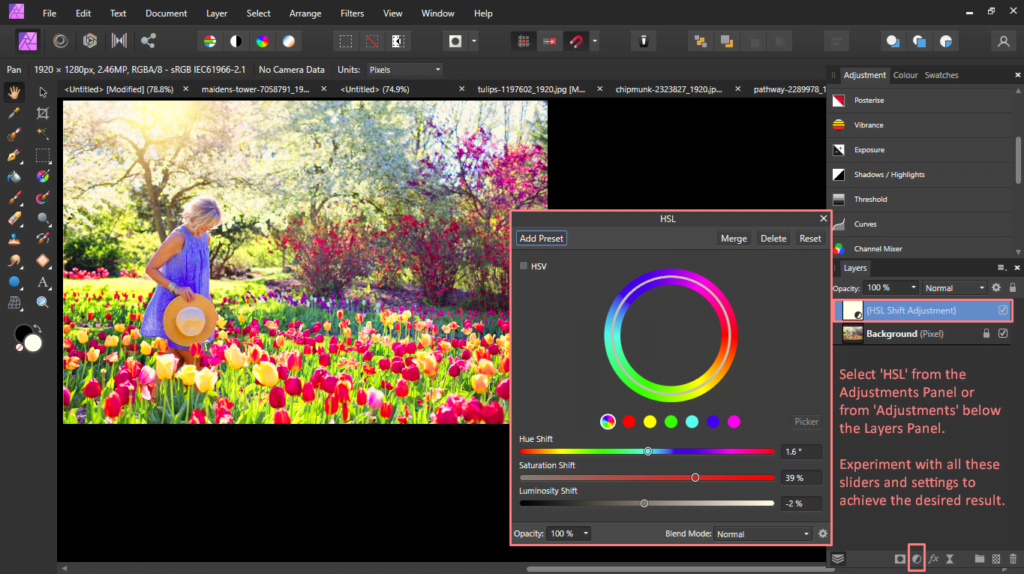
The HSL adjustment is a great way to fine-tune the colors in your image(Recolour & More). It offers a few options:
- HSV adjusts the overall hue, saturation, and value of your image. Drag the sliders to the right or left to make changes.
- Color Wheel identifies the colors affected by the channel via the four nodes.
- Channel shows the Color nodes under the wheels
- Picker adjusts the colors in your image using a color picker. The picker allows you to select a specific color in your image and then adjust it accordingly.
- Hue shift globally changes the hue of the colors in your image.
- Saturation shift changes the intensity of the colors in your image.
- Luminosity shift alters the brightness of the colors in your image.
Expert Rating
Summary
In summary, adjustment layers are non-destructive. This means that any adjustment added could be adjusted, removed & more. They are difficult to fully learn & master. It takes a lot of time to understand all the functionalities & how to implement them. Having said that, the scale & functionality is equally rewarding as you’ll be using these throughout your workflow in different use cases.
Conclusion
Remember, Adjustments are a great way to add & improve your composition in a non-destructive manner. They even come with a layer mask. Just remember, practice makes perfect!
That’s it! You now know all about getting started with Adjustment Layers in Affinity Photo.
Thanks you!


