
Masking is an essential part of photo editing. Masks allow you to hide or reveal parts of a layer, which is perfect for compositing and creating advanced effects.
They allow you to play with & add adjustments and filters to specific parts of an image and also combine multiple images together to produce original and eye-catching results.
What is masking?
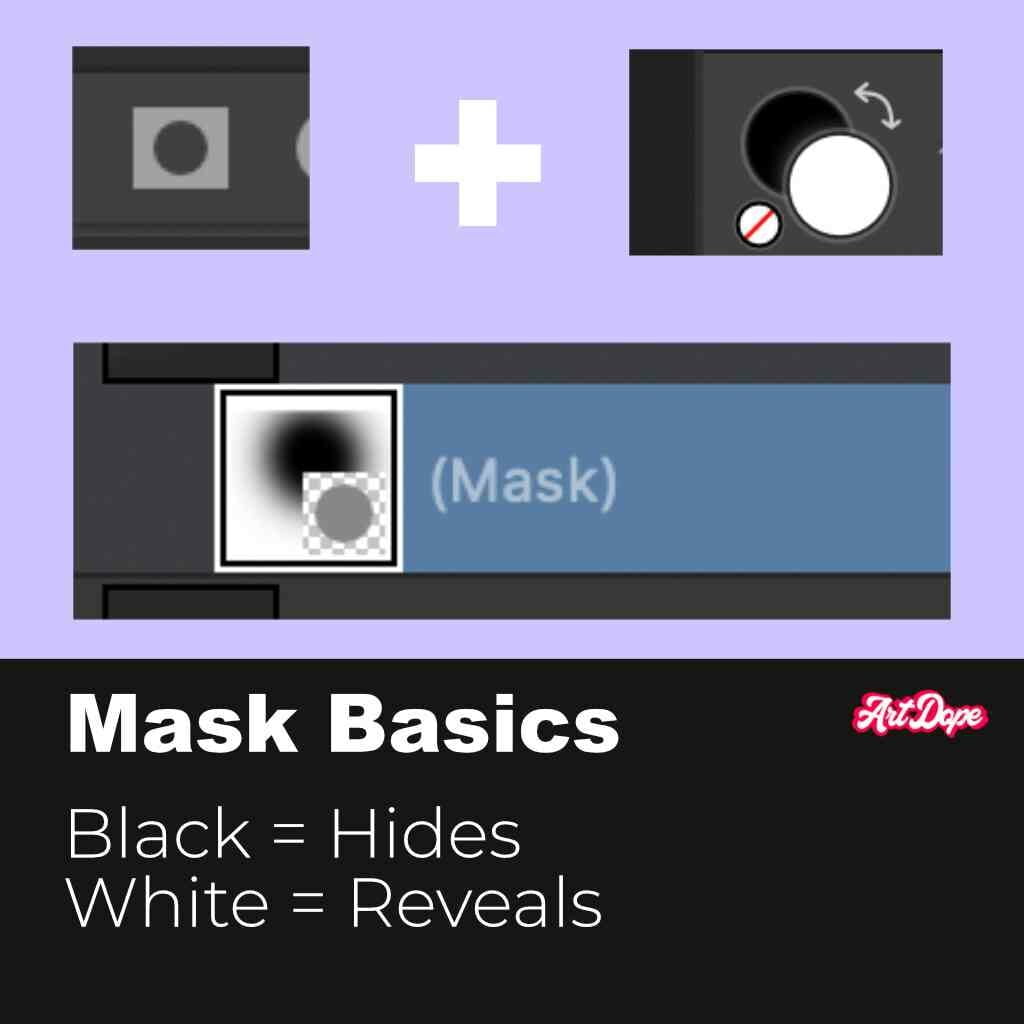
Masks are used to hide or reveal parts of a layer. They are created by selecting the area you want to mask and then painting over it with black or white (Or the range of colour in between, which means black, grey or white) (with the paint brush tool: shortcut = “b”).
When you paint with black, you’re hiding the selected area; when you paint with white, you’re revealing it.
Masking 101
Remember that black is dark like the night, therefore it conceals. On the other hand, white is light and thus it uncovers.
Masks act like masks in real life, where a mask can be used to cover your face entirely or only let parts of your face show through.
You can use gradients and selections to create masks. Another way of using masks is by selecting parts that you want to keep visible, then inverting the selection from black (hide) to white (reveal). Selections can then be used for further editing or exporting. When an area is masked it will remain transparent as long as there’s no paint applied to it.
The advantage of masks is that they are non-destructive, which means you can always go back and change the mask later if you need to. This allows you to experiment with different effects and easily undo any mistakes without modifying the original image.
The two types of masking available in Affinity Photo are Pixel Masking and Vector Masking. Pixel masking, similarly to the erase tools allows you remove parts of a layer.
The distinction is that a pixel mask may be easily altered or deleted at any moment.
Vector masking is another form of masking that involves using vector tools/shapes as a mask over another layer in Affinity Photo, which crops to the outline of the the pixel image with a vector container (These are created using vector based tools like the pen tool).
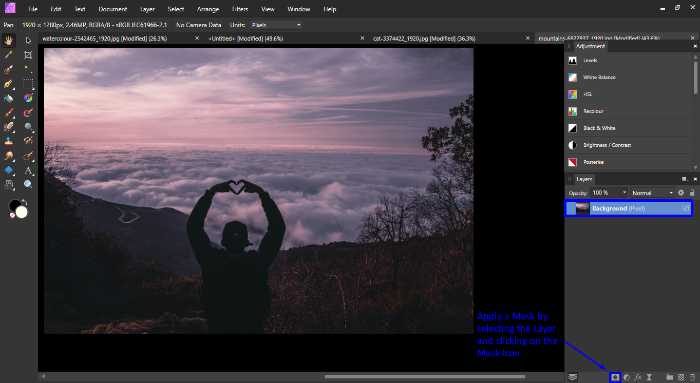
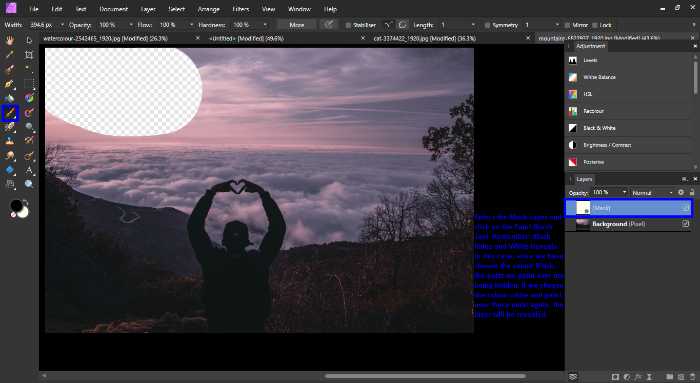
How to add a mask in Affinity Photo
Applying a mask is easy. Just select the layer you want to mask and click on the Mask icon at the bottom of the Layers Panel. Then select the Paint Brush Tool and paint over the layer with black, white, or any other colour as desired. You can easily remove parts of the image by painting them black.
When you apply Adjustments and Live Filters, Affinity Photo will create a mask for you automatically. This is because such effects are equipped with a built-in mask that is applied by default. You can then select the Paint Brush Tool and paint over the mask to customise it as desired.
If you choose the colour black and paint over parts of the image, you will notice that the effect of the adjustment or filter will no longer be applied to those areas. If you change the colour to white and paint over the black parts, Affinity Photo will reapply the effect to those areas.
The images below illustrate how a Mask can be applied.
Tip: You can use the keyboard shortcuts ‘Ctrl’ + ‘I’ (Windows) or ‘Cmd’ + ‘I’ (Mac) to invert the mask from black (mask) to white (unmask) and vice versa. This is a quick way of selecting all the areas that are masked and then doing further editing.
To create a luminosity mask, you should hold ‘Ctrl’ + ‘Alt’ (Windows) or or ‘Cmd’ + ‘Option’ (Mac) and click on Mask Layer.
Grey mask in Affinity Photo
Grey masks are a special type of mask that are used to partially hide or reveal a particular layer. The advantage of using a grey mask is that it gives you more control over how different layers are blended together.
As an example, if you apply a grey mask to a layer and then change the opacity of that layer, you will see that the masked areas remain unaffected. This is because the grey mask acts as a kind of threshold, where anything that’s lighter than 50% grey will be visible and everything darker than 50% grey will be hidden.
To create a grey mask, select the layers you want to blend and then click on the Mask icon at the bottom of the Layers Panel. Select the Paint Brush Tool and paint over the layer with 50% grey. You can then edit it as desired by painting with black or white.
Grey masks are especially useful when working with selections because you can adjust the parts of a layer that should be visible and how it blends with the layers below.
As an example, the following image shows that when you apply a grey masking in Affinity Photo, the selected layer is not completely hidden.
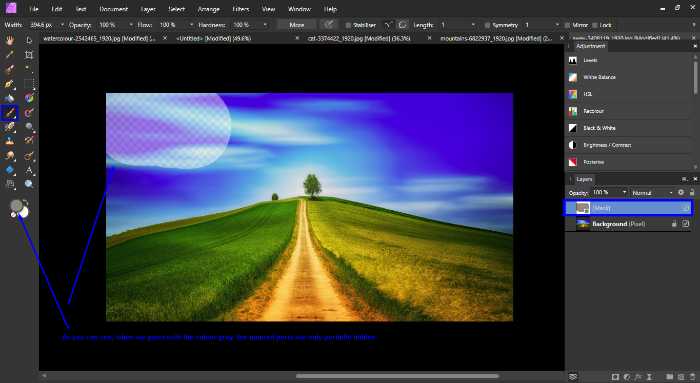
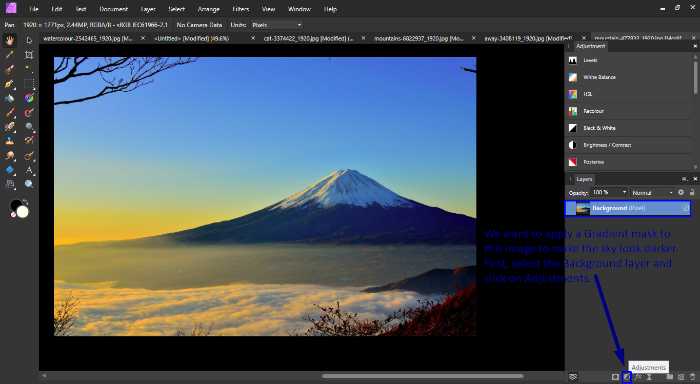
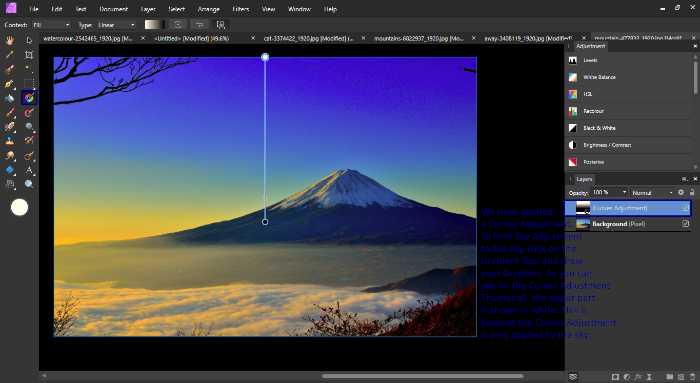
Gradient Mask in Affinity Photo
Gradient masks allow you to create smooth transitions between different parts of an image. This is done by creating a mask that uses a gradient as its source. Affinity Photo comes with a variety of preset gradients that you can use.
Some of these gradient types are:
- Linear
- Elliptical
- Radial.
To apply a gradient mask, select the layer you want to apply the Gradient to and select the Gradient Tool from the toolbar or press ‘G‘ on your keyboard. Choose the context and type and then drag a gradient over the layer. You can then edit it as desired by painting with black or white or grey using the Paint Brush Tool.
Gradient masks are best applied when you wish for a particular Adjustment or Live Filter to be gradually applied to an image.
For example, if you want to create a soft glow effect, you can use a radial gradient mask (or adjust the feathering on the sliders = the middle dot). This will allow you to control the intensity of the effect and how it’s distributed over the image. Another example would be using a linear gradient mask to darken the edges of an image.
These two images demonstrate how a gradient mask can be applied and how it works.
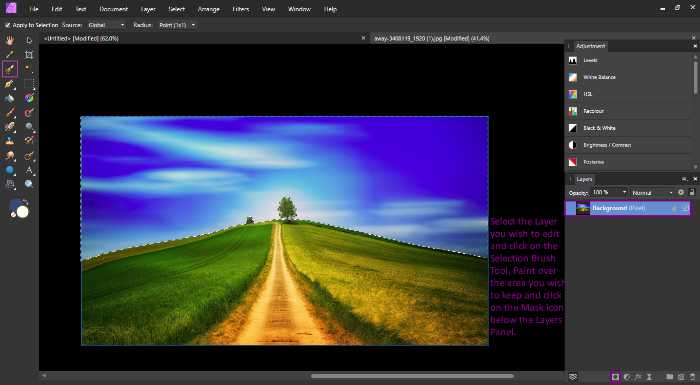
Selections and masks in Affinity Photo
Selections and masks are two of the most important tools you can use in Affinity Photo. They allow you to edit specific parts of an image without affecting the rest and also to reveal or hide that particular selection. In this section, we will take a look at how selections and masks work and some of the things you can do with them.
First, you have to select the a selection tool. Any selection tool works to create a mask. If you want to learn more about them, check out our complete selection tools guide.
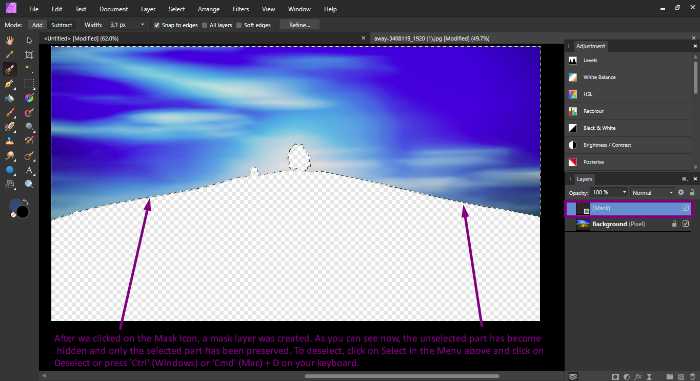
For example, Selection Brush Tool (W) from the Toolbar and then click and drag over the area you want to select. You can also use the Pen Tool to create custom selections. Once you finished selecting, the selection will be displayed as a marching ants border.
If you wish to show this selection and hide the rest of the layer, you should click on Mask. You will see that a new Mask Layer will be created and the unselected parts will be hidden.
If on the other hand you wish to hide the selection and reveal only the rest of the layer, select the mask & press ‘Ctrl’ (Windows) or ‘Cmd’ (Mac) + ‘Shift’ + ‘I’ to invert the selection.
At this point, you can start editing the Mask Layer by applying Adjustments, Live Filters or any other feature available at your disposal.
To better understand how selections and masks work, see the images below.
Combining images
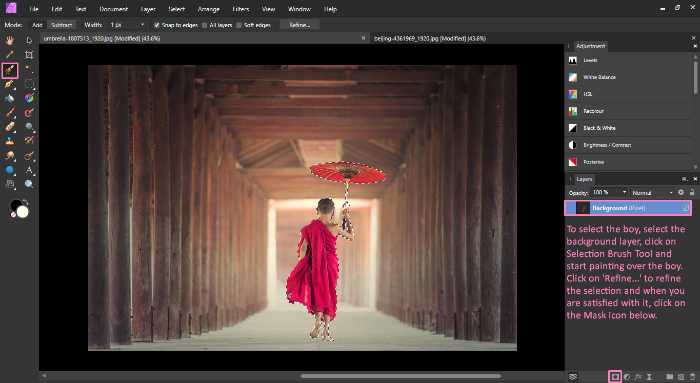
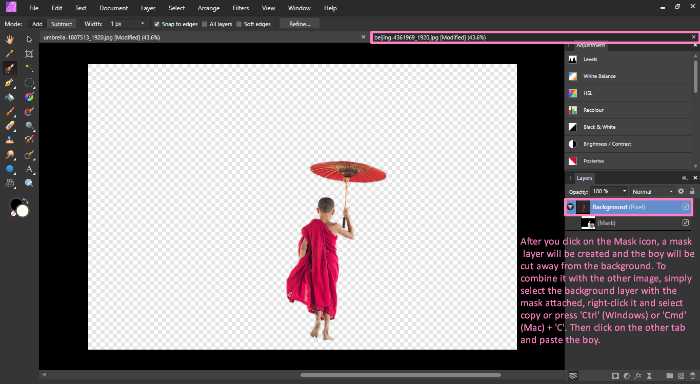
You can also use selections and masks to combine different images together. For example, you could select a person from one image and then paste him/her into another image. In this case, you would need to create a layer for each image and then apply a corresponding mask to each layer.
Once you have your selections, it’s simply a matter of clicking on the Mask icon at the bottom of the Layers Panel and painting with black or white over the areas where you want to combine the images. Affinity Photo will automatically blend them together once you’ve finished editing.
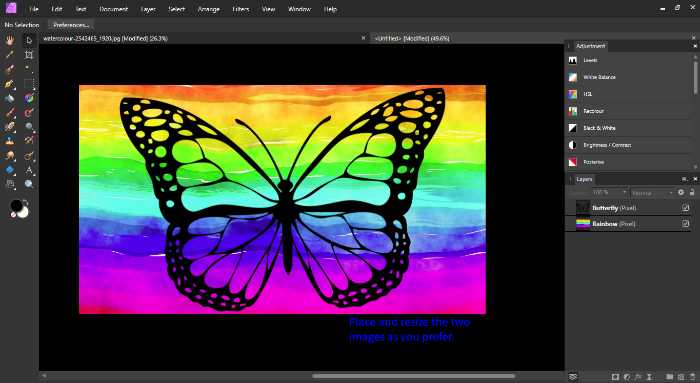
In these four images, we managed to combine two photos by making a selection and pasting it on another image.


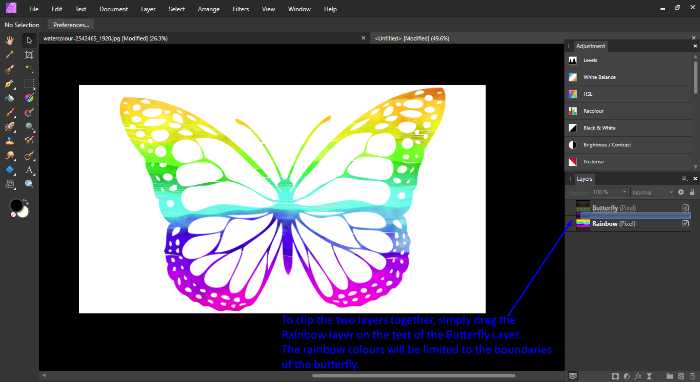
Clipping Mask in Affinity Photo
A Clipping Mask is a group of layers that has a mask applied to it. You can easily adjust the visibility and/or blending methods of a layer as well as fit images into shapes. Clipping masks are a non-destructive method of layering that lets you edit each layer separately.
Affinity Photo allows you to clip layers together so that only the bottommost one shows through with all its features available for editing.
The bottom layer controls the visibility of the top layer as it acts as the mask. The top layer is the layer that’s clipped to the mask and therefore the parts which overlap the edges of the bottom layer will be hidden.
To create a clipping mask, you first need to have two layers that you want to clip together. Select the layer you wish to clip and then drag it on top of the text of the other layer. The top layer has now been clipped to the layer below it. Use the Move Tool to reposition the cropped image.
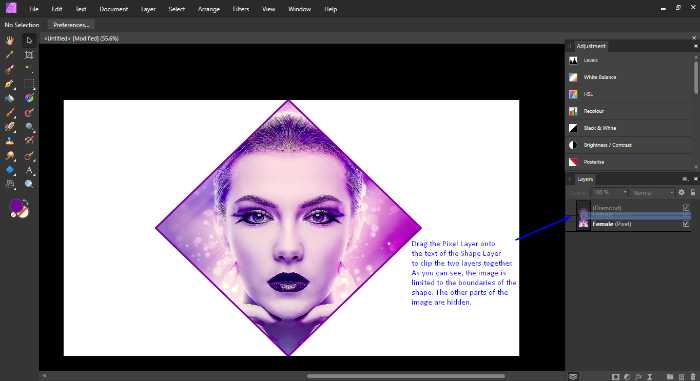
Use Shape as a Mask
Clipping masks allow to you to clip an image into a particular shape.
Once you have selected the shape (could be a selection or a shape from the tool bar “U”), position it over the part of the image you want to mask. Subsequently, drag the pixel layer on top of the shape text to clip them together. At this stage, the two layers are clipped and the image is restricted to the boundaries of the shape.
If you move or resize the shape layer with the Move Tool, you will notice that the image layer will automatically move and resize in conjunction with the shape.
In this example, we clipped the model to the boundaries of the diamond shape.
Expert Rating
Summary
Masking is often misunderstood, thus why people tend to find masks (as a concept) difficult. The prime principle of masking is “black = hides & white = reveals”. Takes time to master, but it is one of the best (if not the best) tool in the program.
Conclusion
Masks are powerful non-destructive tools which you can use when editing your images on Affinity Photo. With masking in Affinity Photo, the possibilities are endless!
We hope that you’ve found some new techniques on how to use masks or maybe even discovered a whole new way to make use of them!
Thanks for reading & feel free to check out more of our articles!


