
If you’re looking for a complete guide on the various tools available in Affinity Photo, you’ve come to the right place! In this blog post, we’ll take a close look at each and every Affinity Photo’s Tools.
These tools are divided into categories according to their function. We’ll discuss what each tool is used for and how to use it to improve your photo editing workflow.
What are Tools?
Tools allow you to perform specific tasks related to photo editing, such as cropping, resizing, or adding text.
Tools are the heart of Affinity Photo. They provide the means to select, edit, paint, retouch, and otherwise manipulate pixels and vectors within your documents. Affinity Photo comes with a wide variety of tools to suit every task, from the mundane to the creative.
In this blog post we’ll take a look at each tool in detail.
Following are the 11 groups of tools in the Photo Persona of Affinity Photo:
- Photo Editing Tools
- Vector Line Tools
- Selection Tools
- Fill Tools
- Paint Tools
- Erase Tools
- Retouch Tools
- Healing Tools
- Vector Shape Tools
- Text Tools
- Warp Tools
What is the Tools panel and where is it?
The Tools panel is Affinity Photo’s primary way of accessing the various tools available. It is located on the left side of the workspace by default and it can be hidden from the View Menu.
The Tools panel contains all of Affinity Photo’s tools available for photo editing and retouching. To use a tool, simply click on it in the Tools panel. Alternatively, you can press the keyboard shortcut for that particular tool.
Some tools have hidden tools which can be accessed by clicking on the small triangle at the bottom right corner of the tool icon in the Tools panel. For example, the Node Tool is nested within the Pen Tool group.
All tools are equipped with different settings that can be adjusted from the context toolbar. The settings for each tool vary according to the function of the tool. For example, the settings for the Flood Fill Tool include the Tolerance slider, the Contiguous option, the Blend Mode, and the Source.
Now, we’ll take a closer look at each tool by category.
Photo Editing Tools in Affinity Photo
Photo Editing Tools are the most basic tools you need for general photo editing tasks. There are five tools in this category:
- View Tool
- Move Tool
- Colour Picker Tool
- Crop Tool
- Zoom Tool
VIEW TOOL [H]
The View tool is the first tool in the Photo Editing Tools category. It is used to easily drag the document and move the view of your document in the Document View.
For example, you can zoom in or out, or pan around the photo. When the View Tool is selected, the context toolbar contains settings you can adjust to modify the zoom level of your document.
When double clicking on this tool from the Tools Panel, the document will be zoomed to ‘Fit‘. Due to Hot Key Panning, the View Tool can be temporarily activated by pressing the Spacebar.
MOVE TOOL [V]
The Move Tool primarily allows you to select particular layer content. It is also used to rotate and move the selected objects around your workspace.
After selecting this tool, various settings will be available prior to selecting layer content. These include Fill, Lock Children, Show Alignment Handles, amongst others.
To resize the object, simply drag the control handles located at each corner. If you hold ‘Shift‘ while resizing, the content will be restricted to vertical, horizontal and 45° angle directions.
COLOUR PICKER TOOL [I]
The Colour Picker Tool allows you to choose sample colours from your photo and store them in the Colours or Swatches Panel. This can eventually be used to paint over or fill a particular object.
This tool can be used by click-dragging on the canvas and a magnifier allows you to view the colour pixels better. The colour will be picked once you release the mouse button.
CROP TOOL [C]
As the name suggests, the Crop tool can be used to eliminate parts of your photo or document. This can be because there are unsightly portions of your image or simply for creative purposes.
You can either crop to an original ratio, a custom ratio or in an unconstrained manner. The Crop Tool also allows you to straighten an image by choosing the Straighten mode from the context toolbar.
ZOOM TOOL [z]
The Zoom Tool is the fifth tool in the Photo Editing Tools category. It allows you to zoom in and out of your photo in the Document View. You can set a zoom level from the pop-up menu by dragging the slider. Double clicking on the zoom tool icon will set the level to 100%.
Following this brief description of Photo Editing Tools in Affinity Photo’s Photo Persona, let’s have a look at Vector Line Tools.
Vector Line Tools in Affinity Photo
Vector Line Tools in Affinity Photo allow you to create shapes, lines as well as strokes.
There are two main types of Vector Line Tools as follows:
- Pen Tool [P]
- Node Tool [P]
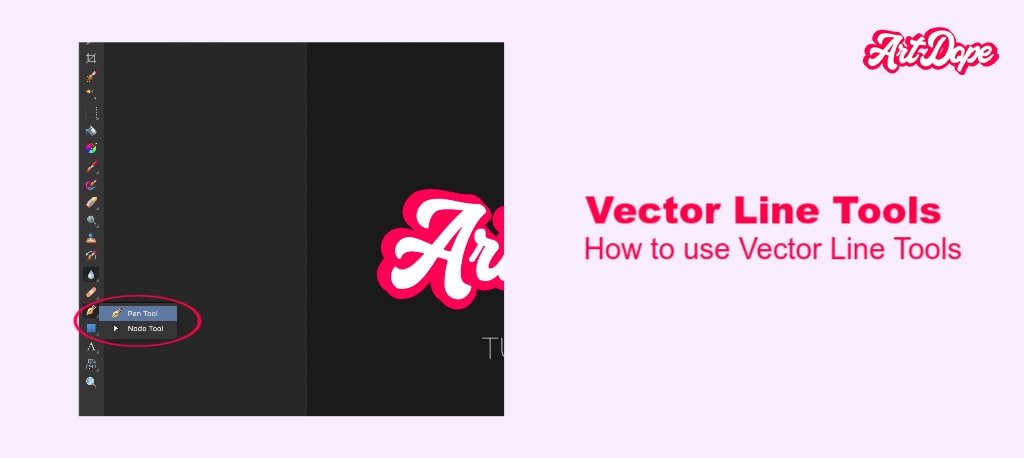
The Pen Tool is the first tool in the Vector Line Tools category. It creates vector shapes by drawing paths with straight or curved segments. You can trace the outline of a particular shape to create custom shapes and create selections out of a drawn path.
The Node Tool is the second tool in the Vector Line Tools category. It edits existing vector shapes and lines by adding, deleting as well as moving nodes.
Both of these tools are essential when it comes to creating vector graphics in Affinity Photo. If you’re new to vector graphics, I recommend checking out our tutorial on Using the Pen Tool in Affinity Photo (2022).
Next, we have Selection Tools.
Selection Tools in Affinity Photo
Selection Tools allow you to select areas of an image for various photo editing tasks.
There are three main types of Selection Tools available in the Photo Persona of Affinity Photo, each with its own unique function:
- Selection Brush Tool
- Flood Select Tool
- Marquee Selection Tools
SELECTION BRUSH TOOL [W]
The Selection Brush Tool works like a brush as it allows you to paint over a portion of your image to select it. You can easily add and subtract parts of the selection and the brush settings can be altered to achieve the desired result.
The icon of Selection Brush tool is identical to a paintbrush consisting a dotted line around the tip. The settings which can be adjusted in the context toolbar consist of Mode, Width, Snap to edges, All layers, Soft edges as well as Refine. For further details on this tool, click here.
FLOOD SELECT TOOL [w]
Flood Select Tool is the second tool in the Selection Tools category. It is a great option if you want to quickly select a large area having pixels of a similar colour. The tolerance will determines the range of pixels affected when clicked.
It has 4 selection modes: New, Add, Subtract and Intersect. Adjust the settings from the context toolbar to refine the selection. You can check out more details about Flood Select Tool here.
MARQUEE SELECTION TOOLS [l]
There are five Marquee Selection Tools, namely the Rectangular, Elliptical, Column, Row and Freehand Selection Tools. As the name suggests, these tools select portions of your document in the shape of the tool chosen.
The selection is made by simply clicking and dragging on the canvas. You can read more about Marquee Selection Tools here.
These are the Selection Tools available in the Photo Persona of Affinity Photo. Fill Tools are next on the list.
Fill Tools in Affinity Photo
Fill tools are used to fill in areas with solid colors, gradients as well as patterns. Be it a selection, a particular object or the entire document, filling in Affinity Photo is extremely easy.
There are two Fill Tools available in the Photo Persona:
- Flood Fill Tool
- Gradient Tool
FLOOD FILL TOOL [g]
The Flood Fill Tool is used to fill a selection, an image or an object with a chosen colour. The icon of this tool looks like a paint bucket as it flood fills with a solid colour or pattern.
How the pixels are affected is determined by their colour, their location, their relation to the clicked pixel as well and the Tolerance and Blend mode chosen.
These settings can be adjusted from the context toolbar prior to using this tool:
- Tolerance- This is the distance (in pixels) between the position of the pixel clicked and the ones adjacent to it. When a pixel is selected, all of its neighbors are affected. For lower tolerance settings, pixels must be close in value to the clicked pixel for this option to take effect. Pixel color can vary widely from the clicked pixel.
- Contiguous- The flood will be applied to affected pixels that are in the same area of the image. If this setting is disabled, the flood is applied to all pixels that satisfy the tolerance criteria, regardless of position in the picture.
- Blend mode- The Fill color and pixels in the filled region are blended. The settings defines the Fill colour and pixels in the filled area are blended together, such as merging the contents of two or more layers.
- Source- Choose whether the tool determines the area to fill by inspecting pixels in the current layer and all those below it, or only layers beneath the current one.
GRADIENT TOOL
Gradient Tool is the second tool in the Fill Tools category. It applies a gradient colour to all types of layers, such as fill layers, layer masks, adjustment layers, text and also vectors.
To use the Gradient Tool, simply click on the icon and then choose one of the options from the context toolbar:
- Context- The Fill and/or Stroke color of the selection is altered.
- Type- The Fill Type of a non-Linear color type is changed to Linear. For example, from None to Linear. You can then use Solid or Bitmap fills from here.
- Choose and change the object’s solid or gradient color from the colour swatch.
- Rotate gradient- The frame creates an illusion of depth by rotating the applied gradient by 90 degrees.
- Reverse gradient- The colours of the gradient are swapped.
- Maintain fill aspect ratio- The end stops are locked when this option is selected to maintain an aspect ratio. This option applies only to Elliptical and Bitmap files.
In the next section, we have Paint Tools.
Paint Tools in Affinity Photo
The four Paint Tools are the following:
- Paint Brush Tool
- Colour Replacement Brush Tool
- Pixel Tool
- Paint Mixer Brush

PAINT BRUSH TOOL [b]
Paint Brush Tool is the first tool in the Paint Tools category. It basically paints pixels on the document with a selected brush and creates strokes with smooth edges.
The type of brush can be chosen from the Brushes Panel and the width of the strokes is determined by the velocity of the mouse or the pressure made when using pressure-sensitive devices.
To use the Paint Brush Tool, simply click on the icon and then adjust these settings from the context toolbar:
- Opacity- Enter the value directly in the text box or use the pop-up slider to customize it.
- Hardness- How soft or how hard the pixel brush’s edges are. The brush appears softer as the percentage decreases. To set the value, enter it in the text box or use the pop-up slider.
- Stabiliser- This feature of the Window Stabiliser Plus enables stroke stabilization by using either a Rope stabiliser or a Window stabiliser mode.
- Symmetry- The number of times the brush stroke is repeated around multiple axes is controlled. The center axis point is relocated while dragging it with the mouse.
- Mirror- Depending on the value of the symmetry option, brush strokes are mirrored along the X and Y axes when it is turned on.
- Lock- When enabled, this option causes the symmetry line to fix.
- Blend Mode- Affects how applied pixels react with existing pixels on a layer. Choose one of the options from the drop-down menu.
- Wet Edges- The watercolour effect is produce the build painting up along the edges of pixel brush stroke, creating a watercolour look.
- Protect Alpha- It won’t let you paint in the transparent portions of the current layer.
COLOUR REPLACEMENT BRUSH TOOL [b]
The Colour Replacement Brush Tool replaces the colours of the selected layer with the chosen colour on the Colour panel.
These settings are found in the context toolbar:
- Opacity- Enter the value directly in the text box or use the pop-up slider to customize it.
- Hardness- How soft or how hard the pixel brush’s edges are. The brush appears softer as the percentage decreases. To set the value, enter it in the text box or use the pop-up slider.
- Stabiliser- This feature of the Window stabiliser Plus enables stroke stabilisation by using either a Rope stabiliser or a Window stabiliser mode.
- Tolerance- The tolerance pixel value changes not only with distance but also when pixels hover over. When the tolerance is low, neighbouring pixels must be quite similar in value to the clicked pixel for them to affect. For higher tolerance settings, colors of adjacent pixels might vary greatly from the clicked pixel.
- Sample continuously- Choose on or off, and if it’s switched off by default, the initial click position defines the replacement color. The new reference colors are chosen as the cursor goes.
- Contiguous- If this option is switched off, qualifying pixels under the stroke are recolored regardless of their proximity.
PIXEL TOOL [b]
Pixel Tool is used to draw pixel-aligned, hard-edged lines.
The Context Toolbar contains these settings when this tool is selected:
- Opacity- Enter the value directly in the text box or use the pop-up slider to customize it.
- Hardness- How soft or how hard the pixel brush’s edges are. The brush appears softer as the percentage decreases. To set the value, enter it in the text box or use the pop-up slider.
- Stabiliser- This feature of the Window Stabiliser Plus enables stroke stabilisation by using either a Rope stabiliser or a Window stabiliser mode.
- Symmetry- The number of times the brush stroke is repeated around multiple axes is controlled here. The centre axis point is relocated alongside dragging it with the mouse.
- Mirror- Depending on the value of the symmetry option, brush strokes are mirrored along the X and Y axes when it is turned on.
- Lock- When enabled, this option causes the symmetry line to remain constant.
- Blend Mode- Affects how applied pixels react with existing pixels on a layer. Choose one of the options from the drop-down menu.
- Protect Alpha- It won’t let you paint in the transparent portions of the current layer.
- Alternate- Performs a transformation on the alterable modifier. It includes settings such as Erase, Background color, and Undo from Snapshot.
- Protect Alpha- It won’t let you paint in the transparent portions of the current layer.
PAINT MIXER BRUSH TOOL
The Paint Mixer Brush Tool is the fourth and final tool in the Paint Tools category. It’s like mixing wet paint on a canvas. When you drag your mouse on the canvas, the chosen colour on the Colour panel will be combined and smudged with the original colours.
Adjust these settings from the context toolbar:
- Strength- To set the degree of smudging, use one of these two options. To do so, type into the text box or move the pop-up slider to define the value.
- Load Brush- It removes the mixed color from the brush and replaces it with the Color 1 swatch color set on the Colour panel.
- Auto Load Brush- If you enable this option, the new stroke will be loaded as a brush and applied to the page as soon as it is drawn.
- Clean Brush- Remove any unwanted colour from the brush.
- Model- By clicking the RGB button, the color is changed. Red, yellow, as well as blue, are combined to make primary colors in this subtractive color model called RYB.
- Symmetry- The number of times the brush stroke is repeated around multiple axes is controlled here. The centre axis point is relocated alongside dragging it with the mouse.
- Mirror- Depending on the value of the symmetry option, brush strokes are mirrored along the X and Y axes when it is turned on.
- Lock- When enabled, this option causes the symmetry line to be fixed.
Erase Tools in Affinity Photo
Erase Tools comprise the sixth category of tools in Affinity Photo’s Photo Persona. As the name suggests, these tools are used to remove objects from photos.
Following are the three types of Erase tools:
- Erase Brush Tool
- Background Erase Brush Tool
- Flood Erase Tool
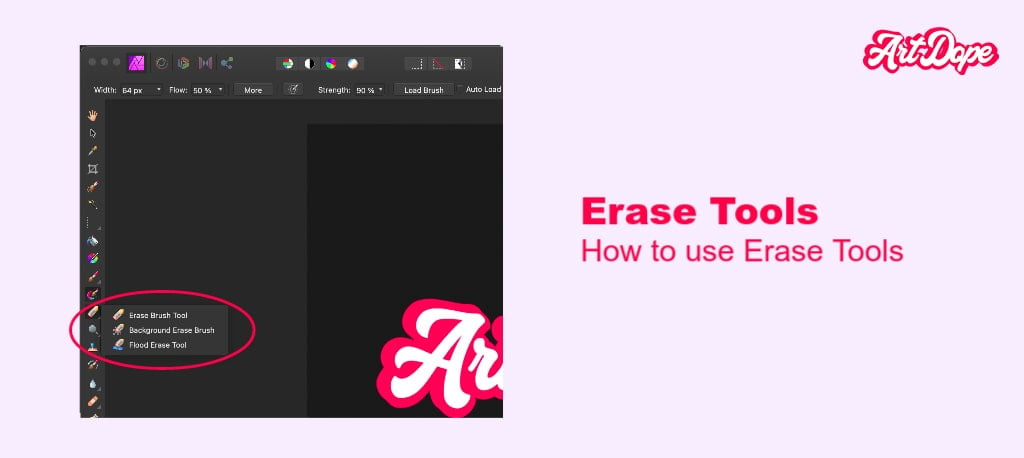
ERASE BRUSH TOOL [e]
The Erase Brush Tool removes any portion from your image. These erased parts will become transparent.
The context toolbar is equipped with various settings you can modify.
BACKGROUND ERASE BRUSH TOOL [e]
The Background Erase Brush Tool allows you to erase pixels of a similar color. This is ideal for removing backgrounds with a similar texture or tones such as the sky from landscape photography.
FLOOD ERASE TOOL [e]
Flood Erase Tool erase large areas of an image having a similar colour with one mouse click.
To use the Flood Eraser Tool, simply click on the icon and then set the Tolerance from the context toolbar:
- Tolerance- The tolerance of a pixel’s value changes not only with distance but also when pixels hover over. When the tolerance is low, neighboring pixels are quite similar in value to the clicked pixel to affect it. For higher tolerance settings, colors of adjacent pixels might vary greatly from the clicked pixel.
That’s a quick overview Erase Tools. Furthermore, we’re going to take a closer look at Affinity Retouch Tools.
Retouch Tools in Affinity Photo
As their name suggests, this category of tools is used for retouching and improving photographs.
Affinity Photo offers nine retouching tools:
- Dodge Brush Tool [O]
- Burn Brush Tool [O]
- Sponge Brush Tool [O]
- Clone Brush Tool [S]
- Undo Brush Tool
- Blur Brush Tool
- Sharpen Brush Tool
- Median Brush Tool
- Smudge Brush Tool
Here is a short description of each tool:
Dodge Brush Tool lightens pixels and adjusts the exposure of your image. The effect can be limited to shadows, highlights and mid-tones.
Burn Brush Tool does the exact opposite of the previous tool. It darkens the image and also controls the exposure. Once again, the affect can be limited to the shadows, highlights and mid-tones.
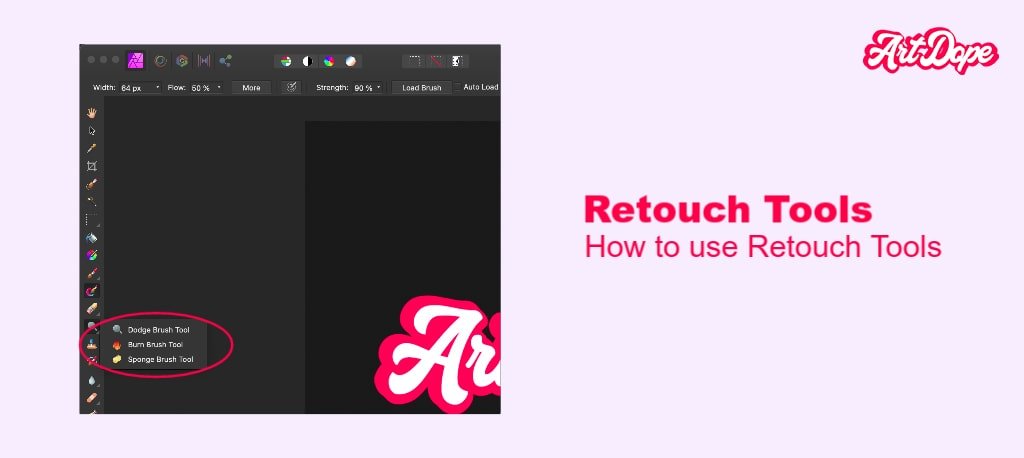
Sponge Brush Tool saturates or de-saturate a portion or portions of your image. This mean that you are in complete control of the intensity and vibrancy of the colours in your artwork.
Clone Brush Tool samples one area of an image to another area. It removes flaws, copies objects and can be used for general retouching.
Undo Brush Tool allows you to selectively undo changes made to specific pixel. You can combine the image’s current state with previously recorded ones to achieve a particular effect, similar to painting back in time.
With the Blur Brush Tool, you can blur pixels or portions of the image. The hardness of the blur effect is determined by the number of times you paint over an area.
Sharpen Brush Tool is used to enhance details within your image by increasing the contrast of neighbouring pixels.
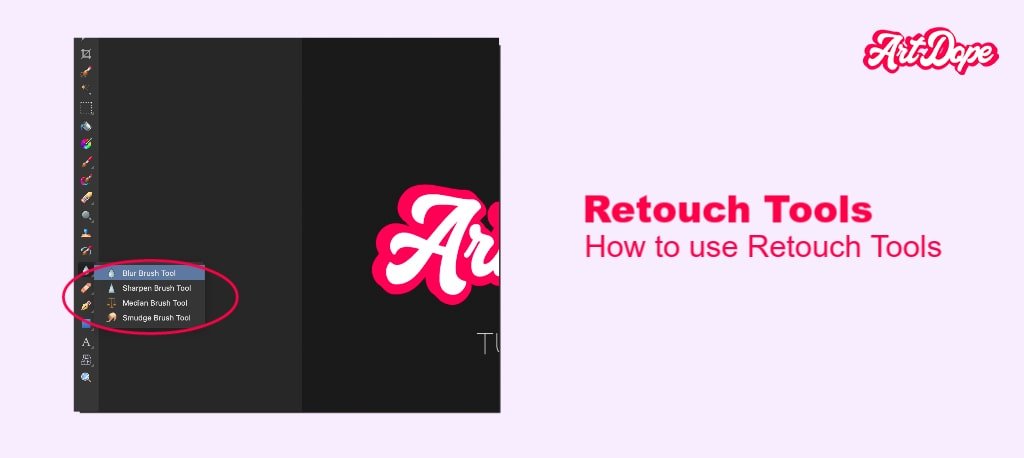
Median Brush Tool removes noise from an image selectively by blending pixels.
Smudge Brush Tool smudges or drags the colours of pixels around the image. This is similar to the wet paint effect mentioned earlier. The fusion of colours opens the door for creativity and interesting effects.
Let’s have a look at Healing Tools in the next section.
Healing Tools in Affinity Photo
There are five types of Healing Tools in Affinity Photo:
- Healing Brush Tool [J]
- Patch Tool [J]
- Blemish Removal Tool [J]
- Inpainting Brush Tool [J]
- Red Eye Removal Tool [J]

Following is a brief description of each Healing Tool:
Healing Brush Tool works by sampling areas of an image onto another area. This tool merges the pixels from the sample area and the target area together by combining their colour, texture and visibility. The Healing Brush Tool is ideal for hiding blemishes, wrinkles, and other defects from your photographs.
Patch Tool retouches undesirable areas of an image by replacing them with pixels from another area. This is mainly used to fix large portions of a photograph.
The Blemish Removal Tool lets you remove tiny flaws from photos with a single click.
Inpainting Brush Tool retouches or restores small to large areas of an image by filling them with pixels from the surrounding area.
Red Eye Removal Tool removes red-eye effect from photographs without losing any details. Further Affinity Photo can automatically detect and correct the problem with a single click.
A more detailed description of the Healing Tools available in Affinity Photo can be found here.
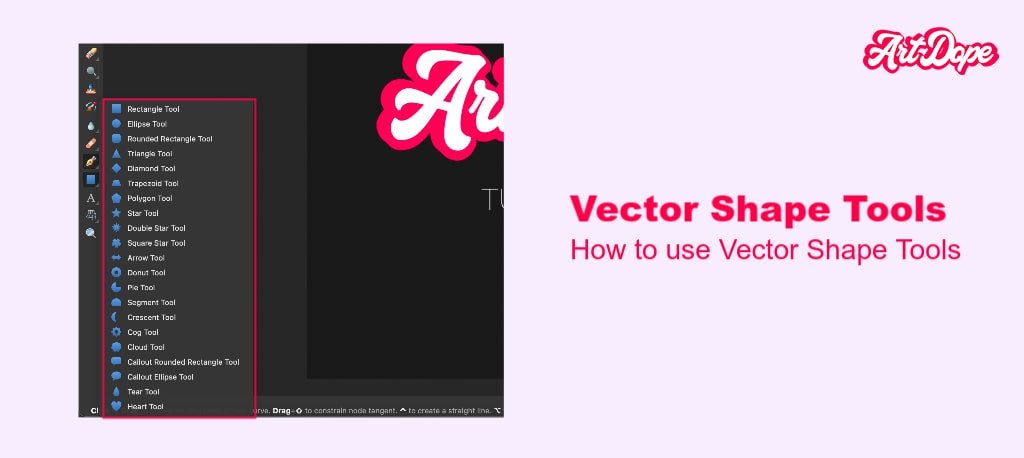
Vector Shape Tools in Affinity Photo
Vector Shape Tools in Affinity Photo are used to create vector shapes.
The following are the twenty-two types of Vector Tools in Affinity Photo:
- Rectangle Tool [U]
- Ellipse Tool [U]
- Rounded Rectangle Tool [U]
- Triangle Tool
- Diamond Tool
- Trapezoid Tool
- Polygon Tool
- Star Tool
- Double Star Tool
- Square Star Tool
- Arrow Tool
- Donut Tool
- Pie Tool
- Segment Tool
- Crescent Tool
- Cog Tool
- Cloud Tool
- Callout Rounded Rectangle Tool
- Callout Ellipse Tool
- Tear Tool
- Heart Tool
- Cat Tool
The Rectangle Tool creates rectangles and squares.
The Ellipse Tool is for circles and ellipses.
The Rounded Rectangle Tool creates rectangles with rounded corners.
The Triangle Tool is used to draw triangles, including isosceles and right-angle triangles.
The Diamond Tool creates diamonds, rhombuses, and kites.
The Trapezoid Tool creates trapezoids, parallelograms and rhombuses.
The Polygon Tool draws shapes with a custom number of sides.
The Star Tool creates stars with any number of points.
The Double Star Tool creates double stars with any number of points.
The Square Star Tool is used for drawing square stars, ranging from crosses to sunbursts with any number of points.
The Arrow Tool creates arrows with two or more segments.
The Donut Tool creates donuts or rings. The context toolbar has an option to change the thickness of the donut as well as an option to make it hollow.
The Pie Tool creates pies or wedges.
The Segment Tool is for creating ellipses with missing segments.
The Crescent Tool is used to draw crescent shapes.
The Cog Tool creates cogwheels with an unlimited number of teeth.
The Cloud Tool creates clouds or bubbles.
The Callout Rounded Rectangle Tool is used to draw callout shapes such as speech bubbles.
The Callout Ellipse Tool creates speech bubbles in the form of an ellipse.
The Tear Tool is used for drawing droplets and tears.
The Heart Tool creates hearts of various forms.
You guessed it, the Cat Tool allows you to draw cats.
Each shape tool has its own adjustable settings in the context toolbar.
Now, let’s have a look at the Text Tools.
Text Tools in Affinity Photo
Text Tools are used to add text to photos.
Affinity Photo has two distinct types of text tools. The following is a quick rundown of each:
- Artistic Text Tool [T]
- Frame Text Tool [T]
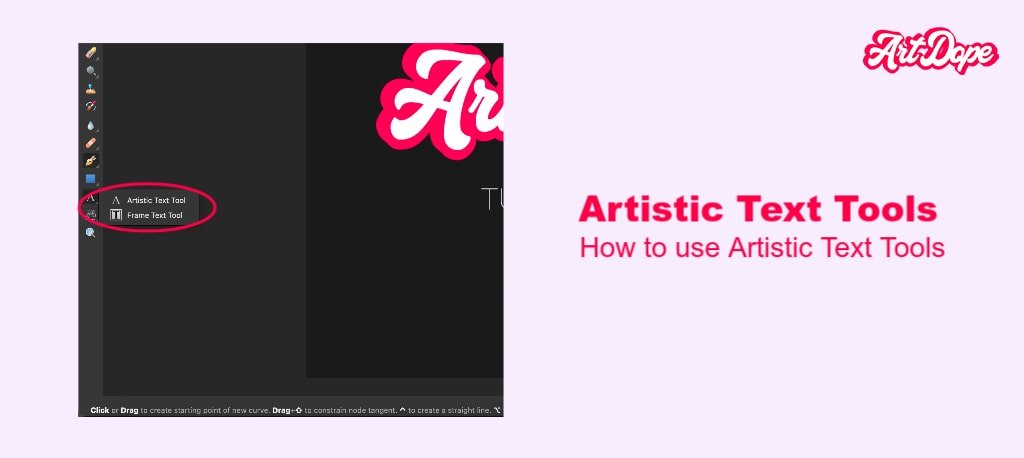
Artistic Text Tool adds artistic text to your images.
Frame Text Tool adds chunks of text within a border.
These settings are available for both these tools in the context toolbar:
- Font Family- The font of the text is modified.
- Font Style– The drop-down list within the pop-up menu will contain a range of options for the chosen font.
- Font Size– Drag the pop-up slider to adjust the value, or directly type in the text box.
- Bold/Italic/Underline– Applicable properties can be applied to your text by selecting one or more of these options.
- Character Style– If a choice is made to apply a style, this action opens the Character Style dialog box. Choose from the pop-up menu.
- Update Character Style– Updates the character style of the selected text.
- Character– The Text tab of the Character panel provides access to more robust text options.
- Paragraph Style– To apply a paragraph style, choose one of the options from the pop-up menu.
- Update Paragraph Style– Select the text, then style it with a paragraph style.
- Paragraph– The Paragraph panel includes all of the features you need to create advanced paragraphs.
- Left Align– The paragraph alignment is picked as left-align.
- Centre Align– The position of the paragraph is controlled by paragraphs, which are set to be equidistant from the left and right margins.
- Right Align– The paragraph alignment is picked as right-align.
- Justified– Has additional options.
- Justified Left– The Alignment option in the Paragraph section of the Text formatting window aligns each paragraph to both the left and right margins. A paragraph’s last line is left aligned.
- Justified Centre– In Justified Left, the paragraph’s last line is centered.
- Justified Right– In Justified Left, the paragraph’s last line is right-aligned.
- Justified All– Just like Justified Left, the paragraph’s last line is justified regardless of the length.
- Bulleted List– Use it to create a bulleted list.
- Numbered List– Use it to create a numbered list.
- Paragraph Leading– Enter the value directly in the text box or select from the pop-up menu.
- Typography– Has access to the Typography window for advanced typography settings.
For a more detailed insight into these tools in Affinity Photo, check out this link.
Warp Tools in Affinity Photo
Warp Tools comprise the eleventh and final category of tools in Affinity Photo’s Photo Persona. These tools are used to distort and change the perspective of photos.
The following are the two types of Warp Tools in Affinity Photo:
- Mesh Warp Tool
- Perspective Tool
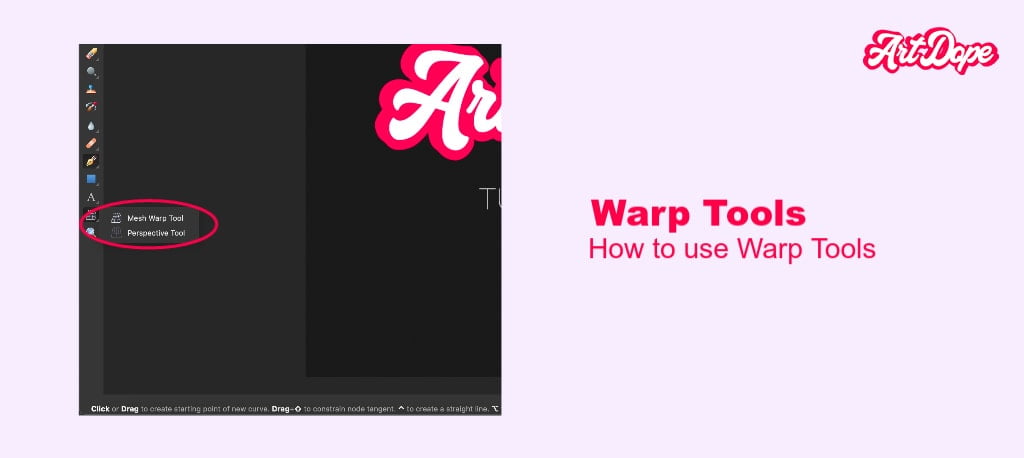
MESH WARP TOOL
The Mesh warp tool is for distorting images or a parts of an image. This is done by customising a grid made up of nodes and lines.
PERSPECTIVE TOOL
The Perspective Tool fixes objects in a photo that look skewed because of the camera angle or lens distortion.
The main purpose of this tool is to correct perspective distortions in photographs as well as to change the focal point of a photograph. You are also free to twist, stretch, pinch and bulge any object in your image to create interesting or abstract effects.
You can get further information on Warp Tools in our blog: Affinity Photo’s Perspective Tool and Filters: A Complete Guide.
Expert Rating
Summary
Tools are not too difficult to understand. If you’re a beginner, practice is absolutely essential. Make mistakes & master them.
Conclusion
These tools found in Affinity Photo’s Photo Persona are very easy to use once you get the hang of them. They are tailor-made for various types of photo editing exercises and extremely efficient to use.
Thanks for reading & feel free to check out more of our articles!


