

We will be covering how to use different tools such as the pen tool, to draw different types of lines, and shapes, shaping the texts and embedding an image within a shape.
Lines in Affinity Photo
Drawing lines in Affinity Photo is simple. All you need to do is select the Pen tool from the Toolbar on the left side. With this tool, you can draw any type of line that you need.
There are three different types of lines that you can create with the Pen tool: straight, curved, and freehand.
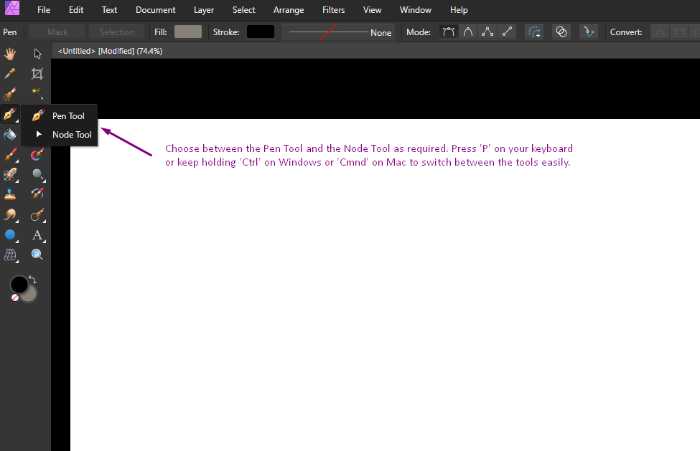
The Pen tool (P) is very easy to locate due to its icon which is literally a pen. If you left-click on the arrow to the bottom right of the Pen Tool, you will see a pop-up menu where you can select either the Pen Tool or the Node tool (see image below).
In order to use the Pen Tool, make sure that the Pen tool is selected by looking at the icon.
There are seven modes available in the context toolbar when using the Pen tool:
– Pen mode: This is the default mode and it allows you to draw sharp corners or smooth curves, depending on whether you click or drag with your mouse.
– Smart mode: This mode determines how sharp or smooth your curve needs to be depending on the position of the next node.
– Polygon mode: This mode allows you to draw polygons by clicking and creating straight lines with sharp nodes.
– Line mode: This allows you to create single-segment straight lines.
The following modes can be used in conjunction with the four modes listed above:
– Preserve selection when creating new curves: When this mode is selected, you can create a path without affecting the current selection.
– Add new curve to selected curves object: This can be used together with any other mode to draw additional curves on the same layer as the initial curve.
– Rubber Band mode: This mode creates a preview of the forecasted path.
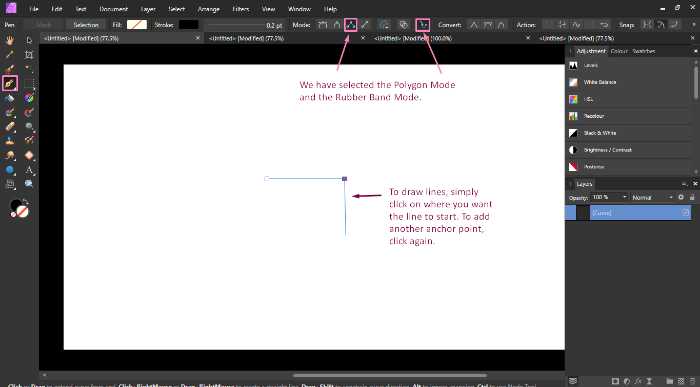
In the following example, we will show you how the Polygon Mode and the Rubber Band Mode work.
Straight lines
To draw a straight line, first you have to select the Pen Tool from the toolbar. Then, choose the Line Mode from the context toolbar.

Before you start drawing, you can set the colour, style and width of your line. You can do this by selecting ‘Stroke’ from the context toolbar and picking a colour from the colour swatch. From the ‘Stroke properties’, you can also set the line style (ex. solid, dash) and width.

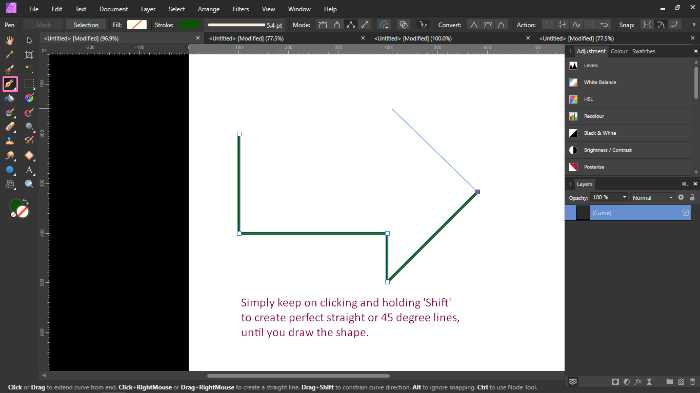
To start drawing, simply click at one point on your document to create an anchor node (the small circle) and then click at another chosen point. If you hold down ‘Shift’ + left-mouse button, you will be able to create perfectly horizontal, vertical and 45° lines.
Curved lines
To draw a curved line, you first need to select the Pen Tool from the toolbar. Then, choose the Pen Mode or the Smart Mode from the context toolbar. Similar to drawing straight lines, you can set the colour, style and width of your line before starting to draw.

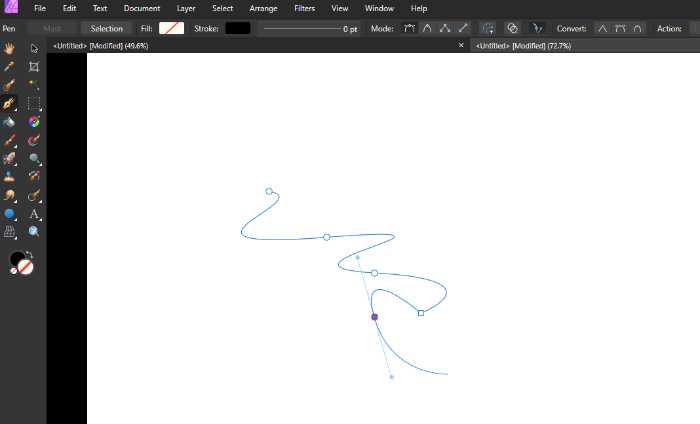
If you left-click on the canvas and drag your mouse, a pair of control handles will appear. You can set the curvature and the length in the direction of the first curve by moving the control handles.
The continue drawing by clicking on another point and dragging until you achieve the desired curve.
If you make a mistake, select the Node tool or hold ‘Alt’ (Windows) or ‘Option’ (Mac) to add, remove or edit a node of the path. In Affinity Photo, you can also convert a node to ‘Sharp’, ‘Smooth’ or ‘Smart’ from the context toolbar.
Create a shape out of lines in Affinity Photo
Creating shapes out of lines in Affinity Photo is a very simple process. All you need to do is select the Pen Tool from the toolbar. Then, you can choose whichever mode you require according to the types of lines you need to create. The Pen Tool allows you to create custom shapes very easily by clicking and adding nodes.
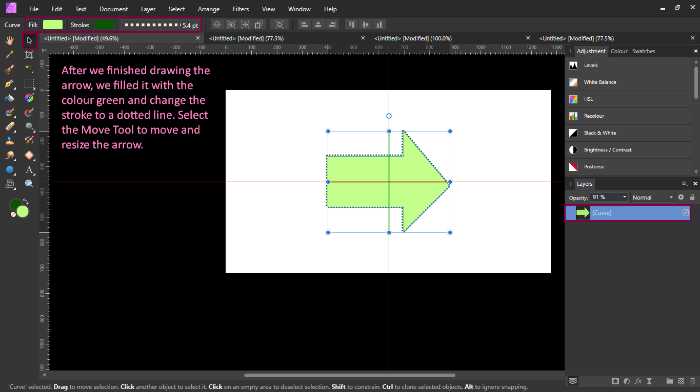
For example, if you wish to draw an arrow out of lines, you can either pick the ‘Polygon Mode’ or the ‘Line mode’ and start drawing the arrow line by line. In these tutorial images, we will be using the ‘Polygon Mode’ to draw the arrow.
You may wish to display rulers around your canvas to create a more perfect shape. You can do this by selecting ‘View > Show Rulers’ of by pressing ‘Ctrl’ (Windows) or ‘Cmd’ (Mac) +’ R’ on your keyboard. Affinity Photo will show the rulers on top and at the left side of your document.
After you finish your shape, you may wish to change the colour, style and width of the outline from the context toolbar. You can also fill the arrow with any colour you want. To do this, select ‘Stroke’ from the context toolbar and pick a new colour.
You can also adjust the opacity and blending mode of the shape from the Layers panel.
Shapes in Affinity Photo
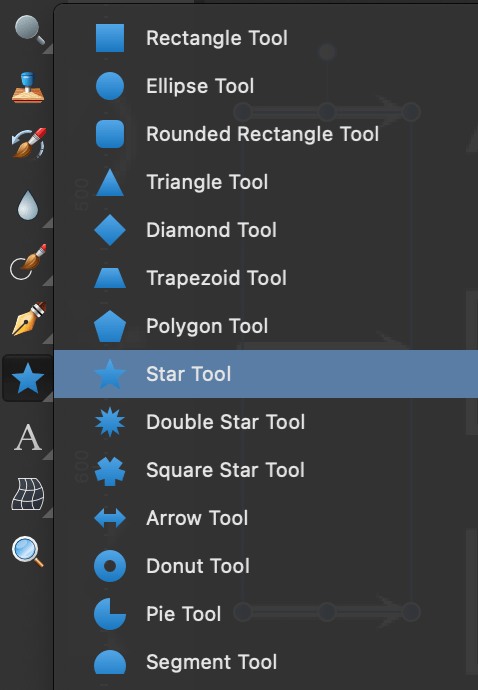
Affinity Photo offers a variety of shapes that you can use in your documents such as circles, stars, polygons and many more. To access these shapes, you first need to select the ‘Shape Tool‘ from the toolbar on the left side of your document. Affinity Photo will show you a variety of predefined shapes.
Each shape has its own set of options that you can adjust and choose from the context toolbar. For example, the ‘Trapezoid Tool’ has the following properties: Presets, Left Point, Right Point, Mirror and Negate. Notably, some options such as Fill and Stroke, are common to all shapes.
To add a particular shape to your document, simply click and drag it onto the canvas. You can also resize and rotate the shape by using the control handles that appear around it. Affinity Photo will show you the dimensions of your shape on the top-right corner of your cursor.
The shape and its strokes can be modified after it is drawn. You can for example turn them into curves to customise the shape to your liking.
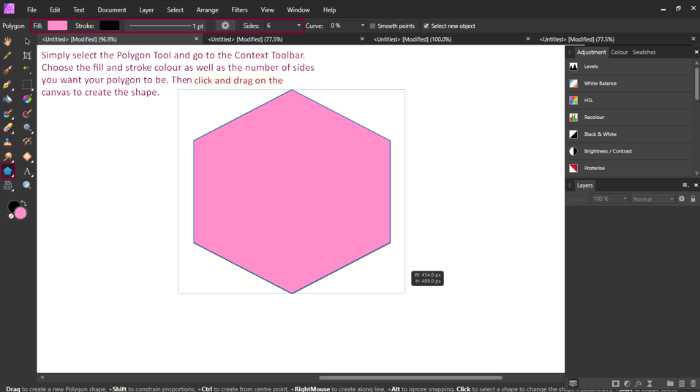
In this example, we have create a hexagon out of the Polygon Tool.
Drawing a diamond Shape in Affinity Photo
In this part, you will learn how to draw a diamond shape in Affinity Photo.
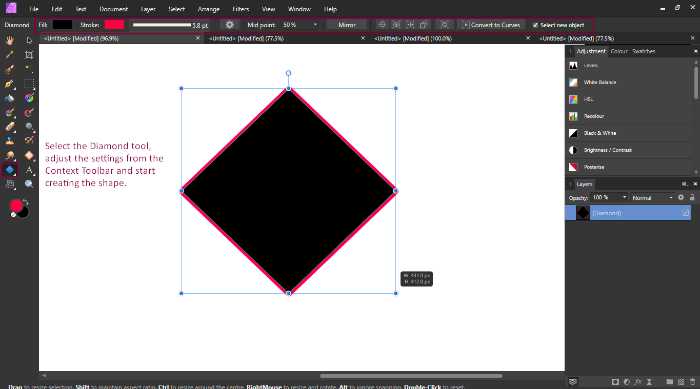
The first step is to select the ‘Diamond Tool’ from the toolbar. Then click on the canvas and drag to create the diamond shape. Affinity Photo will show you the dimensions of your diamond on the top-right corner of your cursor. The control handles on each side of the diamond allow you to resize and rotate the shape.
In the context toolbar, you can choose to adjust the following settings: Fill, Stroke, Stroke properties, Presets, the Mid Point position, Mirror and others.
To fill the diamond with a colour, select ‘Fill’ from the context toolbar and pick a new colour. Experiment with the different settings available until you are satisfied with your shape. You can also adjust the opacity and blending mode of the shape from the Layers panel.
If you select the ‘Move Tool’, you can also resize and move the diamond shape around your document by clicking and dragging it. From now on, the possibilities are endless and it’s up to your imagination how you want to edit the shape you have created!
Creating a 3d star (3 Steps)
Creating a three-dimensional star shape in Affinity Photo is very easy.
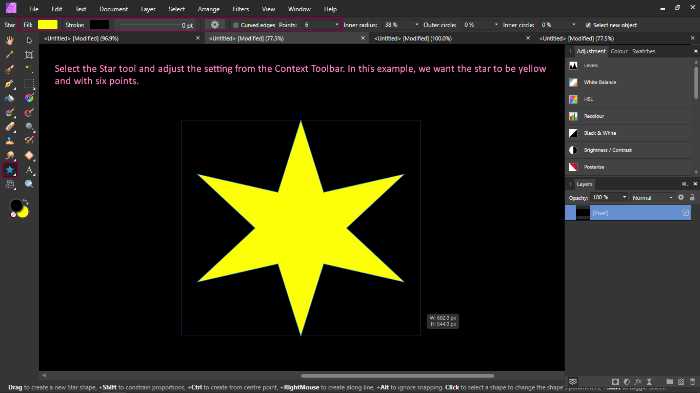
Select the ‘Star Tool’ from the toolbar, click on the canvas and drag to draw the star. Affinity Photo will show you the dimensions of your star on the top-right corner of your cursor. The control handles on each side of the star allow you to resize and rotate the shape.
In this tutorial, we will fill the star with the colour yellow and set the stroke width to 0pt. We want the star to have 6 points, so we will drag the Points slider to 6 (From the top bar). We will fill the shape by choosing a colour from the “fill section” from the tool bar.
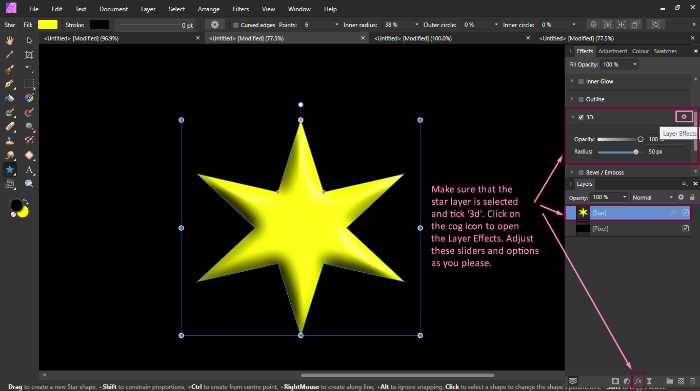
To create a 3D effect, select the Star layer and click on ‘Layer Effects‘ located at the bottom of the layers panel or from the Effects Panel. Affinity Photo will show you a list of effects that are available to the layer. We will select the ‘3D’ effect and click on the cog icon to reveal the layer effects tab.
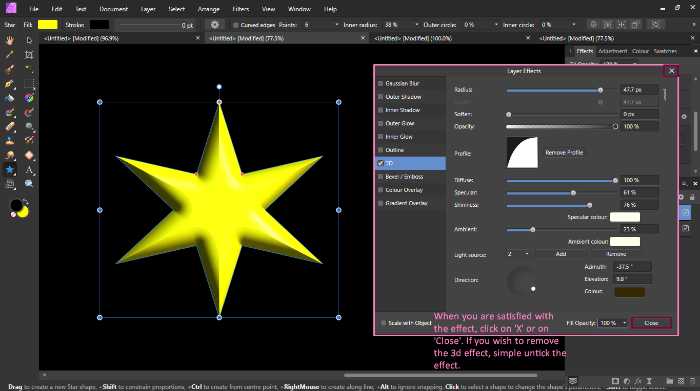
From here, you can play around with the different settings to get the desired effect. You can for example adjust the light position, ambient colour and more. Experiment until you are happy with your star shape!
The following are our settings!
Shape text in Affinity Photo
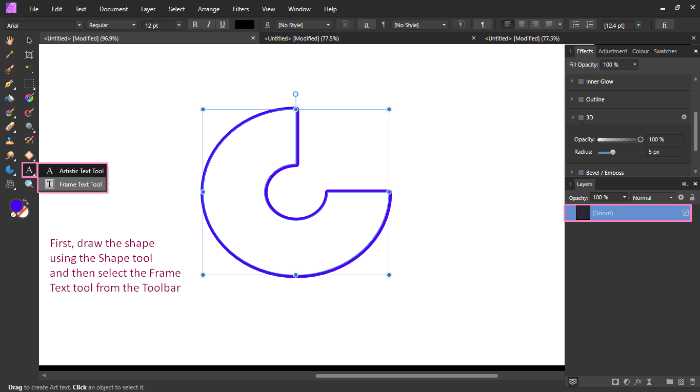
In Affinity Photo, you can also fit text within a shape. First, you have to create the shape from the ‘Shape Tool’.
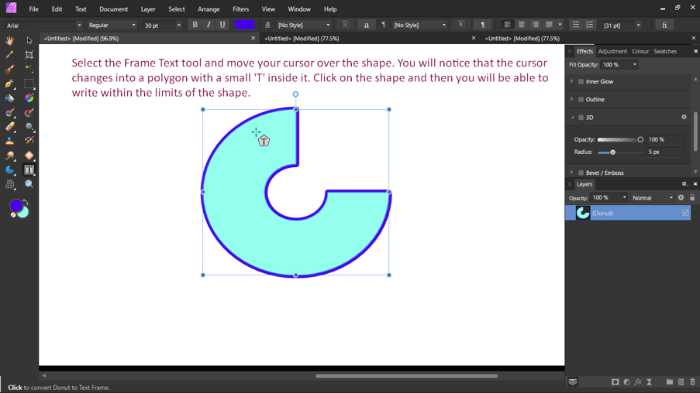
When you have drawn a particular shape, select the shape layer and click on the ‘Frame Text Tool‘ from the toolbar. Move your cursor on the shape and you will notice that it will transform into a small pentagon with a ‘T’ inside it. The shape will automatically transform into a framed text box.
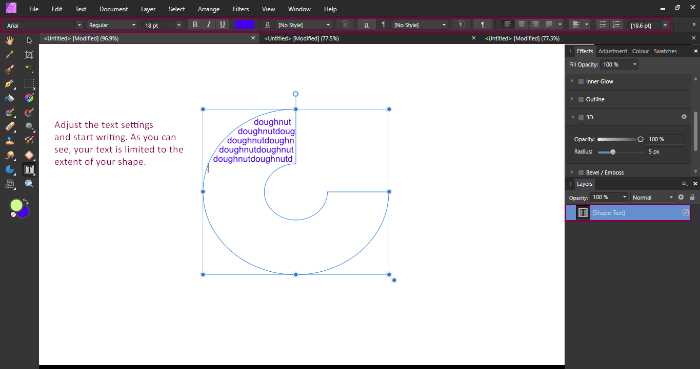
Type in your text and Affinity Photo will automatically fit it within the shape. In the context toolbar you can resize the text, change the font and adjust other settings.
Filling shapes with images in Affinity Photo
Affinity Photo also allows you to fill shapes with images. This can be done by clipping the image onto the shape (Clipping Mask).
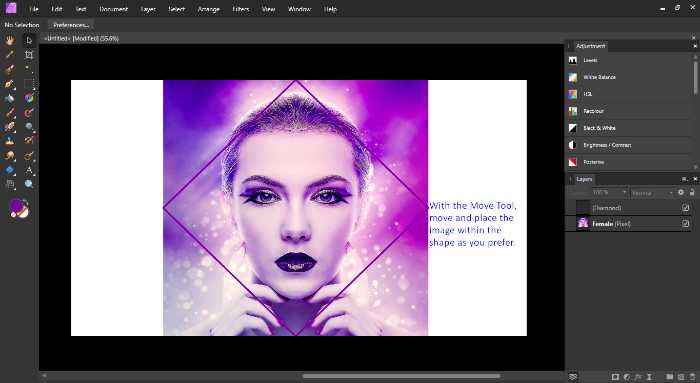
First, you need to open the image you wish to insert in the shape. Then, draw the shape either using the Pen tool or the Shape tool as explained above.
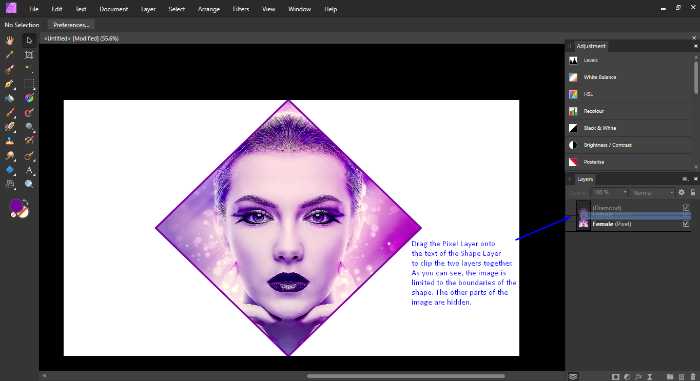
Then, select the layer you want to clip and in the Layers Panel, drag it on top of the shape layer. (A blue line will appear when hovering layers on each other – In the layers panel)
You will notice that the shape becomes filled with the clipped image. You can adjust the opacity and blending mode of the image from the layers panel.
As you see in these two images, clipping an image to a shape is very easy.
Expert Rating
Summary
Understanding its specific use case is key. You might not be using this tool as often. It doesn’t take too much time to learn nor understand. However, when required it works wonders.
Conclusion
That’s it for this tutorial! We hope you have enjoyed learning how to draw lines and shapes in Affinity Photo. The Pen Tool and the Shape Tool are very simple to use and allow you to create any shape imaginable.
With just a few clicks, you can be on your way to creating lines and beautiful shapes that will add interest and flair to your photos.
Have fun experimenting with these tools and see what amazing creations you come up with!
Thanks for reading & feel free to check out more of our articles!


