

Layers are one of the most fundamental features of any image editing software. They allow you to create and edit complex images by stacking multiple layers on top of each other. Layers are combined together to create a complete design to display on your page.
In this tutorial, we’ll take a look at how to use layers, the different types of Layers in Affinity Photo, and why they are useful. We will also include tutorial images to help illustrate how layers work.
Understanding Layers in Affinity Photo
Layers are essentially a way of stacking multiple images on top of each other. This can be useful for many reasons, such as combining images to create a composite or adding text or effects to an image.
Think of it as like you’re building a cake or a sandwich. It is layers of food stacking on each other to eventually create your final result.
Each layer can be edited individually to change the transparency, position, and appearance of each layer without affecting the other layers below it.
Layers in Affinity Photo allow you to organize your images and work on them more efficiently. For example, you can create a layer for each element in your composition, such as the background, foreground, and middle ground.
This will make it easier to edit each element separately. Layers are used for retouching and repairing images.
Layers are like a stack of books on top of each other – The bottom book is the background, and each book above it represents a layer. Unless the book at the top is transparent, you cannot see the underlying books through the pages of the top book.
However, if we change the transparency of the top book, we will be able to see through it and view the underlying books.
The opacity of a layer controls how much of the layer or layers below is visible. The way layers work and which parts are visible is all in your hands. The order of your layers, which layers are visible, the layers’ settings, and the use of child layers all affect the outcome of your design.
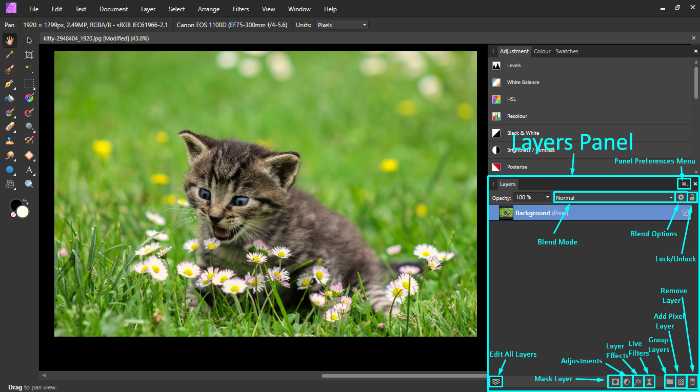
Layers Panel in Affinity Photo
The Layers Panel is where you manage all of your layers in Affinity Photo. The Layers Panel is typically found on the right-hand side of Affinity Photo’s interface. This panel is used to construct your design made up of several layers, with each layer dedicated to a specific component. These include filters, adjustments, text, lines, etcetera.
From the Layers Panel, you can select a particular layer. If you right-click on it, you will be able to copy or cut it, paste it, hide it, lock or unlock it, duplicate it, adjust the opacity and so much more.
You can change the order of layers by selecting them and then dragging and dropping them with your mouse. The squares at the right-hand side of a layer allow you to toggle the visibility on and off.
At the bottom of the Layers Panel, you may choose to ‘Edit All Layers‘, create a ‘Mask Layer’, apply an ‘Adjustment’. You can also pick ‘Layer Effects’ and add ‘Live Filters’. Additionally, you can ‘Group Layers’, add a new pixel layer, or remove a layer.

This screenshot will help you familiarise yourself with the Layers Panels and all the options available.
There are various types of layers in Affinity Photo, but the main types are the following: Pixel Layers, Mask Layers, Adjustment Layers, Vector Layers and Clipping Layers.
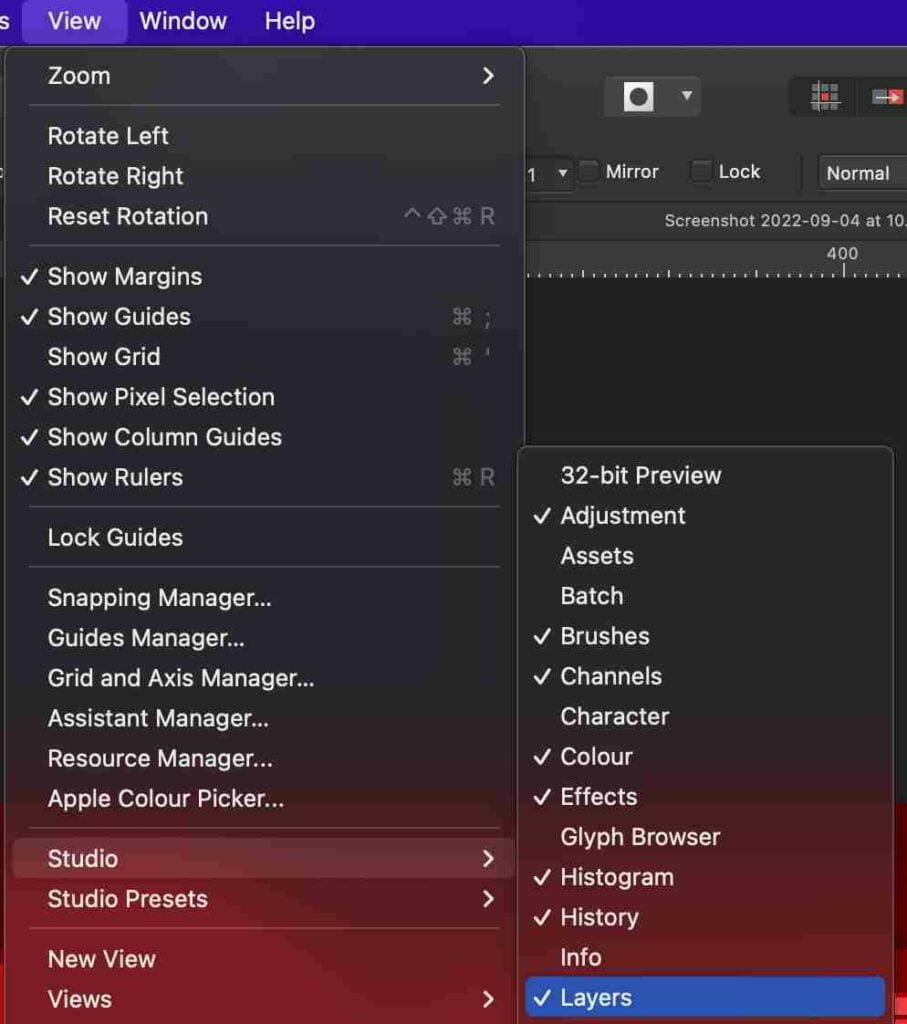
You cannot find the layers panel in Affinity Photo?
Let’s say you closed the Layers Panel by mistake. This is how you can find/reset it:
- Click on “View” in the top menu.
- Navigate to “Studio” section and a drop down menu shows up.
- Select “Layers” to open the layers panel.
Pixel Layers in Affinity Photo
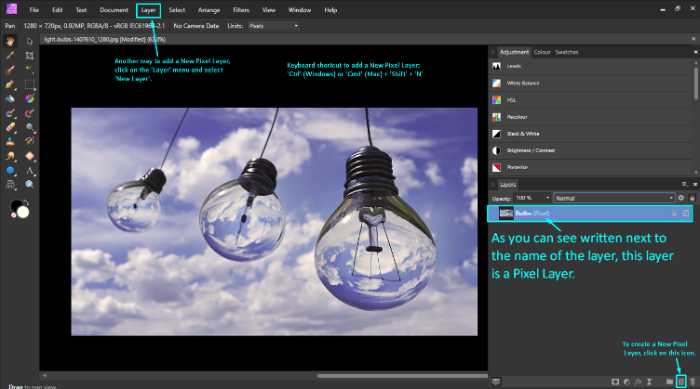
Pixel Layers in Affinity Photo are the most common type of layer used for images and graphics. As the name suggests, a Pixel Layer is comprised of pixels. They are the smallest unit of colour information in an image.
When you create a Pixel Layer, Affinity Photo creates a new layer that is the size of your document’s canvas.
Any changes that you make to the layer will be applied to the overall file. It’s important to keep your layers organized and tidy, as messy layers can quickly use up disk space and create problems down the line.
Have you ever tried to edit an image layer and you are unable to use tools, effects and adjustments?
This is because in order to modify an image, the layer has to be a pixel layer. Image layers preserve all of the original image data. On the other hand, pixel Layers are composed of pixels to modify and manipulate in any way you want. In order to turn a particular layer into a pixel layer, you have to rasterize it.
Rasterizing a layer means that you are turning it into pixels. It allows you to edit the contents of the layer with tools and effects.
To make sure that a layer is a pixel layer, take a look at the layer in the Layers Panel. If there is ‘(Pixel)’ written next to the name of the layer, then it is definitely a Pixel layer. This is clarified in the image below.
Mask Layers in Affinity Photo
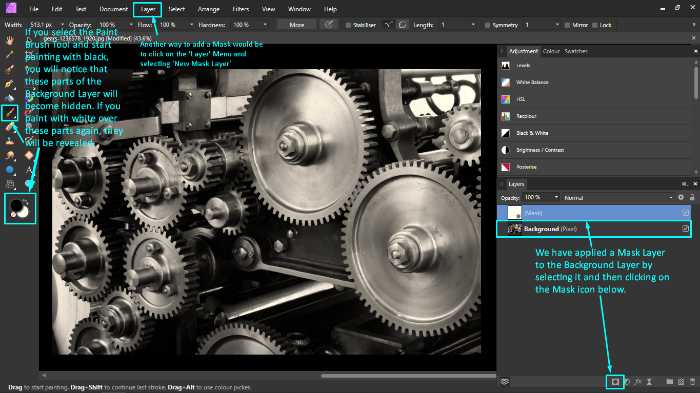
Mask Layers in Affinity Photo is handy to hide or show parts of other layers. They are typically used for compositing. It is the process of combining different elements into a single image. For example, you can use a Mask Layer to hide the background of an image so that you can see the subject more clearly.
Mask Layers work non-destructively indicating the layer’s original contents are preserved. The Mask Layer simply controls which parts of the underlying layers are visible. When you paint on a mask with the colour white, you are revealing the underlying layer. When you paint with black, you are hiding the layer below. Use other shades of grey to control the level of transparency.
You can add a Mask Layer by selecting the layer you to apply the mask to by clicking on the Mask icon at the bottom of the Layers Panel. Apply a Mask by clicking on the ‘Layer’ menu, and select ‘New Mask Layer’.
To add an Inverted Mask Layer, hold down ‘Alt’ (Windows) or ‘Option’ (Mac) and add a new mask layer as instructed above. If you already have a Mask Layer and you wish to invert it, simply select the Mask Layer and press ‘Ctrl’ (Windows) or ‘Cmd’ (Mac) + ‘I’ on your keyboard. Another method would be to select the Mask Layer and click on the ‘Layer’ menu, and select ‘Invert’.
This image will help to understand how a Mask Layer can be added and how it functions.
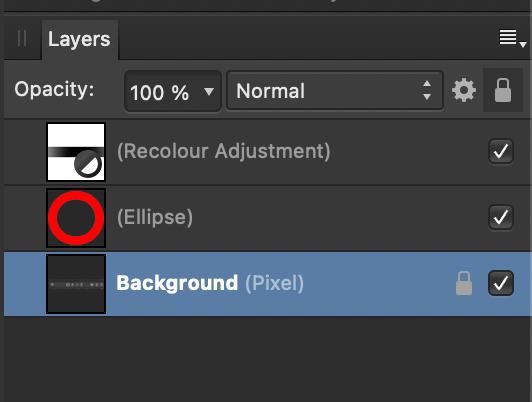
Adjustment Layers
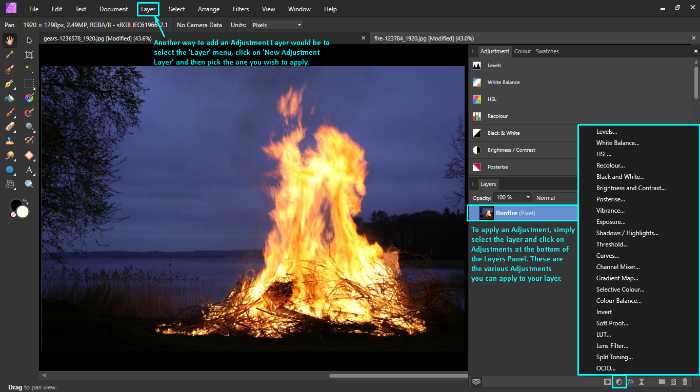
Adjustment Layers are handy to change the appearance of other layers without permanently altering them. These layers are non-destructive, which means that you can always go back and change the settings if you’re not happy with the results.
This type of layer is very useful for making global changes to an image, such as increasing or decreasing the brightness, contrast, saturation or hue. You can also apply multiple Adjustment Layers to a single layer.

Affinity Photo provides various Adjustments such as Curves, Levels, Black and White, HSL and so much more. Simply select the Adjustment from the menu at the bottom of the Layers Panel, and a new layer will be added above the currently selected layer.
Adjustment Layers in Affinity Photo are equipped with a built-in mask, which restricts the adjustment to a specific area of the image. To do this, simply select the Adjustment Layer and select the Paint Brush Tool to start painting.
You can paint with black, white or any other shade of grey to hide or reveal parts of the adjustment layer.
We have included this image to show you how to add an Adjustment Layer and the variety Affinity Photo offers.
Vector Layers
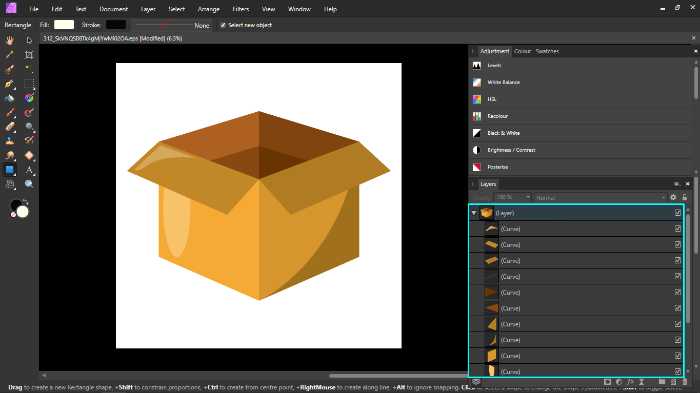
Vector Layers are used for creating and editing vector graphics. A Vector Layer is made up of mathematical objects called vectors. It defines the shape, size and colour of an object. Affinity Photo includes a wide range of tools for creating and editing vector graphics, including shapes, lines, text and curves.
You can scale up a vector layer as much as you want, as they wont become pixelated like pixel/raster layers.
This is how a vector looks like in Affinity Photo.
Clipping Layers
Clipping Layers are used to restrict the visibility of a layer to a specific area of another layer. For example, you can use a Clipping Layer to create a drop shadow for an object.
The advantage of using a Clipping Layer is that you can change the shape and size of the clipping mask without affecting the contents of the layer. The clipped layer will be bound within the extent of the parent layer.
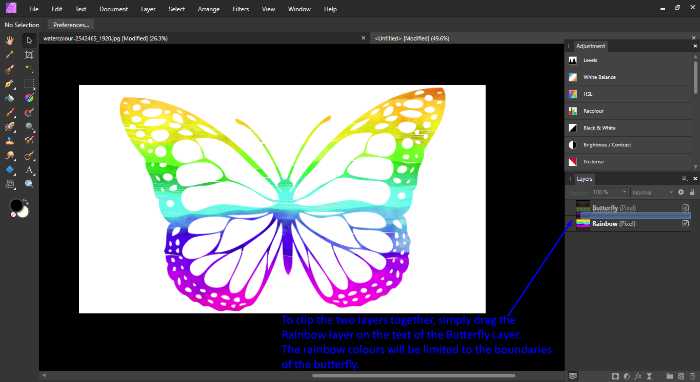
To create a Clipping Layer, select the layer you want to clip and in the Layers Panel drag it on top of the other layer. You can also select the layer to be clipped, click on the ‘Layer’ menu, select ‘Arrange’ and ‘Move inside’. You will see that in the Layers Panel, the layer becomes clipped to the layer which was underneath it.
For a thorough explanation on Clipping Masks, check out our blog on Masking in Affinity Photo. Take a look at these images to learn how you can clip layers together.
Other Layers
Other layers in Affinity Photo are Fill Layers and Live Filter Layers, amongst others. Fill Layers are used to fill an area with a solid colour, gradient or pattern.
Live Filter Layers are used to apply filters to a layer in real-time and therefore they are non-destructive. This type of layer is very useful for creating special effects and adding texture to your images.
About Grouping Layers
Groups are used to combine layers into a single entity. This can be useful when you want to apply an adjustment to multiple layers at the same time, or when you want to move all the layers in a group together.
To create a Group, select the layers you want to include and clicking the Group icon at the bottom of the Layers Panel. Alternatively, select the layers you want to include and press ‘Ctrl’ (Windows) or ‘Cmd’ (Mac) + G on your keyboard. The selected layers will be combined into a single Group.
You can add adjustments to a a group and edit in a neater manner. By default the blending mode of the group is set to “pass through”. This is because, layers which have their own separate blending mode, they would not be effected.
However, if you’d like the group to have a specific blending mode you could as well. Furthermore, masks could be applied to groups for a wider range of editing.
Smart objects/layer in Affinity Photo (Embedded Document )
Smart Objects are not as easy to use/create as they are on photoshop. However, there is a way to create a close version of them.
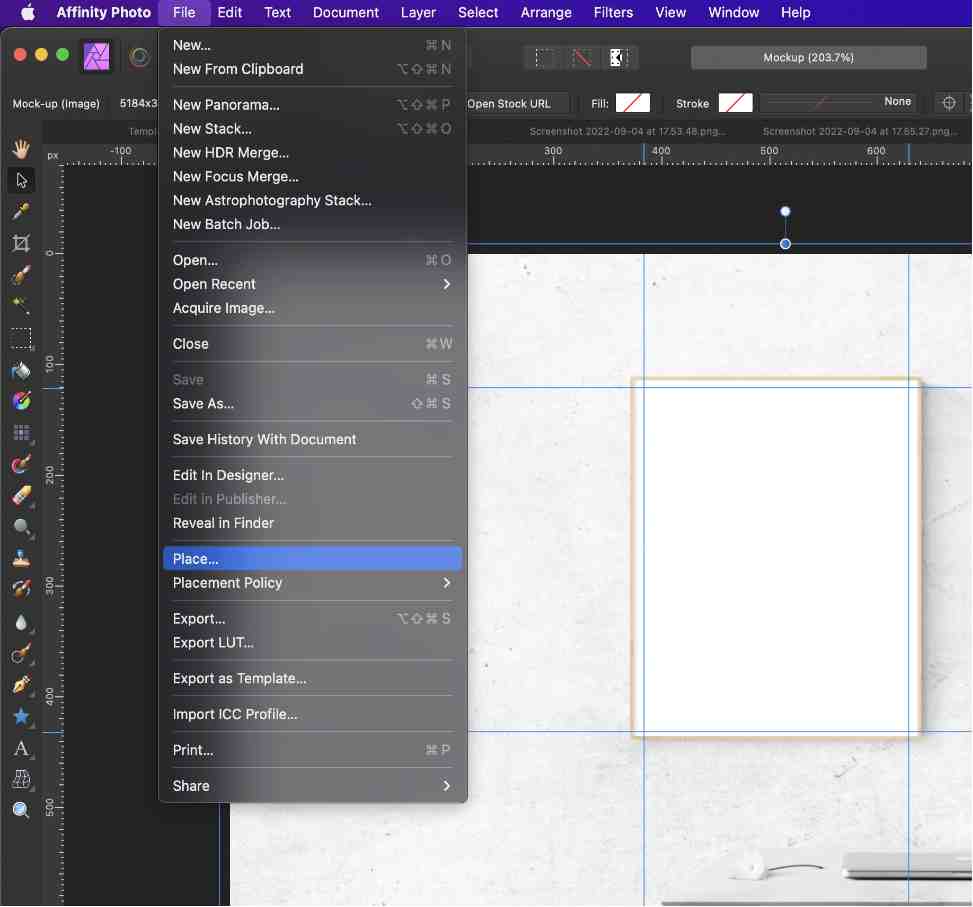
What are the equivalent of a smart object in affinity photo? Affinity uses whats called an embedded document. You would need to save a file and place it in another another affinity photo document.
- Open The Image you’d like to use in Affinity and save is as an affinity file.
- Open the Main Template/File you’ll be working on. Go to File > Place & place the image that you saved as an Affinity photo file.
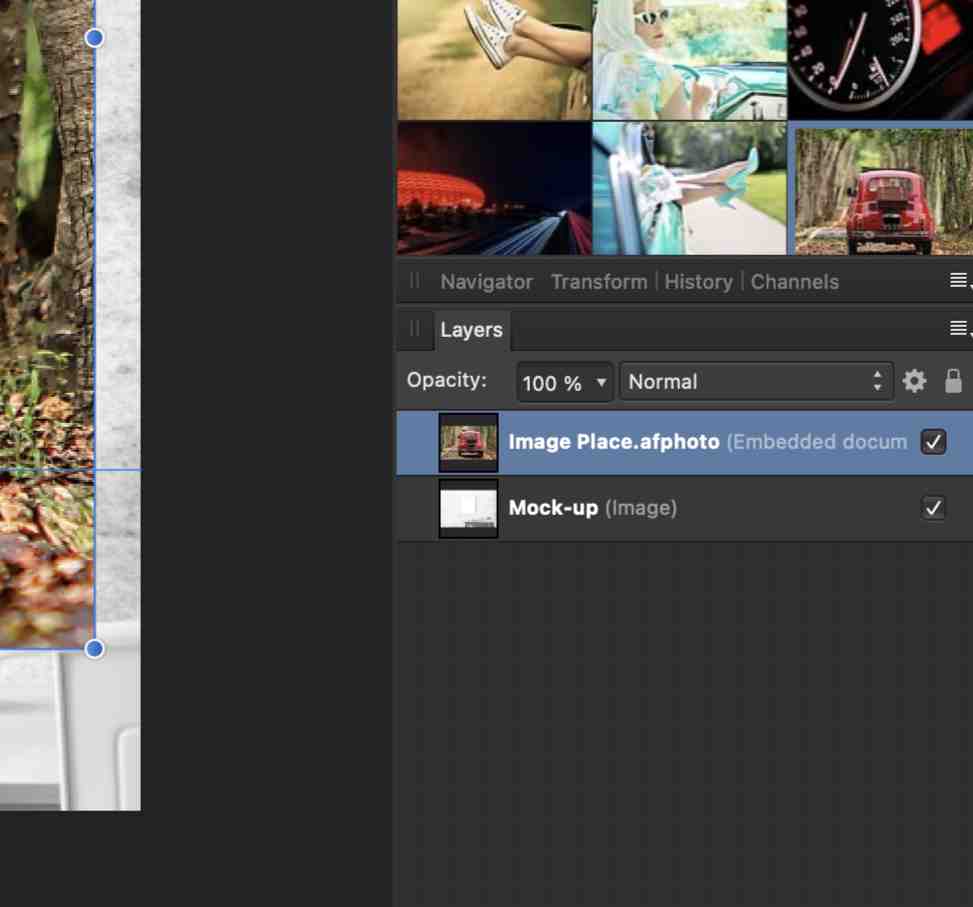
- The placed Image will be an Embedded Document with the Layers Panel. You can double click the Layer of the Image (in the Layers panel) & replace it with the Image that you’d like.
Furthermore, you are able to open a Photoshop smart object in Affinity, just like you would in Photoshop.
Embedded Documents are great when you need to export multiple sizes whilst having the same image. You could just use update one layer (Embedded Document) and the sizes automatically update. (Example: Social Media Posts). They are used for to create mockups as well.
Expert Rating
Summary
Layers are core to any design tool. Anything you do requires a layer, so make sure you understand it well. Very functional & takes some practice to understand.
Conclusion
In this blog post, we’ve looked at the different types of layers in Affinity Photo and how they can be used to create stunning visual effects.
We hope you’ve found this information helpful! As always, thank you for tuning in!
Thanks for reading & feel free to check out more of our articles!


