

Do you want to use Photoshop plugins in Affinity Photo? This can be a little tricky, but we’re here to show you how it’s done! In this guide, we will walk you through the steps of using Photoshop plugins in Affinity Photo.
What are plugins in Affinity Photo?
Plugins are third-party additions to Affinity Photo that extend its functionality. They can be used for a variety of purposes, such as adding new filters or effects or even completely changing the way Affinity Photo works.
There are a few things to keep in mind when using Photoshop plugins in Affinity Photo. First, not all plugins are compatible with Affinity Photo. Some may only work in Photoshop, or they may not work at all.
Second, even if a plugin is compatible with Affinity Photo, it may not work the same way as it does in Photoshop. This is due to the different ways that Affinity Photo and Photoshop handle images.
Photoshop plugins are small pieces of software that add additional features and functionality to Photoshop. There are plugins for just about everything, from retouching photos to creating stunning graphics. Plugins can be either paid or free, and they’re usually easy to install and use.
That being said, there are still a lot of great plugins that can be used in Affinity Photo.
Affinity Photo can run 64-bit Photoshop plugins, but not all plugins are compatible with Affinity Photo.
Now that we’ve covered the basics, let’s get into how to use Photoshop plugins in Affinity Photo!
How and where to install the plugins
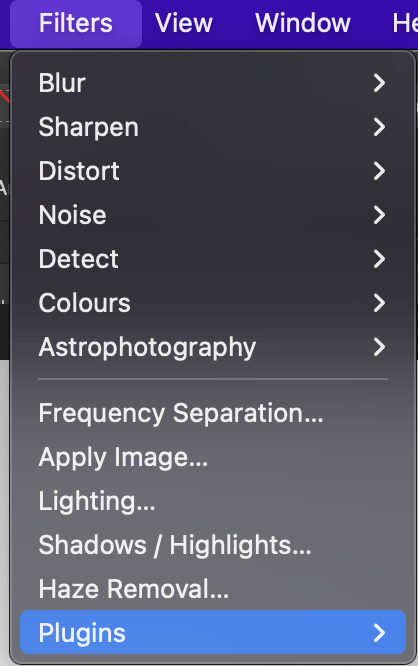
Plugins are found in the Filters Menu. Move to Plugins at the end of the Filter Menu to check out the listed plugins.
To install plugins through Affinity Photo,
- To open the Preferences, click the menu “Affinity Photo > Preferences” on a Mac or “Edit > Preferences” on a Windows PC.
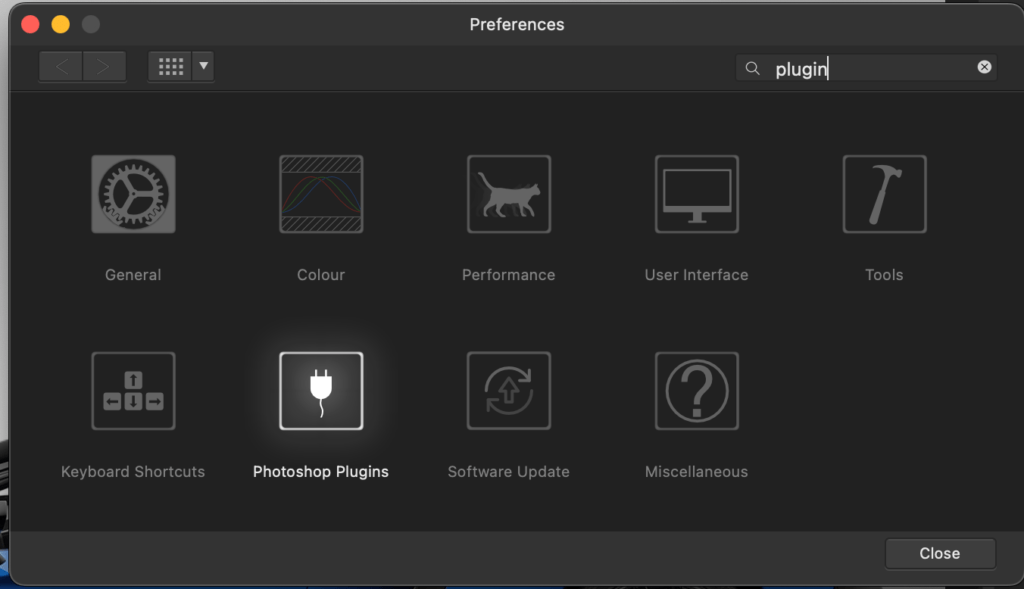
- Select the Photoshop plugin option to display the Preferences dialog.
- In order to find the default location of Affinity Photo Plugins, click the Open Default Folder in Finder button appearing at the top of the window which shows the plugin folder location.
- If you had installed plugins to this location, when you launch Affinity Photo, it displays them as a list.
Sometimes, after the plugin is installed, you’ll need to restart Affinity Photo for the changes to take effect.
Finding Photoshop Plugins in Affinity Photo
For Affinity Photo to detect the plugin location, you should have added them to Affinity Photo’s plugin file,
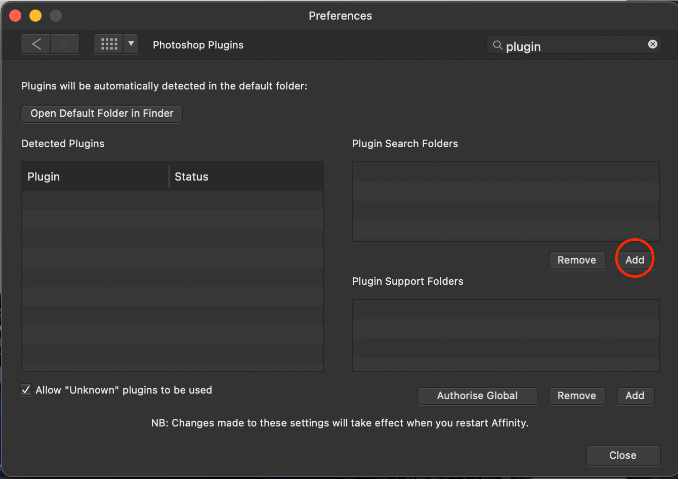
- Under the Preferences dialog, dive into the Plugin Search Folder.
- Click Add button over there to add plugin locations easily.
Before you attempt to add folders to your search list, make sure you know where your Photoshop plugins are installed.
As a rule of thumb, if your plugins were installed in Photoshop 2018 or earlier, they’ll be in a folder with the application’s files. However, if you installed them in Photoshop 2019 or later, they will most likely be in a new shared folder independent of the application’s files.
Because some plugins are still present in the application directories.
Finding Photoshop plugins on Mac in Affinity Photo
If you’re using a Mac, remember that Photoshop plugins can be installed in two locations on the hard drive.
- The Applications folder.
- The Library folder.
If you have plugins installed for Photoshop 2019 or later, they are probably in the Applications folder rather than the Library folder.
In the case of the Application folder,
- Select Application Folder and choose the Adobe Photoshop type namely Adobe Photoshop 2020, Adobe Photoshop 2021, Adobe Photoshop CC 2018, or Adobe Photoshop CC 2019.
- Next, two folders will appear on the slide menu, Plug-ins, and Presets.
- Choose Plug-ins. There you go finding the location!
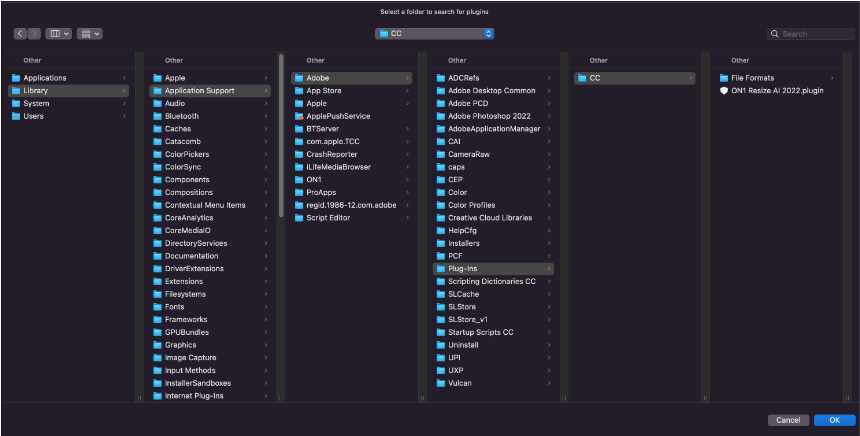
In the case of the Library Folder,
- Select Library Folder and go to Application Support.
- Next, a list of folders appears, and choose the Adobe folder.
- Another list of folders appears and choose Plug-ins.
- The CC folder is the location where you will find the Photoshop plugins.
Finding Photoshop plugins on Windows in Affinity Photo
In Windows,
- To find the “Program Files” directory on your computer, you must first locate where Windows is installed on your hard drive. This is most often located on the C: drive of a PC.
- Choose Program Files.
- Choose the Adobe file.
- The installed Adobe Photoshop folders appear such as Adobe Photoshop CC 2018, and Adobe Photoshop CC 2019. Choose one of them.
- Plug-ins folder can be detected and clicked as well.
- The CC folder is the location where you will find the Photoshop plugins.
Now that we know how to install and find Photoshop plugins in Affinity Photo!
Enabling unknown plugins in Affinity Photo
Not all plugins are compatible with Affinity Photo. Some may only work in Photoshop, or they may not work at all. So it has a setting to prevent it from loading “Unknown” (i.e., untested) Photoshop plugin files.
Let’s fix it,
- Go to Edit > Preferences, and make sure there’s a checkmark next to Allow ‘Unknown‘ Plugins.
- After check-marking that setting, close & restart Affinity Photo.
- The plugins folder in Affinity Photo has Photoshop plugins installed, which will appear in your Filters menu.
How to use these plugins
After the Affinity Photo is launched, you can see the plugins in Affinity Photo.
Now let’s see how to use a plugin in the following steps,
- Go to the Filter menu and choose Plug-ins.
- A list of plugin collections will appear and dive into the folders to choose the desired plugin.
- The Plugin Window appears along with the layer you selected.
- Here, you could use the different sliders and plenty of other features appearing in the right window.
That was a quick overview of using plugins in Affinity Photo.
What are the best Photoshop/Affinity plugins?
Let’s discuss the plugins which are compatible with both Affinity Photo and Photoshop. They offer a wide variety of visual effects, including oil painting, watercolor, sketching, etc.
Two of the best Photoshop plugins are the following:
- ON1 Professional Plugin Series
- Nik Collection 4 by DxO
1. ON1 Professional Plugin Series.
You can purchase them individually or as a pack. They are handy as stand-alone applications.

Following are the five ON1 plugins to use with Affinity Photo:
- AI-based ON1 plugins
- ON1 Effects 2021
- ON1 Resize 2021
- ON1 Portrait AI 2021
- ON1 HDR 2021
AI-based ON1 plugins
Noise reduction is a complex process that requires a specialist program. ON1 NoNoise AI 2021 employs Artificial Intelligence (AI) to identify noise and details in photos.
However, it’s quick and supports RAW file formats giving you complete control over the procedure and providing a real-time view of the changes. Also, it’s a profitable investment, if you deal with lots of low-quality.
ON1 Effects 2021
Effects 2021 provides a wide range of designs and styles, which you may personalize and apply to a variety of images. Nevertheless, most of its capabilities overlap with Affinity Photo (e.g., color and contrast adjustments, healing brush, burning, and dodging).
Despite the fact that it is quick and enjoyable to use, ON1 Effects 2021 isn’t required when you already use Affinity Photo.
ON1 Resize 2021
The most exciting of ON1’s plugins is undoubtedly ON1 Resize 2021, which takes advantage of industry-leading Genuine Fractals® technology to produce the highest quality photo enlargements and prints possible.
It aids with preparing images for print, an area where attention to detail is essential as well as each error has the potential to be highly visible.
ON1 Portrait AI 2021
ON1 Portrait AI 2021 uses artificial intelligence-based algorithms to automatically recognize faces and repair them. Furthermore, you may select between various kinds of portraits as well as customize the modifications to your taste. If you’re a portrait photographer, this plugin is a great addition.
ON1 HDR 2021
ON1 HDR 2021 is an expert for photographers and especially for HDR photography, an area where Affinity does a good job by itself. If you take pictures with high dynamic range on a regular basis, it may be worth investing in the most up-to-date technology. So it’s up to the user to use the plugin if it’s essential.
2. Nik Collection 4 by DxO
The Nik Collection is a set of eight plugins for photographers that implement everything from sharpening and noise reduction to altering viewpoints and manipulating different sorts of images. The plugins are Viveza, Analog Efex Pro, Color Efex Pro, DFine, HDR Efex, Perspective Efex, Sharpener, and Silver Efex.
Generally, Nik Collection contains local adjustments, selection tools, RAW support, and non-destructive editing. They summarize 250 presets and allow you to modify them and develop your own. Nik Collection is available for purchase. It’s compatible with Windows and Mac.
Photo retouches in Affinity Photo
However, Nik Dfine is intended for noise reduction, and Nik Sharpener improves details. They perform very well together, much like color photography apps. Meanwhile, Perspective Efex is a fantastic tool for correcting optical aberrations and volume deformation.
Furthermore, it’s great for straightening lines in landscape images and eliminating volume anomalies in photos of large groups of people.
Expert Rating
Summary
For some plugins are essential to their workflow. Quite difficult to install & requires a cautious approach – knowing the risk that some plugins might simply not work. Furthermore, even if they work, sometimes they tend to misbehave. So it’s up to you to judge if the risk factor in relation to function is worth your time.
Conclusion
In this blog post we have covered how to use plugins, ways to find the plugins folder, and enabling unknown plugins. We have also looked into some other plugin options that are available on the market.
Thanks for reading & feel free to check out more of our articles!


