How To Draw A Cycling Glove | Step-by-Step Guide
A cycling glove is a specialized piece of clothing designed to be worn while riding a bicycle. It provides padding and protection for the hands, as well as improved grip on the handlebars.
Cycling gloves were first invented around the late 19th to early 20th century, most likely in response to the increasing popularity of cycling as a recreational and competitive sport.
Today, cycling gloves are commonly used by cyclists of all levels to enhance their comfort and performance during rides.
In this tutorial, you will learn how to draw you very own cycling glove with only 6 easy steps.
| Steps | Complexity Level |
| Thumb & Wrist Belt | 4 |
| The Fist | 3 |
| The Fingers | 4 |
| The Detailing | 3 |
What You Will Need
- Pencils (2b, 3b, or 5b)
- Eraser
- Drawing Paper
- Ruler (optional)
- Color pencils or markers
- 20-25 minutes
How to Draw a Cycling Glove
Drawing a cycling glove may seem difficult at first sight, but it’s entirely achievable with some practice, patience and skill.
Before you begin today’s tutorial, make sure you have all of your drawing tools handy, steal a peek at the outline below to get a sense of what you will be doing during each step, and without any further ado, jump right in!
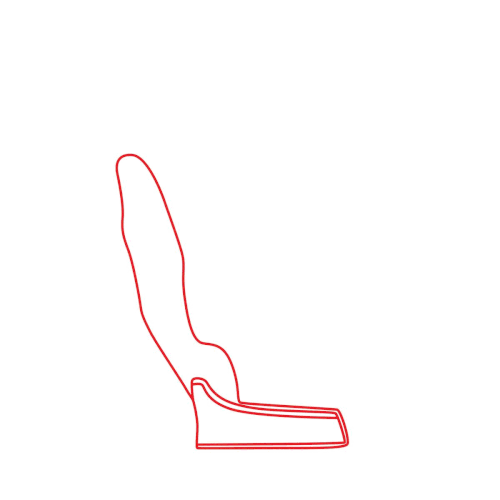
Step 1: Draw the Thumb and Wrist Belt
Cycling gloves are designed with wrist belts to provide support and stability, keeping the gloves securely in place and ensuring a proper fit during cycling.
In this step, you will need to draw both the thumb and the wrist belt. After you’re finished, you will have a nice outline for your entire glove and it will be easier to add in the rest of the steps later!
To start, flip your page onto a portrait orientation. Draw a medium-sized horizontal line on the lower half of your page. Then, create the outline of the wrist belt by drawing some curvy lines – which first run vertically upward on the left and then curve down to the right until it’s slightly horizontal again.
When the length of the line is parallel to that of your first one, curve it into a vertical line running downward and connect it to your bottom horizontal line.
Next, add some more lines inside the wrist outline. Start by drawing another curvy line beneath the one you drew on top of your base, making sure it’s inside your outline and following the curves of the line above it.
Lastly, draw a horizontal line on top of the upper part of your wrist belt, starting from the point where the line curves horizontally, and wrap it right around the bottom of your wrist belt.
For the thumb, draw some curvy lines that are generously spaced apart and resemble the shape of a thumb on the left of your wrist belt. Check out the image below to make sure your drawing is accurate.
- Flip your drawing paper onto a portrait orientation
- Draw the wrist belt at the bottom of your page first
- Add some lines to the inside of your wrist belt
- Draw the thumb using wavy vertical and diagonal lines

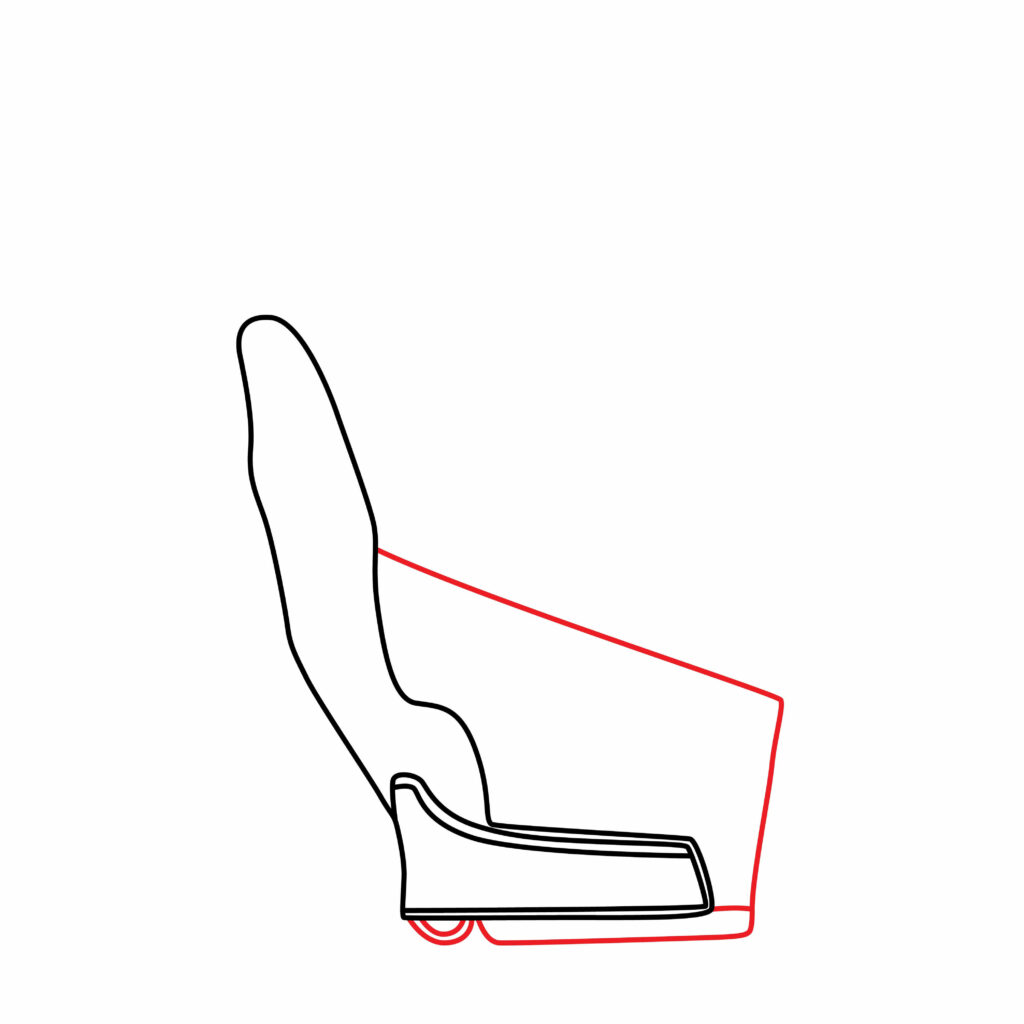
Step 2: Draw the fist
Draw a smooth diagonal line using a ruler from the inside bump of your thumb down to the right side of your wrist belt. Make sure your line ends a good distance higher and slightly past the end of your wrist belt.
Using your ruler again, abruptly curve the end of the diagonal line into another diagonal line, however this one needs to run downward instead of sideways.
When your line is somewhat below your wrist belt, curve the line horizontally and connect it to the left side of the bottom wrist belt. Then add some bumps in the left corner that look like “C” shapes laying on their sides.
Don’t forget to draw a small horizontal line from the bottom right side of your wrist belt and connect it to the downward running diagonal line.
Sounds kind of complex, but when you take a look at the drawing below, the pieces will definitely all fall into place and be so much easier to draw!
- Draw a smooth diagonal line starting from the inside bump of the thumb
- End the line a good distance higher and further right from the wrist belt
- Curve the line into a downward diagonal line until it’s below the wrist belt
- Add some “C” shapes laying on their sides in the left corner
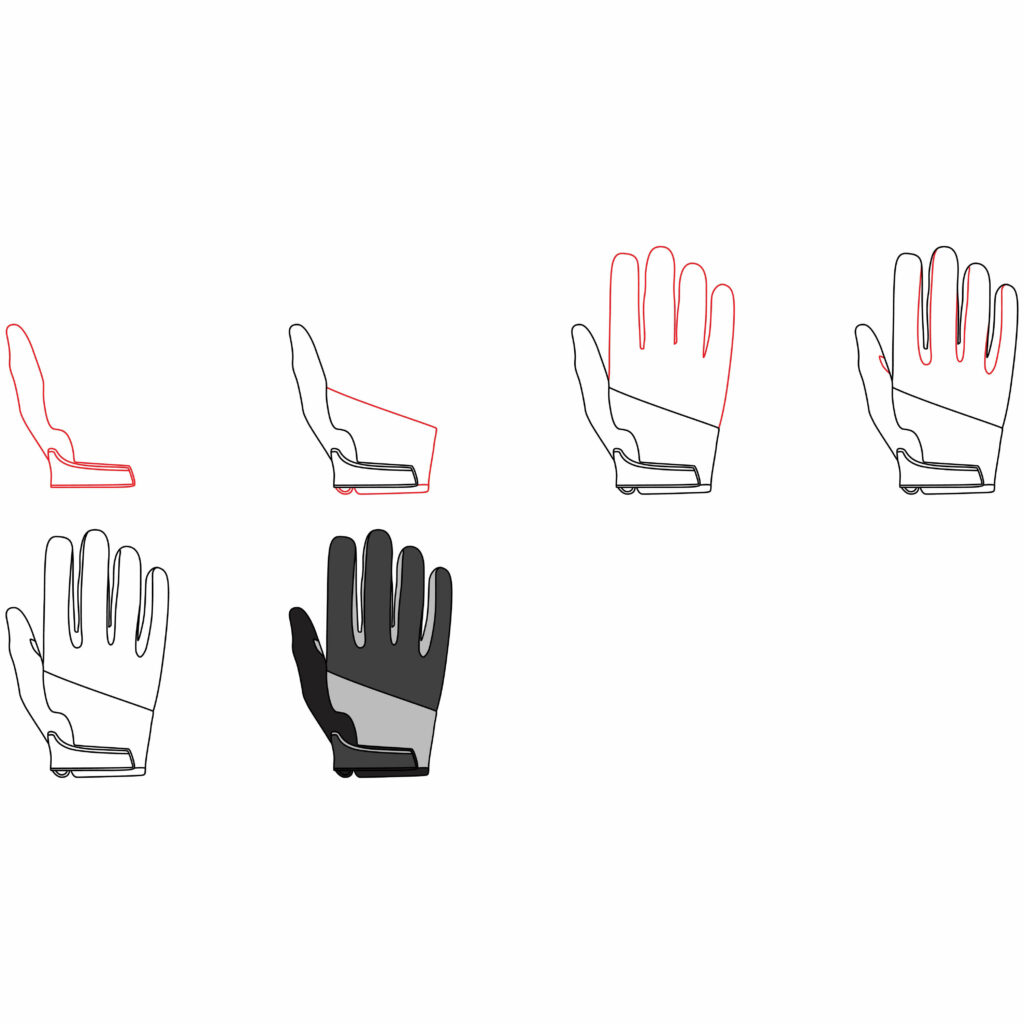
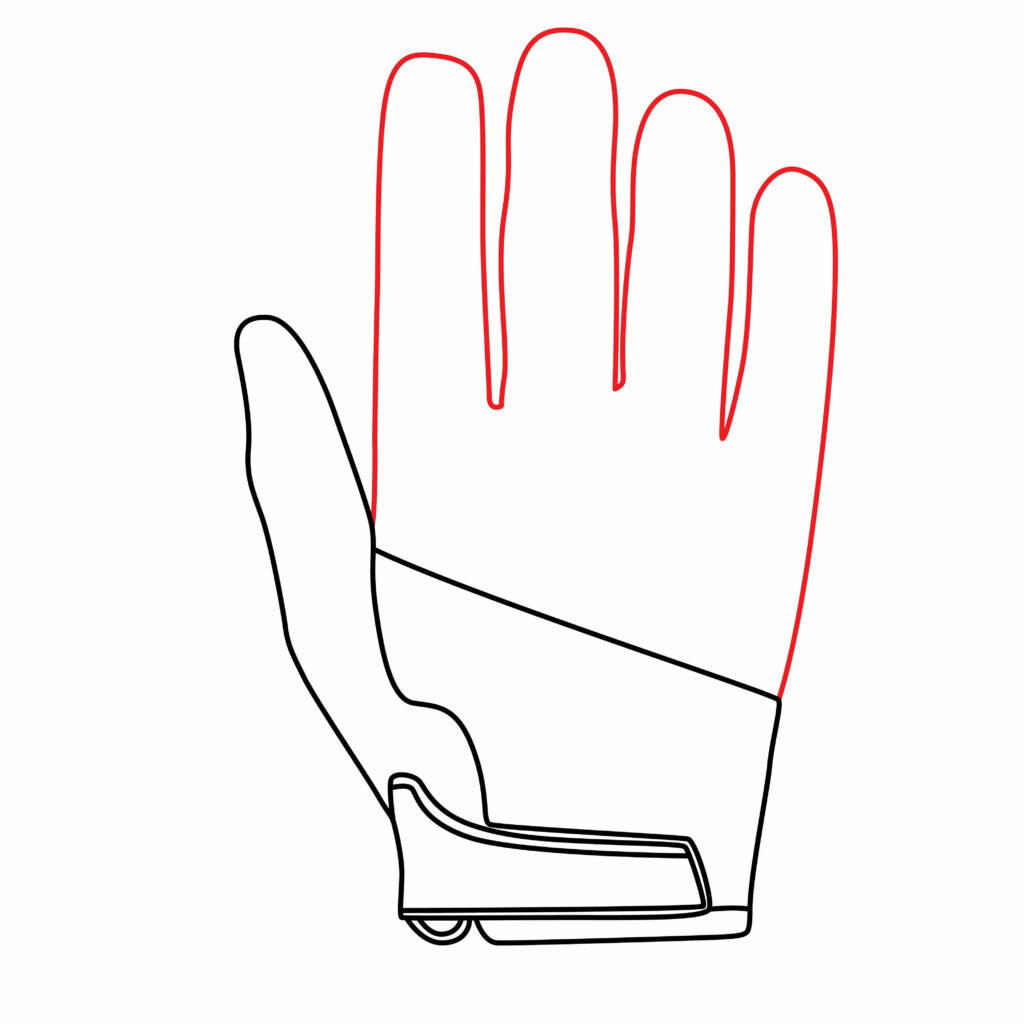
Step 3: Draw the Fingers
Now, we’re going to add the rest of the fingers to what you have already drawn. Your drawing hand needs to be fluid for this part, because it involves a lot of curves.
Starting from the left, draw a vertical line running upward, curve it soothly until it folds into another vertical line that runs downward.
Do the same for the rest of the fingers, while remaining mindful that some parts abruptly curve upward on different points of the fingers.
Remember to keep the lines of your fingers slightly wavy to give it an extra realistic look, and to make certain fingers longer than others.
If for whatever reason you may have difficulty completing this step, follow the guide we provide below for some help.
- Keep your drawing hand as fluid as possible while drawing the curves
- Start by drawing a long vertical line on the upper left corner of the wrist belt
- Draw the fingers using a combination of straight and wavy vertical lines
- Connect the line on the right (pinky) side with the wrist belt
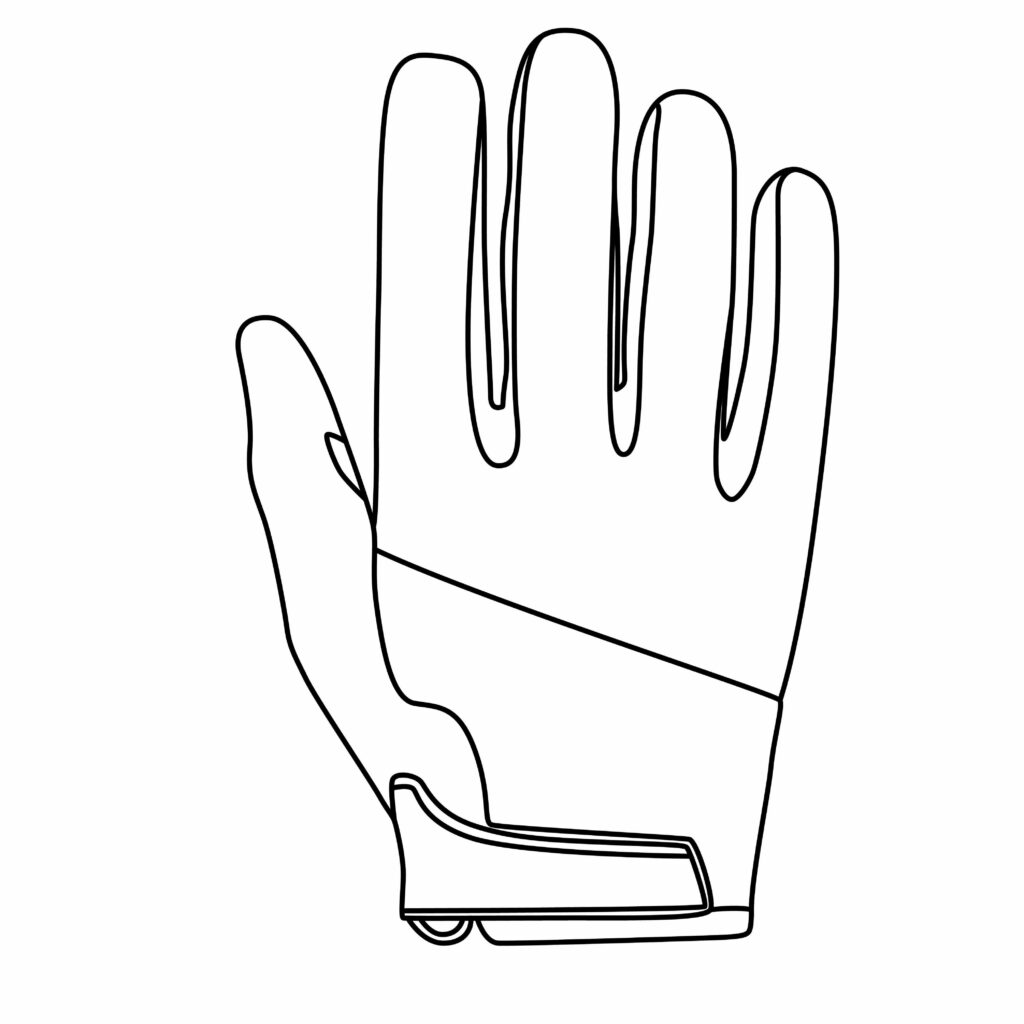
Step 4: Add Some Details
Some added detailing is essential for making a drawing look authentic. With this step, you will need to draw some more wavy and curvy lines, though it’ll be a little less than what you did for the fingers.
Start on the thumb to make it easier for yourself. Draw a wavy right triangle on the bottom right inside of your thumb.
Next draw a line that curves along the right side of your index finger until it connects to the left side of your middle finger.
Carry on by starting a line from the right side of your middle finger and curve it under and around until it connects to the left top side of the “ring” finger.
Lastly, do the same thing by drawing a line starting from the bottom right side of your “ring finger“, curve it around until it connects to the top of your “pinky” finger and voila!
Some seemingly simple added details that give your drawing a more refined look.
- Start by drawing a wavy right triangle on the bottom right inside of the thumb
- Draw some more wavy lines that connect on the sides of each finger

Congratulations! Your Cycling Glove Drawing is Complete
Take a moment to give your drawing hand a well-deserved break and feel proud of what you’ve created. Acknowledge the effort you put into taking a blank page and turning it into a cool new drawing. But, don’t just stop here, though. There are more steps below that’ll enable you to have some real fun with your work.
Taking your Drawing to the Next Level
There are ways to improve a black and white drawing and elevate it entirely. Adding color takes a black and white sketch and almost immediately transforms it into something eye-catching!
On the other hand, adding a background enhances a drawing by broadening the scope of your art. Not only does it inspire you, but it will inspire those who look at your drawings to imagine different things and attach storylines to the objects you draw.
step 5: adding a background
There are quite a few background ideas to play around with for a cycling glove. A big cycling tournament coming up is the 2024 Summer Olympics, so you may be inspired by adding some Olympic Rings in the background of your drawing if you feel like making it sport-centered.
Additionally, you can add a bicycle, a field or road, other cycling gear such as a cycling helmet, a cycling jersey, or even some shorts. The main thing to remember is that the possibilities are endless, and you are free to make full use of your artistic license and think outside the box with this step.
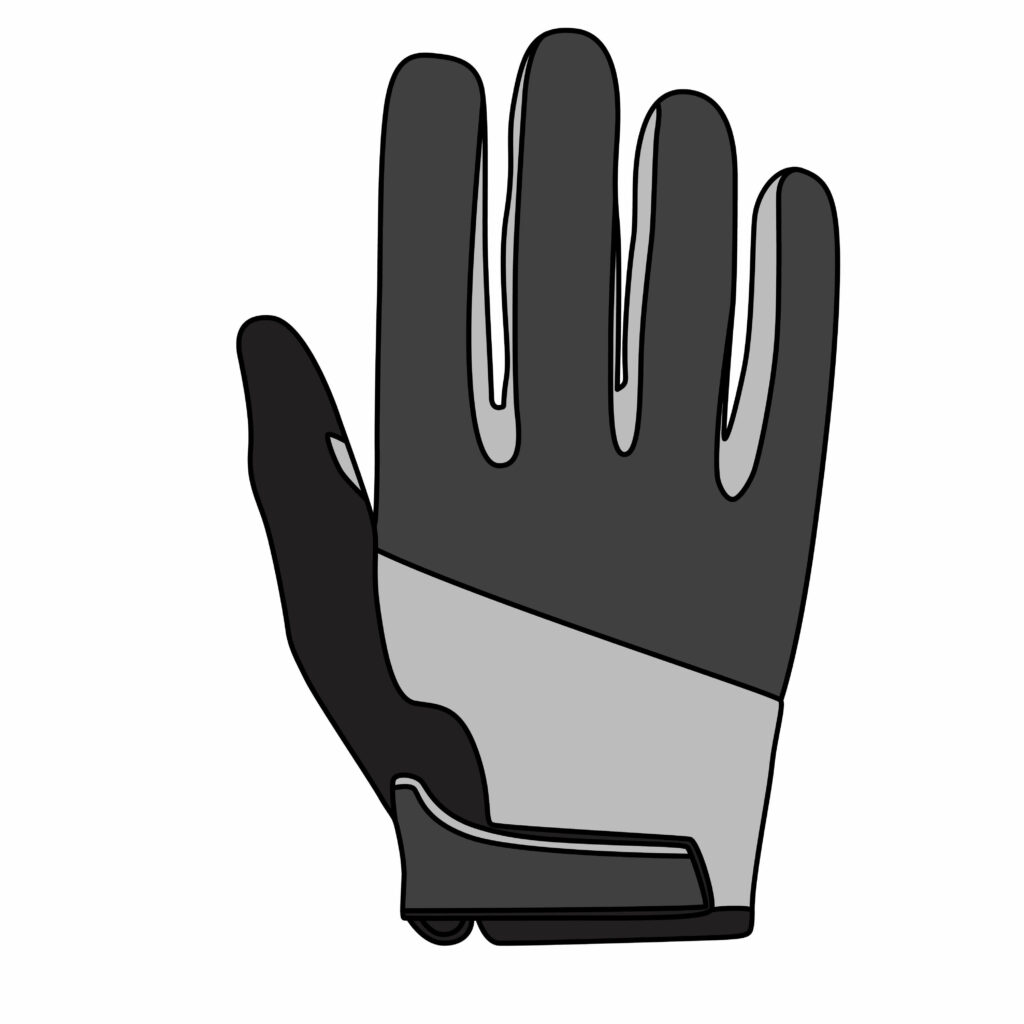
Step 6: adding Color
Most artists who are in the habit of creating lively work consider this step to be the most fun part.
This is also another opportunity to let your creativity and vivid imagination soar, as color does not have to be linear or even realistic. You can go all out and pick some of your favorite colors for your cycling glove. Really, it’s all up to you!
We’ve chosen a dark theme for our cycling glove because it makes it look just a touch more realistic, and that’s the feel we were going for.
If you like the look of ours though, feel free to use similar colors for your drawing. However, make sure you use different colors for different parts of your drawing as this will highlight each feature.
Like black for the thumb and wrist belt, a light gray for the bottom half of the fist, a darker gray for the four remaining fingers, and then a light gray for the extra detailing.
Bonus Tips
Add shadows to your drawing by lightly shading the outer sides of each finger with a black pencil to give your drawing a more three-dimensional look.
Draw the left hand cycling glove as well to round off the drawing beautifully. Just remember to make the piece as symmetrical as possible.
Check out some of our other tutorials on gloves for some added inspiration. We have quite a diverse range to choose from, like goalkeeper, archery, fencing and ice hockey glove tutorials.
Add some personalized touches to your cycling glove like your name or a cool nickname to let people know it’s yours.
Reach out to us by commenting on any video on our YouTube page with some details about your experience. We’d love to hear from you! Just be sure to add the name of the drawing you did to your comment, e.g, “I did the cycling glove tutorial and…”.
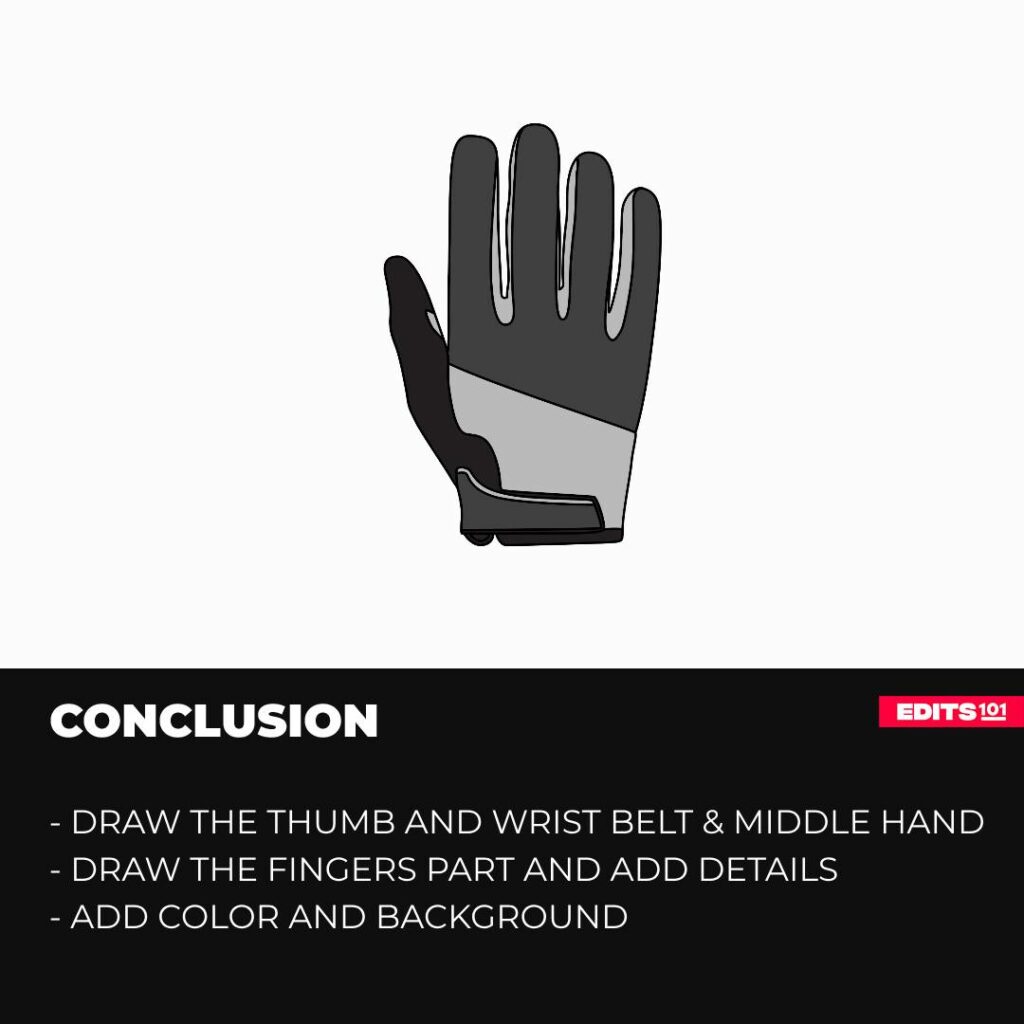
Conclusion
Your very own cycling glove drawing is now complete! Hopefully, you have learnt quite a bit by completing this tutorial, like the importance of hand fluidity when drawing curves and how to add detailing for some extra flavor.
If, perhaps, you were not previously exposed to cycling, you’ve hopefully also learnt some cool facts on how gloves assist cyclers.
We’re super proud of the fact that you managed to complete all of the steps, and want to acknowledge your hard work! Well done! Continue to challenge yourself and do more. From Edits101 to you, see you next time in another tutorial!
Thanks for reading & feel free to check out more of our articles!
Author Rating
Overall Rating
Summary
This tutorial will lead you through sketching a cycling glove and subsequently elevating the design to attain a more realistic and intricate appearance.