
In this article, we will explore the different ways to set up a project in DaVinci Resolve 18.
You will learn how to adjust the project settings, create a timeline, set up the timeline proxy resolution, change the aspect ratio, import media, create bins to sort your clips, and finally how add clips to your timeline.
Once you get to know these primary steps, you will start setting up your projects in no time. This will also allow you to start editing without having to go back and arrange your media, adjust the timeline or change the aspect ratio, amongst others.
How to Adjust the Project Settings
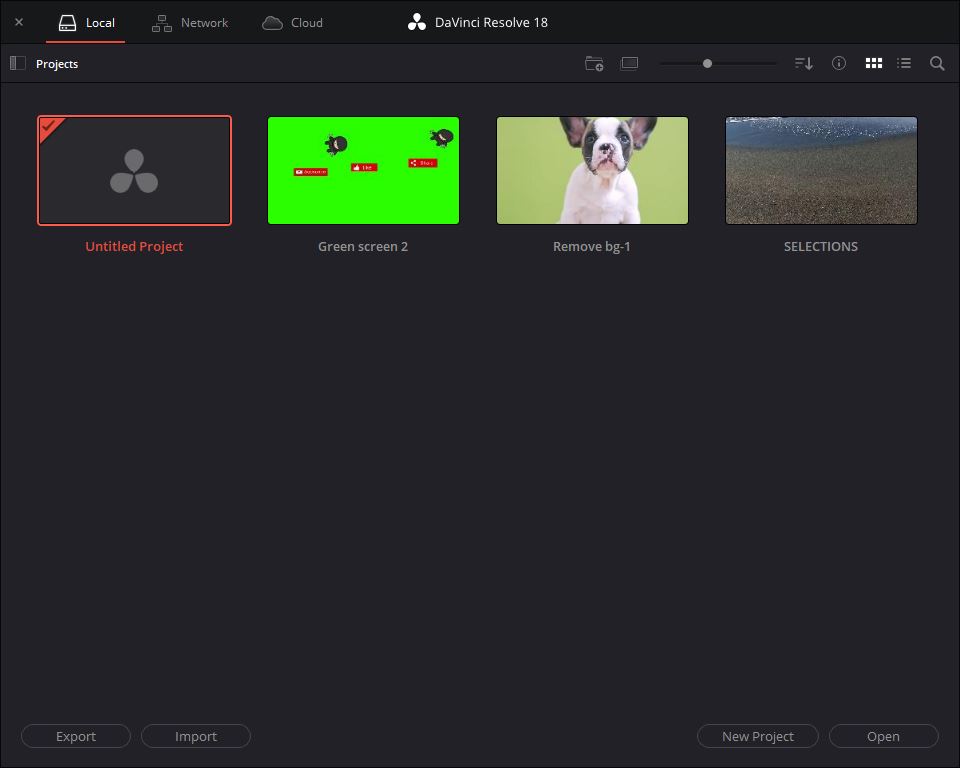
If you are wondering which is the first thing you have to do when starting a new project, the answer is to go to the Project Manager. The Project Manager is the first window that will appear on your screen once you are logged in to DaVinci Resolve 18.
This is the place where you can create different projects, give them a name, organise them, edit them, export them and also delete them! The Project Manager can be accessed anytime by simply clicking on the Home icon at the bottom right-hand side of your screen.

In this section, you learn the following:
- How to Create a New Project
- Adjust the Project Settings
- Add Presets
Step 01: How to create a new Project
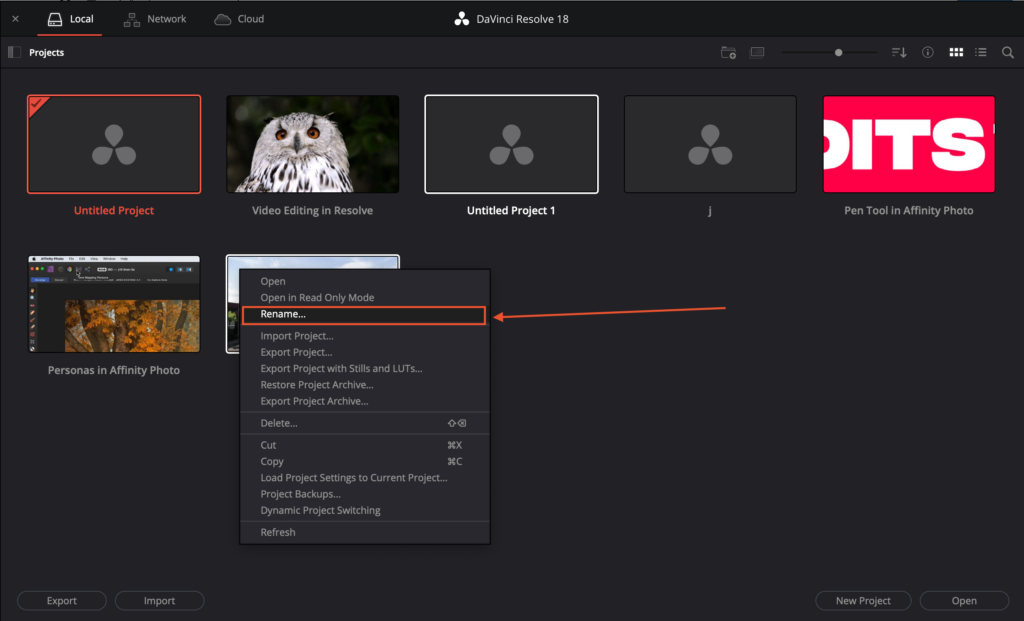
Once you open the DaVinci Resolve app, the Project Manager will appear as displayed below.
To create a new project,
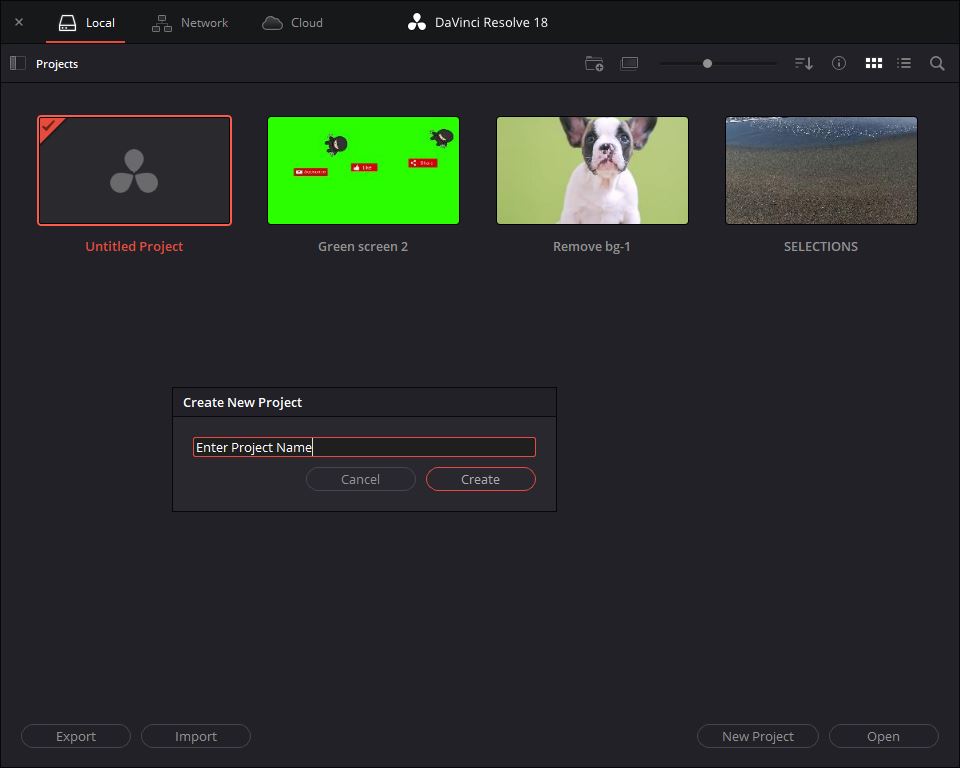
- Click on ‘New Project’.
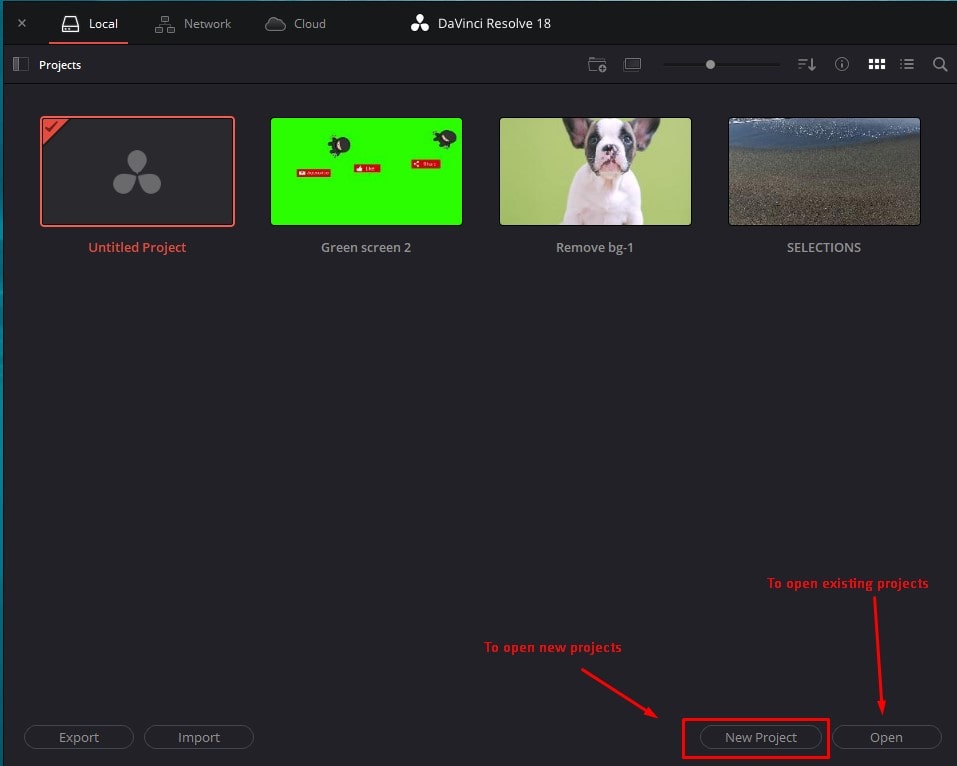
- Next, enter the name and click ‘Create’ to save and open a new project.
If you want to continue working on an existing project, double-click on the Project you wish to open. another method would be to select the Project and click on ‘Open’.
To rename a project,
- Right-click on a specific project and click on ‘Rename…’
Step 02: How to adjust the Project Settings
All settings and options imaginable can be found in the Project settings. You can freely adjust the timeline resolution, aspect ratio, timeline frame rate, playback frame rate, Video monitoring settings, Image Scaling and various other project settings.
To adjust the project settings,
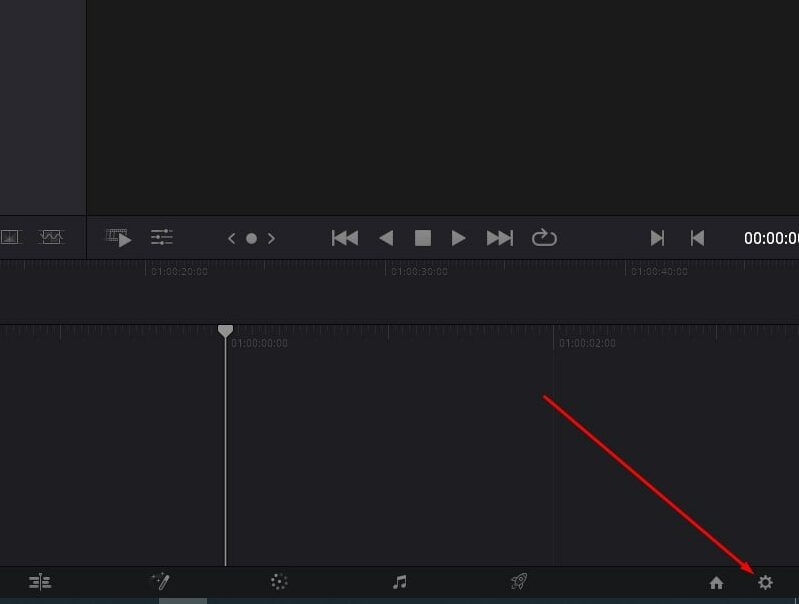
- Click on the Cogwheel/Gear icon at the bottom right hand side of the screen to open the Project settings.
- The Project Settings dialog will be displayed. Simply adjust any of the settings available as necessary and click on ‘Save’ when ready.
- In case you need to keep the Project Settings open after you make any changes, simply hold ‘Alt’/’Option’ and click on ‘Save’.
- The Master Settings are displayed in the image below as an example.
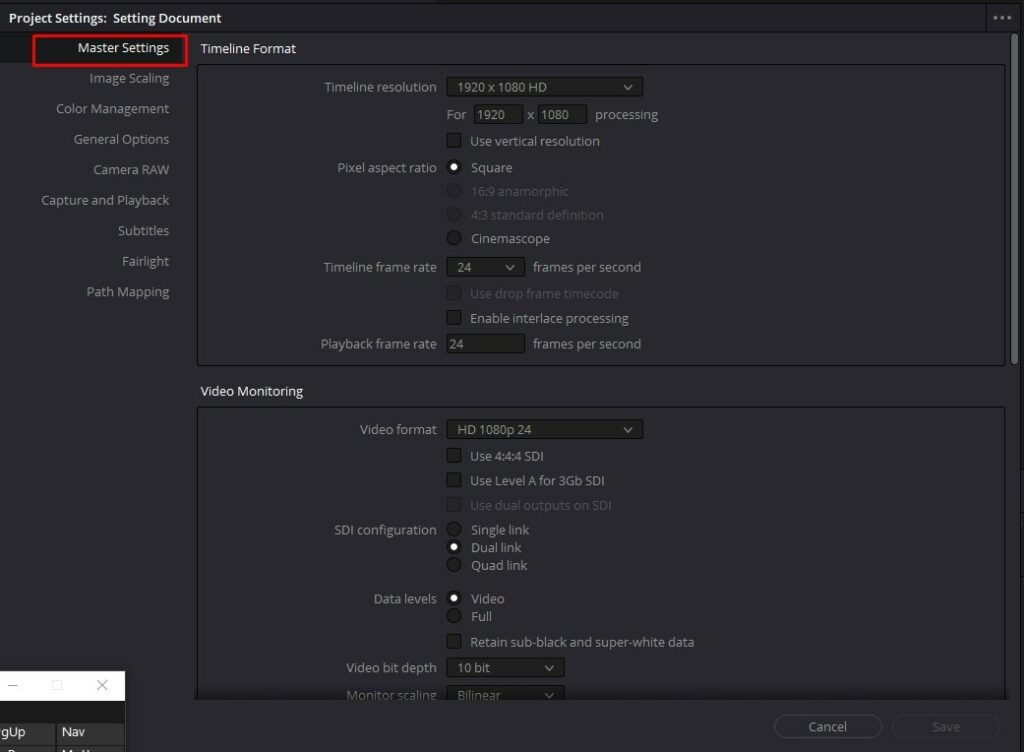
As you can see in the above image, the Project settings are divided into different panels according to their functionality. The ‘Master’ and ‘Color Management’ settings may be the most common settings one may need to adjust when working on different projects in DaVinci Resolve.
Nevertheless, feel free to change any settings as required and we recommend creating presets in order to avoid applying the same settings each time you start a new project.
Step 03: Adding Presets
If you want to apply any settings to re-use them later, you can save them as Presets. You can have multiple presets saved and they can be applied according to the type of video you are working on.
How to add a new Preset
- Click on the Cogwheel/Gear icon at the bottom-right corner of the page to open the Project Settings dialogue.
- Change the settings from the different panels as necessary.
- Click on ‘Apply’ in each panel once you finish adjusting the settings.
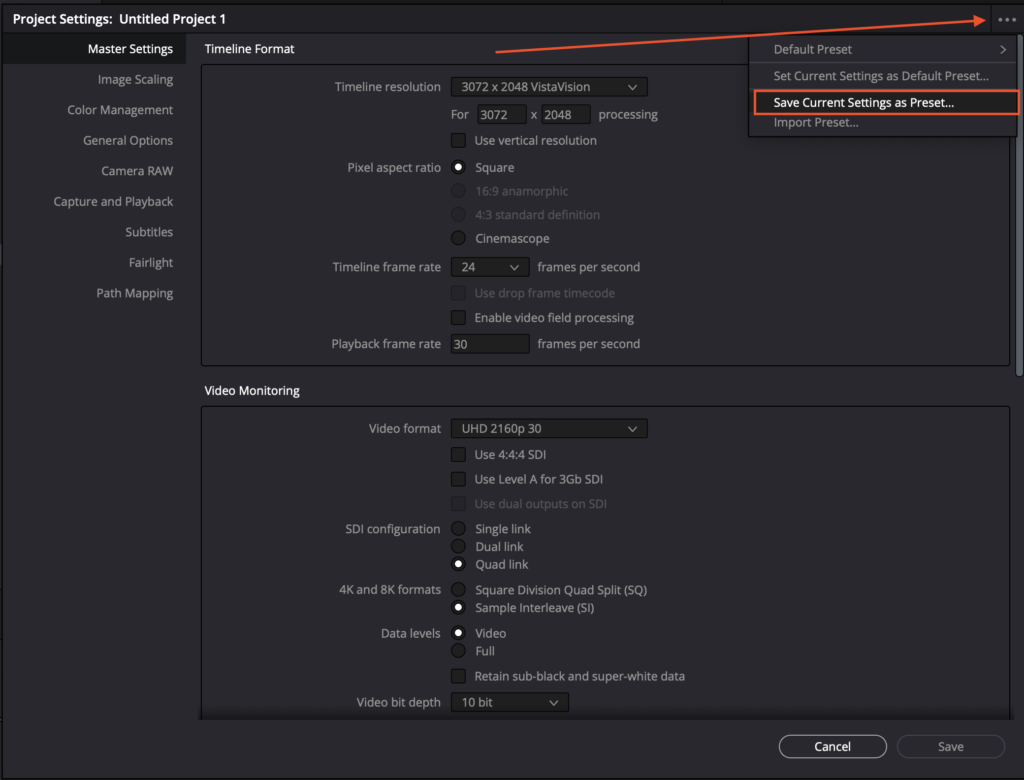
- Click on the three dots at the top-right corner of the Project Settings Dialog (…).
- Then, click on ‘Save Current Settings as Preset…’ to save a new preset.
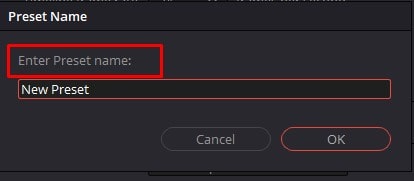
- Finally, enter the Preset name and click ‘OK’ to save your preset settings.
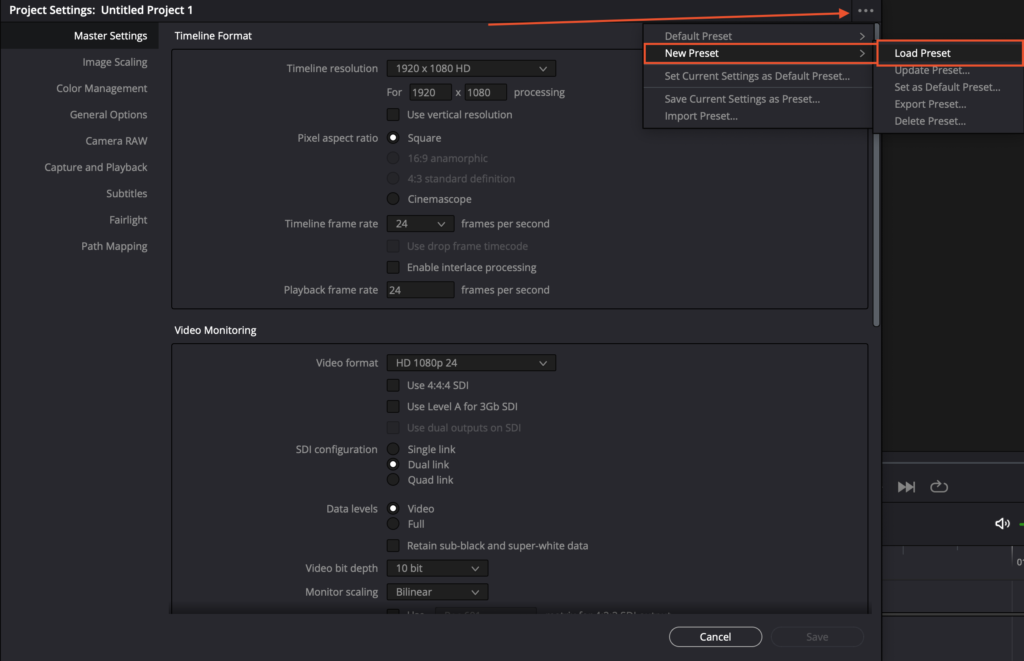
To load a saved Preset,
- Click on the Cogwheel/Gear icon at the bottom-right corner of the page to open the Project Settings dialog.
- Click on the three dots at the top-right corner of the Project Settings Dialog (…).
- Click on the preferred Preset.
- Select ‘Load Preset’.
- The settings will automatically be adjusted according to the saved settings in the Preset.
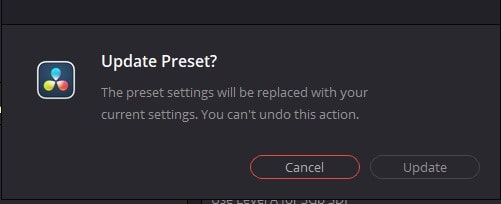
If you click on ‘Set Current Setting as Default Preset’, the below dialog appears. This should only be done when you wish to change the default settings to a preset with your most commonly used settings.
You may find this useful to automatically open a project with these particular settings saved. Finally, click on ‘Update’ to update the default settings.
Creating a New Timeline
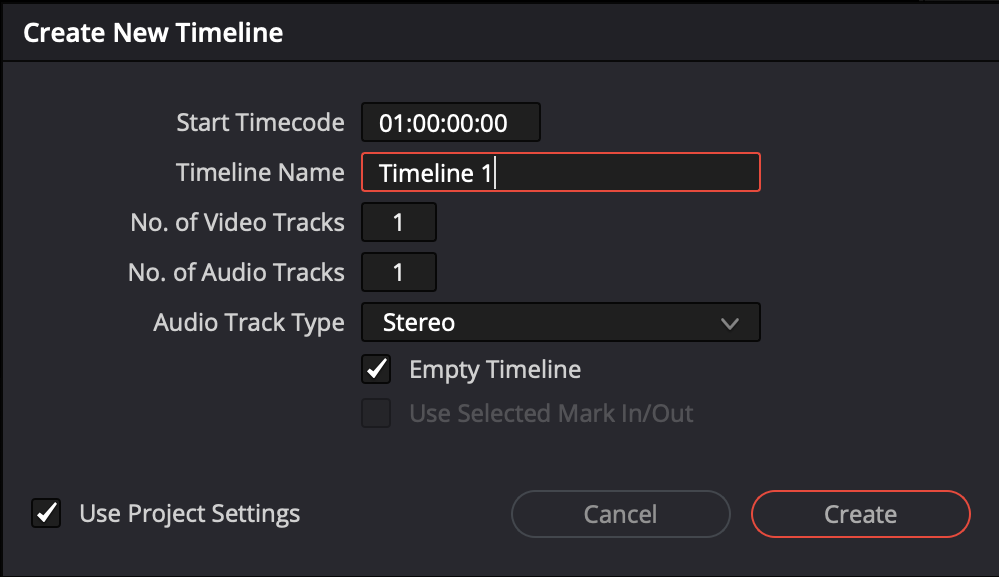
You may wish to create a new timeline based on your preferences. You are in full control over the Start Timecode, the Timeline’s name, the number of tracks, the type of Audio Track, the Timeline Resolution, the Video Format and other settings.
To do so,
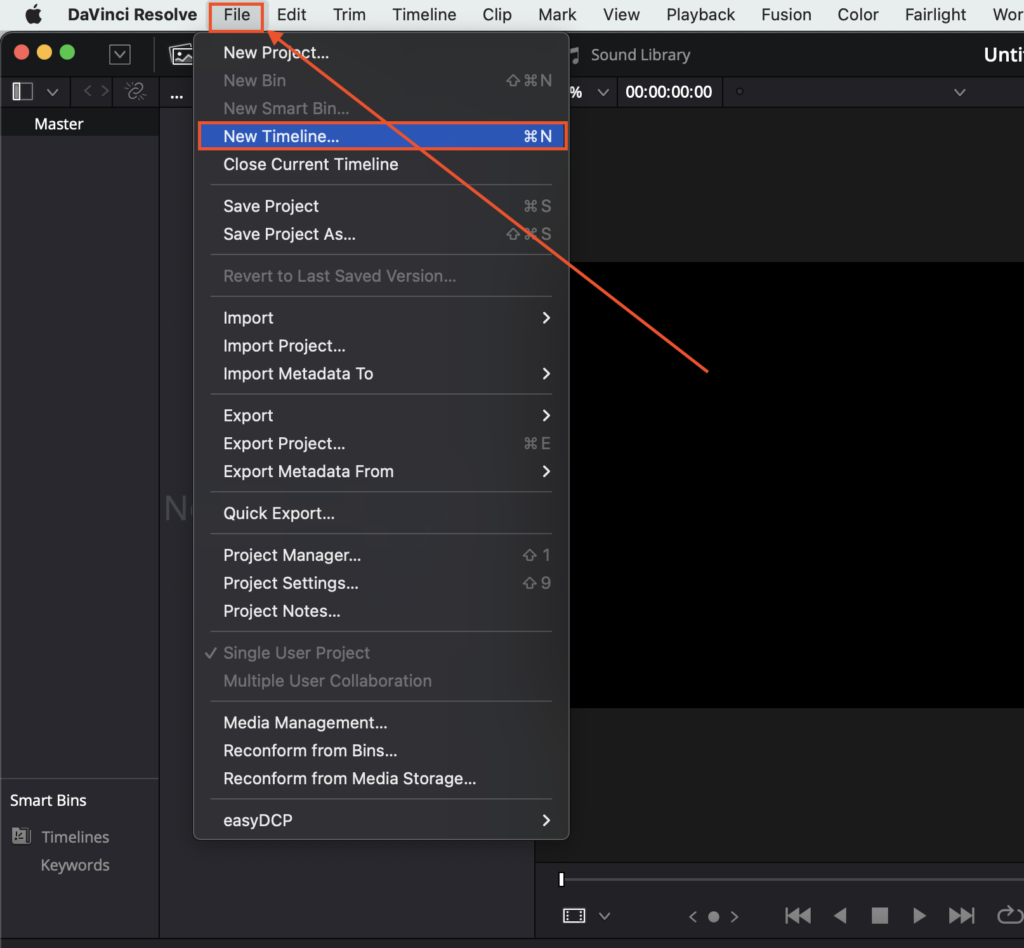
- Go to the File Menu and click on ‘New Timeline…’
- Alternatively, right-click on the Media Pool. Click on ‘Timelines’ and then select ‘Create New Timeline’.
- The keyboard shortcut would be ‘Ctrl/Cmd+N’.
- As you can see below, you can start the Timecode from ‘0’ hours or any other time you prefer.
- You can also give the Timeline a new name as well as choose the number of Video and Audio tracks. The number of tracks can be changed later on when you start adding clips to your timeline.
- The Audio Track Type should ideally be ‘Stereo’ in order to hear from both sides of your headphones.
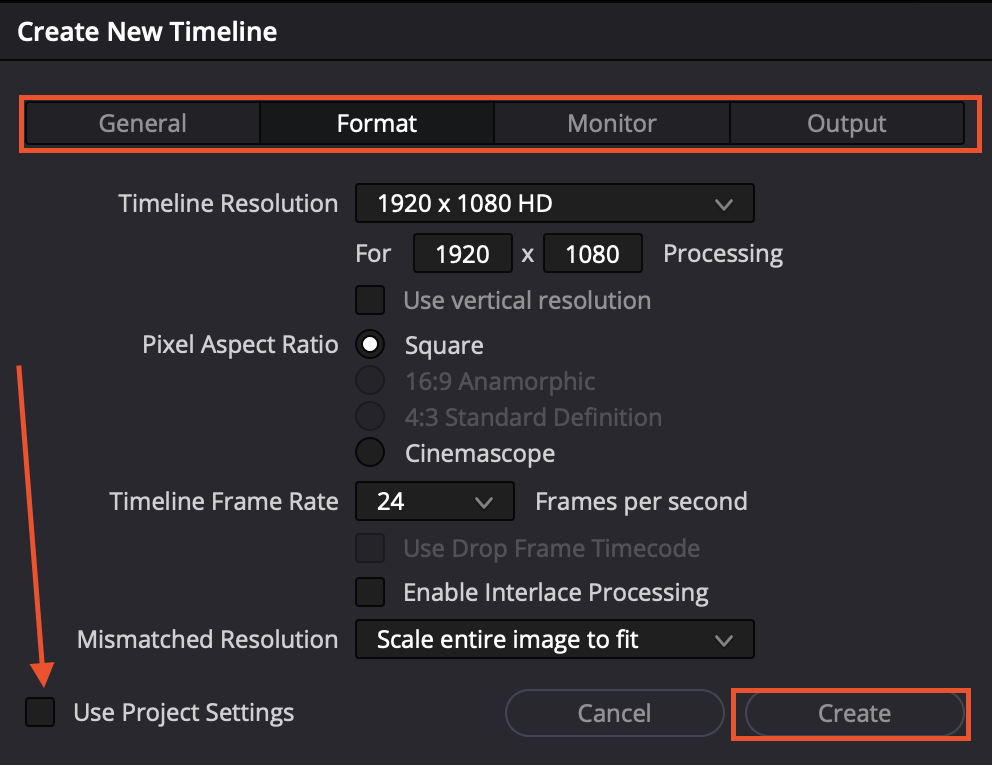
- If you untick ‘Use Project Settings’, you can access more settings.
- These different tabs represent different settings based on their functionalities.
- For example in the ‘Format’ tab, you can change the ‘Pixel Aspect Ratio’, the ‘Timeline Frame Rate’ and the ‘Timeline Resolution’.
- In the ‘Monitor’ tab, the ‘Video Format’, the ‘Bit Depth’, the ‘Monitoring Scaling’ and other settings can be adjusted according to your preferences.
- The ‘Output’ tab allows you to set the ‘Output Resolution’ and other settings associated with the final project.
- Once you are satisfied with the changes, click on ‘Create’.
How to Set Timeline Proxy Resolution?
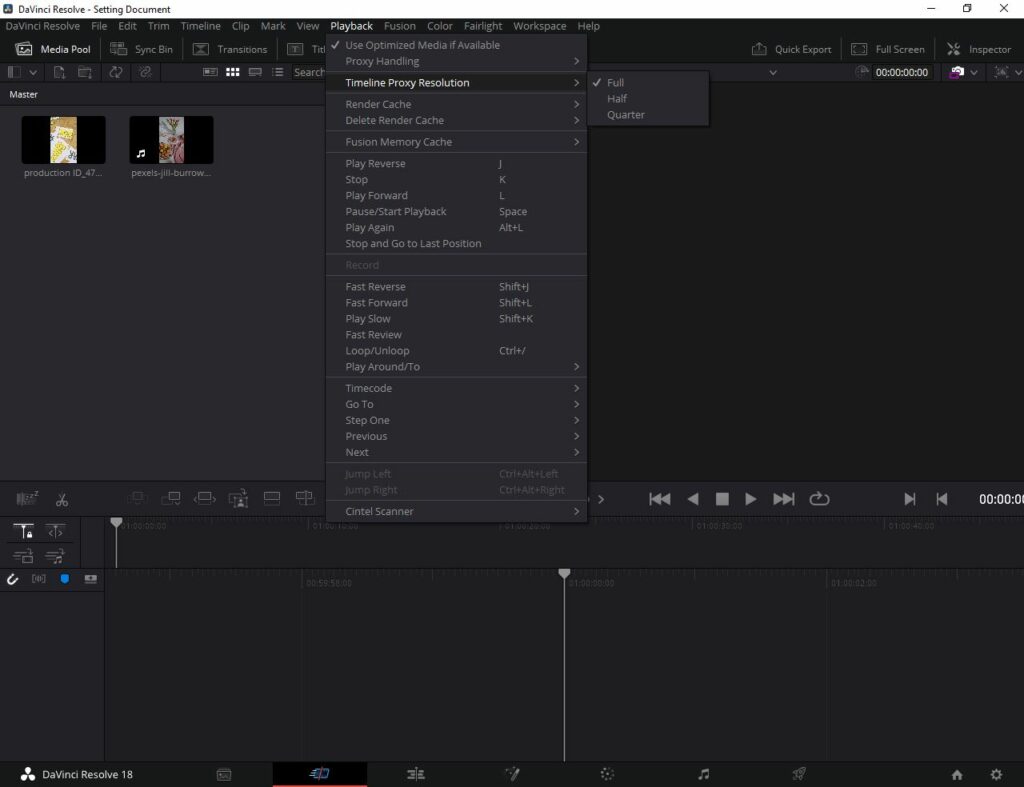
Timeline Proxies allow you to decrease the resolution of high-definition clips in real time. This makes the clip much smaller and therefore smoother to preview and work with. This is especially recommended when you have a large number of high-resolution clips to reduce the load on your computer or laptop. Your workflow would definitely improve as the playback becomes more efficient and easy to work with.
To set the Timeline Proxy Resolution,
- Click on the ‘Playback menu’.
- Choose Timeline Proxy Resolution and select either ‘Half’ or ‘Quarter’ based on the resolution quality you require.
How to Change the Aspect Ratio in Davinci Resolve 18
Adjusting the aspect ratio helps to set the suitable height, width, and scale to fit the clip size as per your project’s requirements. It’s ideal for experienced editors and those with a specific vision and goal for their video projects.
There are four main ways to change the aspect ratio in Davinci Resolve 18:
- Full Manual Option
- Fully Automatic Method
- Image scaling
- Set Custom Aspect Ratio
Let’s go through all these steps.
the Full Manual Option
For those looking for more control over their aspect ratio, the full manual option in DaVinci Resolve 18 is a perfect choice. This method allows you to manually adjust the aspect ratio using the software’s advanced tools and settings.
To do this,
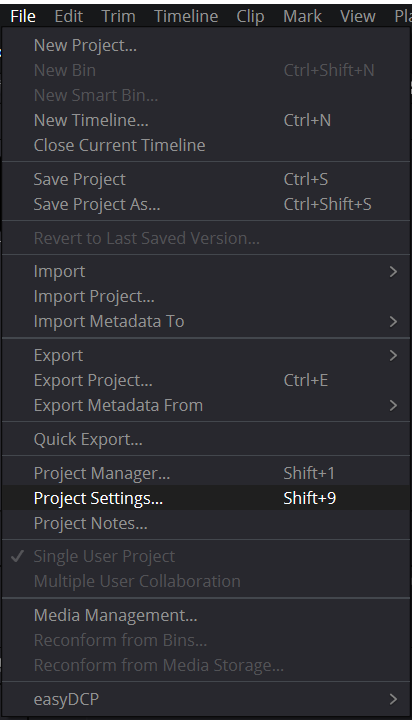
- Go to the File menu in the top toolbar.
- Click on Project settings.
- Alternatively, use the shortcut Shift+9.
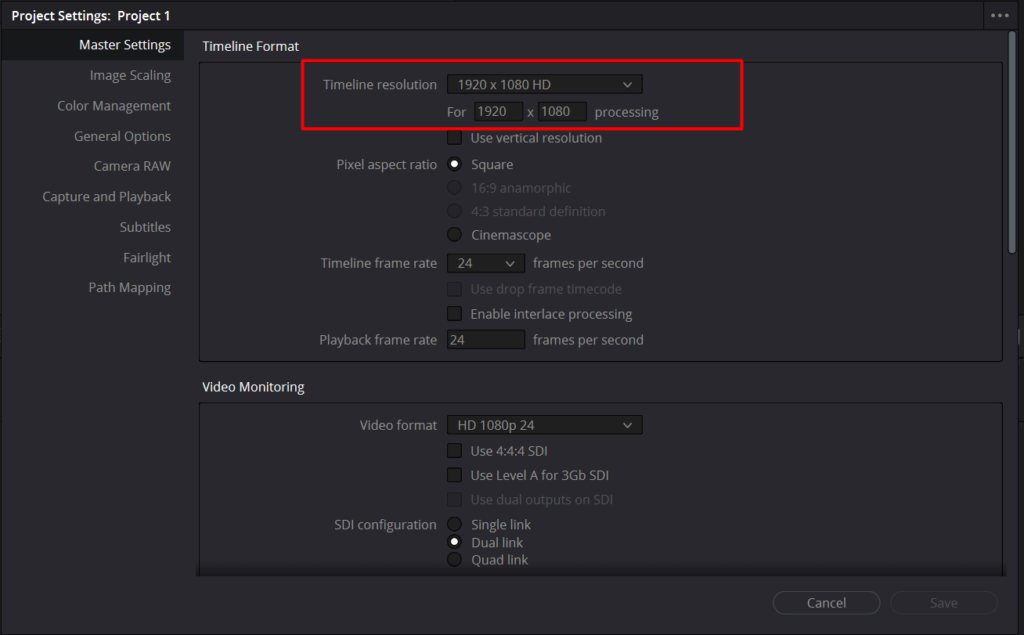
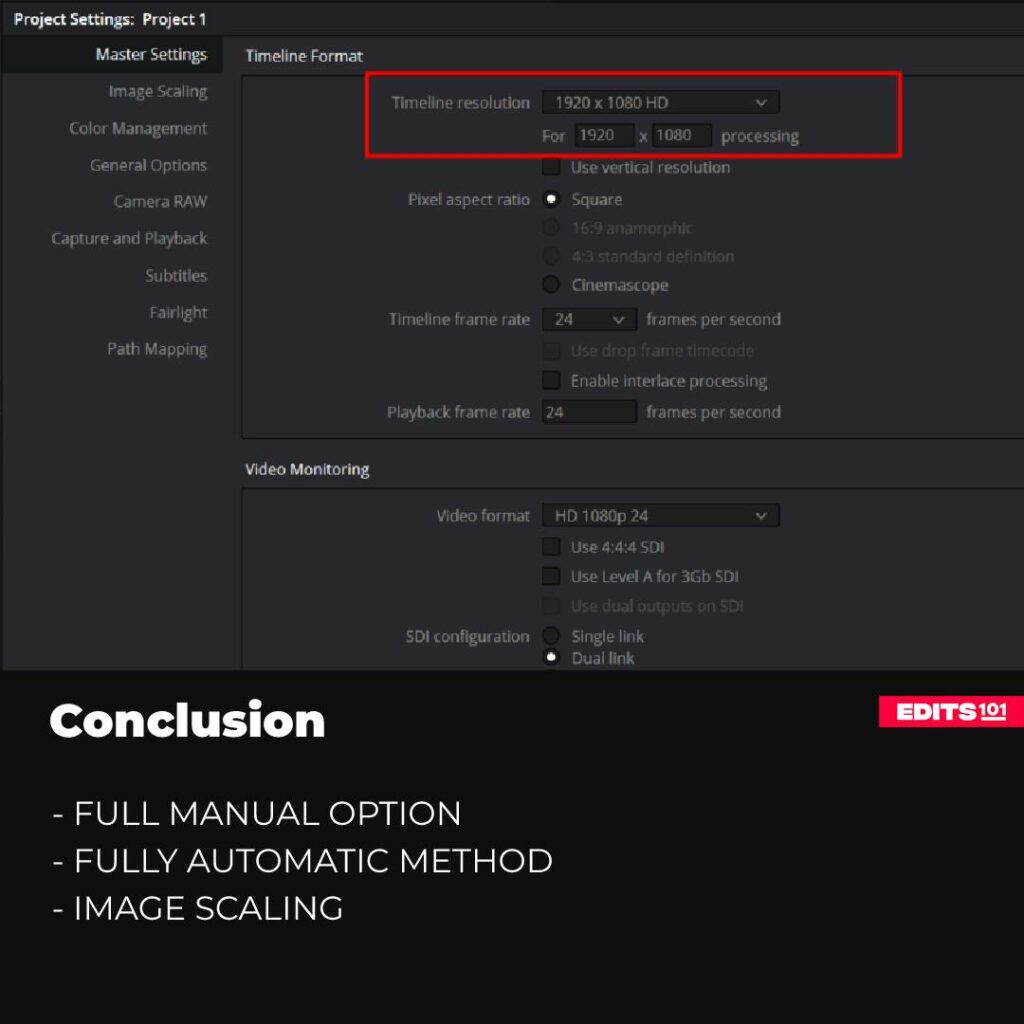
As soon as you choose Project Settings, a new dialogue will appear. Next, go to the Master settings from the left side of the dialogue.
To change the aspect ratio,
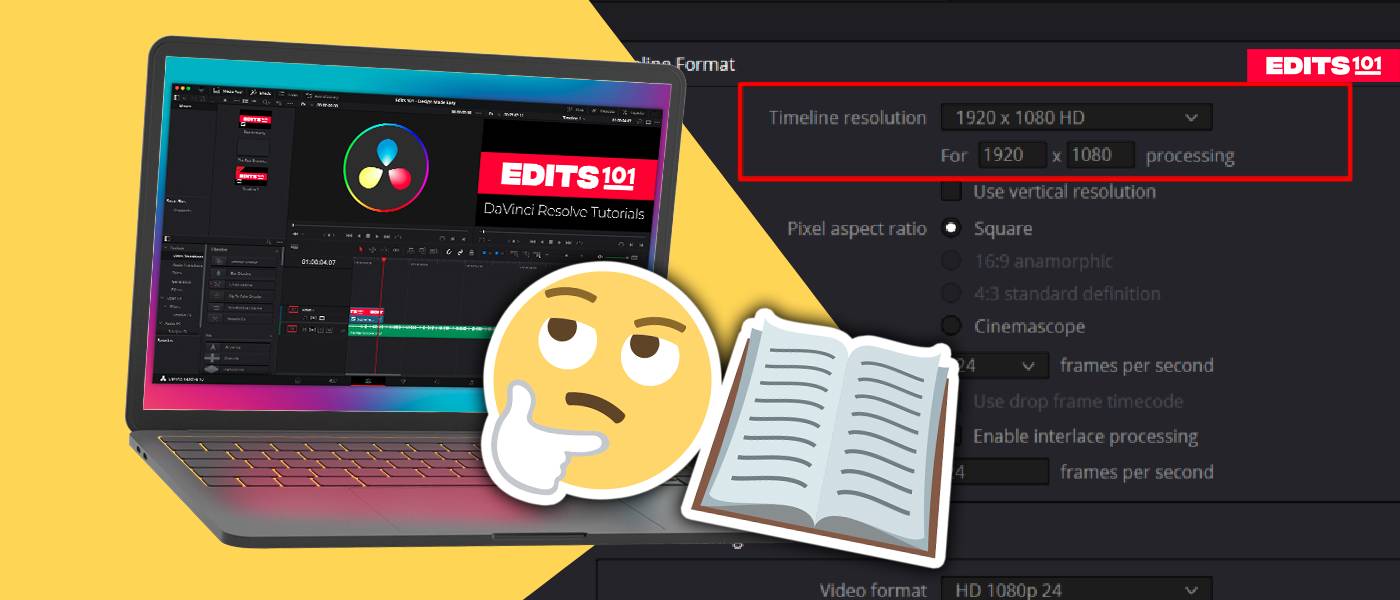
- Go to the Timeline resolution option.
- Change the aspect ratio by typing the desired height and length value.
What are the Pros & Cons of the Full manual option?
Perks of using the full manual option:
- Results in a smaller file size
- The aspect ratio will be precise and according to your preferences
Cons of using the full manual option:
- It is important to do some calculations before deciding the aspect ratio to ensure that the final result would be satisfactory
- Time-consuming method
- A mismatch of image scaling can result in a poor-quality video
- May not be scalable to be viewed on particular devices such as mobile phones
How to use the Fully Automatic Method
The fully automatic method in DaVinci Resolve 18 is a quick and easy way to adjust the aspect ratio of your footage. This option utilizes the software’s built-in algorithms to automatically detect and adjust the aspect ratio, making it a great choice for beginners or those short on time.
With this method, you can achieve professional results with minimal effort. The fully automatic method saves you from extra calculations. You don’t have to be a pro in calculating the aspect ratio, as Davinci Resolve takes care of it through automation. To start up,
- Go to the Timeline menu.
- Next, choose ‘Output Blanking. option.
- Next, you can choose the desired aspect ratio and click on it.
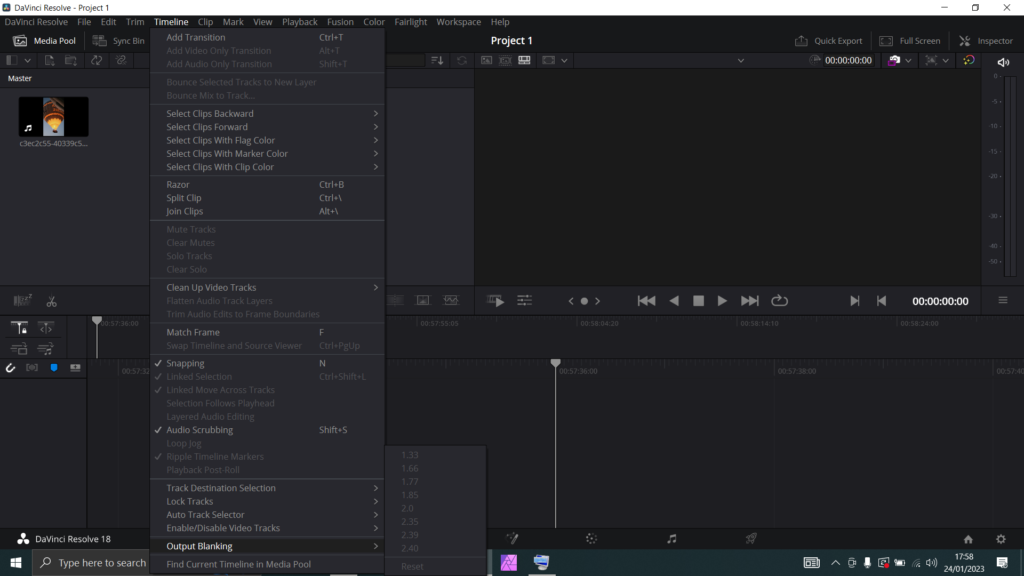
That’s it!
What are the Pros & Cons of a Fully automatic option
Perks of using the fully automatic option:
- Reduction in the file size
- Saves you from the black pixels which are saved on your hard drive space
- Ease the task
- Less room for error
Cons of using the fully automatic option:
- Lacks some essential aspect ratios
How to use the Image Scaling
The image scaling option in DaVinci Resolve 18 allows you to adjust the size of an image to fit your desired aspect ratio or frame size. With this feature, you can ensure that your clips look their best in your final video or project. To do this,
- Go to the File menu.
- Next, click on Project Settings.
- Alternatively, use the shortcut Shift+9.
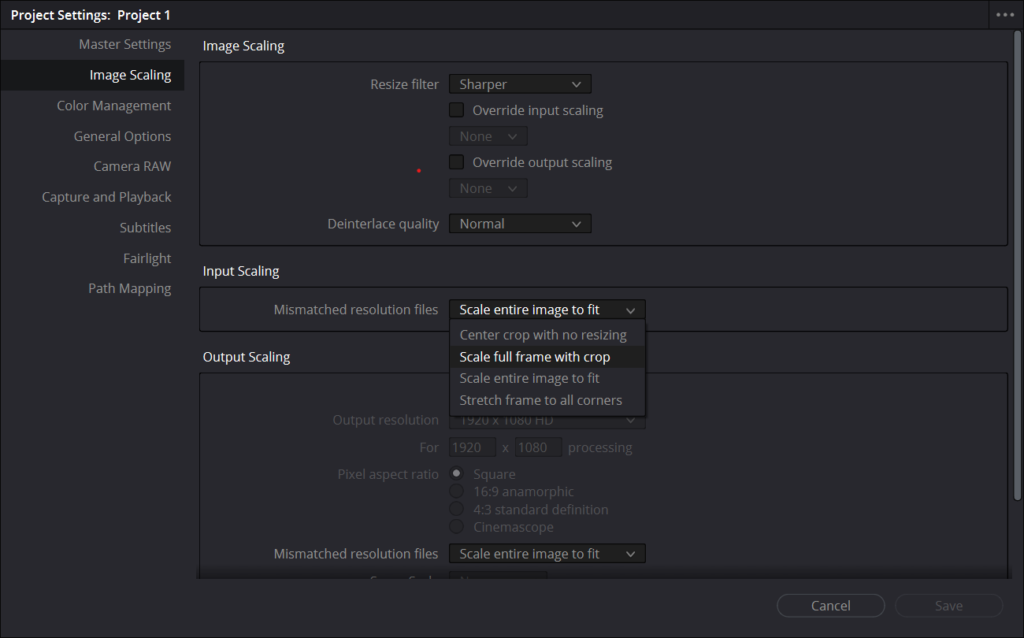
In the Project Settings dialog, switch to the Image Scaling panel.
To change the aspect ratio,
- Go to the Input Scaling box.
- Click to reveal the drop-down menu under the Mismatched Resolution Files option.
- Here, you can choose the preferred option to scale your project by clicking on it.
- Finally, click on ‘Save’.
As soon as you click on the desired image scaling, it is applied across the project and scales your video accordingly.
What are the Pros & Cons of Image Scaling
Pros of using Image scaling:
- Easy to use
- Requires no advanced calculations to set the scaling
- Inbuilt feature in Davinci Resolve 18
Cons of using Image scaling:
- Cannot eliminate the black pixels which are created
- Black pixels consume the hard drive space
How to Set a Custom Ratio
The Custom Aspect Tatio option in DaVinci Resolve 18 allows you to create a unique aspect ratio for your footage. This method is ideal for those who want to create a specific look or feel for their video, or for those working with footage that doesn’t conform to standard aspect ratios.
With this option, you can set your aspect ratio using the software’s advanced tools and settings, providing you with the flexibility to create a truly unique and personalized video. The custom ratio option is hidden in the Project Settings.
We will show you how to get there shortly,
- Go to the File menu.
- Click Project Settings.
- Alternatively, use the shortcut Shift+9.
- Go to the Timeline resolution option.
- Click on the ‘timeline ‘Custom’ option from the drop-down menu.
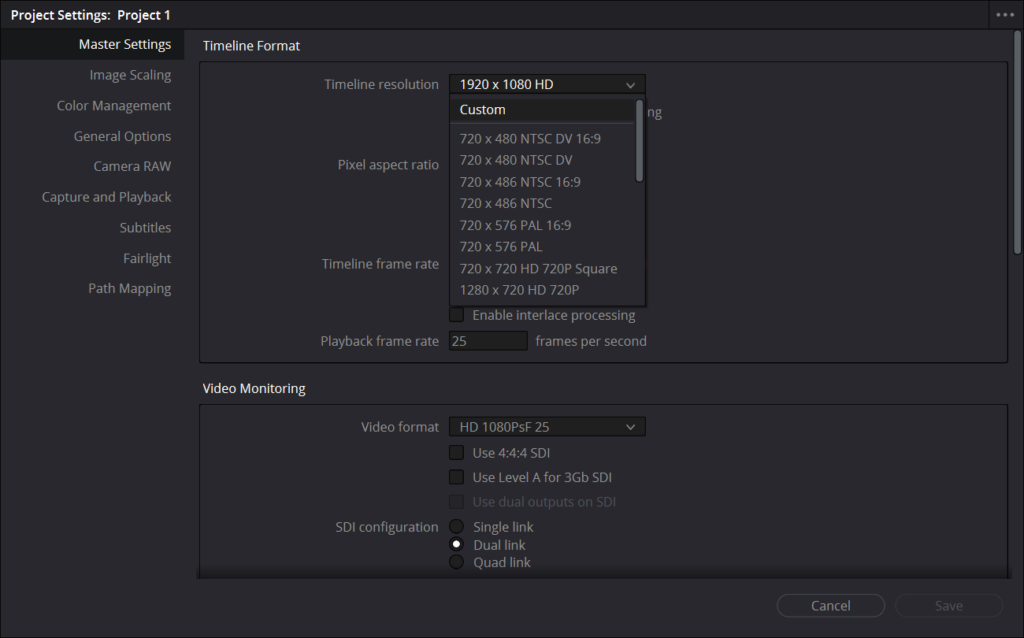
Once you click, type in the ‘resolution’ and click on the Save option to save the Aspect Ratio. Now, you would notice that the aspect ratio of the project will be changed according to the dimensions you inserted.
How to Import Media in DaVinci Resolve 18
The next step is to add the media you want to import into your current project. You can complete this step on any of the Davinci Resolve’s pages with the exception of the Deliver Page.
The Media Page is the main page dedicated to the importing of media and the organisation of your clips into bins. The more organised you are, the better your workflow will be. We recommend importing your media in this page first when you have a large number of clips. You can preview your clips in the video player, manage them and set up your In and Out points as necessary. Once you finish sorting your media, you can go to the other pages to start video editing. You will find the organised media in the Media Pool.
To import media into the Media Page,
- Simply go to the Media Page by clicking on the first icon at the bottom of your screen.
- Next, you can choose one of the following methods:
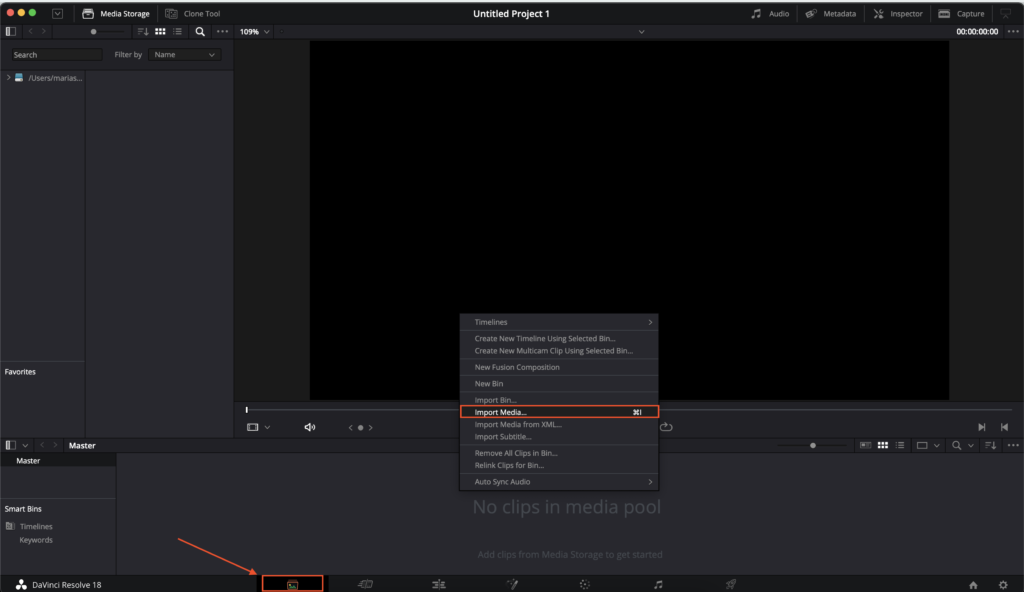
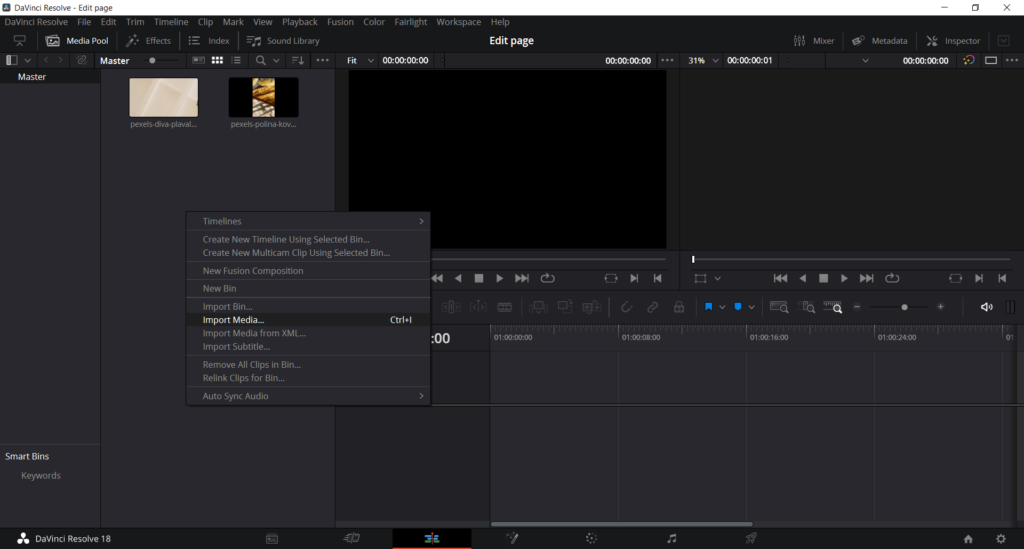
- Right-click on the Media Pool of the Media Page and click on Import Media.
- Alternatively, use the keyboard shortcut Ctrl/Cmd + ‘I’
- Or drag and drop your media from your Storage/Finder directly into the Media Pool
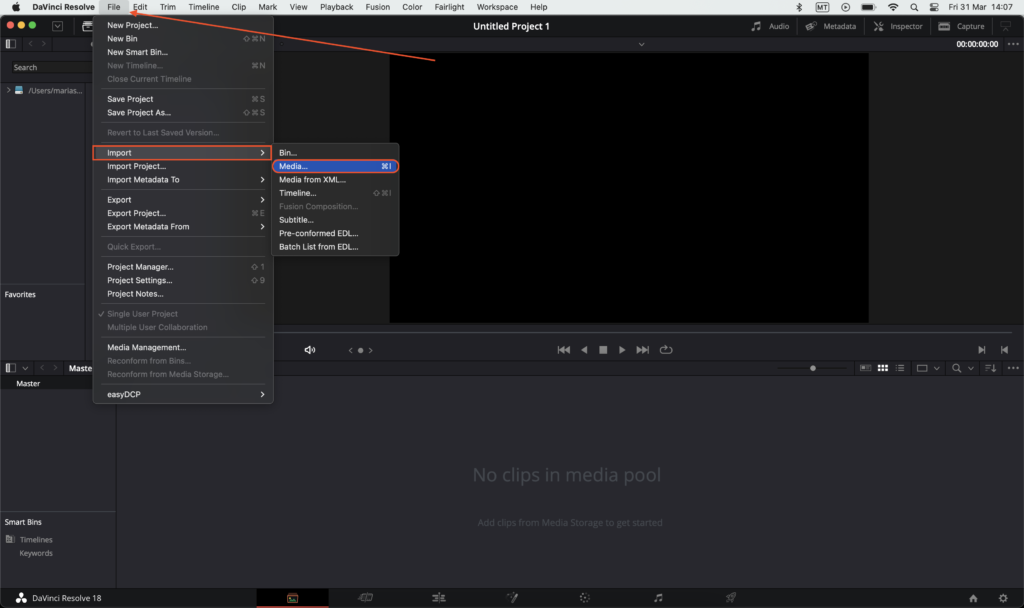
- You can also click on the File Menu > Import > Media
Alternatively, you can always add and access your media from the Media Pool directly, which is available on almost every page as explained above. Here, you can organise your clips in bins just like on the Media Page.
To import media into the Media Pool,
- Right-click on the ‘Media Pool’ section.
- Choose the option ‘Import Media’.
- Or click on the File Menu > Import > Media
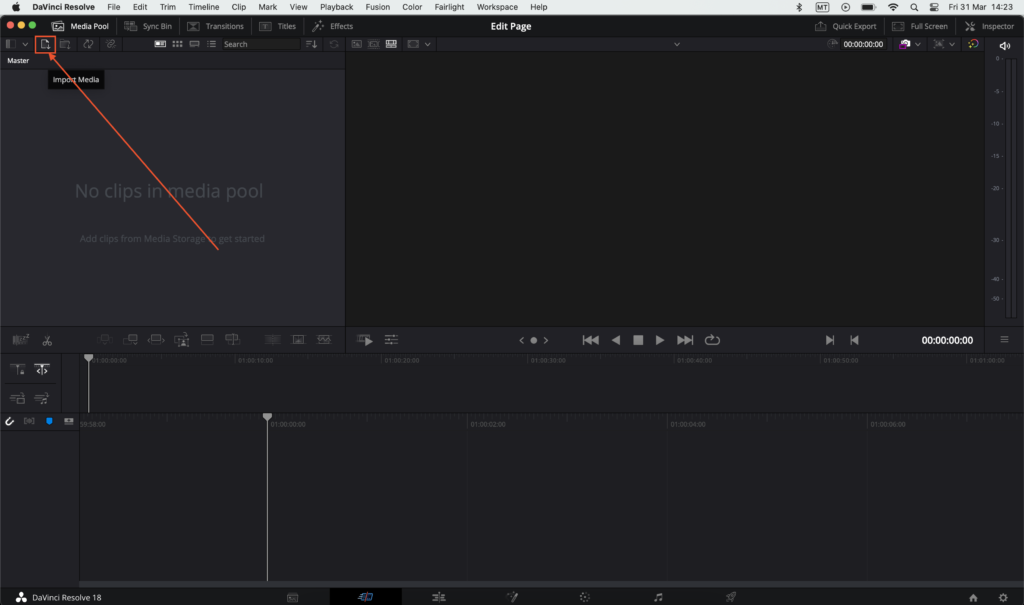
- You can also click on the ‘Import Media’ icon as so:
If you have your clips sorted into folders and you prefer adding them as such,
- Click on the ‘Import Media Folder’ icon as so:

Next, go to the location where the media is placed on your PC or laptop. Choose the media and click on Open to import them to DaVinci Resolve 18. All the clips will be displayed in the Media Pool.
Sorting your media
Folders and bins help to store the media clips in an organized manner. In the Media Pool, you can create folders or bins which work like sub-folders.
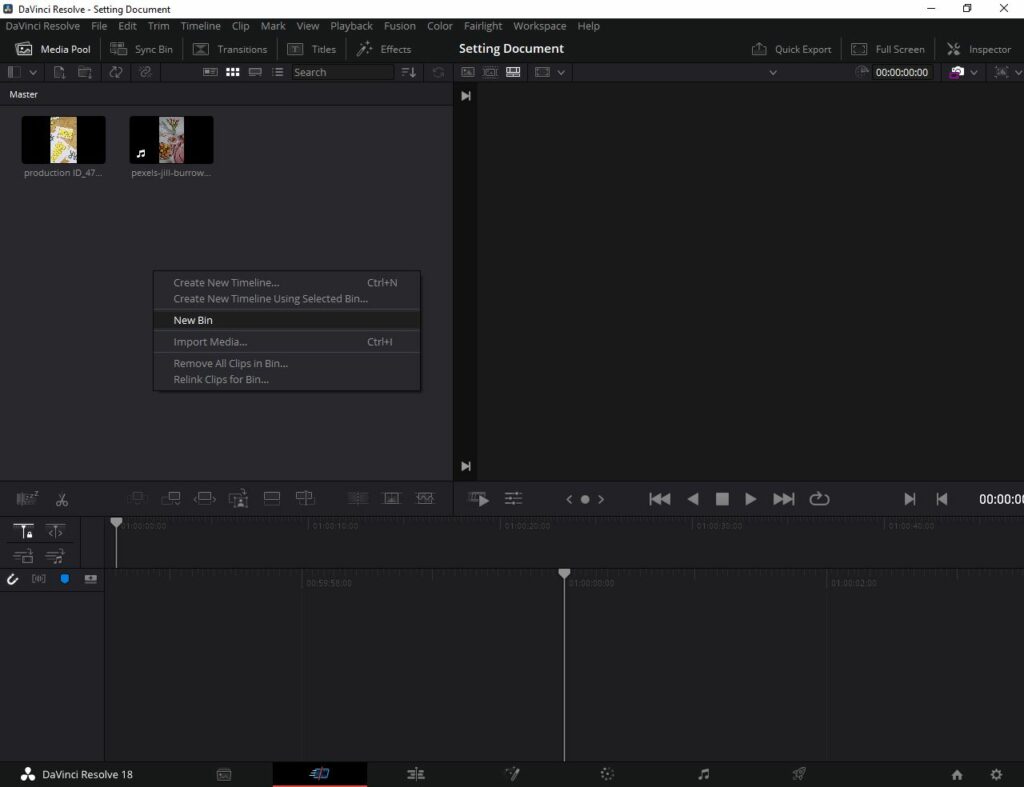
To create folders or bins,
- Right-click on the ‘Media Pool’ of the page.
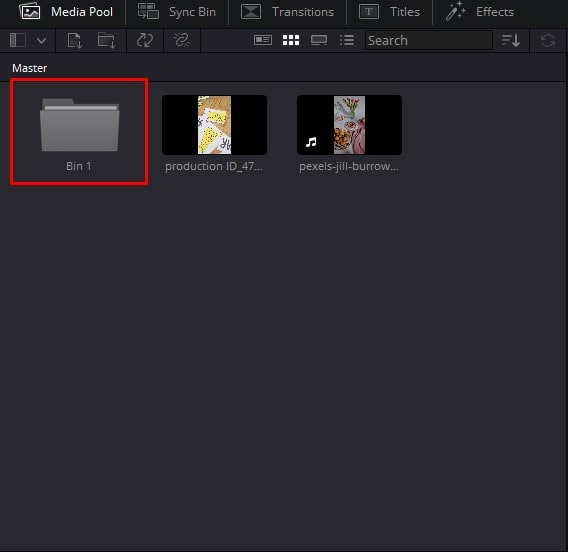
- Choose the option ‘New Bin’.
- A new bin where to store your media clips will be created.
You can always right-click on a specific bin to rename or remove it.
You can now start sorting your clips into bins to organise your media better.
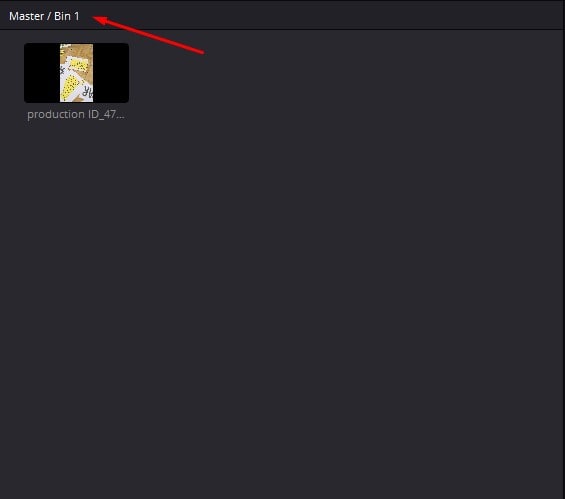
This is done by selecting the clips you want to put into a particular bin, right-clicking and selecting ‘Create Bin with Selected Clips’.
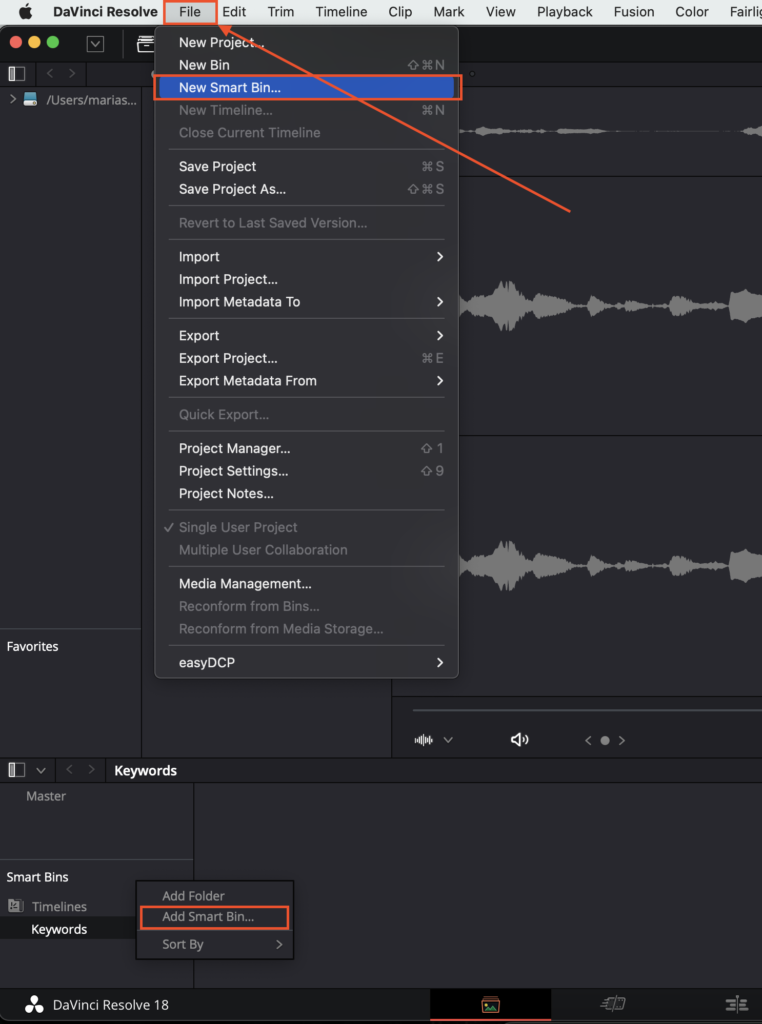
Smart Bins allow you to organise your clips located in the Media Pool based on metadata criteria. This means that they are not only sorted by type but also by their format, resolution, audio tracks, frames and various other properties.
There are two ways to add a Smart Bin in DaVinci Resolve 18:
- Go to the File menu > New Smart Bin
- Or by right-clicking in the Master and selecting ‘Add Smart Bin’
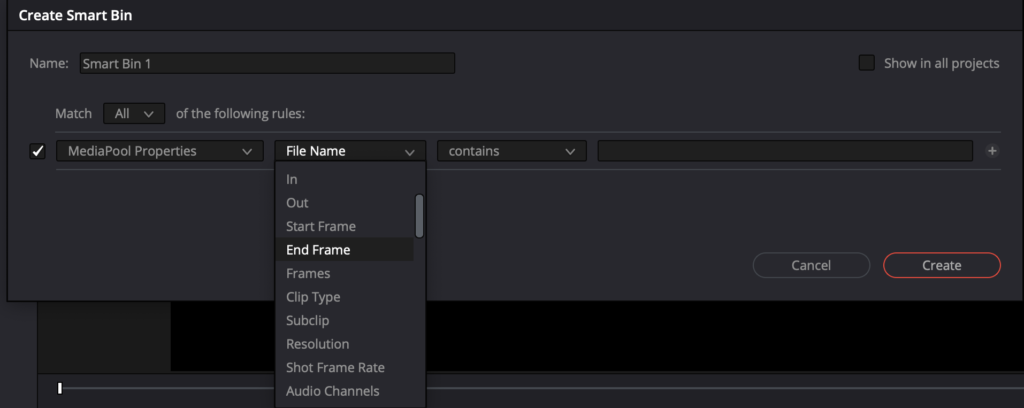
In the ‘Create Smart Bin’ dialog, you can choose the properties you want the clips to be sorted by. Click on ‘Create’ when you finish applying the rules.
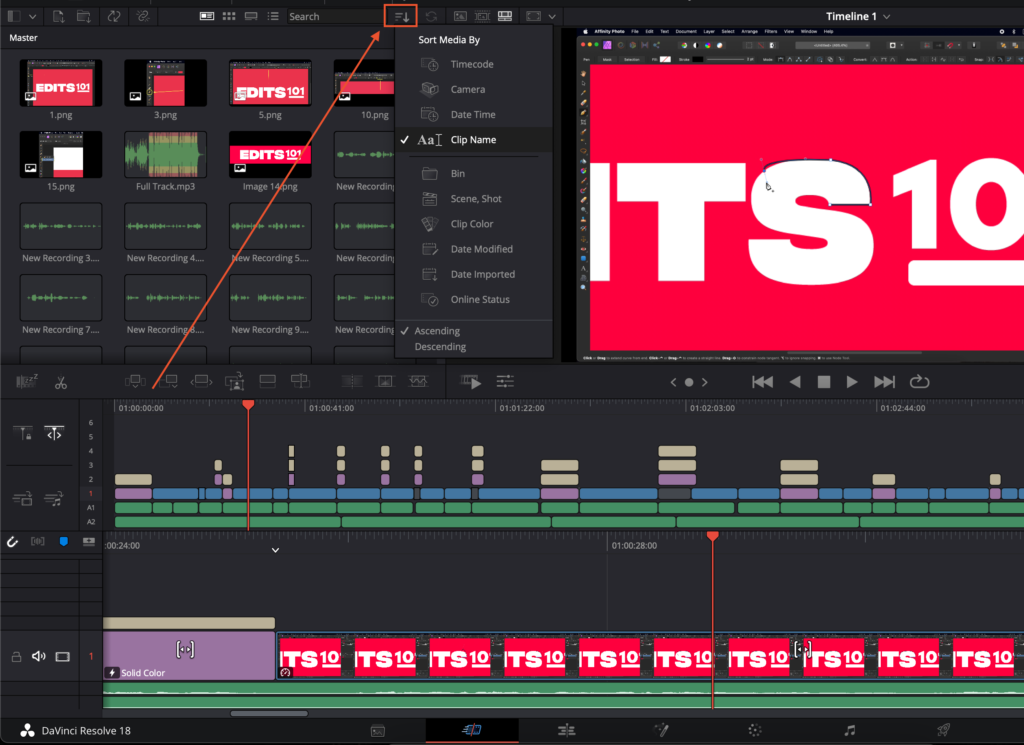
If you have a few clips and you just need to sort them according to their name, date created and so on, click on the ‘Sort’ icon and choose your preference.
How to Add Clips to the Timeline in DaVinci Resolve 18
Once you choose the clips you want to use in your video, you need to start adding them to the timeline. The timeline is the place where you assemble all the clips and place them in order. Once you set the order of the clips, you can make changes and add effects as may be necessary.
Adding In and Out points
Whenever you need to trim a particular clip before adding it to the timeline, you should set the In and Out points from the Source Viewer. The In point is where you want to start your clip and the Out point is where you want the clip to end.
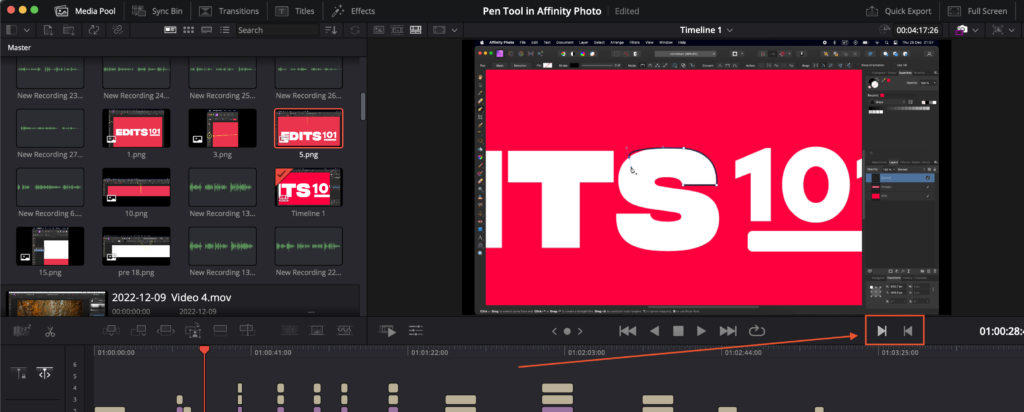
In order to play a clip, simply double-click on it from the Media Pool and play it on the Source Viewer. Then simply click on ‘I’ on your keyboard to set the In point and ‘O’ to set your out point. Alternatively, click on the ‘Mark In’ and ‘Mark Out’ icons as shown below.
To add clips to the timeline,
- Click and drag the clips you want to add to the timeline.
- You can add as many clips as you require.
- If you need to delete a clip, select the clip and press the ‘Delete key’.
The alternative way to add clips to the timeline is:
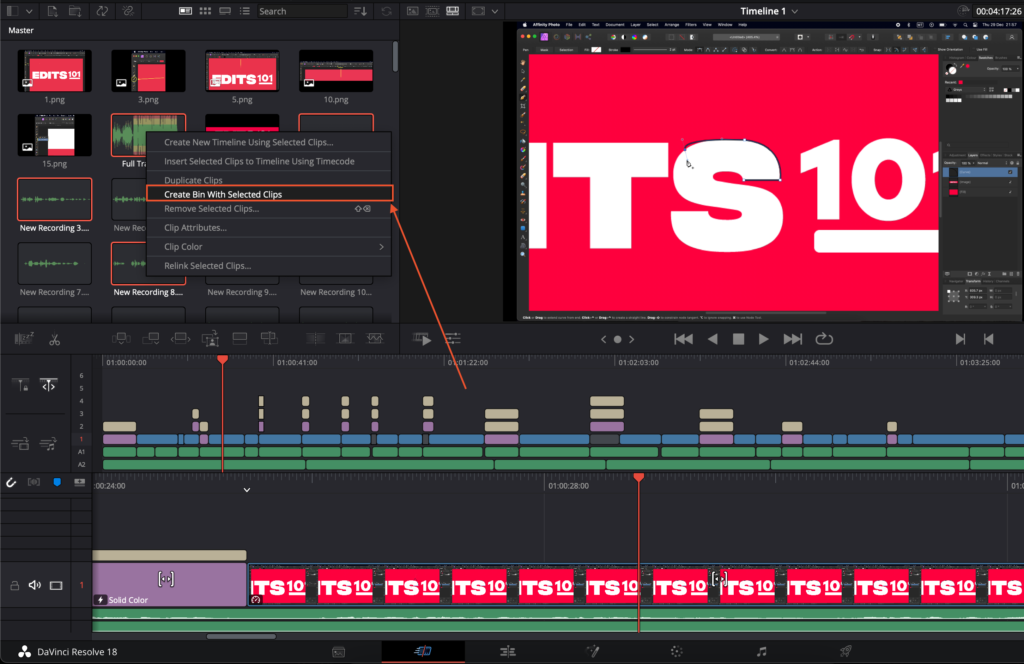
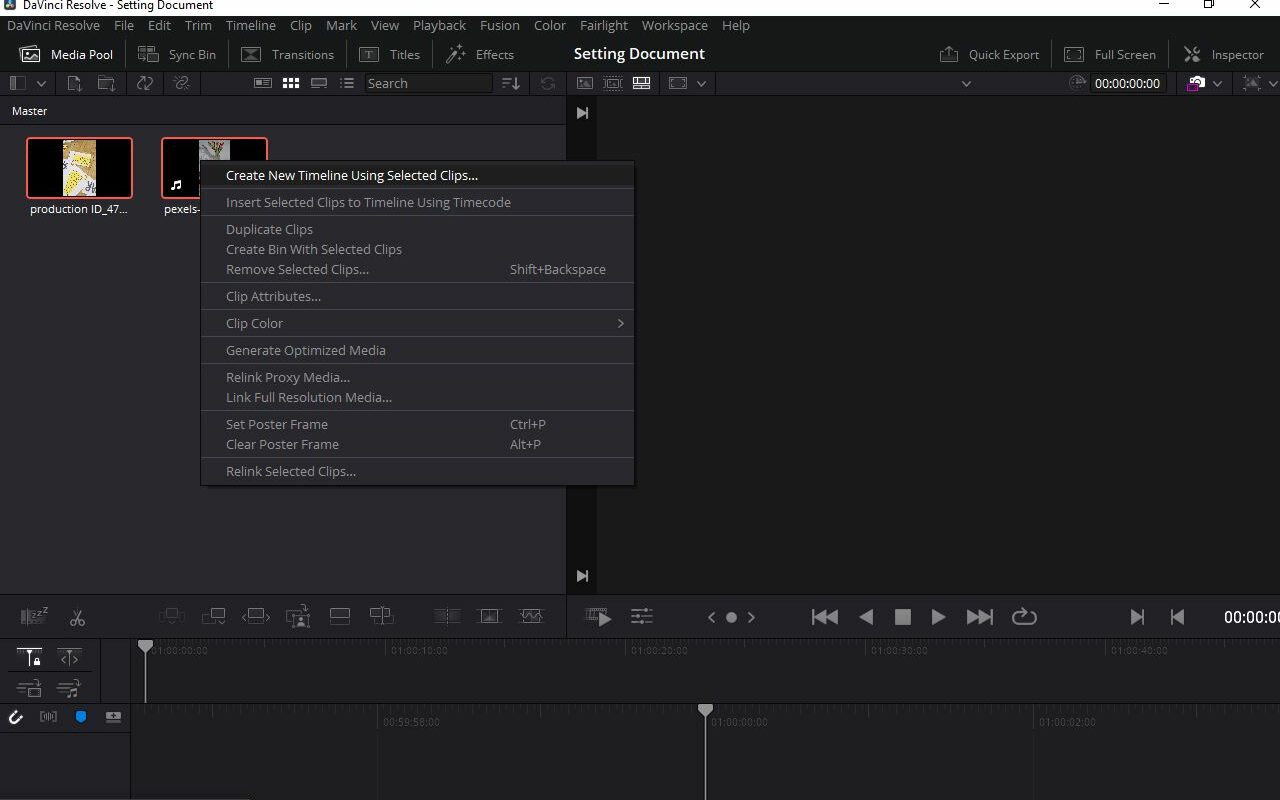
- Press Ctrl/Cmd and click to select the clips as required.
- Once you select the clips you want to add to the timeline, right-click on any one of them.
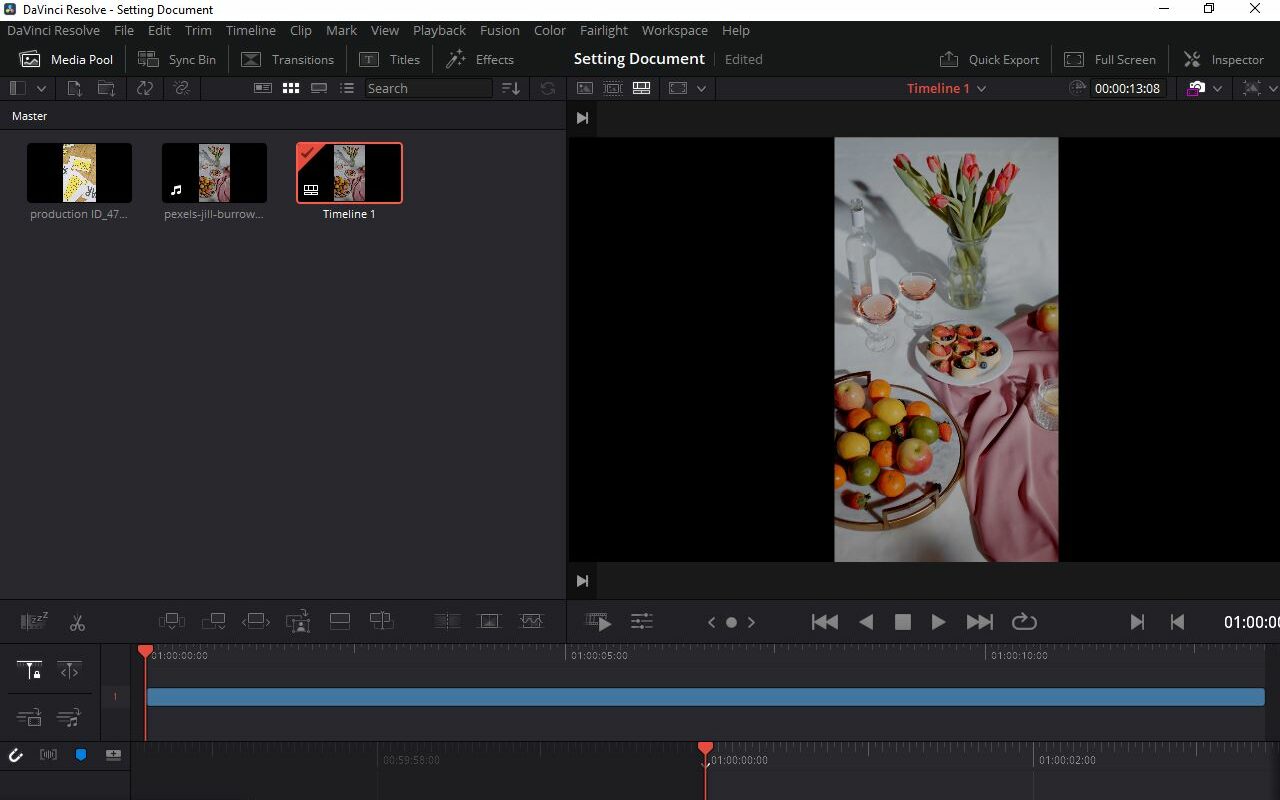
- Choose ‘Create timeline using the selected clips’.
- Now you would notice that the timeline is automatically created using the selected clips.
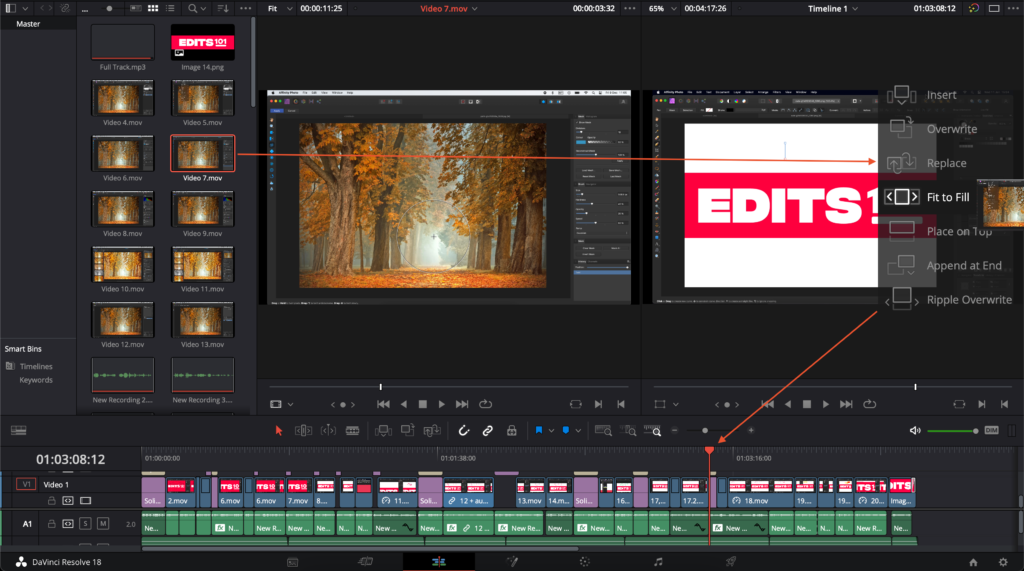
If you are on the Edit Page, you can choose exactly how you want to insert your clip into the timeline. This is done by:
- Going to the Media Pool of the Edit Page
- Pick the clip you want to add to the timeline
- Click and drag the clip onto the Timeline Viewer
- A small menu with various options on how to add the clip to the timeline will be displayed
- Drag the clip on the preferred option and it will be added to the time accordingly
Conclusion
In conclusion, DaVinci Resolve 18 has an easy way to set your document, import clips, set the timeline, adjust timeline proxy resolutions and offer multiple options to change the aspect ratio of your footage. Whether you’re looking for a fully manual option, a fully automatic method, or the ability to set a custom aspect ratio, the software provides the necessary tools to achieve your desired results.
Additionally, the option of image scaling is also available for adjusting the size of an image to fit your desired aspect ratio or frame size. With these techniques, you’ll be able to create stunning videos that are perfectly tailored to your audience.
Thanks for reading & feel free to check out more of our articles!
Expert Rating
Summary
In summary, you can easily open projects, set timelines, adjust timeline proxy resolutions, create bins and fonders and change aspect ratio. Spin around the settings and learn in minutes!


