

Exporting is probably the least interesting part of every editing process. Although it might not be the most fun part, exporting files in the correct format is certainly essential.
In this step-by-step guide, we will discuss how to export files in various formats inside Photopea. After reading this guide, you will know when to export compressed or high-quality zoomable images.
Saving and Exporting File in Photopea
It is necessary to realize that exporting and saving are two separate processes when working with files and images.
A file is saved when its most recent version is kept on your computer or another storage device. Doing this allows you to access and make the required changes to the file later.
On the other hand, exporting a file or an image typically means converting your design or image into a compressed image format which you use across social media platforms.
Where is the Export option in Photopea?
The export option can be found two clicks away from the Photopea homepage.
Checkout our photopea for beginners guide if you are a complete beginner.
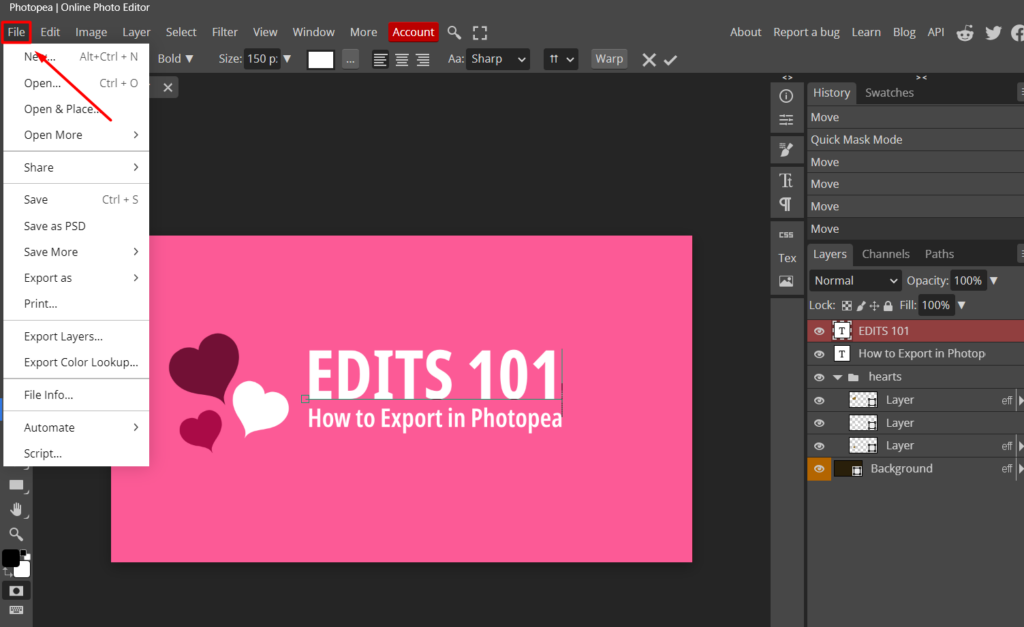
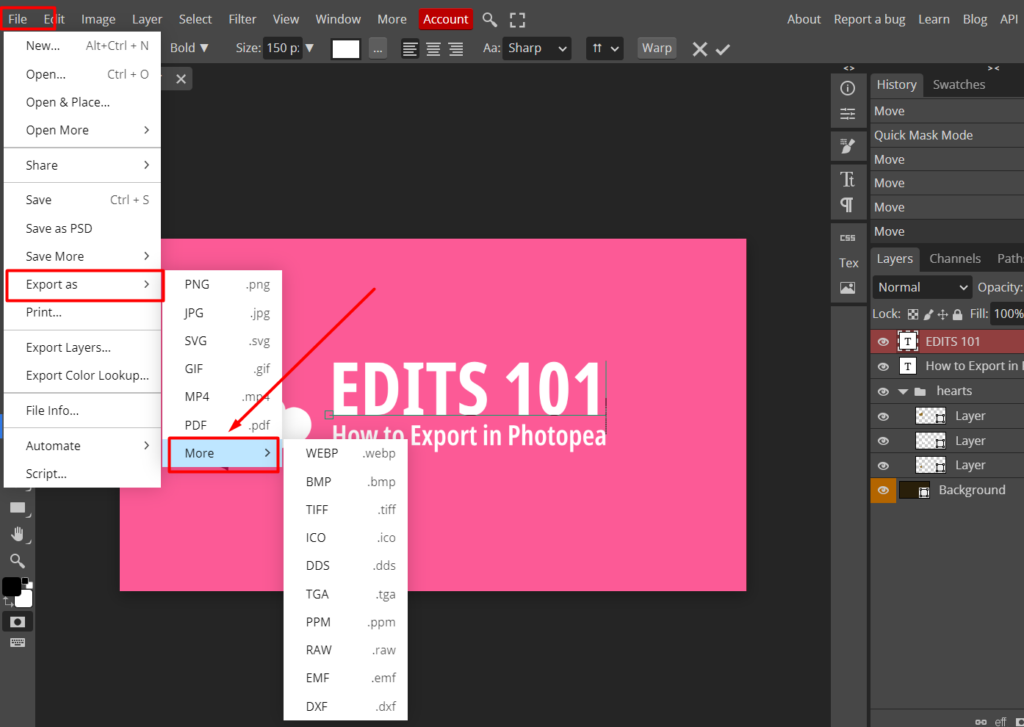
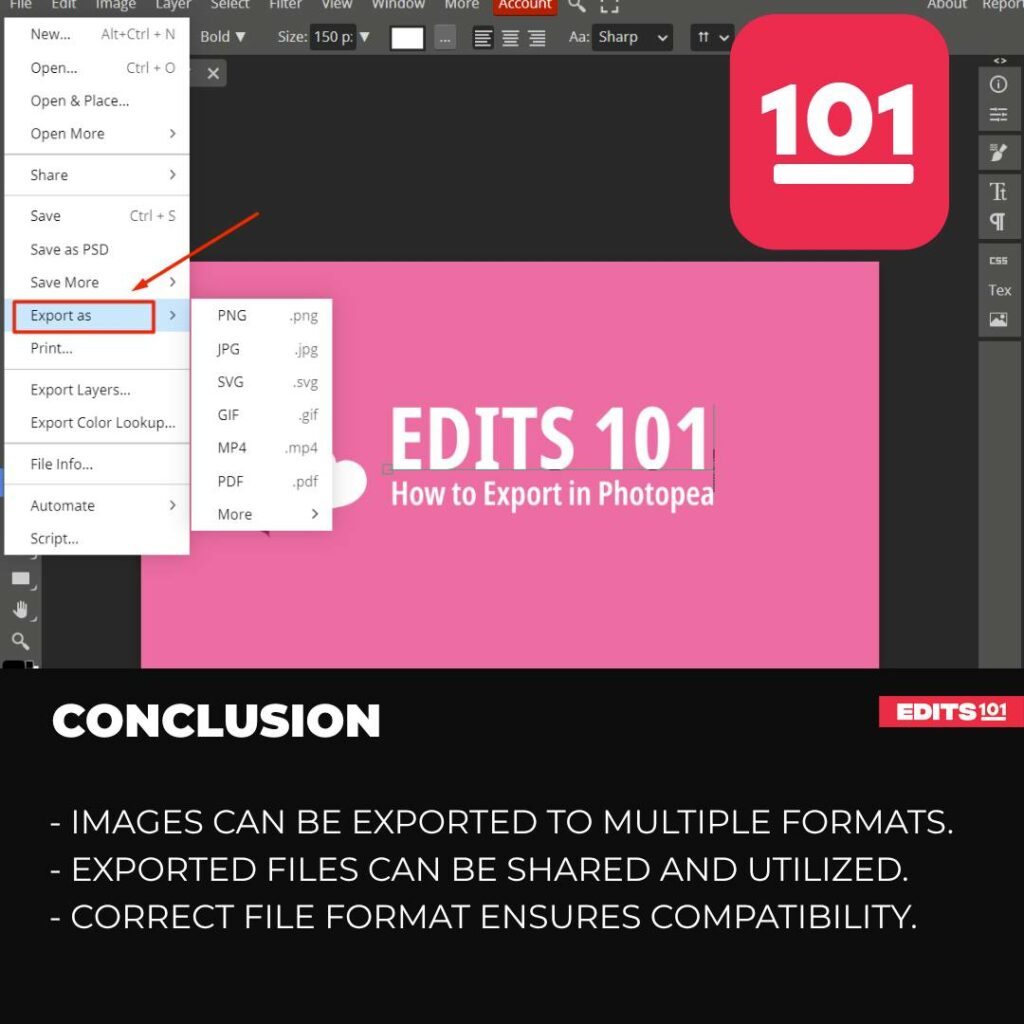
Once you have finished editing your photo, click on the “File” menu at the interface’s top left corner. Select the “Export As” option from the drop-down menu.

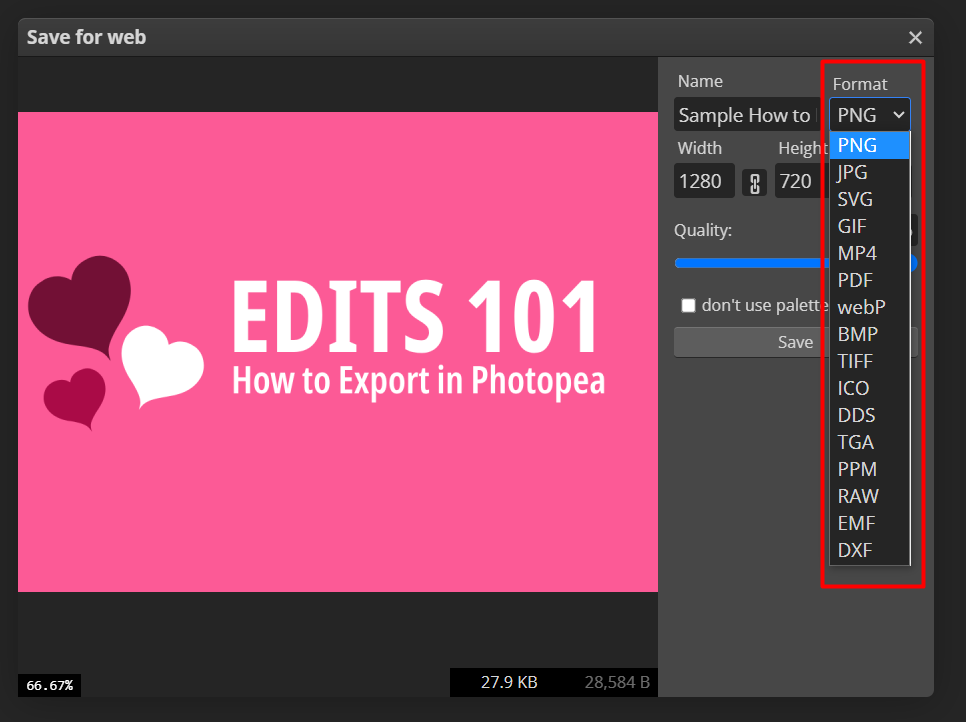
A new dialog box will appear, allowing you to choose the format and settings for your file. Photopea supports popular file formats such as JPEG, PNG, GIF, and PSD.
All you need is to select the desired format for your file by clicking on it, and the step-by-step process will be discussed in the next section.
Read our guide on how to create editable photoshop templates inside photopea.
How to Export in Photopea?
Photopea is a versatile online photo editing tool, and exporting files here is very easy. To export a file in different formats in Photopea, you can follow these steps:
- Open your file in Photopea by either dragging and dropping it into the workspace or using the File > Open option from the menu.
- Make any necessary edits or adjustments to your design.
- Once you are ready to export, go to the “File” menu at the top-left corner of the interface.
4. From the drop-down menu, select the “Export As”option.
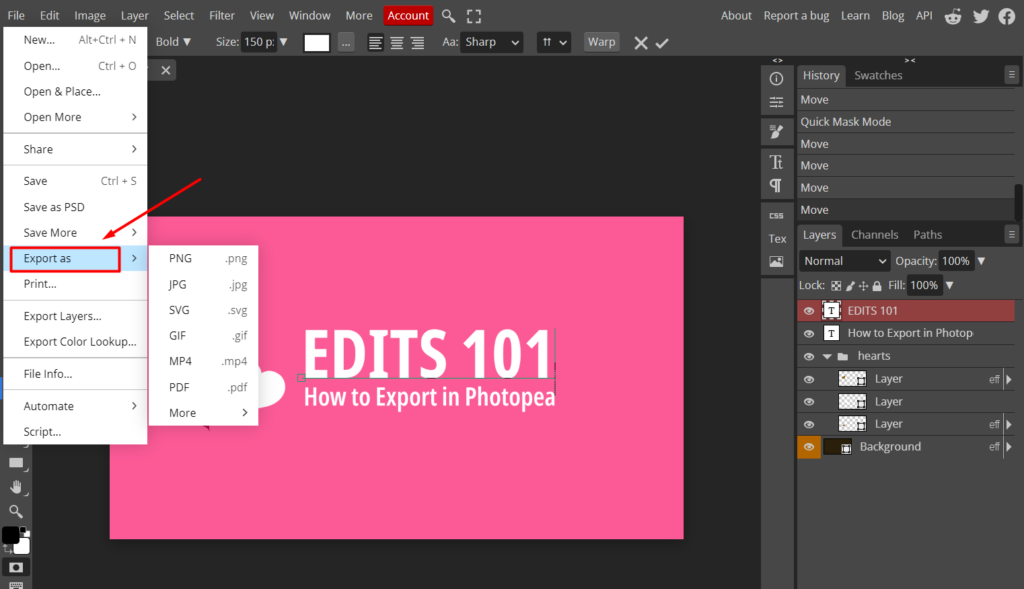
5. A dialog box will appear, allowing you to choose the file format and adjust the export settings. Here’s how you can choose different file formats:
- To export as JPEG: Select “JPG” from the format options in the format option inside the export dialog box. Adjust the quality settings if needed and click “Save” to export the file as a JPEG.
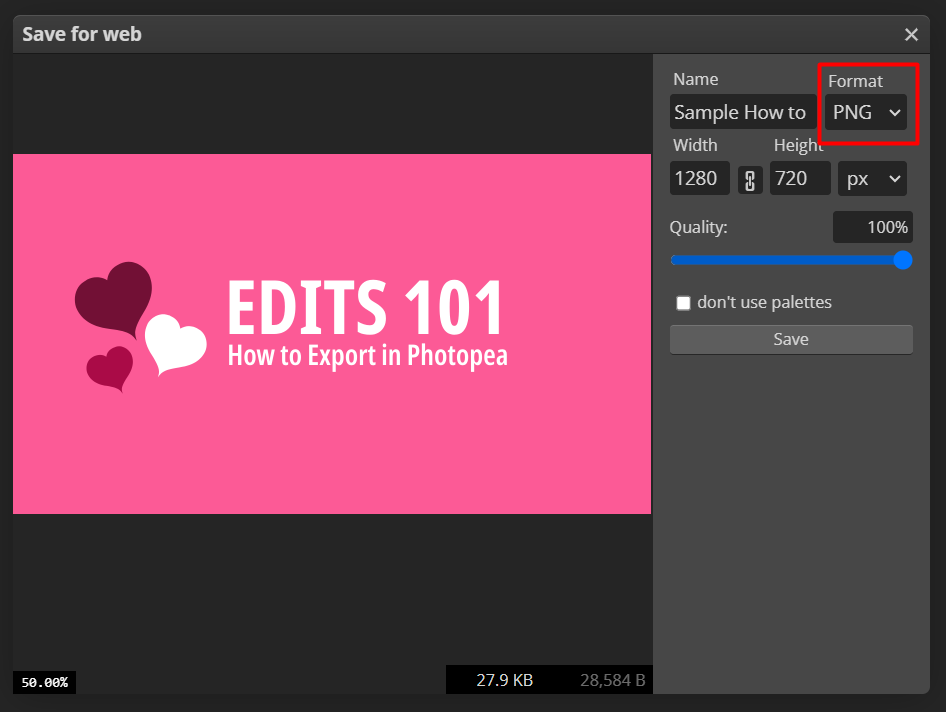
- To export as PNG: Select “PNG” from the format options in the export dialog box. Click “Save” to export the file as a PNG.
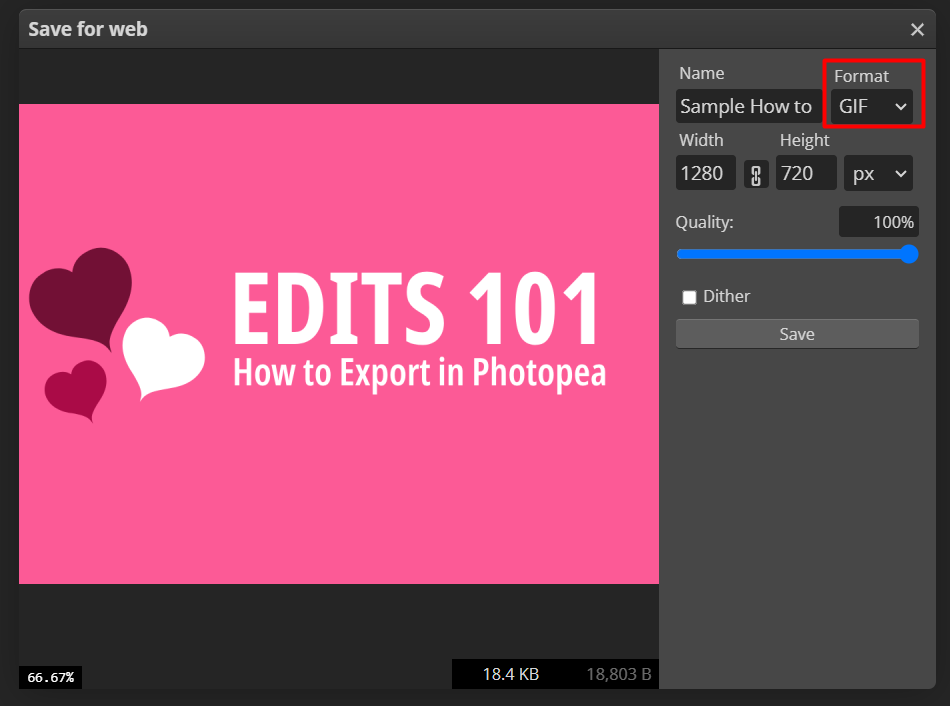
- To export as GIF: Select “GIF” from the format options in the export dialog box. Click “Save” to export the file as a GIF.
- To export as other formats: In the export dialog box, you will find various other formats such as BMP, TIFF, WebP, etc. Select the desired format, adjust the settings if necessary, and click “Save” to export the file.
If you wish to change the file format, but you’ve already clicked PNG, JPG, GIF, etc., you can still do it by clicking the drop-down menu on the export dialog box.
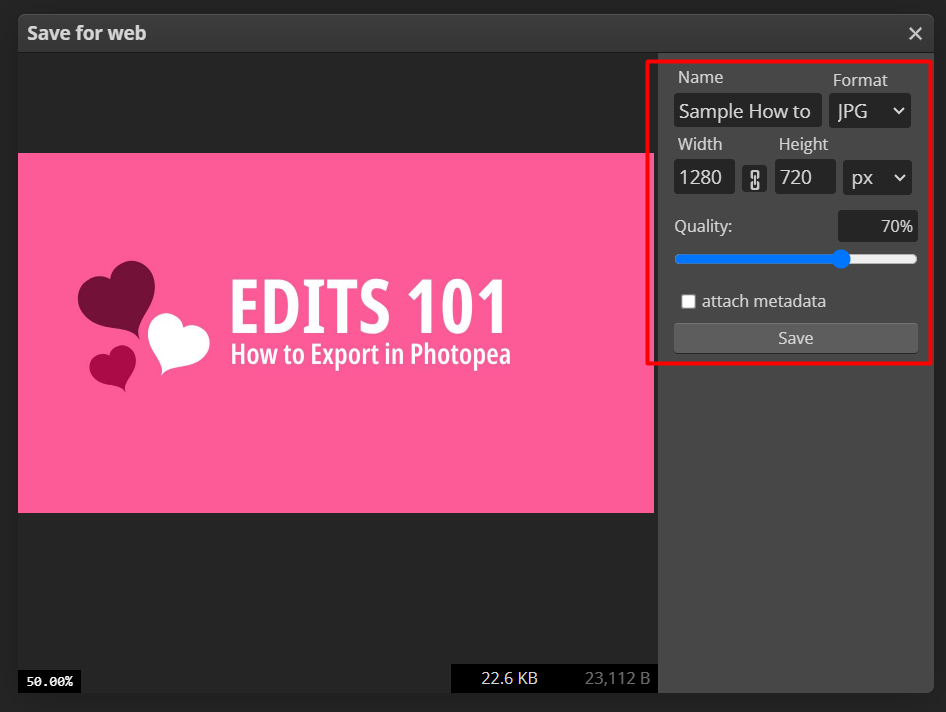
4. Provide a name for the exported file in the “File name” field.
5. Click the “Save” button to start the export process.
6. Photopea will generate the file and save it to the Downloads folder with the chosen file format and settings.
Different File Formats in Photopea
There are several file formats commonly used for images. Here are some of the most popular ones:
JPEG (Joint Photographic Experts Group): JPEG uses lossy compression, which means that some image quality is lost to reduce file size.
PNG (Portable Network Graphics): PNG is a transparent, lossless image format. Web graphics, screenshots, and images with text or sharp edges frequently use it. Compared to JPEG, PNG maintains the original image’s quality without losing its quality.

GIF (Graphics Interchange Format): The GIF format only allows for a limited (256-color) color palette and animation. Simple graphics, logos, and icons are frequently used, as well as short animated images. Transparency is supported in GIFs as well.
TIFF (Tagged Image File Format): It can store multiple layers, transparency, and high-quality images and supports lossless compression. TIFF is a flexible format. Professional graphic design, printing, and photography all frequently use it.
BMP (Bitmap): Uncompressed, basic image format called BMP. For simple images and icons in Windows applications, it frequently supports a variety of color depths. In contrast to compressed formats, BMP files frequently have a large file size.
SVG (Scalable Vector Graphics): XML markup is used in the vector-based image format SVG to specify shapes, lines, and curves. It can be scaled without affecting quality and is independent of resolution. Web graphics and icons frequently use SVG.
Just a few types of image file formats are listed here. The format to use depends on several variables, including the image content, intended use, preferred compression, transparency, and compatibility with software or devices.
Conclusion
Exporting inside photopea is a simple task. All you need to do is Go to the file menu and then go to export as. Choose any of the available formats and a dialogue box will appear where you can dial in the settings.
As part of Photopea’s exporting process, the image may be exported into a variety of file formats, including JPEG, PNG, GIF, SVG, and many more. Each format has its own distinct features and characteristics, so exporting the image to multiple formats needs careful consideration and adjustments to ensure compatibility and perfect quality across various platforms.
Thanks for reading and feel free to check out more of our articles!
Expert Rating
Summary
Exporting is probably the least interesting part in every editing process. Although it might not be the most fun part, exporting files is certainly essential. As part of Photopea’s exporting procedure, the image may be converted into a variety of file formats, including JPEG, PNG, GIF, SVG, and many more. Each format has its own distinct features and characteristics, so exporting the image to multiple formats needs careful consideration and adjustments to ensure compatibility and perfect quality across various platforms.


