
The Fusion Page in DaVinci Resolve 18 is a highly advanced visual effect and compositing module that allows you to create and manipulate visual elements in a 3D workspace.
A comprehensive guide to mastering the Fusion Page in DaVinci Resolve 18 would cover topics such as node-based compositing, 3D animation, keyframe animation, adding text, blurring, and the main activities performed using the Fusion Page.
What is Fusion in DaVinci Resolve 18?
Fusion is the fast-track page to fasten your editing effectively. You can do many activities by integrating the nodes such as adding blur, text, animations, 3D effects, and much more via the Fusion Page. To access the Fusion Page,
- Go to the bottom of the canvas.
- Click the Fusion Page to access the page itself and its settings as shown below.
What are Nodes in Fusion Page?
Nodes are the location where you integrate the options and features of the DaVinci Resolve 18. There are boxes indicating the name once you click on an option and all you need to learn is to integrate them accordingly. Moreover, the nodes section in fusion is identical to a flowchart.
Initially, you have 2 nodes namely:
- MediaIn: Indicates the left side canvas view on the top which displays the inputs given.
- MediaOut: Indicates the right side of the canvas view on the top which displays the output derived.

How to Blur using the Fusion Page?
You can use the blur option to blur the entire media content. By using the below steps, you can learn to integrate any options in the Fusion Page as well.
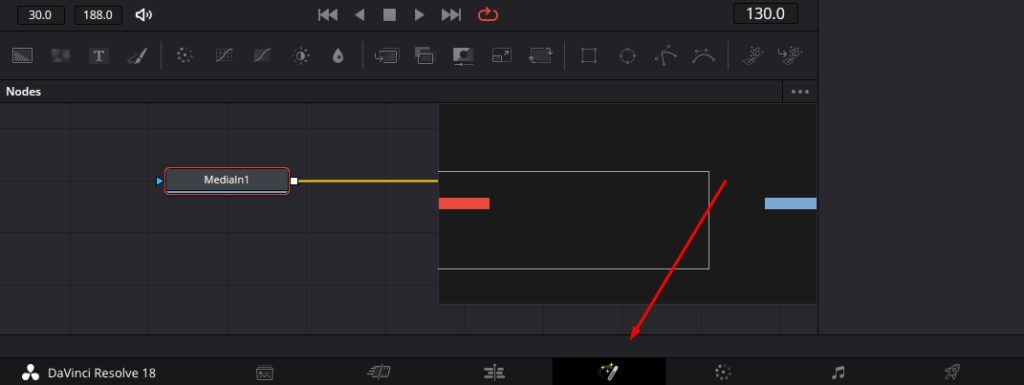
Step 01: How to Connect the input and output nodes
Once you come to the canvas under the nodes, you need to connect the input and the output nodes. This helps to view the content on the left and the right. For example, if you click the MediaIn node, the viewer on the left displays its content of it.
On the other hand, if you click the MediaOut node on the right, it displays the content on the right side. Instead of dragging the media onto the nodes view in the Fusion Page, you can easily set it up via the Edit Page.
To add clips do this,
- Go to the Edit Page.
- Next, click and drag the media onto the timeline of the Edit Page.
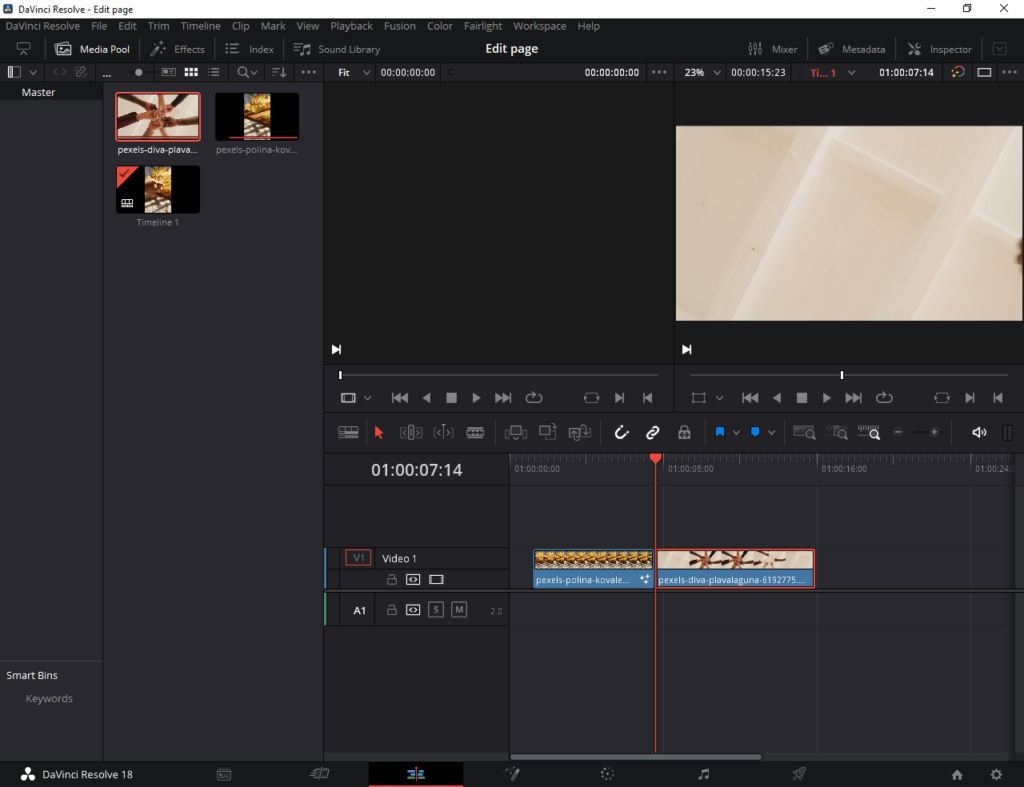
Now, drive to the Fusion Page and check in the nodes view. It displays the media content automatically using the nodes which you had inserted.
Step 02: How to Connect an effect
Next, you can connect any effect to the canvas. In this example, let’s drag the Blur effect. Check on the toolbar on the nodes view and click and drag the Blur option. Once you place it on the nodes view, you can notice that the Blur node appears.
Next, how to connect the Blur node? Drag the end of the MediaOut node to the Blur node. You will notice it automatically connects. Next, drag the inside of the Blur node to the MediaOut node.
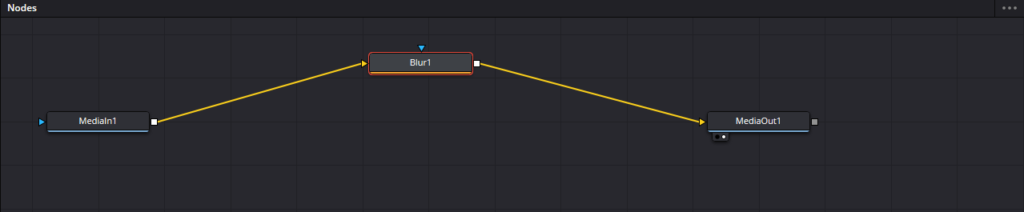
That’s it! Now you would notice that the content is structured to blur. Next, how can you edit the Blur settings?
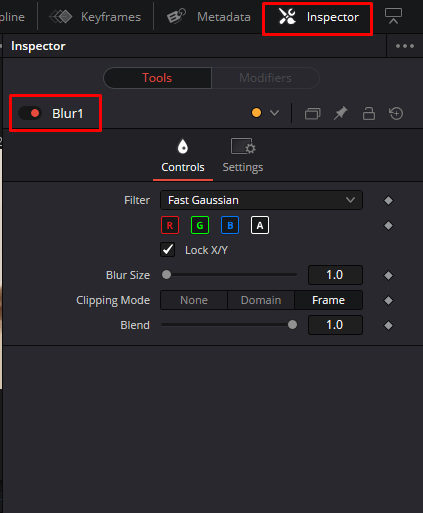
Step 03: How to Edit Effects settings
To edit any effects, you can use the same guideline as follows. In this case, we will seek to edit the Blur settings. To edit the Blur settings,
- Go to the Inspector setting placed on the right side corner top of the page.
- It opens the Blur setting dialog.
- Here, you can change the Blur size, filter, clipping mode, blend, and many more settings.
How to add text using the Fusion Page?
From the Fusion Page, you can add many types of text starting from 2D to 3D texts effectively. All you have to do is, adjust the Inspector text settings according to your requirement.
Step 01: How to Add the text
Under the nodes view, you can notice that there are several options. Here, click and drag the text option onto the canvas. Once you do it, you will notice the text node appears.
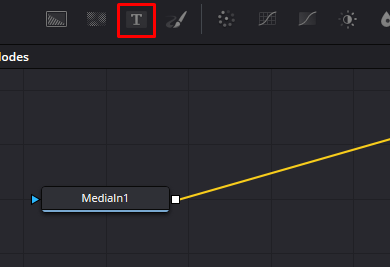
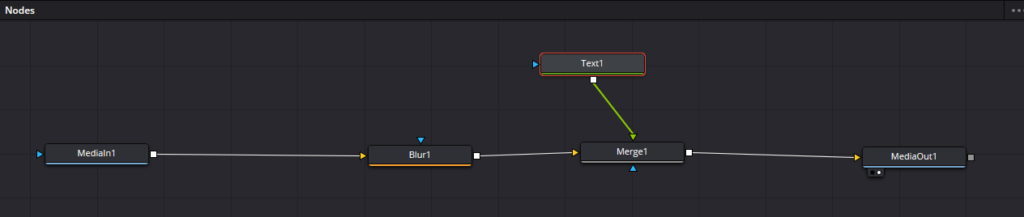
Next, how to connect the text option through the blur nodes? Here, you can use the node namely the Merge node.
Step 02: How to Add the Merge node
The Merge node helps to merge the blur and the text option together. For example, the content will be blurred but it would consist of the text on it.
The merge option is displayed in the toolbar of the node viewer. Click and drag the merge option onto the canvas.
Step 03: Connect the nodes
To connect the blur and text nodes, follow the below steps,
- Pull out the MediaOut input node and connect it to the Merge input.
- Connect the Merge node output to the MediaOut input.
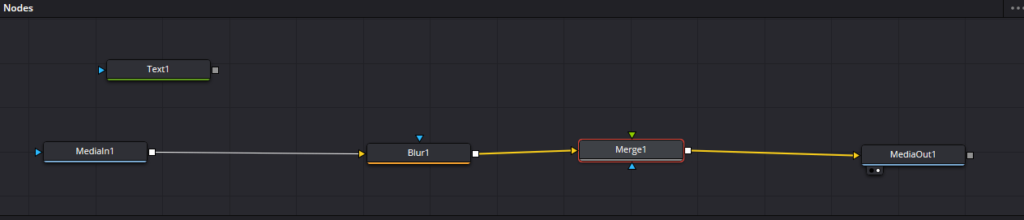
- Grab the text node output and connect to the Merge Node.
Step 04: How to Add the text
To add the text,
- Go to the Inspector setting placed on the right side corner top of the page.
- It opens the Text setting dialog.
- Here, you can add the text onto the text box and you will notice that the text is displayed on the media.
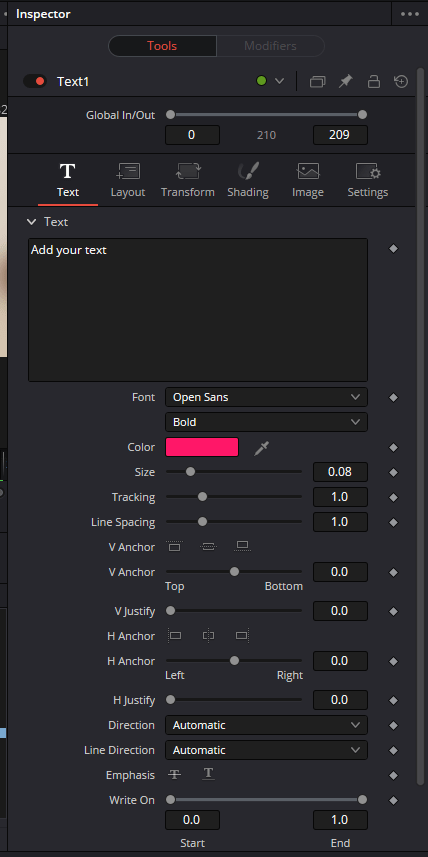
Here, you can change the text size, type of font, alignment, justification, color, and many more text-related settings as per your requirement.
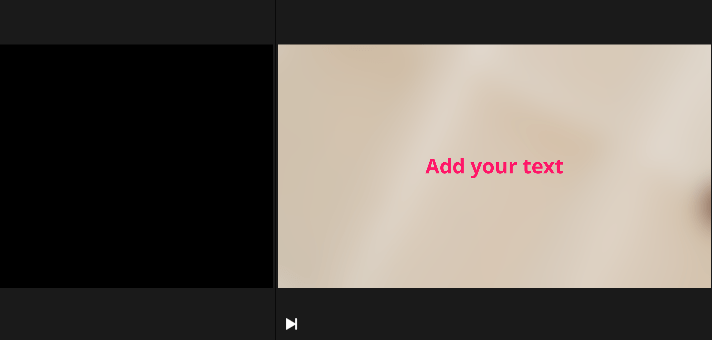
Once you make the changes and add the text to the text box, the clip would contain the text you entered as shown below. To see the proper output of the above edit, go to the Edit Page and view the content.
How to add Mask?
You can add masks easily to let the edit appear only on a sector of the page. Masks come in handy when you want to apply an edit only to a specific sector.
Step 01: How to Add a mask
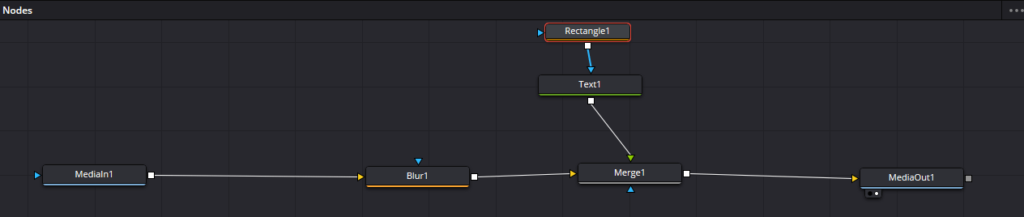
To add a mask,
- Click and drag a rectangle shape onto the canvas.
- Connect the output of the rectangle shape node to the text node.
- Once you connect the nodes, make sure the node view looks like:
Step 02: How to edit the Mask
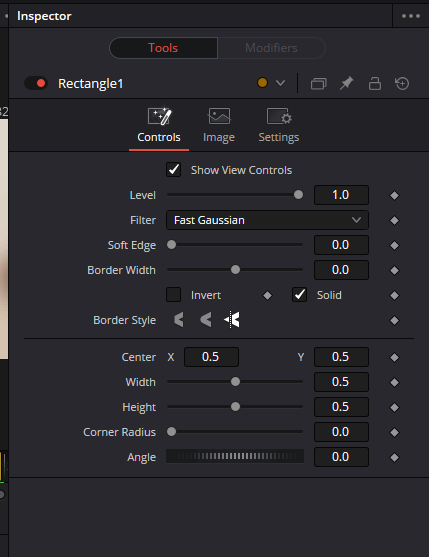
To add the text,
- Go to the Inspector setting placed on the right side corner top of the page.
- It opens the Rectangle setting dialog.
- Here, you can edit the mask setting and you will notice that the mask is displayed on the media.
Now, you can go to the Edit Page and view the output of adding a mask.
What are the other main activities performed from the Fusion Page?
Add Lighting & Shading: OnSpline the Fusion Page, you can find realistic lighting and shading to perform your tasks creatively.
Add Infographics: By connecting a tracker to your media content, you can track the infographics applied to the clip.
Volumetric effects: Volumetric effects can be added by using 3D spaces to create realistic pictures.
Rotoscope tools: These tools are used through the masks, bezier shapes, and rotoscope shapes.
Fusion’s Delta Keyer: It helps to remove the backgrounds in the green and blue screens to remove them using the effect library
3D Particle effects: The 3D Particle effects are a handy tool to add 3D effects onto the clip.
Use the Vector Paint tool: The vector paint tool is a handy tool to paint the unwanted objects present in the image.
Spline Animation: Spline animation can be added to your clips to fast-track your editing in terms of speed and rate of changes.
Import 3D Models: Through third-party apps, DaVinci Resolve 18 helps to import 3D models and use them in your workspace.
Conclusion
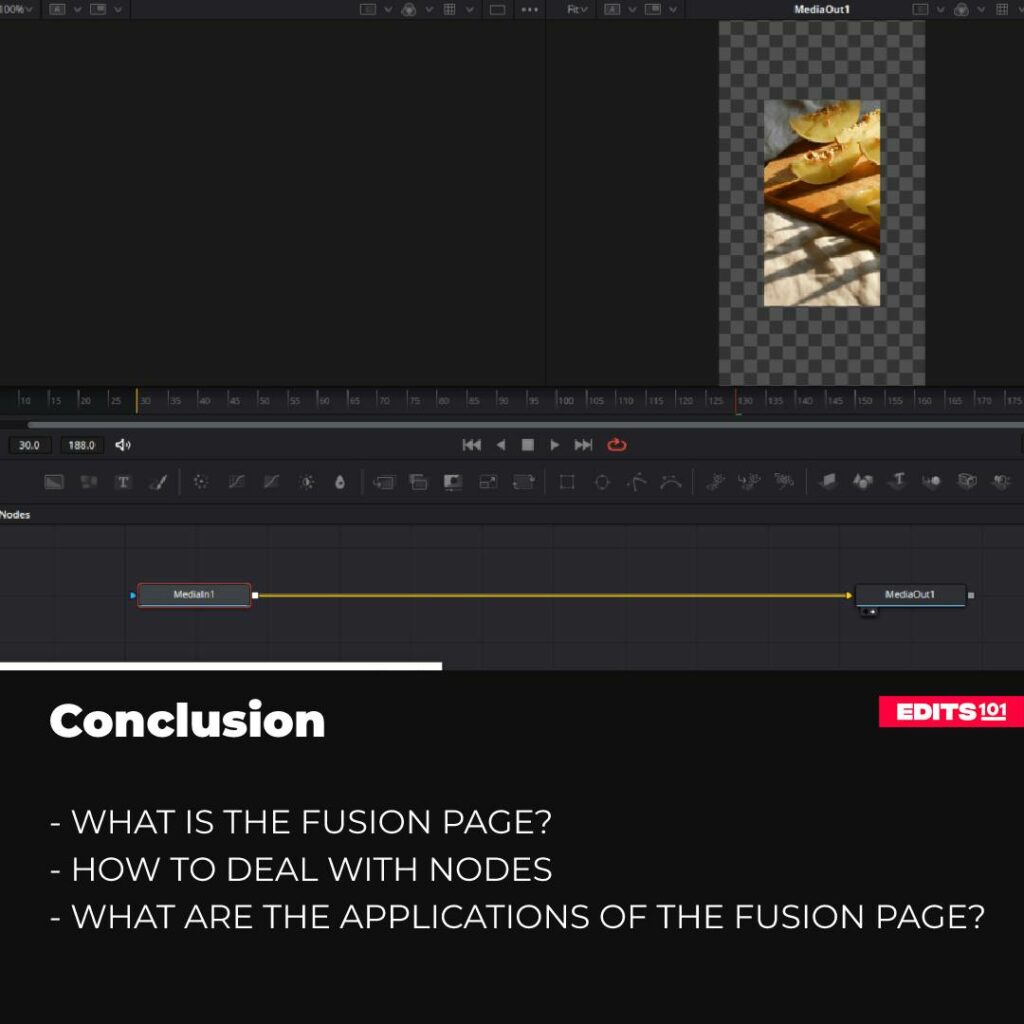
In conclusion, mastering the Fusion Page in DaVinci Resolve 18 can greatly enhance a video editor’s skills and capabilities. This comprehensive guide would provide in-depth knowledge and hands-on experience with the powerful tools and features offered by the Fusion Page.
Thanks for reading & feel free to check out more of our articles!
Expert Rating
Summary
In summary, Fusion page mainly composes of the nodes. If you have a proper understanding to use the nodes, you can master it’s application easily.


