
Transforming, scaling, and rotating are essential elements of video editing and visual effects. In DaVinci Resolve 18, these tasks can be performed in two ways: the visual method and the inspector method.
The Visual method works by using the on-screen controls to transform, scale, and rotate clips and elements in the timeline. The Inspector method allows you to adjust the numerical values in the Inspector panel to precisely control the transformations.
We will show you how to disable Transform controls and how to copy the transform effects applied to a clip to apply them to another clip.
In this tutorial, you will also learn how to add a Picture in Picture effect and how to add different Transform effects to your clips.
You will learn through step-by-step instructions and practical examples to demonstrate how to effectively transform any clip or object in DaVinci Resolve.
How to Transform, Scale & Rotate in DaVinci Resolve 18
Step 01: Setting up the document
To do this task,
- Open the DaVinci Resolve 18 application.
- Right-click on the Media Pool section.
- Choose the option Import Media as displayed below.
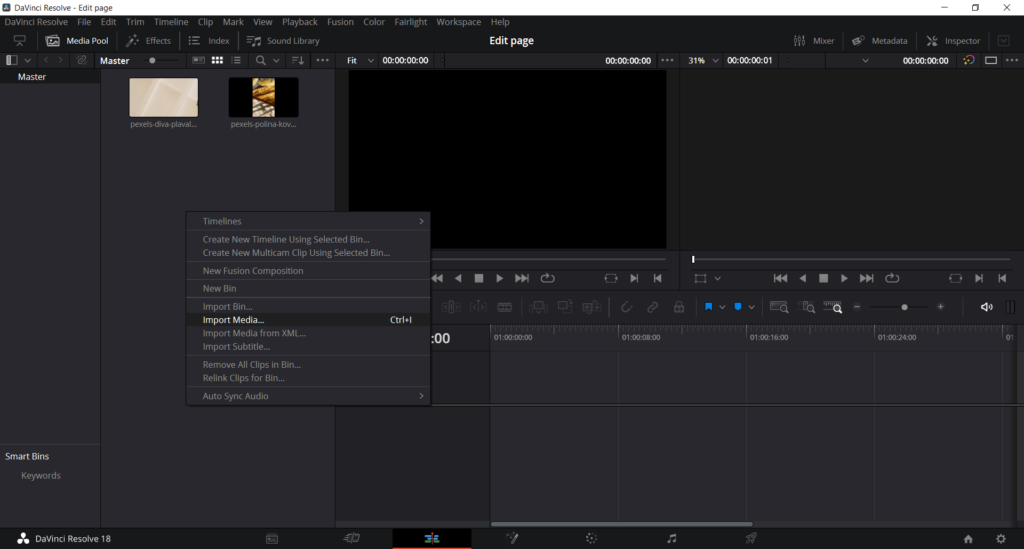
Next, go to the location where the media is placed on your computer or PC. Choose the media and click Open to display it on the DaVinci Resolve 18 application. Now you are set to edit the clip as per your requirement.
Step 02: Go to the Edit page
As you know, there are multiple pages in the bottom toolbar of the canvas. From these pages, we will choose the Edit Page by clicking on it as displayed below. In this tutorial, we will rotate, scale, and transform a clip.
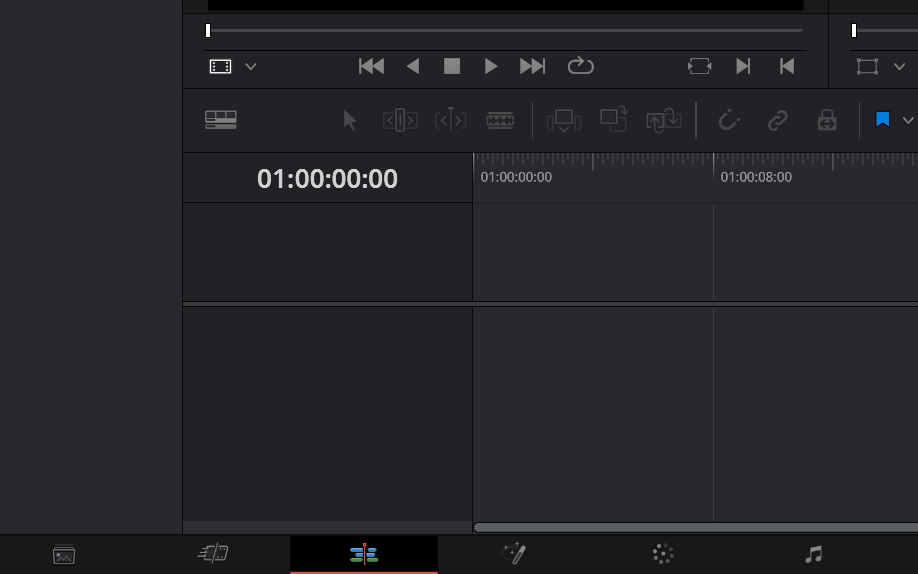
Once you choose the Edit Page, you will notice that the clip appears in the Media Pool. You can simply click on the media clip you prefer to edit from the Media Pool and the specific clip can be previewed on the Source Viewer. Choose the In and Out points as necessary and click and drag the clip to the timeline.
Step 03: transform, scale & rotate a clip
In order to perform these transformation to a clip, you have these two methods:
- Using the Visual method
- Using the Inspector method
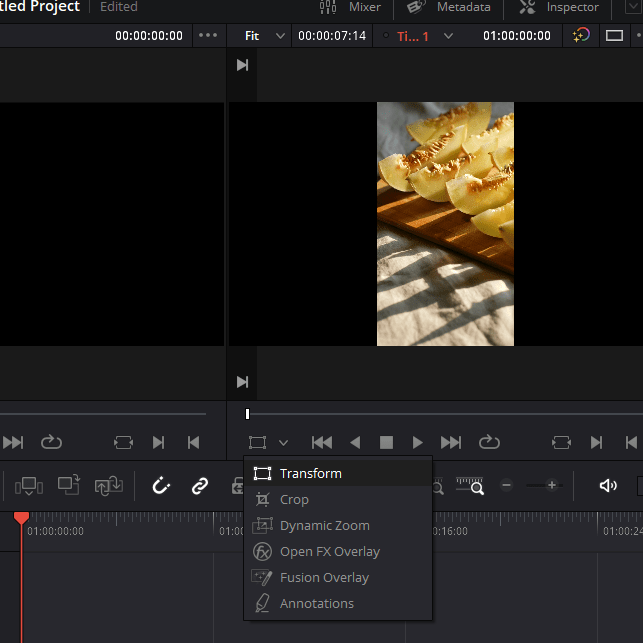
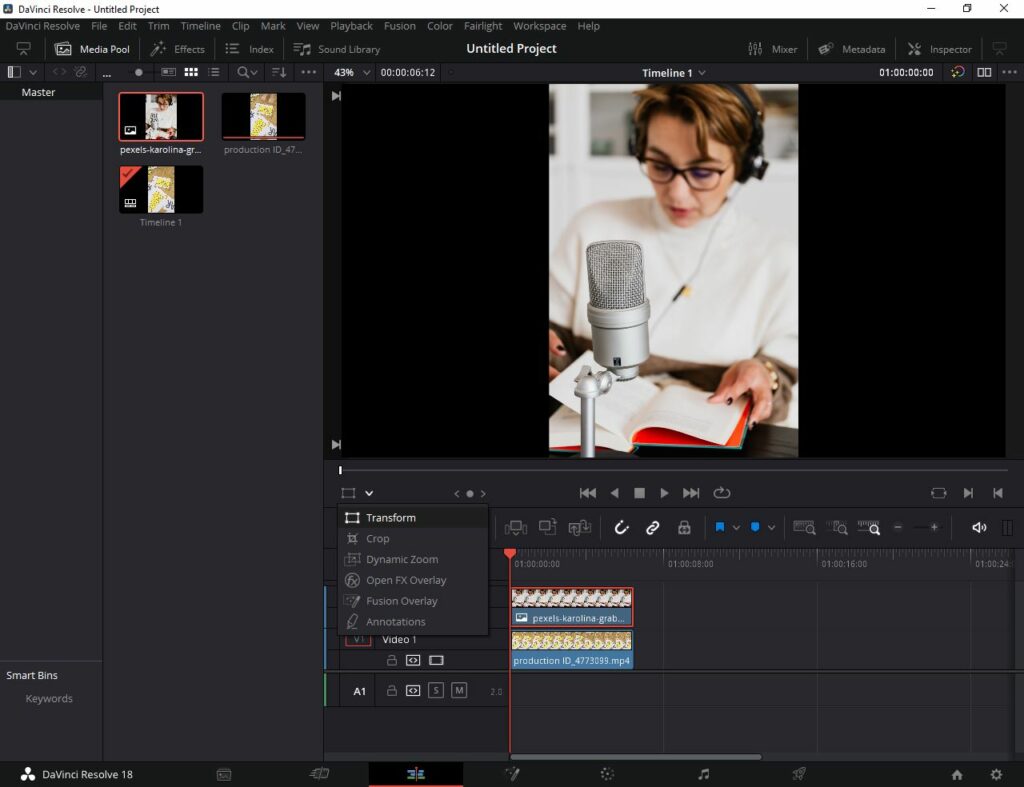
Visual method
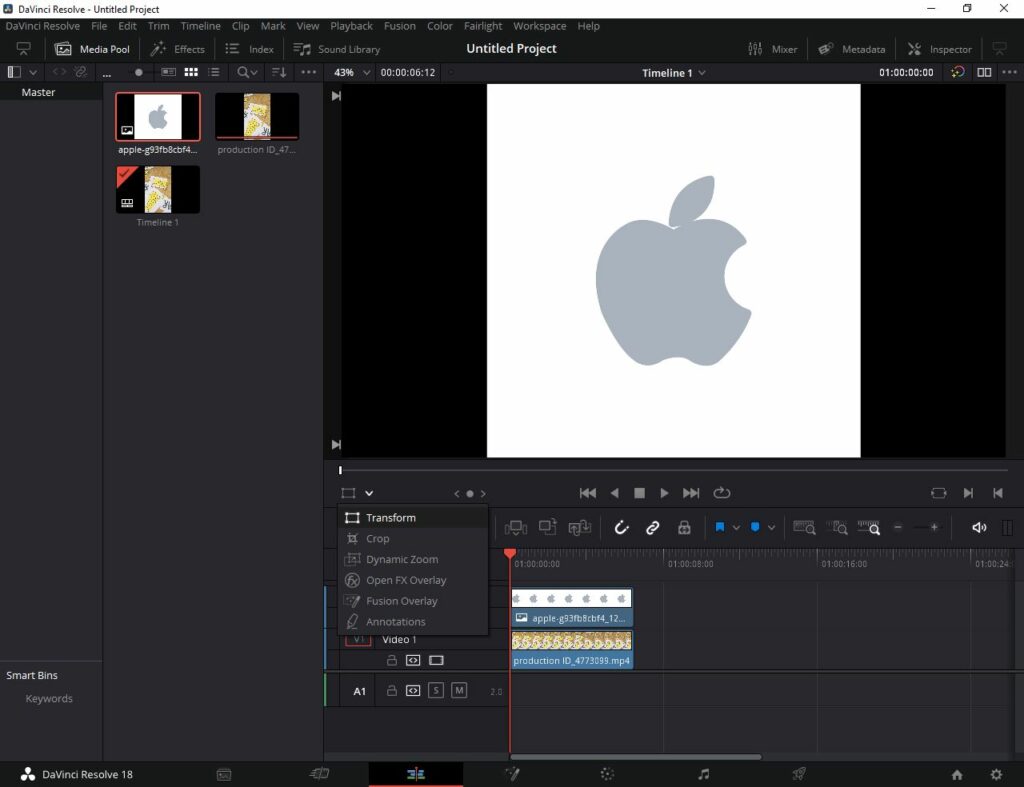
At the bottom left side of the Timeline Viewer, you will see the Transform mode pop-up button. The icon looks like a small rectangle and once you click on it, a couple of options will be revealed:
- Transform
- Crop
- Dynamic Zoom
- Open FX Overlay
- Fusion Overlay
- Annotations
Choose the first option for the pop-up menu to start making changes to your clip.
How do you Transform a Video in DaVinci Resolve?
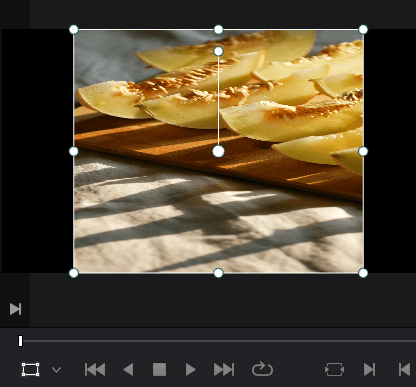
Transform allows you to transform a clip in various ways. You can choose to rotate, extend, flip, resize, and other actions. To transform the clip,
- Click on the Transform option from the drop-down menu.
- Now, you can do any adjustment as may be necessary by clicking and dragging the control handles which appear around the clip.
If you want to widen or narrow the clip horizontally and/or vertically, simply:
- Click and drag the top and side control handles according to your preferences.
If you want to move your clip around,
- Simply click anywhere on the clip in the preview window:
- Next, drag it using the mouse and the clip will be relocated according to your preference.
How do I scale a video in DaVinci Resolve 18?
To scale the clip,
- Click and drag any corner control handle as necessary.
This final method allows you to retain the aspect ratio of the clip.
How do you rotate a Video in DaVinci Resolve?
To rotate the clip,
- Click on the ‘Transform’ option under the drop-down in the Preview window.
- You will notice the two little points in the middle of the clip.
- Click on the top point and drag this point towards the direction you want to rotate the clip.
- Now, the clip will be rotated accordingly.
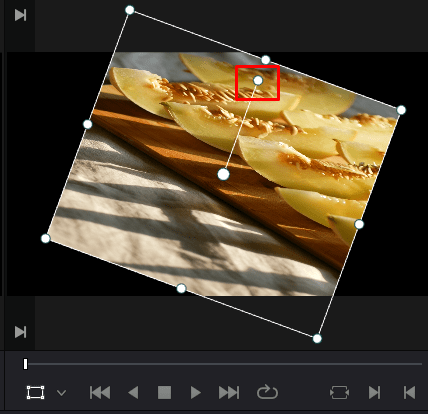
If you drag the point to the left, you can rotate the clip to the left. If you drag the point to the right, you can rotate the clip to the right. As simple as that.
Inspector Method
With the Inspector method, you are more in control over the transformations as these can be made manually. Start by making sure that the clip you want to transform has been added to the timeline and it is selected.
To Transform the clip,
- Go to the Inspector located in the Interface Toolbar.
- Now, make sure that the Video Button is selected.
- The Inspector will be opened.
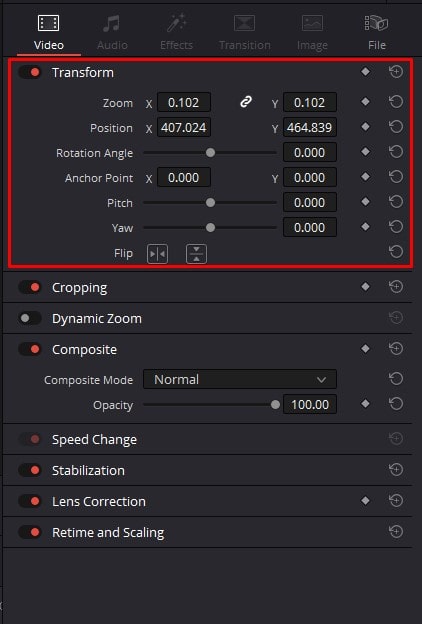
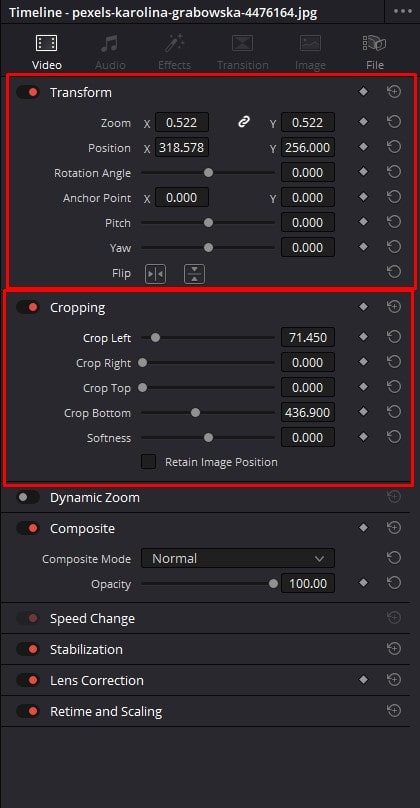
- Different ‘Transform’ controls will be displayed first.

The following are the options in the Transform parameters:
- Zoom: Hover over the numbers in the zoom option. Drag the mouse to the left to zoom out and to the right to zoom in. You can also insert the values manually and choose whether you want to keep them proportionate by clicking on the chain icon.
- Position: Reposition your clip by clicking and dragging on the values or by inserting the preferred values manually.
- Rotation angle: The slider can be used to rotate the image clockwise or anticlockwise based on your preference. The angle value can also be inserted manually.
- Anchor point: Move the anchor point to the left or right by inserting numbers inserted or by clicking and dragging on the values.
- Pitch: Tilt the video forward or backwards by dragging the slider or by inserting a value.
- Yaw: Twist your clip on its vertical axis by dragging the slider or by inserting a value.
- Flip: Allows you to flip the clip horizontally or vertically.
How to transform an object using transform tools
In this section, we will integrate a logo into the video, rescale it and reposition it to the corner. The goal of the section is to teach you how to integrate an object, make it smaller, and move it at the particular location in the video.
Step 01: Set up your document
To do this task,
- Open the DaVinci Resolve 18 application.
- Right-click on the Media Pool section.
- Choose the option ‘Import Media’ as displayed below.
Next, go to the location where the media is placed on your computer or PC. Choose the media and click ‘Open’ to display it on the DaVinci Resolve 18 application. Now you are set to edit the clip as per your requirement.
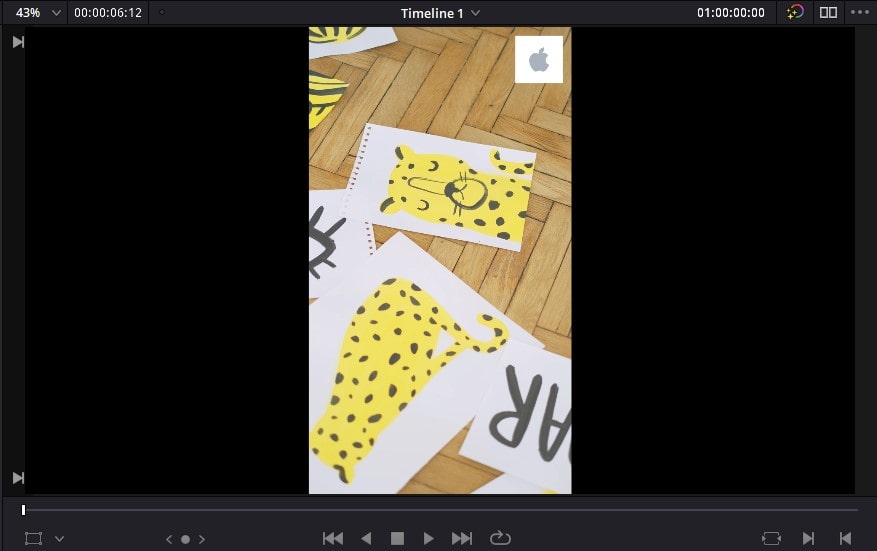
Step 02: Set the Logo
Initially, drag the logo to the timeline. You can place the logo on the timeline above the clips at the right destination. Next, stretch the logo image clip as necessary according to the preferred duration.
Step 03: Use the Transform tools
Next, click and select the clip before you start adjusting the transform options.
To activate the Transform tools,
- Click on the ‘Transform’ option displayed under the Timeline Viewer.
- Now, you can adjust the logo as per your requirement.
- From the preview window itself, you can use the corner handles displayed on the logo and scale it out. If you click and drag the logo, you can move it across and place it at a desired destination.
- Alternatively, go to the Inspector located in the right-hand side corner. By using the Inspector, you can change the position and the scale of the image manually.
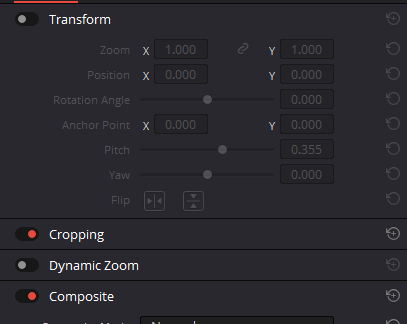
How to disable Transform Controls
If you want to see how your clip looks without the transform controls which you previously applied, follow the below steps,
- Go to the Inspector located in the Interface Toolbar.
- Click on the toggle buttons next to the Transform option.
- Once it is disabled, the Transform category will looks like this.
How to reset Transform controls
If you want to reset an option to its default state, double-click on the specific option and it is reset to default. For example, if you want to reset the zoom option under the Transform controls,
- Go to the Inspector option on the right side corner of the page.
- Double-click on the Zoom option.
- You will notice that the zoom control will be set to default.
If you want to reset the entire transform setting,
- Click on the refresh icon placed besides the Transform option.
- Then, the default parameters are set.
How to copy the attributes from one clip to another?
In this use case, you can copy the settings which you applied onto one clip. Next, paste the same settings onto another clip so that both have the same settings applied. This saves you from applying the same attributes manually for each clips and wasting time.
To copy the attributes,
- Right-click on the clip where you want to copy the attribute.
- Choose the option copy.
- It copies the attributes of the specific clip.
- Alternatively, use the keyboard shortcut Ctrl/Cmd+C.
To apply the copied attribute,
- Right-click on the clip where you want to paste the copied attribute.
- Choose the Paste attribute option.
- Alternatively, use the keyboard shortcut ‘Alt/Option+V’.
Now you would notice that the second clip has the same settings and controls as the first clip. It’s a quick tactic to fasten your work.
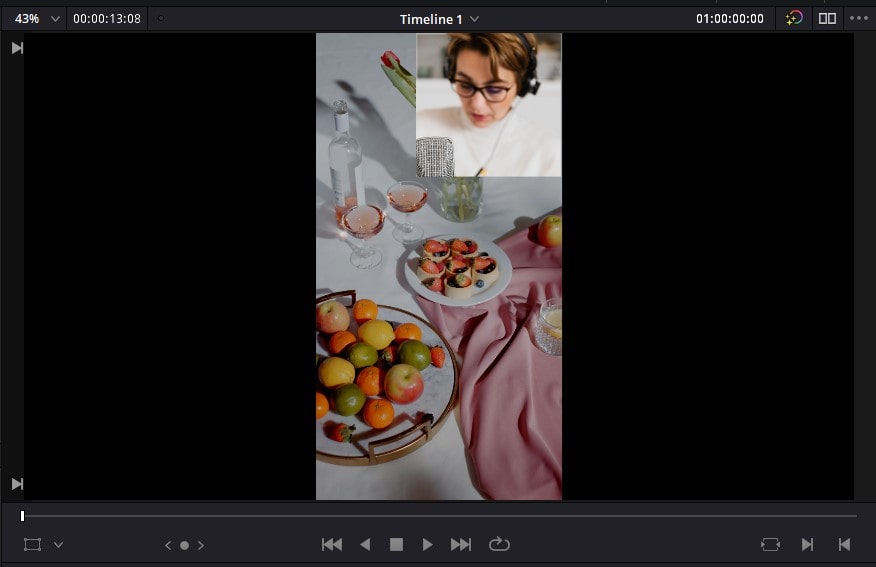
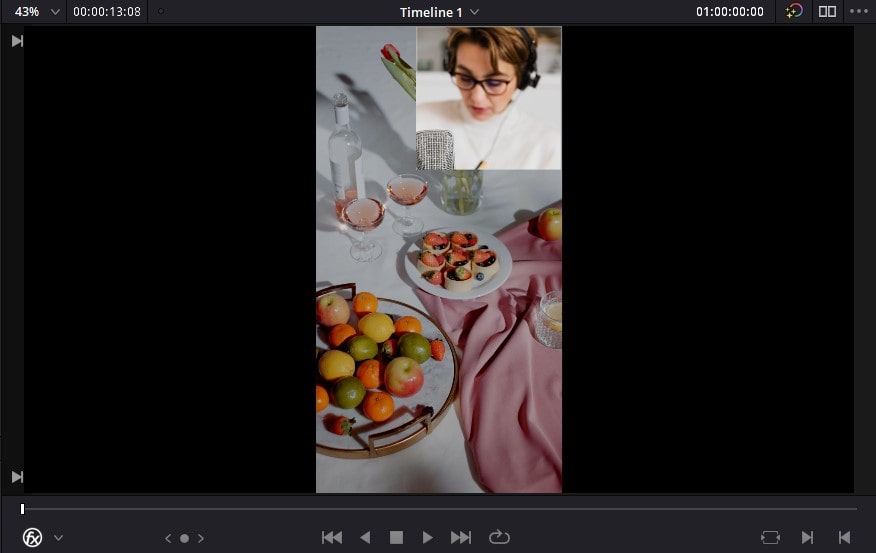
How to add a Picture in Picture effect in DaVinci Resolve
In this section, you will have two clips. We will use one clip as the main clip and place the other one a bit smaller over it. This creates a picture-in-picture effect on the video. When you want to display multiple activities or multiple clips at the same time, you can add this effect using the Transform controls available in the Inspector.
Step 01: Set up your document
To do this task,
- Open the DaVinci Resolve 18 application.
- Right-click on the Media Pool section.
- Choose the option ‘Import Media’ as displayed below.
Next, go to the location where the media is placed on your computer or PC. Choose the media and click ‘Open’ to display it on the DaVinci Resolve 18 application. Now you are set to edit the clip as per your requirement.
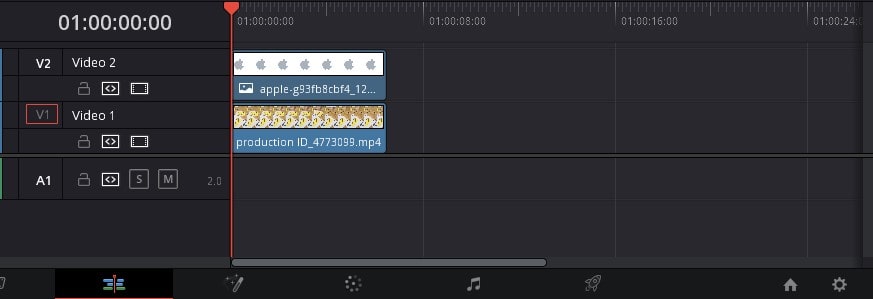
Step 02: Set the Clips in the Timeline
In the picture-in-picture effect, the two clips on the timeline must overlap with each other. For example, if you have a clip that plays from the beginning, the other clip should begin along with the duration of the previous clip. It can overlap at the beginning, middle, or even at the end as well.
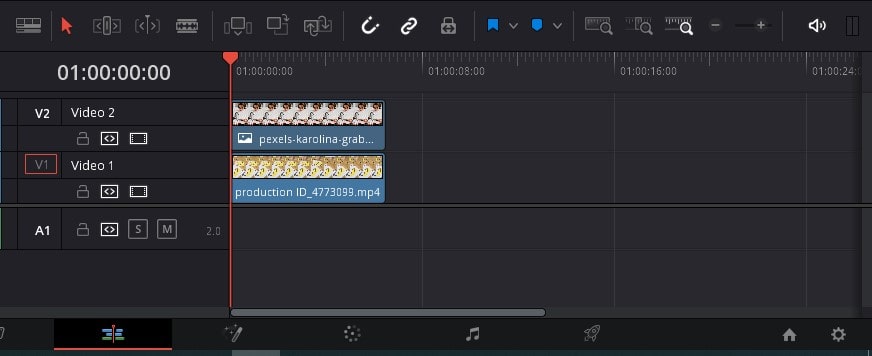
If you set the timeline properly to create the picture-in-picture effect, the rest is very easy.
Step 03: Adjust the Settings
Next, you should place the playhead at the point where the 2 clips overlap. Then, select the overlapping clip which you want to use at the top to apply the picture-in-picture effect.
Once you select it,
- Click on the Inspector from the Interface toolbar.
- You can rescale the clip by zooming out and reposition it by changing the Position values.
- Apart from that, you can adjust the Crop settings to crop your clip for further precision.
Once you make the clip smaller and play the video, you would notice that the picture-in-picture effect is created.
How to apply a Transform effect
Transform effect and transform tools are two different criteria. With the Transform effect, you can add effects and transform clips in a wide variety of ways than those offered in the Visual method and the Inspector Method.
In this section, we will walk through 4 different types of transform effects by using the same setting as follows:
- Explore the main settings
- Create picture-in-picture effect
- Corner pinning
- Edge reflect
Step 01: Set up your document
To do this task,
- Open the DaVinci Resolve 18 application.
- Right-click on the Media Pool section.
- Choose the option ‘Import Media’ as displayed below.
Next, drive to the location where the media is placed on your computer or PC. Choose the media and click ‘Open’ to display it on the DaVinci Resolve 18 application. Now you are set to edit the clip as per your requirement.
Step 02: Add the Transform effect
Transform effect helps to create the effect feature through the Inspector. It has both the Transform tool settings and the Transform effect as well.
To add the Transform effect,
- Go to the Effects library from the Interface Toolbar
- Choose Open Fx.
- There are various Open effects available. Go to the Resolve FX category.
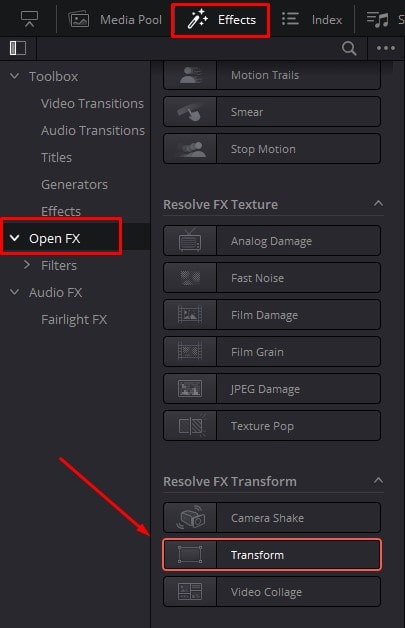
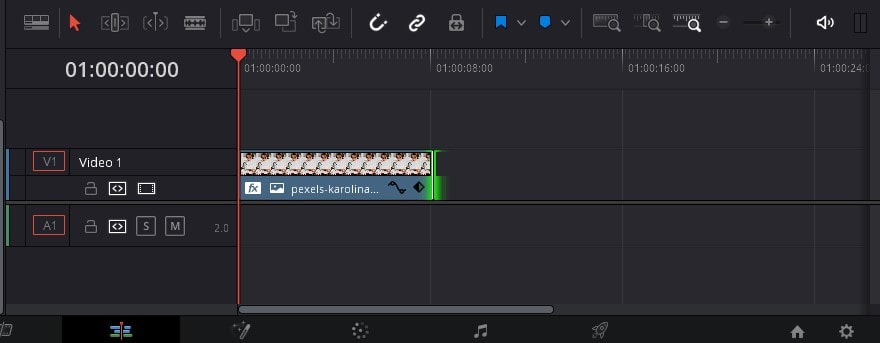
- Next, click and drag the Transform effect and drop it onto the clip you want to apply the Transform effect to.
- Make sure to place the Transform effect over the clip which is located in the Timeline.
Step 03: Explore the main transform effects from the Inspector
Once you have added the Transform effect to the clip, click on the clip and choose the Inspector from the Interface toolbar. On the Inspector, choose the Effects button to explore the different options.
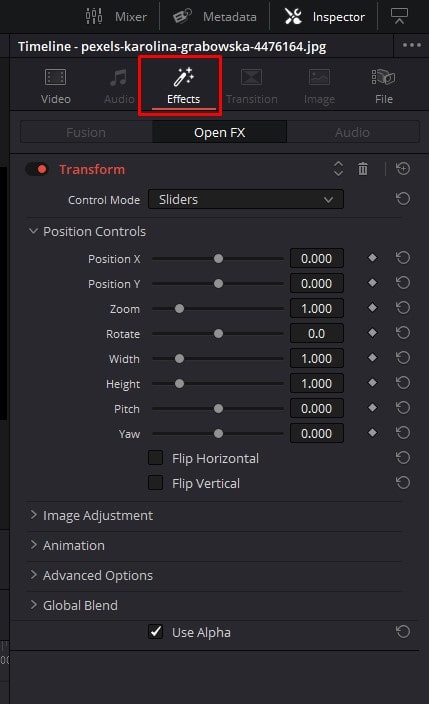
There are plenty of settings to explore, but the most important ones are the following:
- Change the position
- Zoom in and zoom out
- Rotate
- Crop
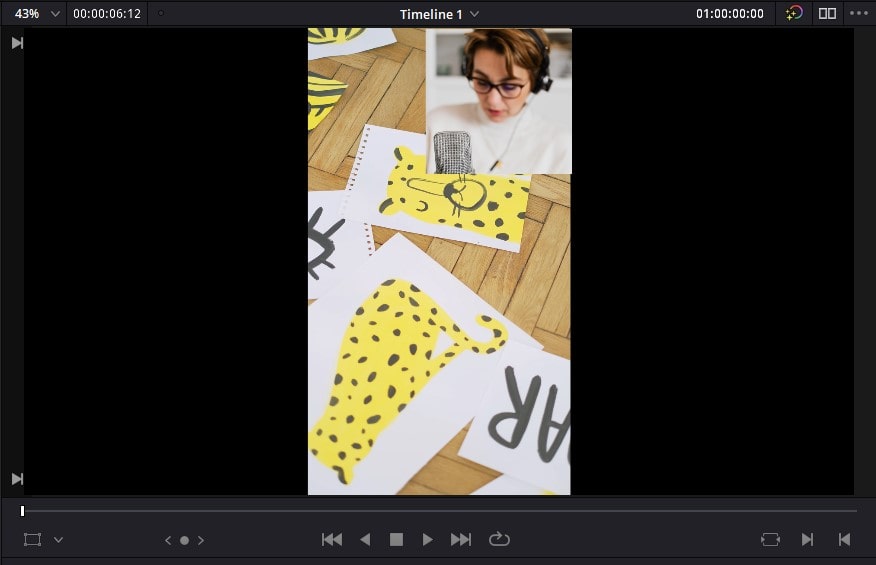
Step 04: Create a picture-in-picture effect
Before you add the Transform effect, make sure you have two clips on the timeline placed over one another- one clip overlapping the other.
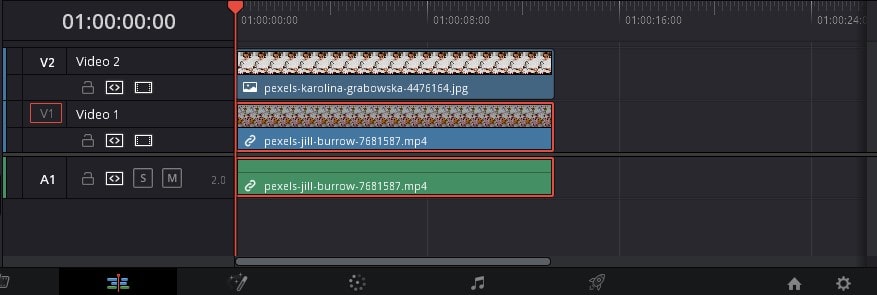
Next, follow step 02 and add the Transform effect to the clip which you want to minimize to get the picture-in-picture effect.

Next, click on the Inspector and change the following settings:
- Zoom out
- Adjust the position
- Crop the clip if necessary
- Use the edge rounding slider under the Cropping setting
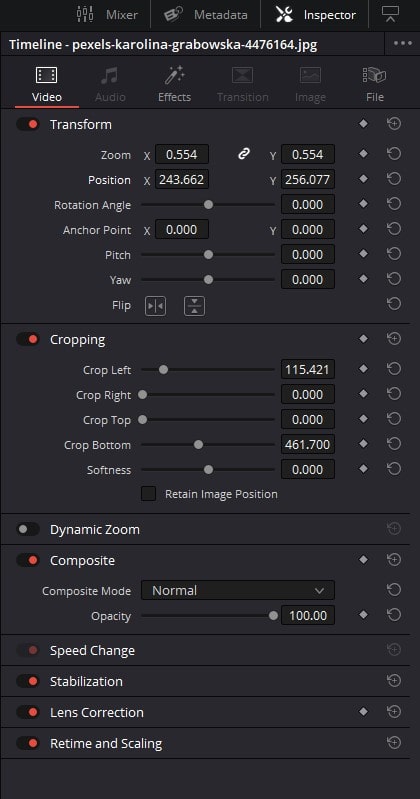
Under the ‘Image adjustments’, you can crop the clip in various ways such as crop left, crop right, crop top, crop bottom and much more!

The following is the result of the picture-in-picture effect creation:
Step 05: Use Corner pinning
You use corner pinning if you want to insert a clip within another frame of the clip. For example, if there is a clip with a television and if you want to insert another clip into the television frame- corner pinning comes in handy!
Initially,
- Follow step 02 and insert the Transform effect clip to the clip you want to corner pin.
- Next, click on the clip to which you added the Transform effect and choose the Inspector in the top right corner.
- Go to Effects and choose the Transform settings. Make sure that Transform is enabled here.
Next, go to the preview window and click on the slider drop-down. Among a couple of options, choose the Open effects overlay. As soon as you click on it, the grids appear on the canvas. Now, grab the corners and fit the clip to the frame on the other clip.
Finally, hit play and check out. You will notice that the corner pinning works perfectly and the clip within the frame looks absolutely perfect!
If you want to further edit the clip,
- Go to the Inspector.
- Under the effects, you can change the settings such as softening the edges per your requirement to fit the clip perfectly.
Step 06: Adding Edge reflect
In this section, we will add a reflection to a particular clip. You can choose a clip or a logo to play around with the edge reflect setting.
Next, follow step 02 and add the Transform effect to the clip you prefer to add the edge reflect to.
To further add the Edge reflection,
- Click and choose the clip.
- Click on the Inspector.
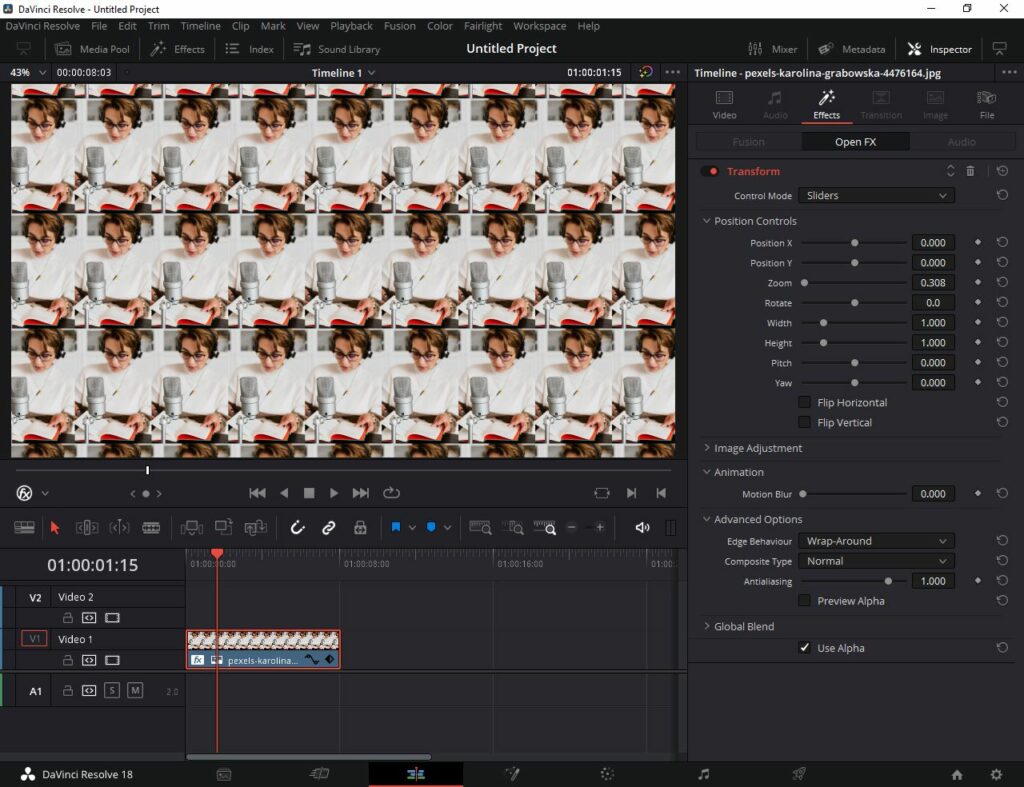
- Under the Effects button, scroll down to Advanced options.
- Find the Edge Behaviour setting and choose ‘Reflect’ from its drop-down menu. Now, you would notice that the clip is being reflected on the Timeline Viewer.
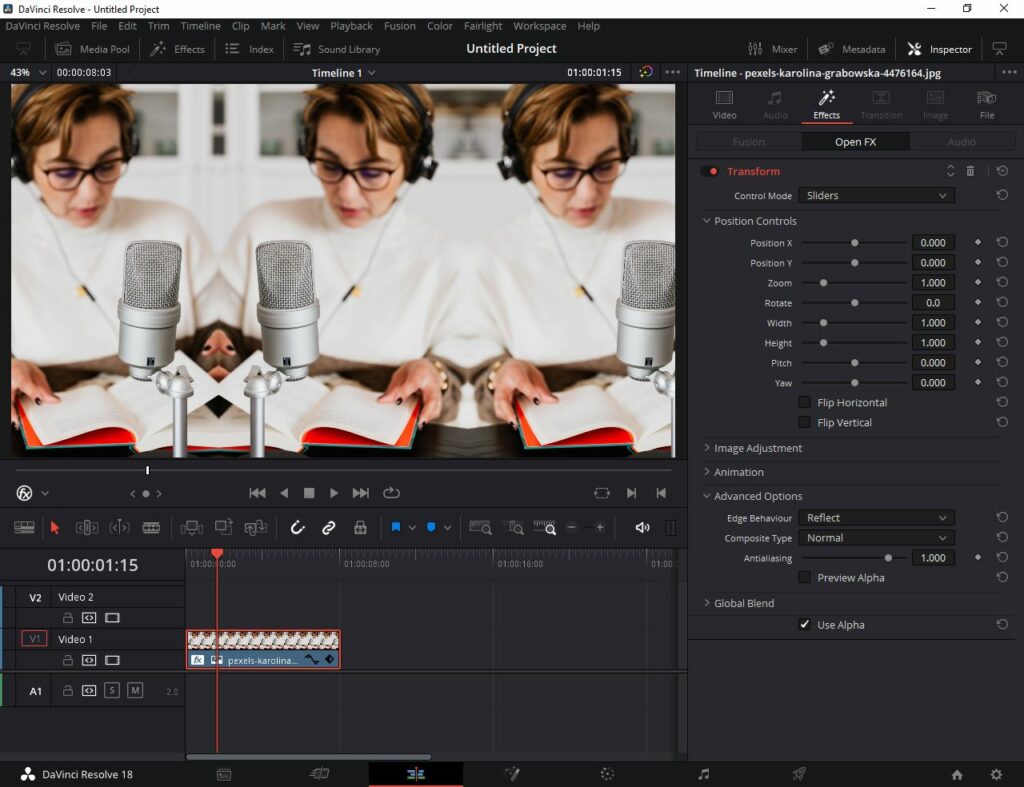
- To increase the number of reflections, zoom out using the Zoom setting slider.
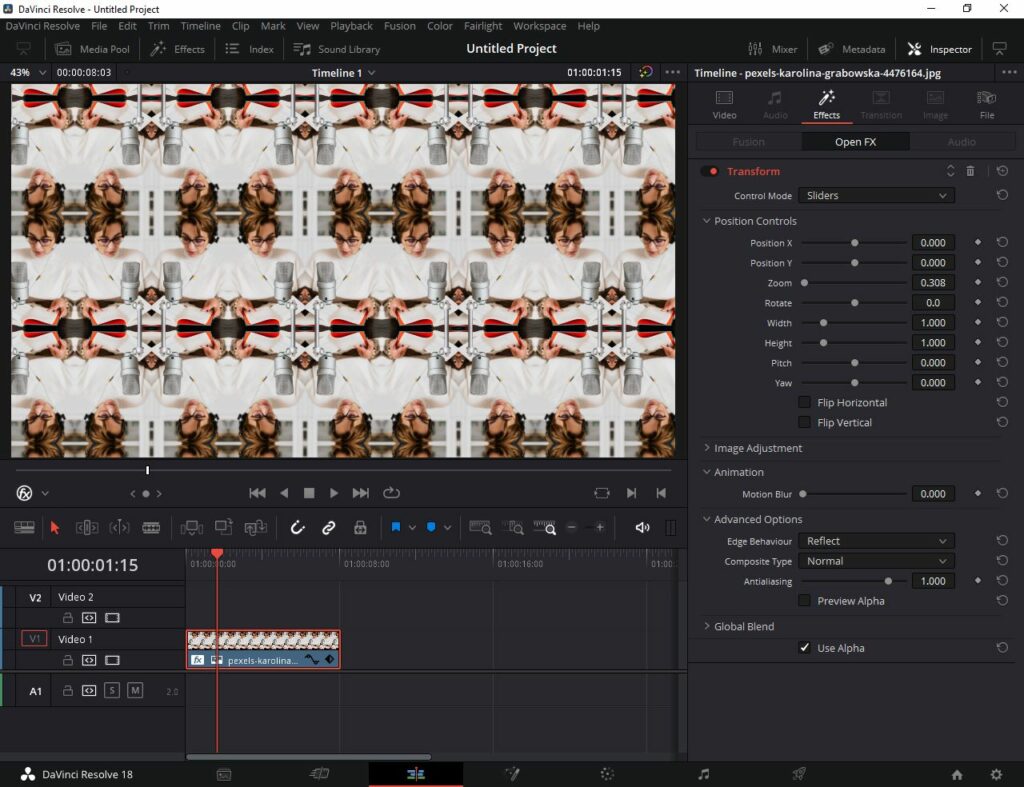
- Alternatively, you can choose the Wrap-around option. It multiplies the visuals and gives a greater transform effect.
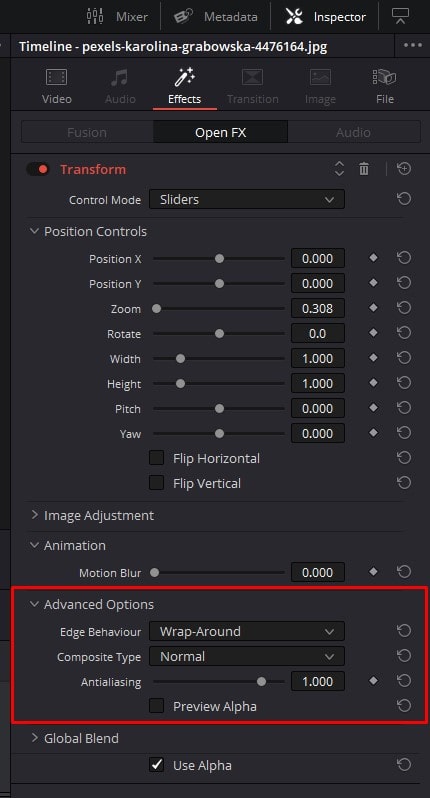
The following is the result of the wrap-around effect:
Conclusion
In conclusion, transforming, scaling, and rotating in DaVinci Resolve 18 are crucial skills for video editing and visual effects. Understanding both the visual and inspector methods is important. We have also provided you different examples to better understand the transforming possibilities in DaVinci Resolve 18.
It helps to perform these tasks and gives editors the flexibility to approach projects with greater precision and control. Whether working on simple adjustments or complex visual effects, the ability to effectively transform, scale, and rotate elements in DaVinci Resolve 18 is a valuable skill to have in your video editing toolkit.
Thanks for reading & feel free to check out more of our articles!
Expert Rating
Summary
In summary, transforming, scaling and rotating clips can be performed using the visual or the inspector method effectively. Alongside, the transform effect in DaVinci can swirl you with amazing techniques.


