How to Draw a Snowmobile | A Step-By-Step Guide
Have you ever wondered what a snowmobile is? A snowmobile is a vehicle for icy adventures. People use it to cruise over the snow. Let me tell you, it is really fun driving a snowmobile. Snowmobile isn’t new; the first snowmobile came into being around 100 years ago. Isn’t that cool?
Today, we will have a cool, icy adventure and learn how to draw a snowmobile. Without any delay, grab your stationary as we’re about to begin. This is going to be an exciting session.
What you will need
- A pencil
- An eraser
- A sheet of paper
- Coloring kit
- Ruler
- 30 minutes
Draw a snowmobile
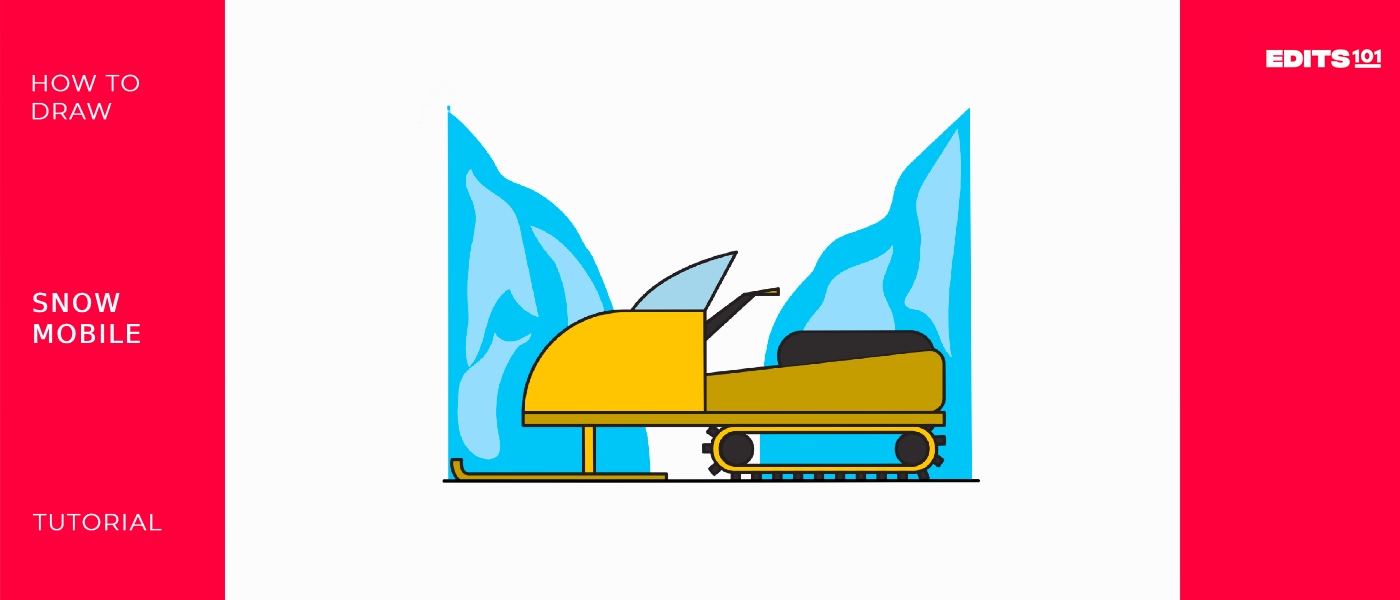
Drawing a snowmobile is a fun activity. This guide contains all the steps required to draw a snowmobile. Within a few minutes, you’ll have your snowmobile.
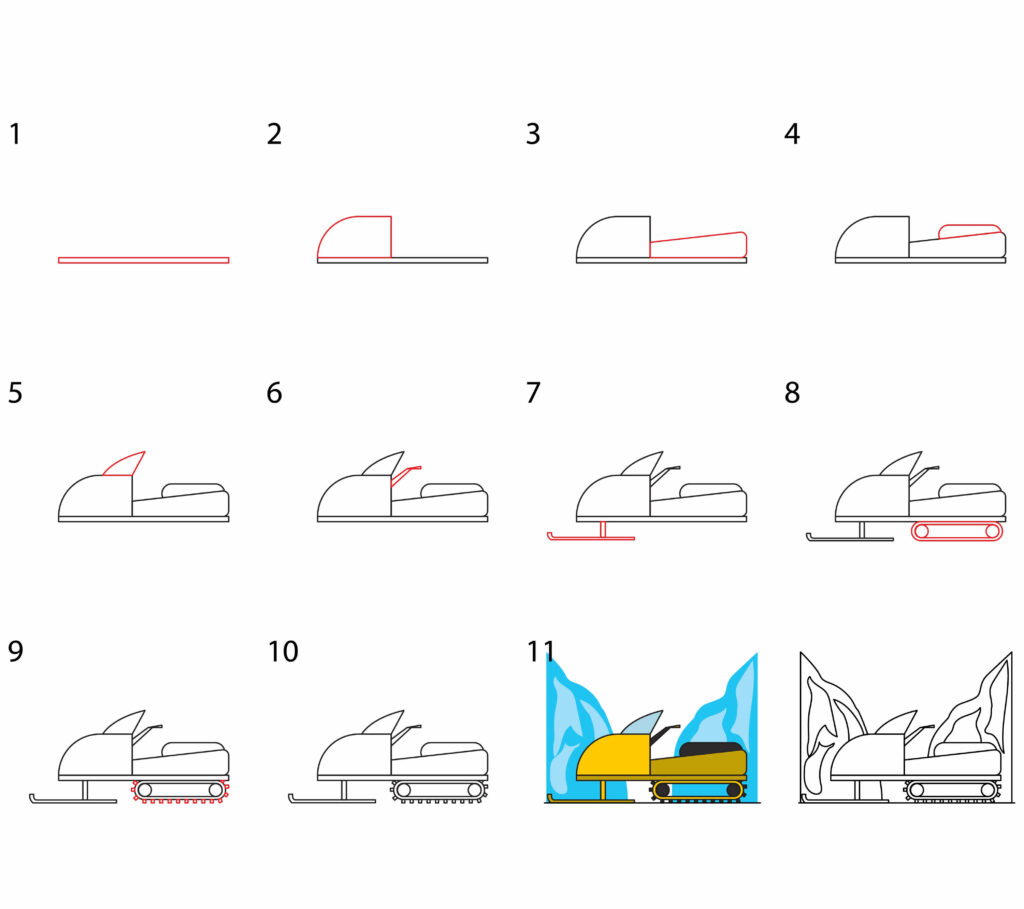
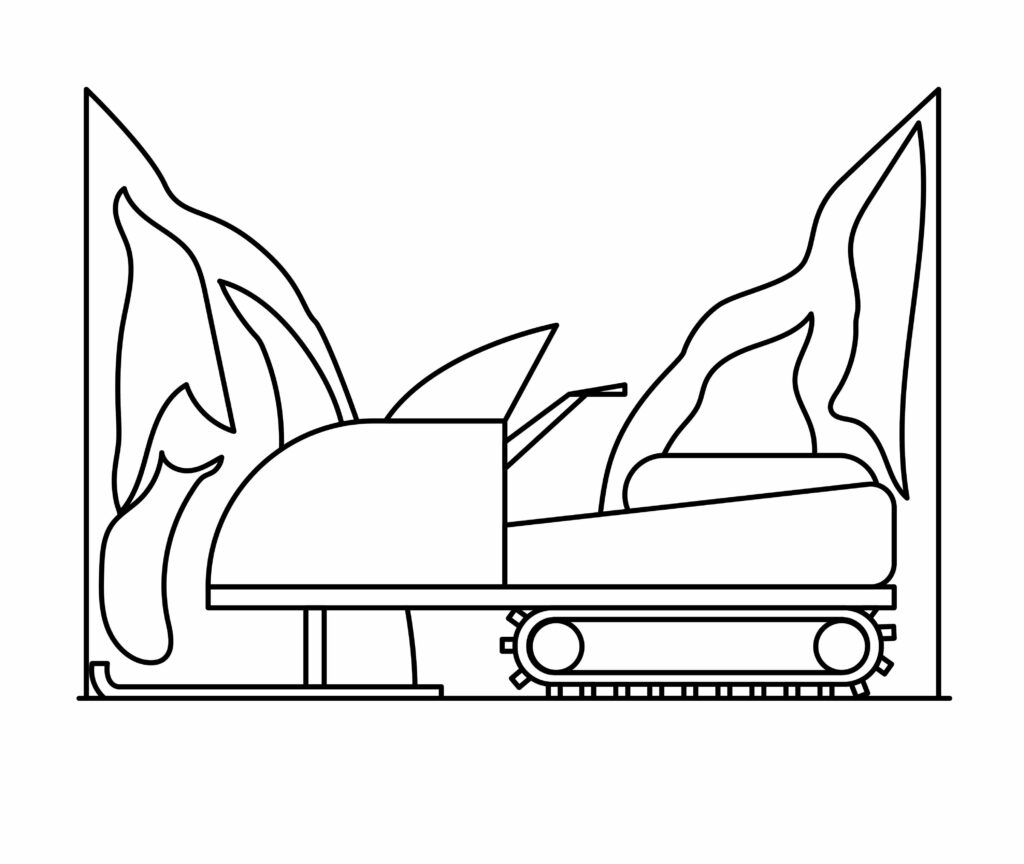
Step 1: Draw the baseline
We’ll begin by drawing the baseline of the snowmobile. Draw a nice and long horizontal line in the middle of the page. Make sure the line is straight. Right above this line, we’ll draw another horizontal line of the same length.
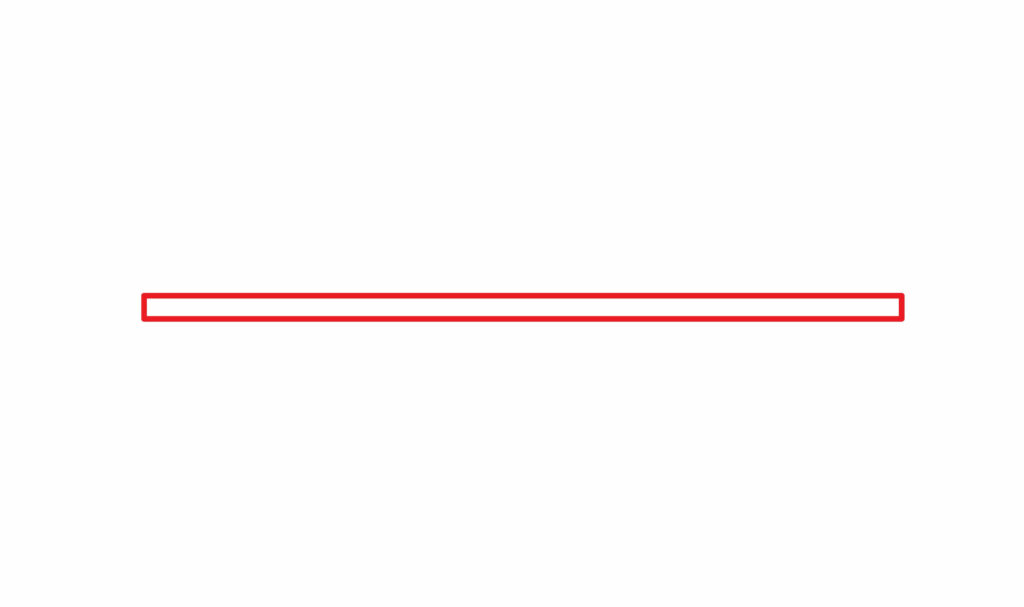
We’ll connect both these lines by two vertical lines. The baseline is ready.
Step 2: Draw the snowmobile head
A head is a round structure unless we’re talking about SpongeBob. The snowmobile’s head is round. We’ll draw a rectangle along the baseline starting from the left side to draw the head. We’ll make sure the left side of the rectangle is curved to give a sleek look.
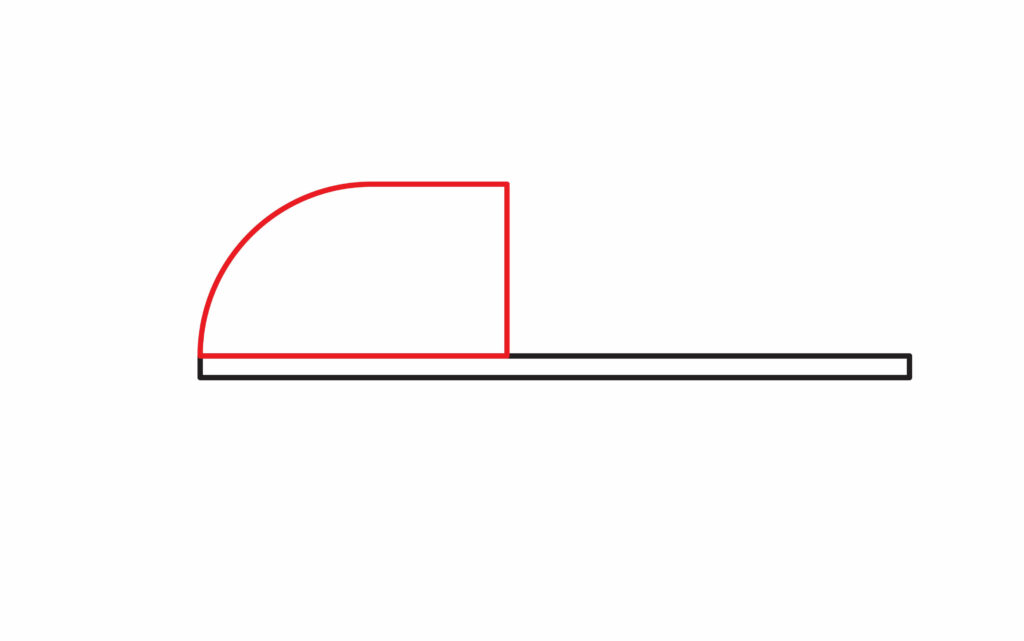
The starting point of the head and the baseline should be the same.
Step 3: Draw the dual seat
After drawing the head on the baseline, we’ll draw the dual seat on the rest of the baseline. As shown in the image, we’ll draw a rectangle on the baseline with its sides curved. The upper line of the rectangle should be slightly slanted.
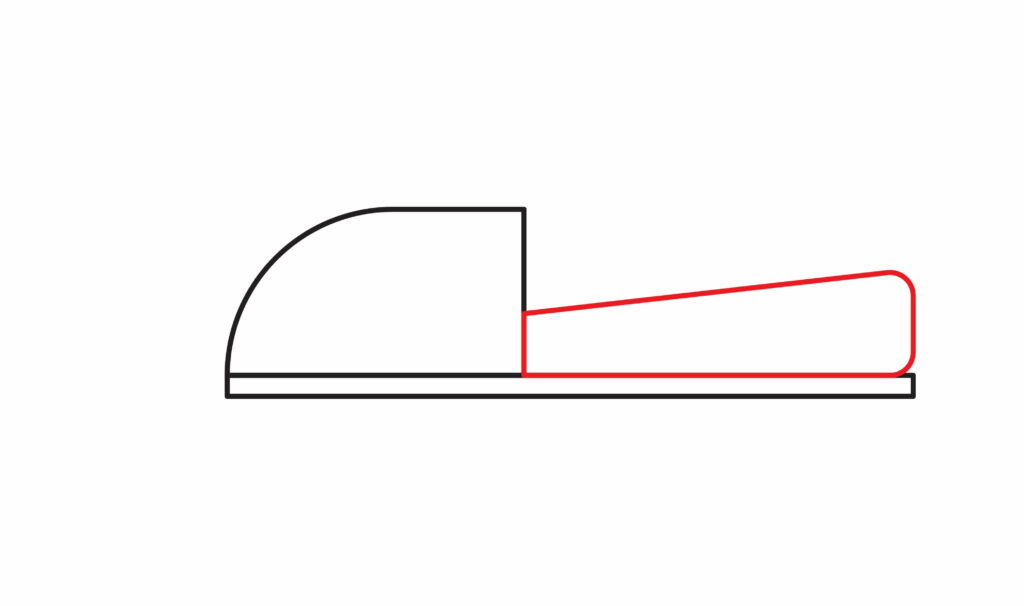
The ending point of the rectangle and the baseline should be at the same level.
Step 4: Draw the seat
We’ll draw another rectangle on the slanted line of the dual seat. We’ll make this on the top right side of the dual seat. The base of this rectangle is in common with the dual seat.
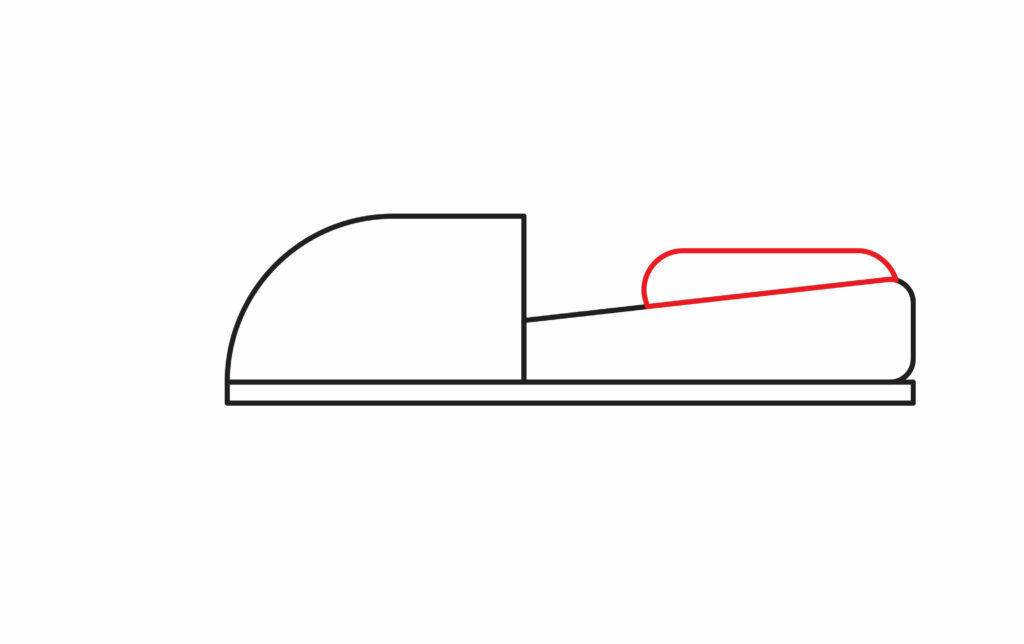
Make the corners curved for this rectangle. This will be our seat where we can sit and go for adventures.
Step 5: Draw the windshield
Now is the time to put protective components on our snowmobile. While cruising in the snow, there can be snow storms that could block our vision. To avoid that situation, we need a windshield to protect ourselves.
To draw the windshield, we’ll draw a curved triangle. This will be on the top right side of the head of the snowmobile.
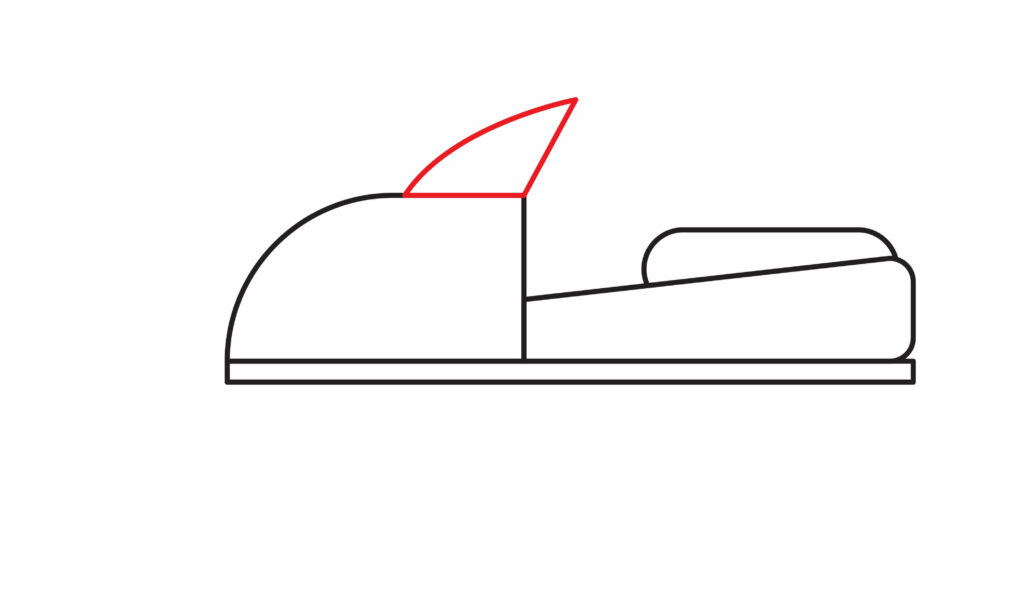
A triangle is shaped with three straight lines joined with each other. To have a curved triangle, we’ll make one side of the triangle a bit curved, as shown in the image. This will be our windshield.
Step 6: Draw the handlebar and brake handle
Get ready to steer the snowmobile like a pro. But how to steer without the handle? Let’s make the handlebar.
As we have already drawn the head of the snowmobile, we’ll draw the handlebar on the backside of the head.
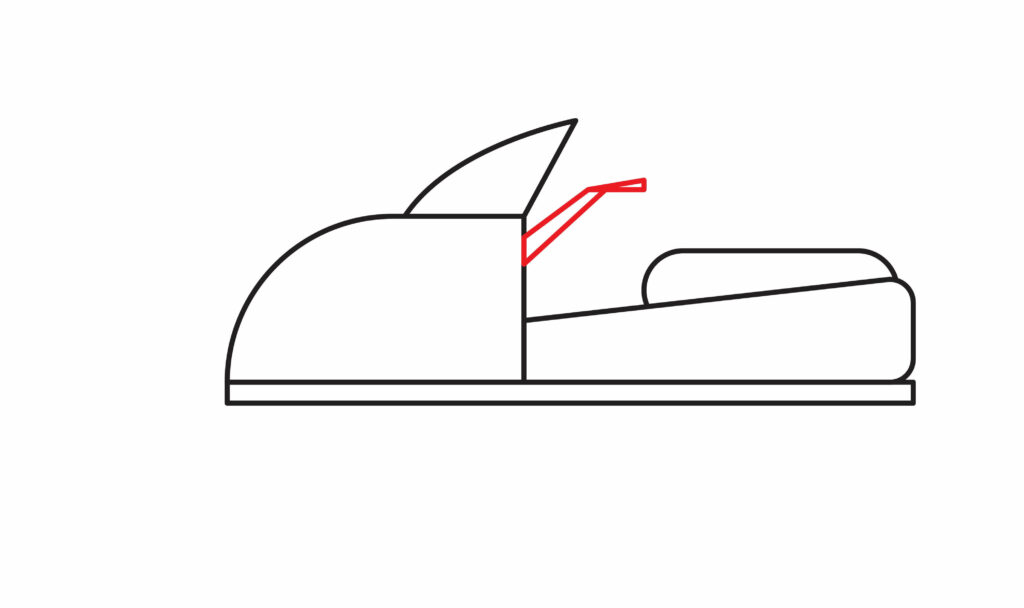
We’ll draw two slanted lines originating from the back of the head. This will be our handlebar.
At the point where the handlebar ends, we’ll draw another line horizontally. This represents the brake handle of our snowmobile.
Step 7: Draw the ski
To draw the ski, we’ll first draw the stand for the ski that holds it. Normally, the ski is present under the left side of the baseline. So we’ll draw it exactly there.
We’ll stretch two vertical parallel lines of small size under the baseline. The length of these lines should be the same.
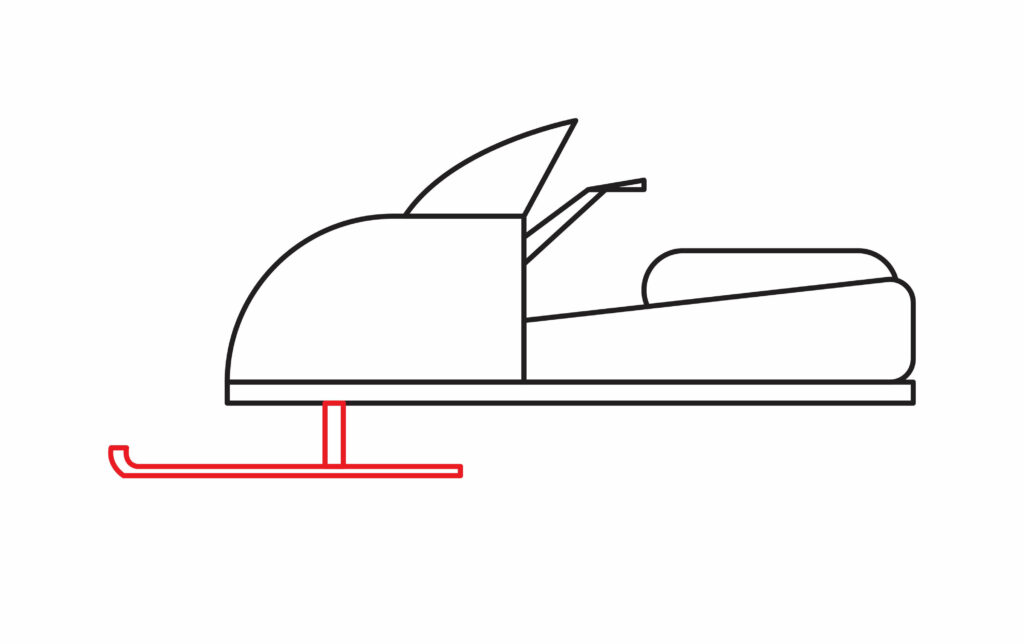
Below this, we’ll draw two horizontal lines curved upwards at the left end. Both lines should be of the same length. The ski is ready to skid.
Step 8: Draw the track
Under the right side of the baseline, we’ll make the track. The track has two rounded structures and a circular belt-like structure.
We will use any round lid to make the circle. If you don’t have it, use the freehand technique for the circles.
Now, let’s make the belt first. Draw a horizontal oval-like shape under the baseline. Within this structure, draw another oval of the same shape but smaller in size.
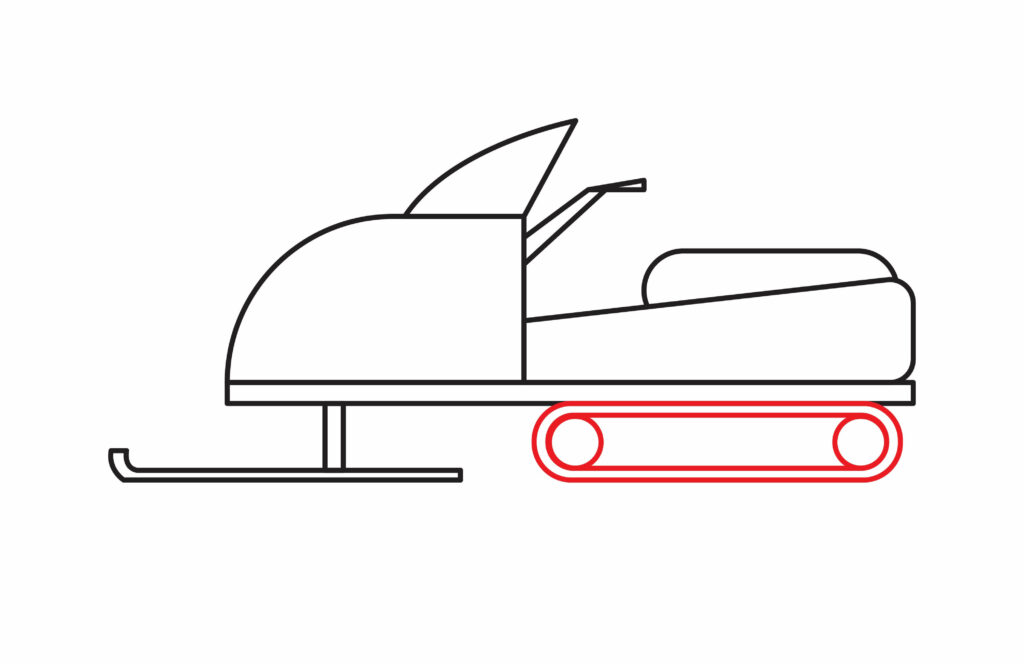
At the front and the back end of the oval, we’ll draw two circles inside it.
The belt and the circles will give a smooth ride while skiing.
Step 9: Add teeth on the track
As we know, friction on the snowy surface is too low. Our snowmobile needs a firm grip while running on the snow. This is where the “teeth” come into play. The teeth on the track would add grip to the snowmobile.
The teeth are small cube-like structures on the track.
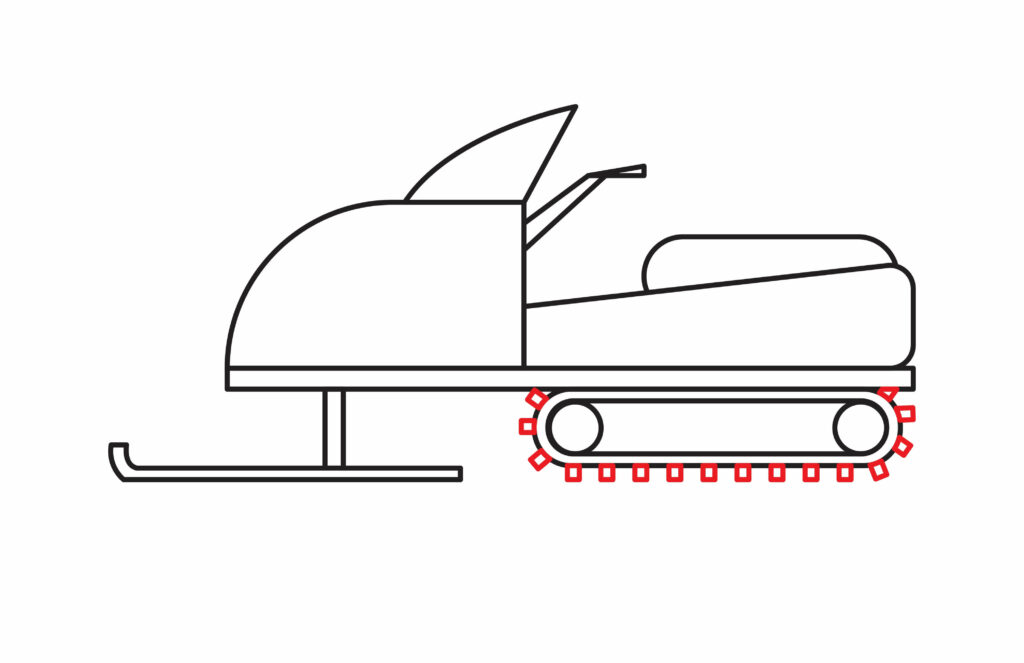
To make the teeth, we’ll draw several small cubes outside the belt of the track. Keep the distance between the cubes alike. The teeth will provide a firm grip on the snowmobile as the ski moves.
Step 10: The snowmobile is ready
Congratulations, young gun! Our snowmobile is ready for the action. We’re certain that you used your creativity and drew an amazing drawing. To make our drawing more prominent, we’ll use a marker and outline our drawing. After doing this, we’ll use an eraser to erase the pencil shades from our paper.
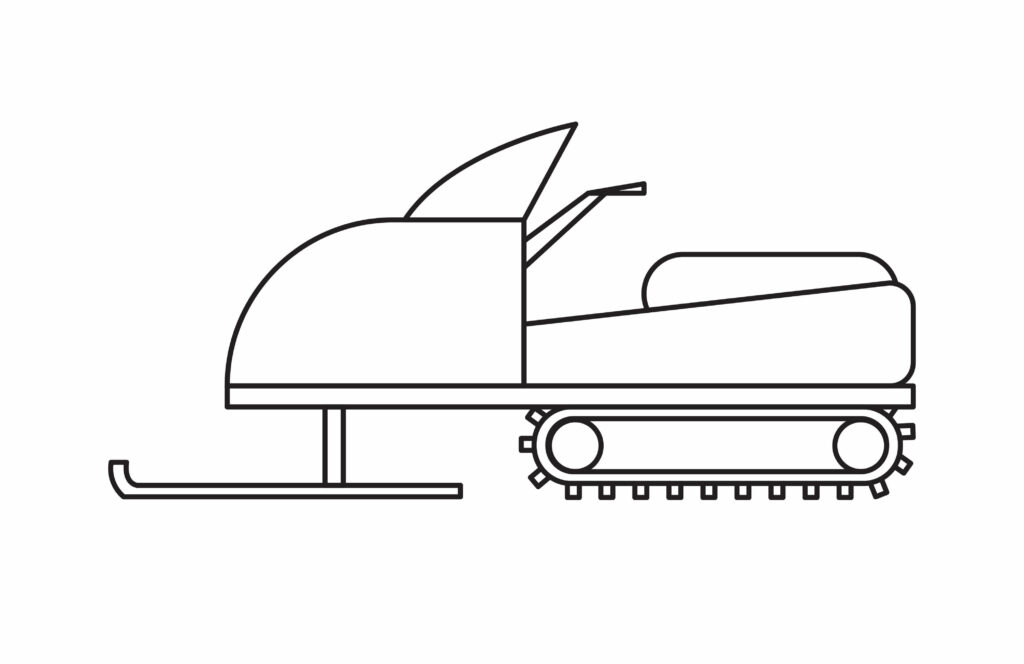
Now it looks fantastic, isn’t it?
We’re sure you enjoyed drawing it, but it doesn’t end here. More fun to follow.
Taking your drawing to the next level
We have made our snowmobile, but it’s not completely done. It’s missing its charisma. It needs more attraction and vibe. We don’t want just a simple snowmobile without any colors. But how do we make it charismatic?
In this section, we’ll add multiple components to our drawing to make it look appealing. It’s an easy process and is full of fun.
Adding background to your drawing
Keep in mind that drawing is like a story. A story is incomplete without having a background, as it gives a perspective of what’s happening. Imagine you’re playing with toys; the toys also need to be in any place, right?
Similarly, our drawing must have a background to make it sound real. Let’s make the background.
One question: where is a snowmobile most likely to be? Of course, in the snowy mountains. That’s why we’ll make snowy mountains as our background.
We’ll draw a straight line under the snowmobile. It’s the surface where the snowmobile will ski. After that, we’ll draw large curved lines behind our snowmobile, as shown in the image. The background is ready.
Adding colors to your drawing
Colors are the backbone of any drawing. Without colors, the drawing is dead. To give life to our drawing, we must add colors.
You can add colors according to your taste. But be realistic while adding colors. Do not color the icy mountains pink. As it’s icy mountains, color it light blue. Similarly, color the trees green.
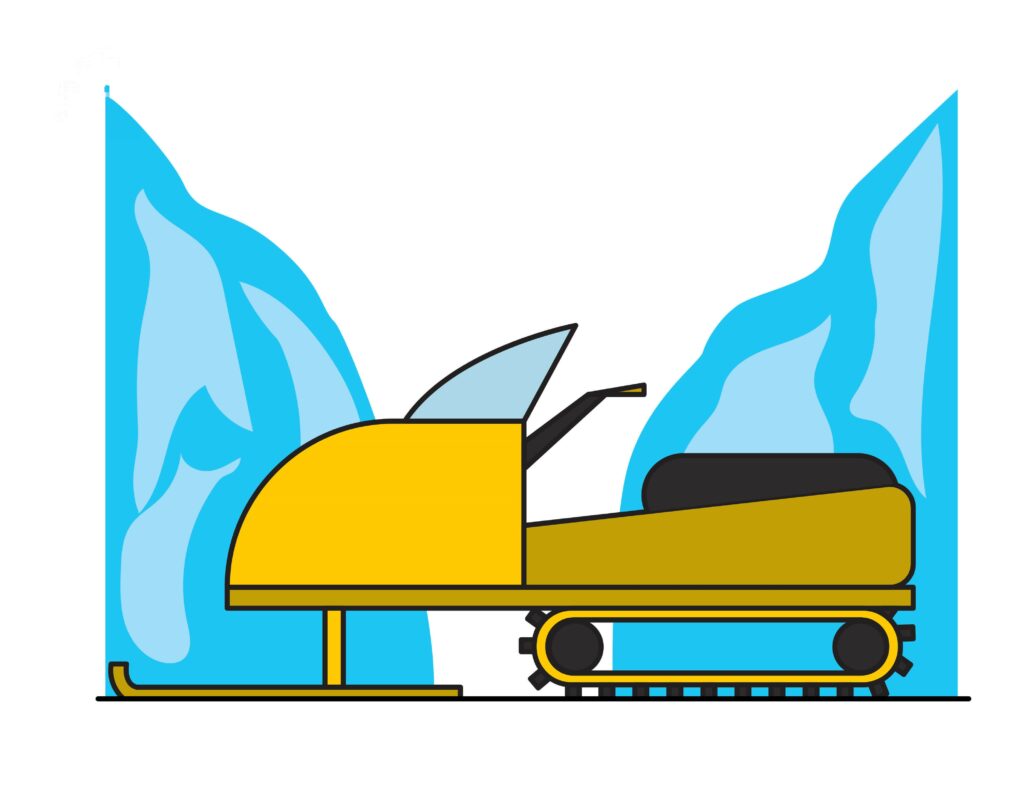
For the snowmobile, it is up to you how you color it. Make sure you color it nice and tidy. In the end, our snowmobile would look amazingly attractive. Be creative and choose the colors you like. Enjoy! Have fun while coloring your snowmobile. Make sure that all the color combinations look great together and that it stands out from all the other ordinary snowmobiles.
P.S Bonus tips
This section is all about creativity and experimentation. This section has no limit; you can add anything to your drawing that sounds good. We can assist you with a few ideas.
We can add trees in the background to enhance the beauty of the drawing. Adding your name to the ski head would be a great idea. It’ll give a sense of ownership. We can add a few wavy lines around our snowmobile to give the impression that our snowmobile is rushing fast. These wavy lines represent the blowing air.
These are just a few ideas; you can come up with multiple ideas and experiment with your drawing.
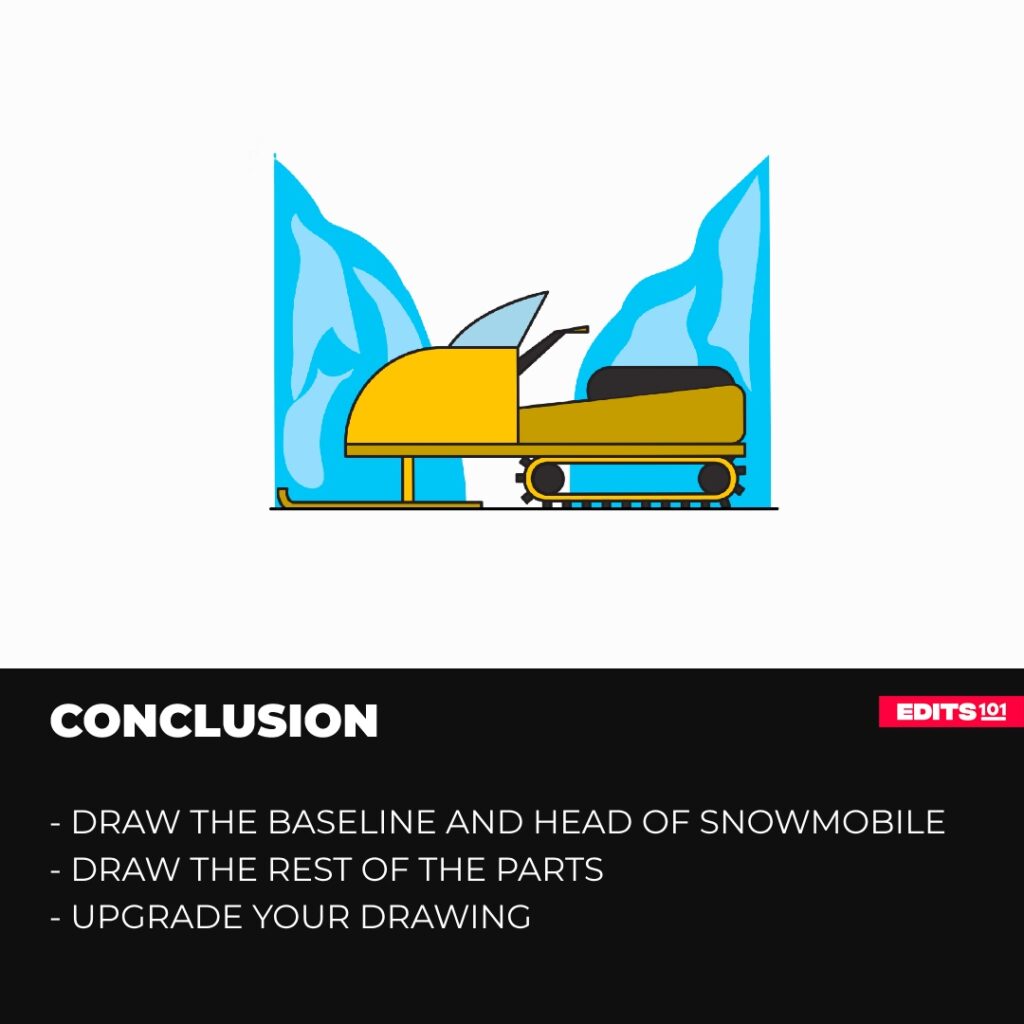
Conclusion
There you go! In just a few minutes and by following a few steps, we have made an amazing snowmobile drawing. At first, it seems difficult, but our guide has made it a piece of cake for you. First, we drew the baseline for the support. Then we made the snowmobile head and the dual seat. Then we drew the seat, windshield, handlebar, brake handle, ski, and track. Finally, we upgraded the drawing.
Drawing is a continuous process and requires practice. No one gets the perfect outcome on the first attempt. You have to try again and again until you get perfection. Just follow the steps provided, and we’re confident that you’ll have a fantastic drawing.
Thanks for reading & feel free to check out more of our articles!
Author Rating
Overall Rating
Summary
Take a look at the steps you should follow to draw a convincing snowmobile. You will also learn fun facts about snowmobile.