

Noise is the unwanted grain that is often seen in images, and it takes away from the quality of your photo.
Noise can come in many forms, but the most common are grainy noise or hot pixels. Noise originates from low light, high ISO, poor quality cameras and long exposures, amongst others.
When aiming to remove noise, it’s important to bear in mind which parts of the image detail should be preserved and which parts are the backdrop and therefore may be blurry.
Denoise Filter in Affinity Photo: What is it? (Destructive Method)
An effective way to remove noise in Affinity Photo is through the Denoise Filter. In the Photo Persona, you can edit images and pixel layers to control the amount of noise as you please. It is a great way of removing noise from your image while preserving detail and quality.
When applying the Denoise Filter, you will be able to see the results in real-time. This makes it easy to see if you need to apply more or less of the filter depending on the level of noise in your image.
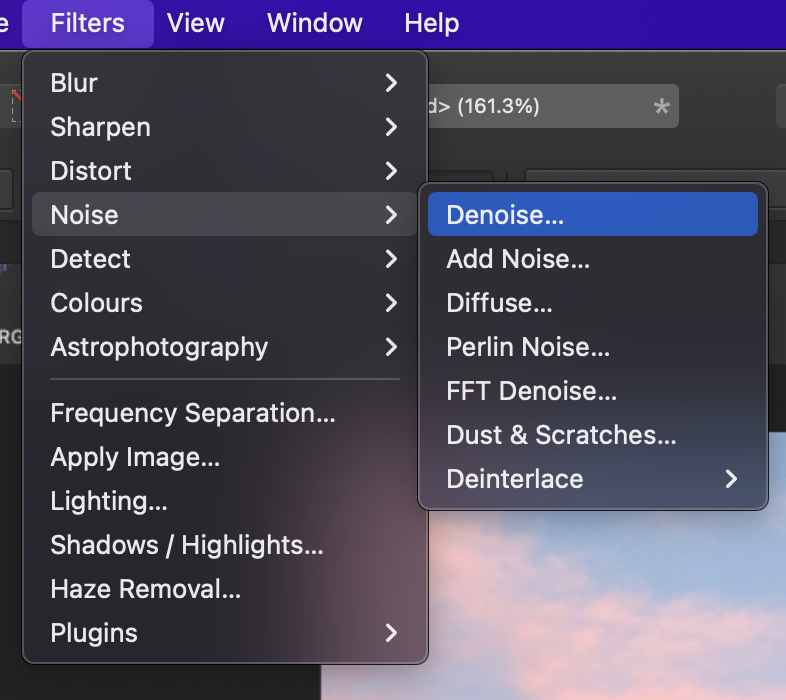
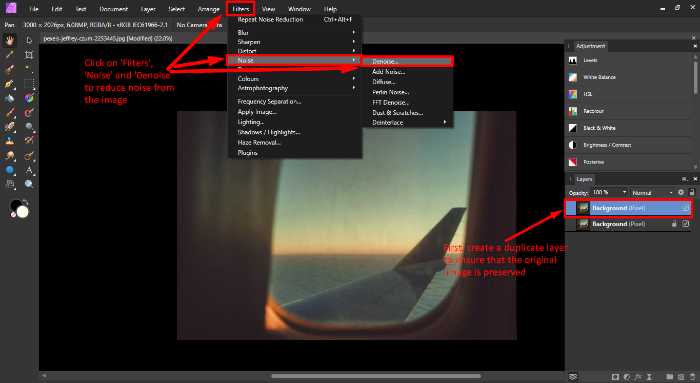
In order to add the noise using the Denoise Filter, select ‘Filter’ from Affinity Photo’s main menu at the top, click on Noise and then select ‘Denoise’.
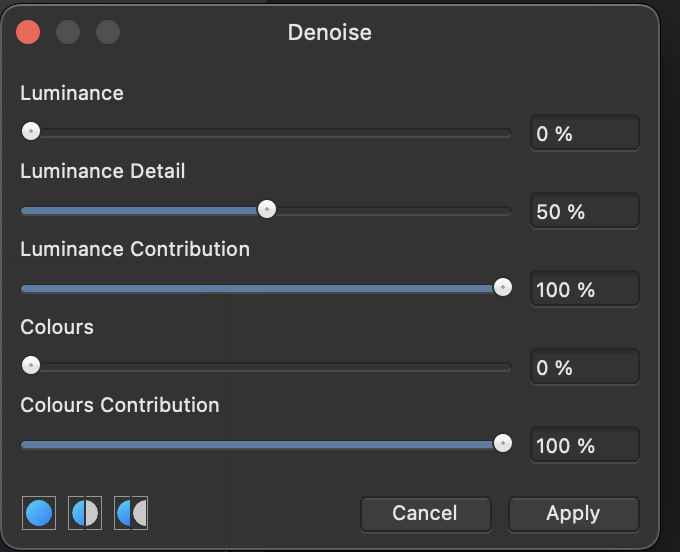
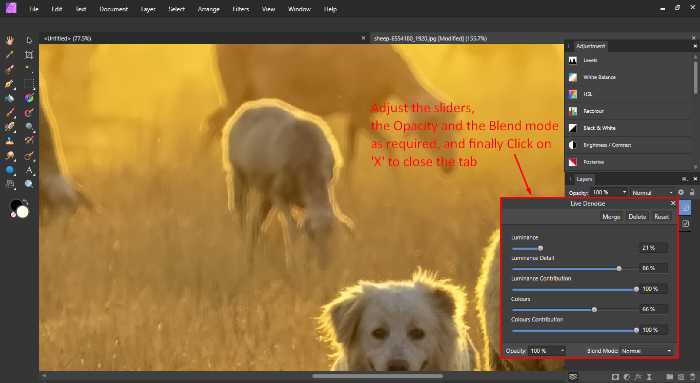
The pop-up window will include the Denoise settings with sliders which can be adjusted according to your needs. Once again, the settings are Luminance, Luminance Details, Luminance Contribution, Colours and Colours Contribution. Before continuing any further, what do the sliders do?
So what do the Denoise sliders do?
As quoted directly from the Affinity Photo Guide:
Luminance—controls the intensity of noise removal from the luminance channel. Drag the slider to set the value.
Luminance Detail—adjusts the detail edge smoothing threshold. Higher values will allow more fine detail through, whereas lower values will smooth fine detail and provide stronger noise reduction.
Luminance Contribution—controls how much of the overall luminance noise reduction is added to the image.
Colors—controls the intensity of noise removal from the chrominance channels. Drag the slider to set the value.
Colors Contribution—controls how much of the overall chrominance noise reduction is added to the image.
Denoise Tool – Affinity Photo
Denoise Filter: How to Use
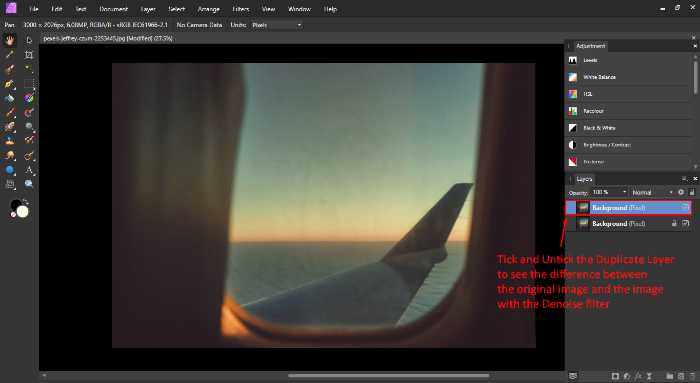
- Duplicate Layer (As its the destructive method)
- Add Denoise Filter on the Duplicate Layer (Adjust Filter to your needs)
- Add mask on the Duplicate Layer to remove the denoise effect where needed.
The Denoise Filter works in a destructive way, meaning that you will need to make a copy of your layer before applying it if you wish to preserve the original image.
If you duplicate the layer before applying the Denoise Filter, you will be able to compare the filtered version with the unfiltered version and decide whether the filter has improved the image or not.
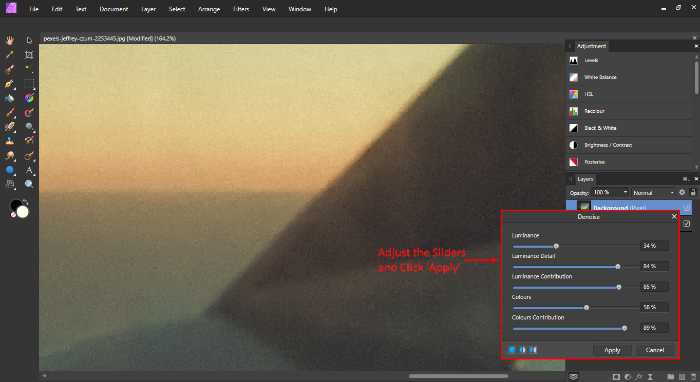
It’s important to experiment with the different sliders to find the best settings for your image. After comparing the images, you can delete, modify or save your duplicate layer accordingly.
To view noise well, one should zoom in to 100% (or more) and look around the image, checking different areas for any hot pixels or graininess.
At this stage, you will notice that the noise will be mainly fixed in the background. This is at the cost of some detail and sharpness in the subject. If this is the case, it is best to work with the ‘Luminance Detail’ slider to fix noise while preserving detail.
If you are still not happy with the result, you should select the subject using the Selection Brush Tool and choose ‘Mask’ as the Output type.
To eliminate the noise reduction effects on the mask layer, click on ‘Layer’ in the Menu at the top and select ‘Invert’ (Shortcut: CTRL+I on Windows or CMND+I on Mac). To edit the noise reduction on the mask layer, make sure that it is selected and apply the Denoise Filter as required.
This will allow you to control how much noise is eliminated from the subject as opposed to the background. If you wish to fix the amount of noise from the background again, simply duplicate the original image again, select the created layer and apply the Denoise Filter once again.
To eliminate the noise reduction effects on the mask layer, click on ‘Layer’ in the Menu at the top and select ‘Invert’ (Shortcut: CTRL+I on Windows or CMND+I on Mac). To edit the noise reduction on the mask layer, make sure that it is selected and apply the Denoise Filter as required (Draw over with the brush tool).
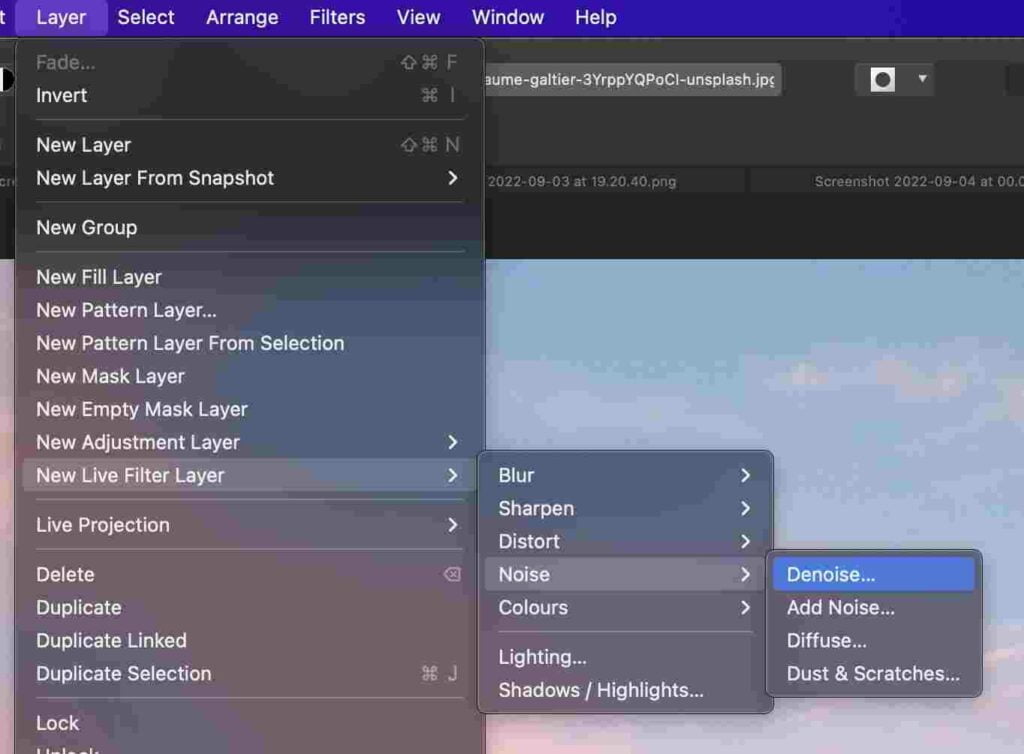
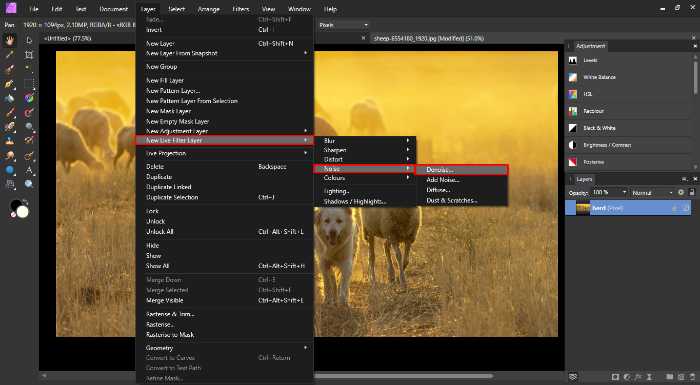
Denoise Live Filter in Affinity Photo (Non-Destructive)
Another great way of reducing noise in Affinity Photo is through the Denoise Live Filter. This filter is just like the Denoise Filter, but it’s applied as a live effect on your image. This means that the filter is non-destructive, therefore you will be able to compare the original and filtered images without having to duplicate your layer first.
Similarly to the Denoise Filter, this filter works by limiting noise in an image through a range of different sliders that control Luminance and Colours. Do not hesitate to experiment with the different filters and options available to you.
This live filter will not act as strongly on the image as the Denoise Filter, so it may be best to use this filter in combination with the Denoise Filter.
The below images will guide you on applying the Denoise Live Filter layer.

Removing noise from RAW files in Affinity Photo
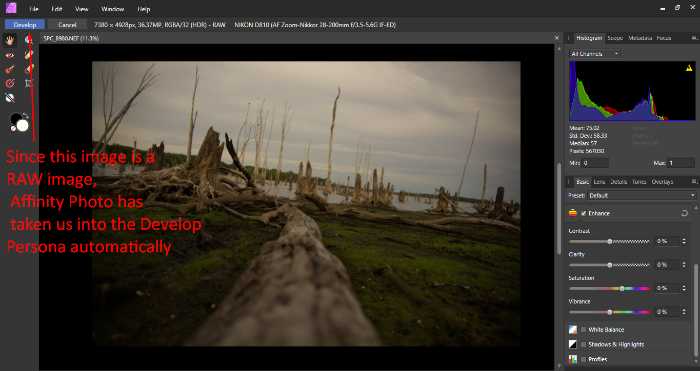
When developing RAW files in Affinity Photo, you have the option to fix noise in your images. Fixing noise during RAW development is a great way of ensuring that the quality doesn’t degrade throughout editing and processing. When you open a RAW file in Affinity Photo, you are immediately taken to the Develop Persona.
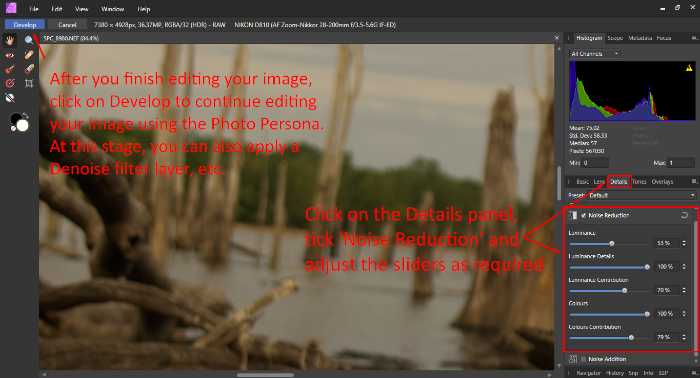
On the right-hand side of the screen, you will find a number of panels and options to fix your photo. In the Details Panel, you will see an option for ‘Noise Reduction’. By default, Affinity Photo will automatically provide you with the noise reduction options. If the box is ticked, you will be presented with a number of sliders that allow you to fix different types of noise in your image.
The sliders consist of Luminance, Luminance Details, Luminance Contribution, Colours and Colours Contribution. The Luminance slider is used to limit the intensity of noise in your image, while the Luminance Details slider allows you to denoise while preserving fine details. The Colours and Colours Contribution sliders are used to control the coloured/chroma noise in your image.
Stacking your images to remove noise in Affinity Photo (To Remove Noise)
This method is another great way of reducing the amount of noise in your photos. First, you should take multiple photos of your subject from the same angle. By stacking your images, you are essentially combining them into one image. This will help to diminish the amount of noise that is present in each individual photo. Noise is completely random and therefore it is presented differently in each photo.
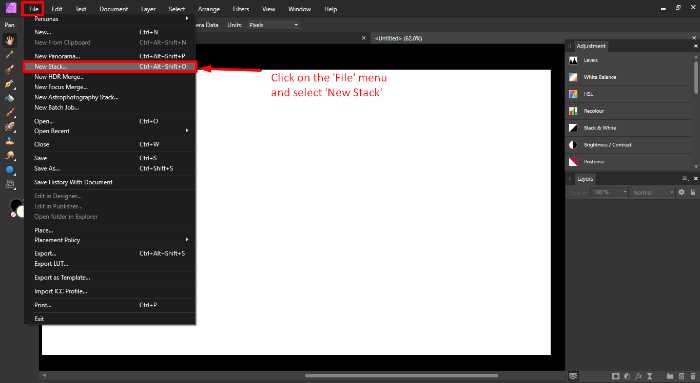
On the other hand, the subject will remain the same in each photo. There are a number of ways that you can stack your images in Affinity Photo. The easiest way is to use the ‘Photo Persona’ and go to the menu at the top of your screen and click on ‘File’.
From there, you can click on ‘New Stack’, select your photos which are saved in your computer and click on Open.
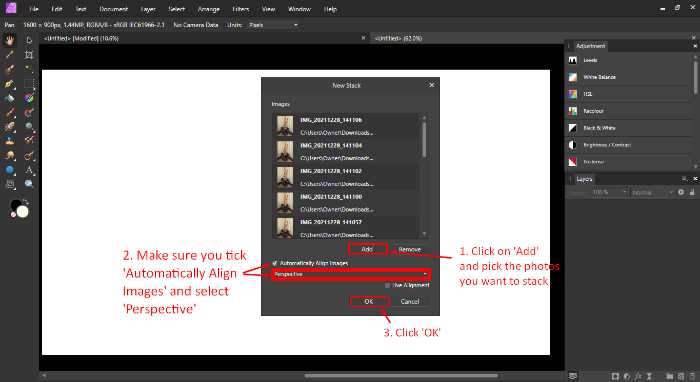
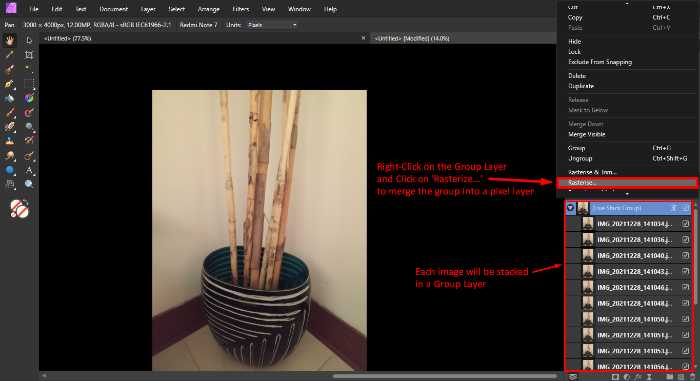
Make sure that you tick ‘Automatically Align Images’ and the operation is set to ‘Perspective’ before clicking on ‘OK’. After a few seconds, each image will be automatically stacked in a group. To combine these images into a single pixel layer, simply left-click on the Group Layer and click on ‘Rasterize…’. At this point, you can start editing and improving your image using Affinity Photo’s endless tools and adjustments.
By going through this process, Affinity Photo will analyse each image and try to find common points in each photo. It will then use these points to line up the photos so that they are merged together as one image. This is a great way of reducing noise, as it will combine all of your images into one smooth photo. The benefits of this technique are that it is super easy and quick.
Unfortunately, the stacking method only works if your subject is stationary. If your subject is in motion, then the images will not be aligned correctly and you will have to use a different method. Thus, it is difficult to use this technique when working on portraits because it is difficult for a person to stay completely still.
Expert Rating
Summary
This tutorial is an in-depth tutorial of what live filters are & how to use them. Applying filters in a non-destructive way has never been easier.
Conclusion
The Denoise Filter, the Denoise Live Filter and the Stacking Method are three different ways you can eliminate noise with Affinity Photo. You might find that one is easier for your own personal style of editing or perhaps all three will work depending on what type of photo you’re working on.
When it comes to eliminating noise in photos, there’s no wrong way to do it as long as you get a high-quality and satisfactory result! We hope that this guide has helped you to understand how to fix grainy noise in Affinity Photo.
Thanks for reading & feel free to check out more of our articles!


