
If you’re a graphic designer, then you know how important it is to have control over the resolution of your images. Even if you simply want to edit an image, quality and sharpness are vital aspects for photo manipulation.
GIMP allows you to change the DPI of an image using the Scale Image command. The image and canvas can be resized by controlling the number of pixels it contains.
What is DPI?
DPI stands for “Dots per Inch”. It is the standard specification for printing and handy for print resolution of images.
If you take a print, it has many tiny dots of ink on the image or the specific print. The DPI consists of the number of dots the printer would contain for every square inch of the image. For example, if the print is 500 dpi, then it indicates 500 dots of ink in the image.
The DPI impacts two main factors of an image as follows:
- Quality of the print: The higher the dpi of an image, the higher the quality. High-resolution images automatically look more professional and can be used for various purposes, including print
- Size of the print: The pixels and dpi have different meanings from each other. If you divide the number of pixels by the DPI, you get the width of the image. For example, if the image has 1500 pixels and 300 dpi- it indicates that the printed image would be 5 inches wide. Simple as that!
Most printers have a DPI of 300, which is the industry standard for printing resolution. However, some newer printers boast a DPI of 600 or even 1200. This higher printing resolution can produce sharper images and smoother transitions between different colors.

When it comes to choosing a printer, the quality of your prints may not be the only factor to consider. Price, speed, and capacity are all important factors that should be taken into account before making a purchase.
If you have an image with a low DPI, then the quality and standard of the image would be low. For example, it can turn out to be blurry or of low quality as well.
There are two other important terms to keep in mind: Lower DPI and Higher DPI.
Lower DPI
If you have a lower dpi, the quality of the image would be low. However, the print would be larger.
Higher DPI
If you have a higher dpi, the quality of the image would be higher. But the image would be smaller. Generally, making an image smaller would improve the print quality.
What is the standard DPI?
- The standard rule for printed images is 300 dpi. Whether it is for photography, it provides great quality and adds extra detail to the images.
- For web, 72 dpi as it is the industry standard.
Suppose the image is very small to obtain a print of 300 dpi, no worries! The viewing distance of the print you obtain also plays an equal role in the resolution of the image. In such instances, you can go with 250 dpi as well.
Generally, for A4 photographs, leaflets, and magazines, 300 dpi would be a great choice for printing purposes.
There are exceptional cases like posters. For posters, you can choose 200 dpi as the audience would look at it from a few feet away.
Depending on the material and the viewing distance, the dpi can vary from one person to another.
PPI Vs DPI
PPI and DPI are two different terms that should be defined for clarity.
PPI stands for Pixels Per Inch. It indicates the display resolution and the number of individual pixels in a specific digital image. DPI stands for Dots Per Inch. It indicates the printer resolution as well as the number of dots of ink which is printed on an image.
Changing DPI in GIMP
Image resolution is an important concept to consider when designing images. To help you out, we will show you how to change the DPI in GIMP.
GIMP has options to change the resolution of the image and give you the perfect image to suit your needs. Whether you require a higher definition image, less quality, or an image suitable for printing, GIMP gives you full control over the resolution.
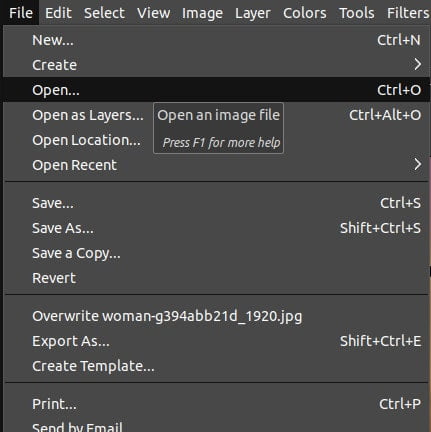
Step 01: Open your image
To open an image in GIMP,
- Simply go to the File menu. Choose the Open option.
- Alternatively, press Ctrl/Cmd+O.
- Also, you can drag and drop the image to the GIMP workspace.
Step 02: Scale the image
To begin fixing the resolution, first, you need to scale the image. By using the Scale Image command, you can adjust the resolution of the image. To scale the image,
- Go to the Image menu.
- Click Scale Image.
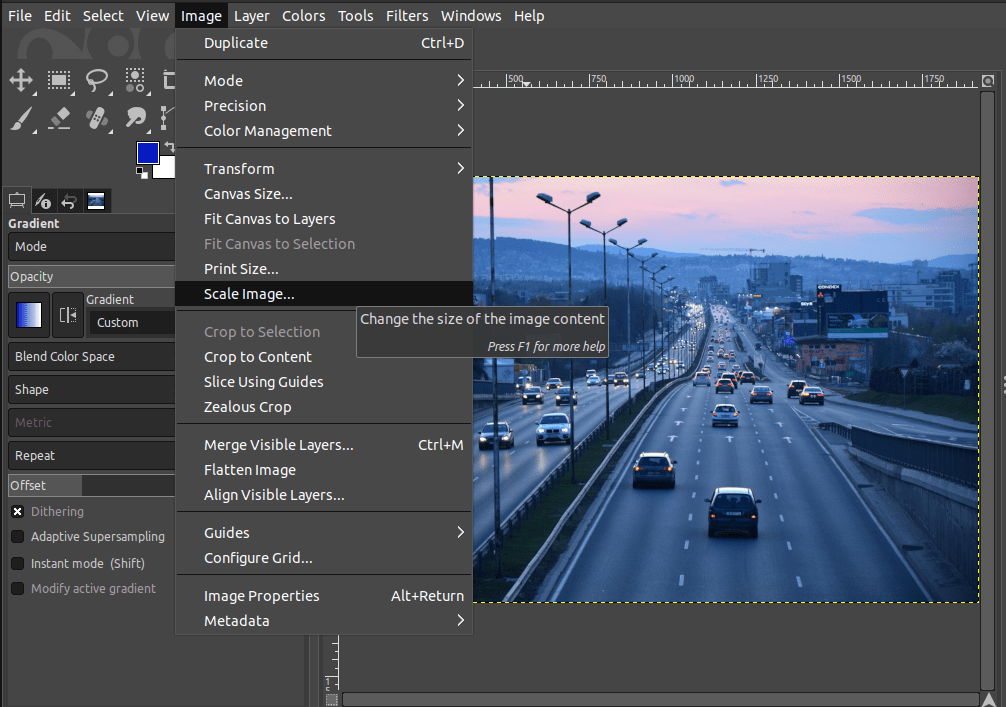
Here, we won’t scale the image. But, we will use the resolution setting of the scale image command. As soon as you click on the Scale Image command, the dialog for Scaling the image will pop up.
Step 03: Adjust the Resolution
Initially, you have the Image size option. Beneath the Image size, you have two settings namely the Width and Height. Make sure not to change the Width and Height nor the px (pixel) measurement. If you change it, it affects the pixels of the image, which is not required here.
Next, you have the X resolution and Y resolution options. This is the setting you require to change for a better DPI as per your needs.
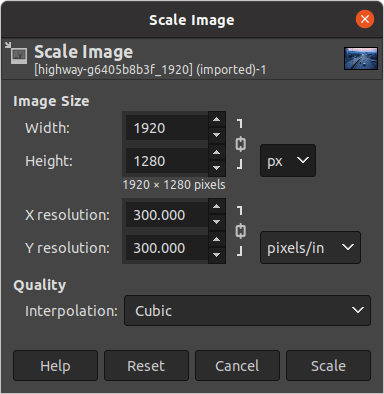
Simply, update the required values for X and Y resolutions and keep them linked to one another. Then, the other values would be automatically updated according to the inserted values
Unlinking the X and Y resolution is a bad idea because the corresponding measurements won’t be maintained correctly. If you make a mistake there, it affects the overall quality of the image. Therefore, it is best practice to keep the X and Y resolutions linked to one another.
Apart from that, if you require a print size, you can simply change the measurement units of Width and Height. Probably, you can convert them into inches, centimeters, or any measurement unit you prefer to change as well.
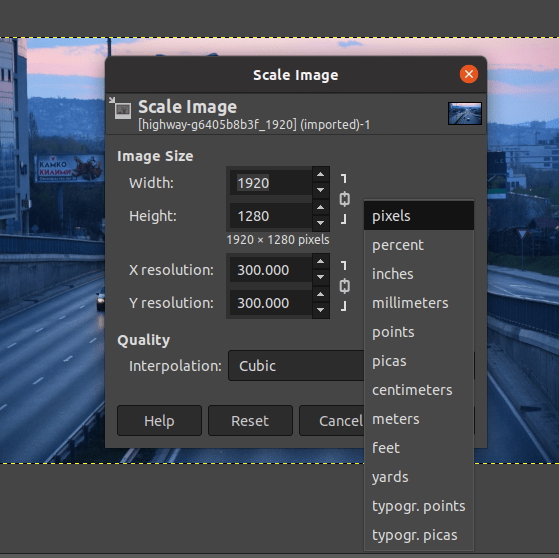
Thus, after changing the desired values, simply click Scale in the Scale Image command. This would scale the image and change the resolution as per your instructions.
Difference between Screen Resolution and Print Resolution
Print resolution and screen resolution are distinct from each other.
The standard print resolution is 300 DPI, while the standard screen resolution varies between 100 DPI and higher. Moreover, these vary according to the resolution of the device.
In the early days, the screen resolution was limited to technical capabilities. While dealing with high-resolution monitors and high-DPI smartphones, things are quite different.
The standard screen resolution is 72 dpi, but this can vary depending on the type and size of the screen.
Conclusion
In conclusion, anyone can change their DPI in GIMP following the simple steps laid out in this article. With a few clicks, you can have your image at the perfect size and resolution.
So what are you waiting for? Get started today!
Thanks for reading & feel free to check out more of our articles!
Expert Rating
Summary
Working with DPI and resolution is a fairly simple and straightforward task while being atleast somewhat scalable and functional. This tutorial will equip you with all the skills you need to know to edit your images as far as scale and DPI are concerned.


