How to Draw a Vintage Car | Simple Tutorial
You know a lot about cars, but do you know what a vintage car is? In a general sense, this is an old car often built between 1919 and 1930. Unlike modern vehicles, these vehicles are mostly distinguished by sharp angles and smooth lines.
Vintage cars are not just cool-looking but also unique. In this tutorial, you will learn how to draw a vintage car freehand. To get amazing results, simply follow the steps as carefully as possible.
Materials You Will Need
- Pencil
- Eraser
- Ruler
- Drawing paper
- Coloring supplies
- 30 minutes
How to Draw a Vintage Car
You have probably seen vintage cars in magazines, TV, video games, or the internet. In today’s lesson, you will learn how to draw a realistic vintage car yourself. Here are the steps we will be following.
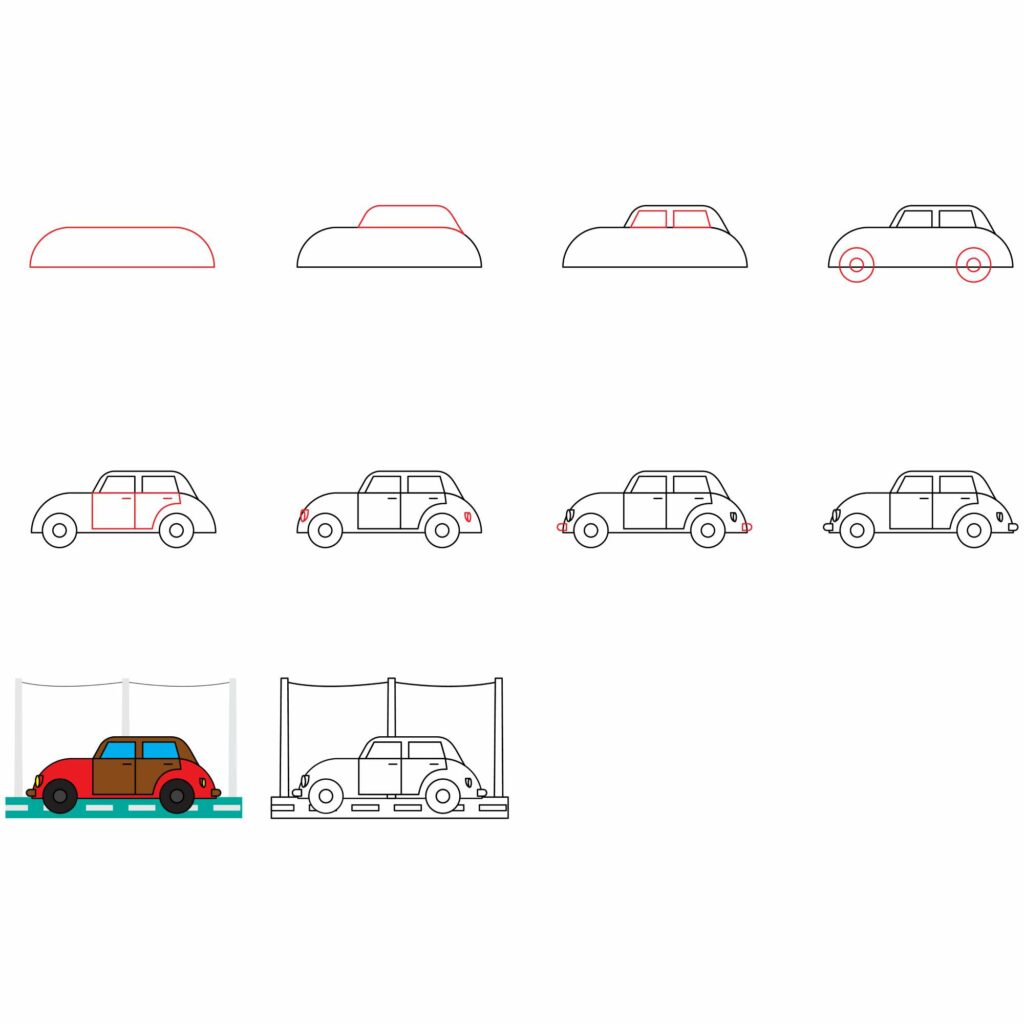
Step 1: Draw the Outline of the Car’s Body
The first thing you need to draw is the body when drawing a car. The body is the biggest part of the drawing, so it needs to be drawn first.
To draw the body, use the ruler to draw a rectangle that covers almost the entire width of your drawing paper. You should, however, leave some space on either side of the drawing paper for the background.
Once the rectangle is ready, draw a curved line starting from the end of the bottom line and connect it with the upper line. Do the same for the other side of the rectangle, then erase the sharp upper corners of the rectangle. You should be left with a shape that resembles the one in the illustration below.
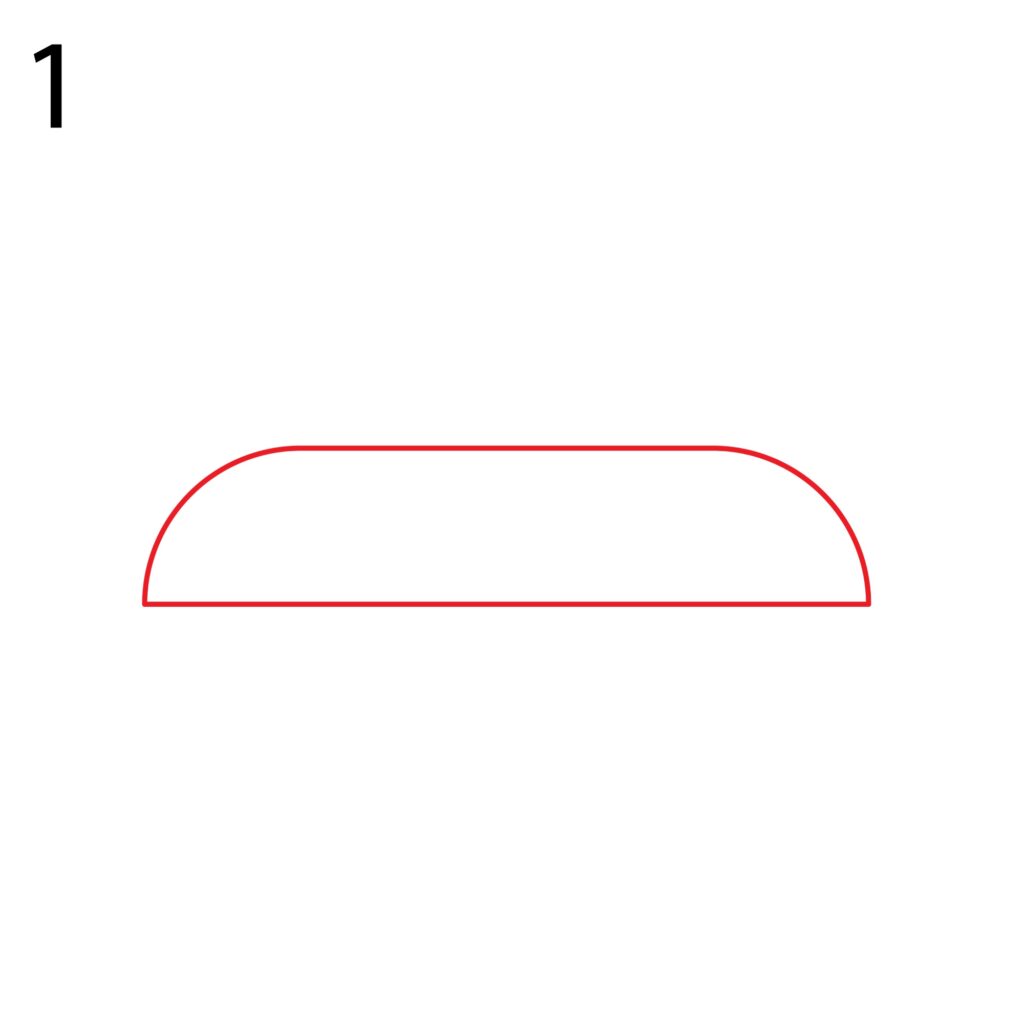
If you are confident, you don’t have to follow our process. You can draw the bottom line, add the curved right and left sides then add the top straight line.
Step 2: Draw the Cabin
The cabin forms the upper half of the vintage car. It has a windshield and windows. We can follow the same process we used when drawing the body to draw the cabin. The cabin should, however, be smaller than the body.
To draw the cabin, draw a rectangle that starts almost at the center of the upper part of the body and ends at the top right corner of the body. Next, we need to make the front and back ends of the rectangle curved, as shown in the below illustration.
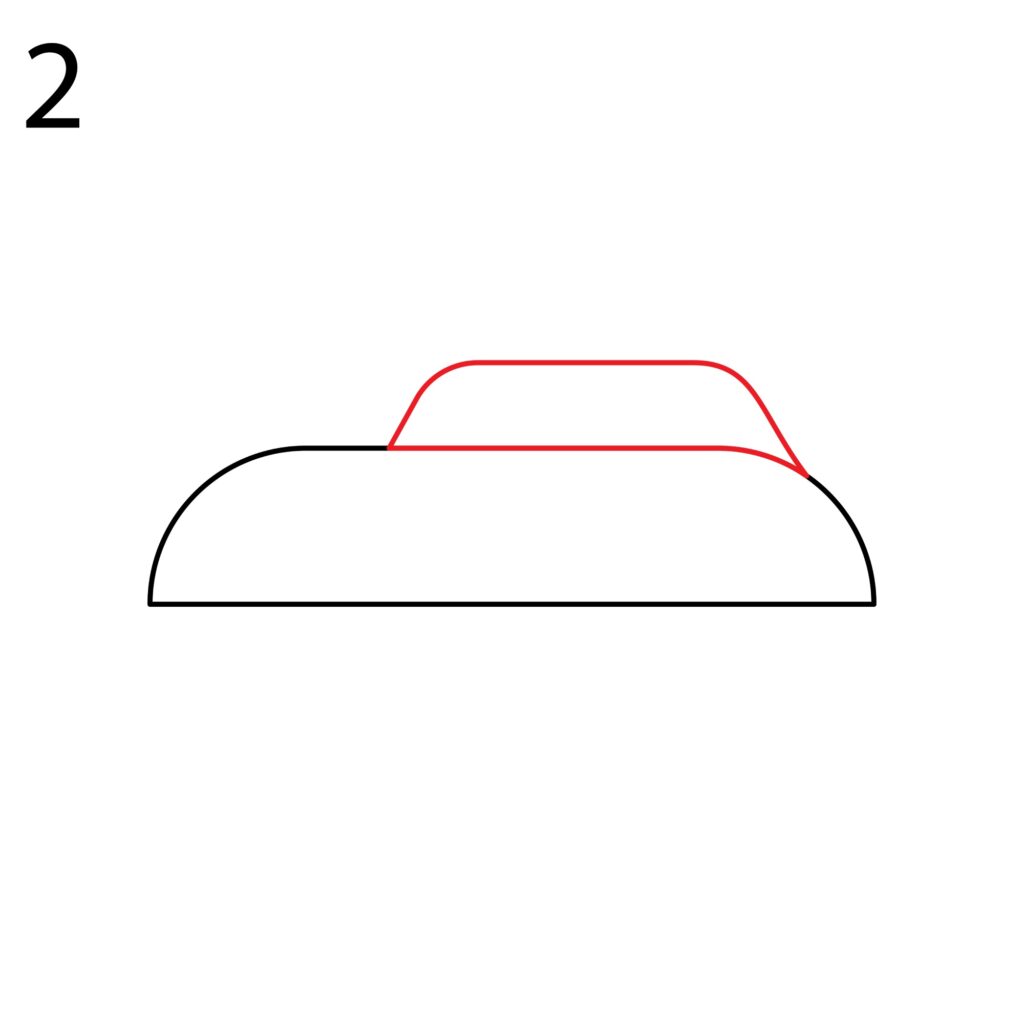
Once you are satisfied with the curved sides, erase the parts of the rectangle that sit outside the curves.
If you are comfortable, you can draw a rectangle with curved lines without having to start with a simple rectangle.
Step 3: Draw the Windows
Our vehicle needs windows. We cannot add a windshield to our vintage car because of how it is positioned. To add the windows, we will need to draw straight lines using a ruler. Our vehicle will have two windows on the side.
Start by drawing two squares inside the cabin. The squares should be side by side and separated by a small space. Next, we need to add a diagonal line on the left part of the first square and another on the right side of the second square.
The slope on the first diagonal line should be bigger to indicate that that is the front window. Once that is done, use the eraser to remove the parts of the squares that sit outside the diagonal lines. You should have windows that look similar to the ones in the below illustration.
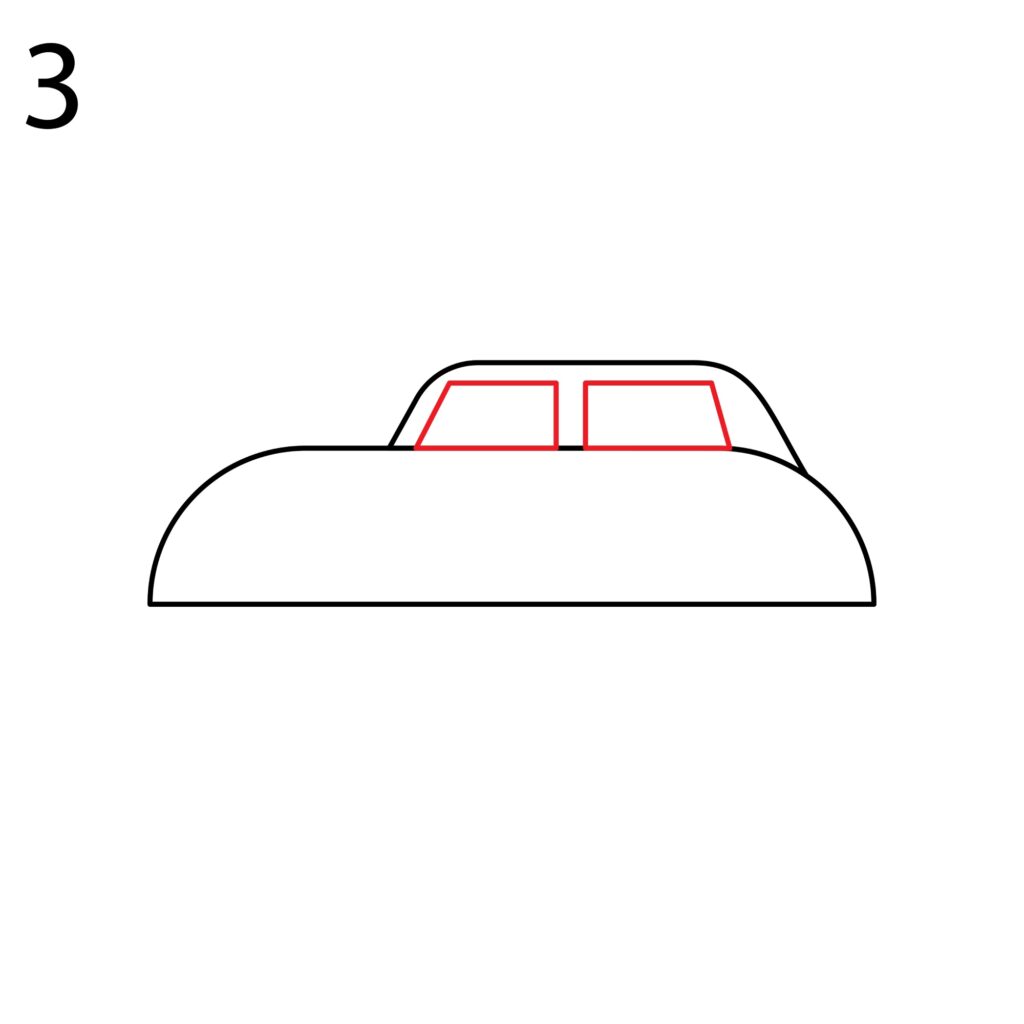
Again, you don’t need to follow our process that involves drawing squares. While ours is the best way to draw proportional windows, you can do it your own way, provided the lines of the window don’t fall outside the cabin.
Step 4: Draw the Wheels
Our vintage car needs wheels to be able to move around. The wheels have to be proportional to the size of the vehicle, so don’t make them too big.
To add the wheels, draw two circles, one near the car’s front end and the other on the rear end. Our wheels need rims, so we need to draw two tiny circles inside each of the circles. You should have something that looks like this illustration.
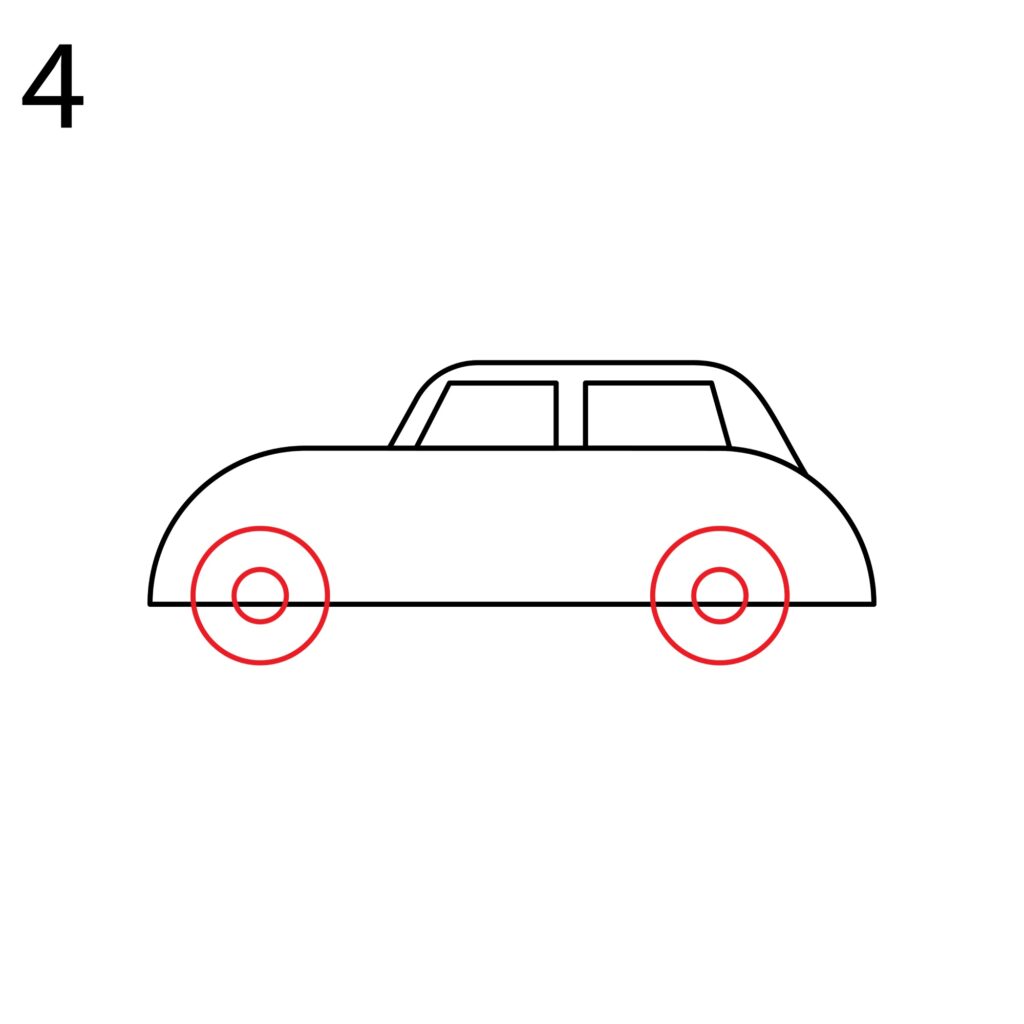
Don’t leave the wheels as they are. Remove the lines of the car’s body that pass through the circles to make them more realistic.
Step 5: Draw the Doors
Even vintage cars need doors to allow drivers and passengers to get in and out easily. We will start by adding the front door. For this, we need to add a rectangular shape right below the front window, as shown in the below illustration.
For the back door, start by drawing a short line from the bottom of the front door and move it close to the rear wheel. Curve the line to run over the wheel, as shown in our illustration. Draw a straight line from the end of the curved line that connects to the bottom of the back window.
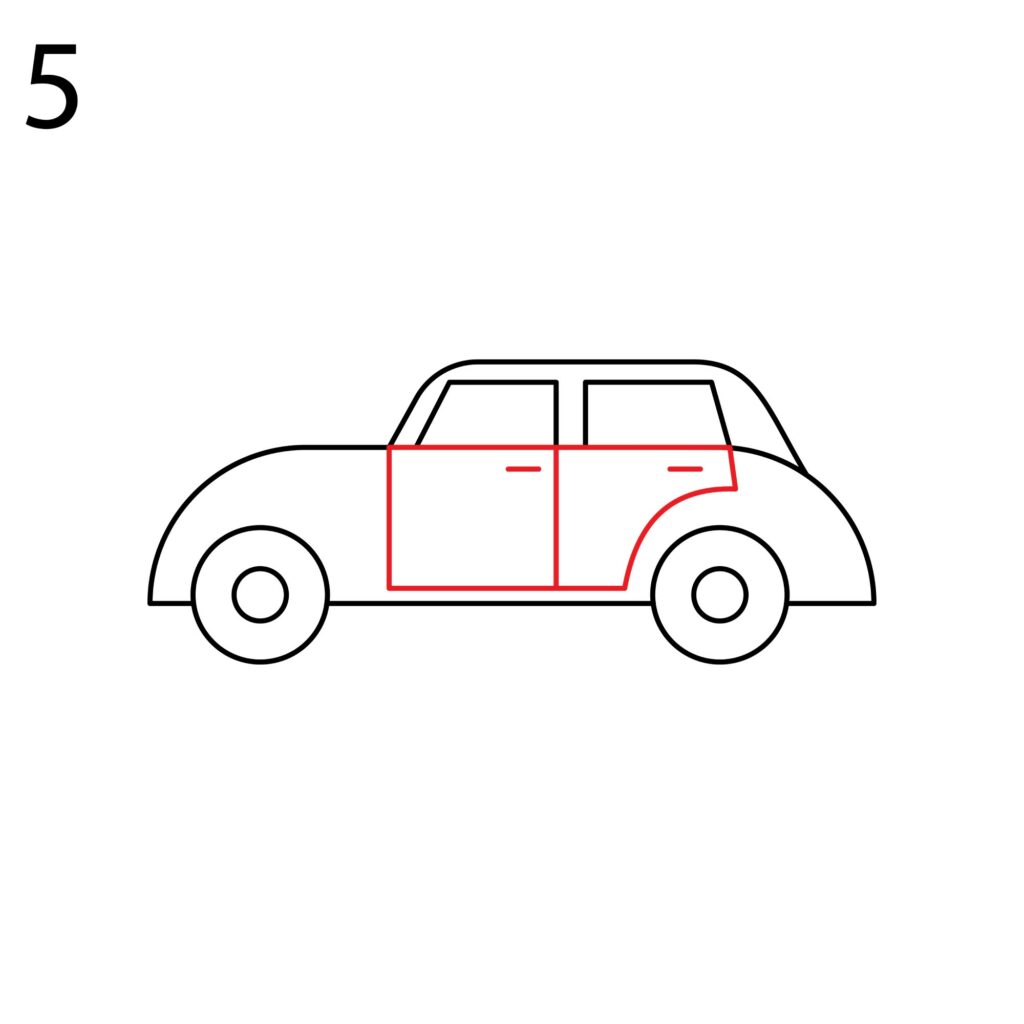
You should have something that looks like the above illustration. For the door handles, add short lines below the windows on the right side of each door.
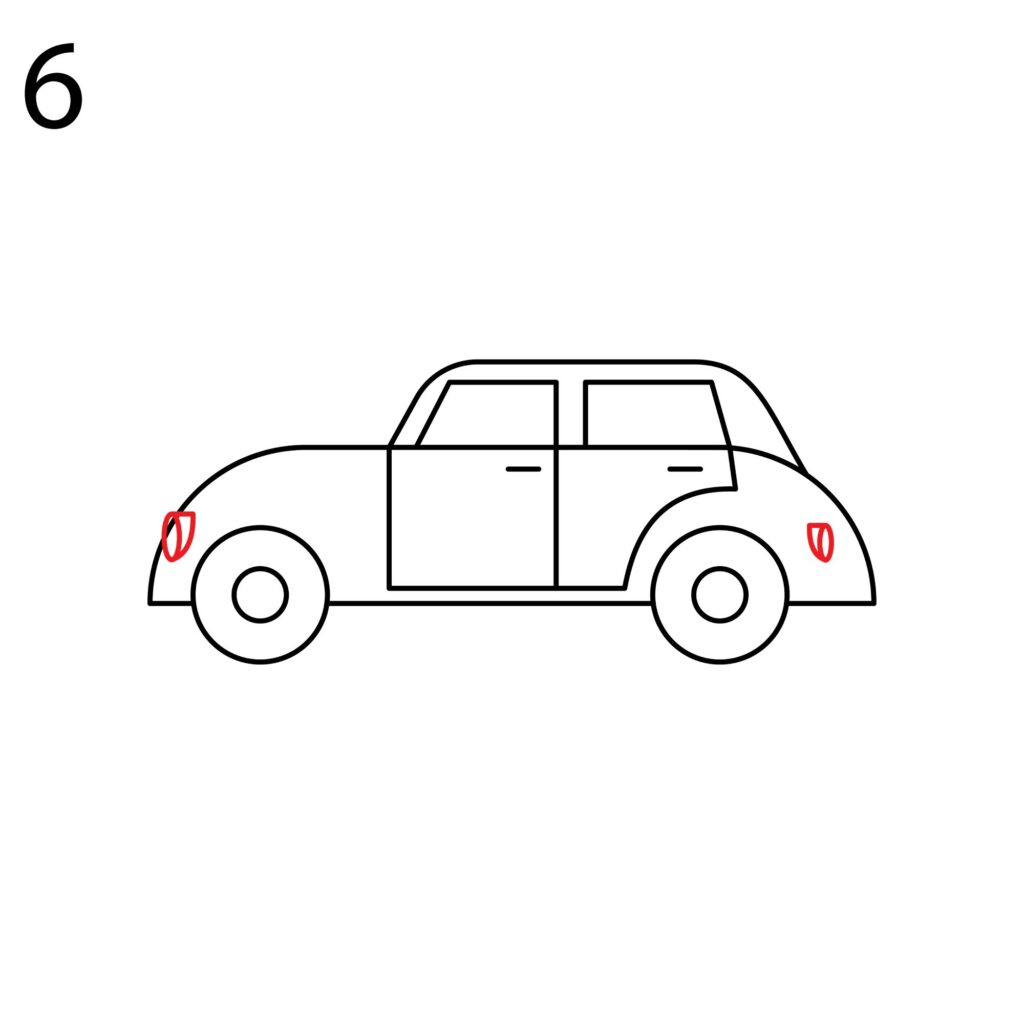
Step 6: Draw the Lights
The lights help illuminate the road at night, add beauty to a car, and keep us safe. We need both rear and front lights on our vehicle.
Draw a small oval on the front of the vehicle. The oval should be the same height as the top part of the wheel. Draw a tiny oval inside the first oval for realism.
You should add a similar shape to the rear end of the vehicle for the rear light. The rear lights should sit a bit inside the car’s body, as shown in the illustration below.
Step 7: Draw the Bumpers
Every vehicle needs a bumper. The purpose of the bumper is to prevent or reduce physical damage to a vehicle’s front and rear end in a low-speed crash. Bumpers are designed to protect the trunk, hood, exhaust, grille, and cooling system.
To draw the bumper to our vintage car, we simply need to add two oval shapes at the bottom part of the body. The first oval should be on the front and the second on the rear.
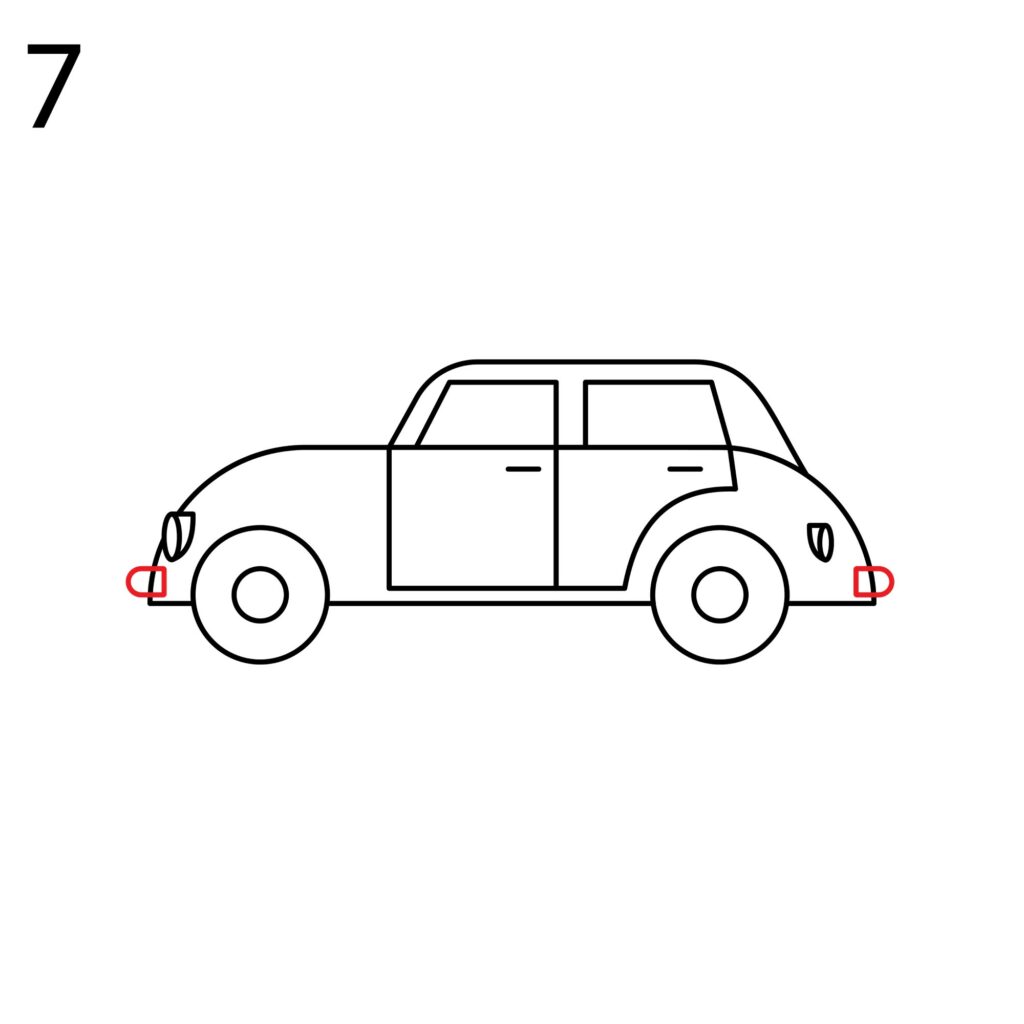
Use your eraser to remove lines that run through the shapes we added for the bumpers.
Step 8: Refine Your Vintage Car
Our vintage car is now ready. If yours doesn’t look the same as the below illustration, you can refine it by erasing the sections that are way off.
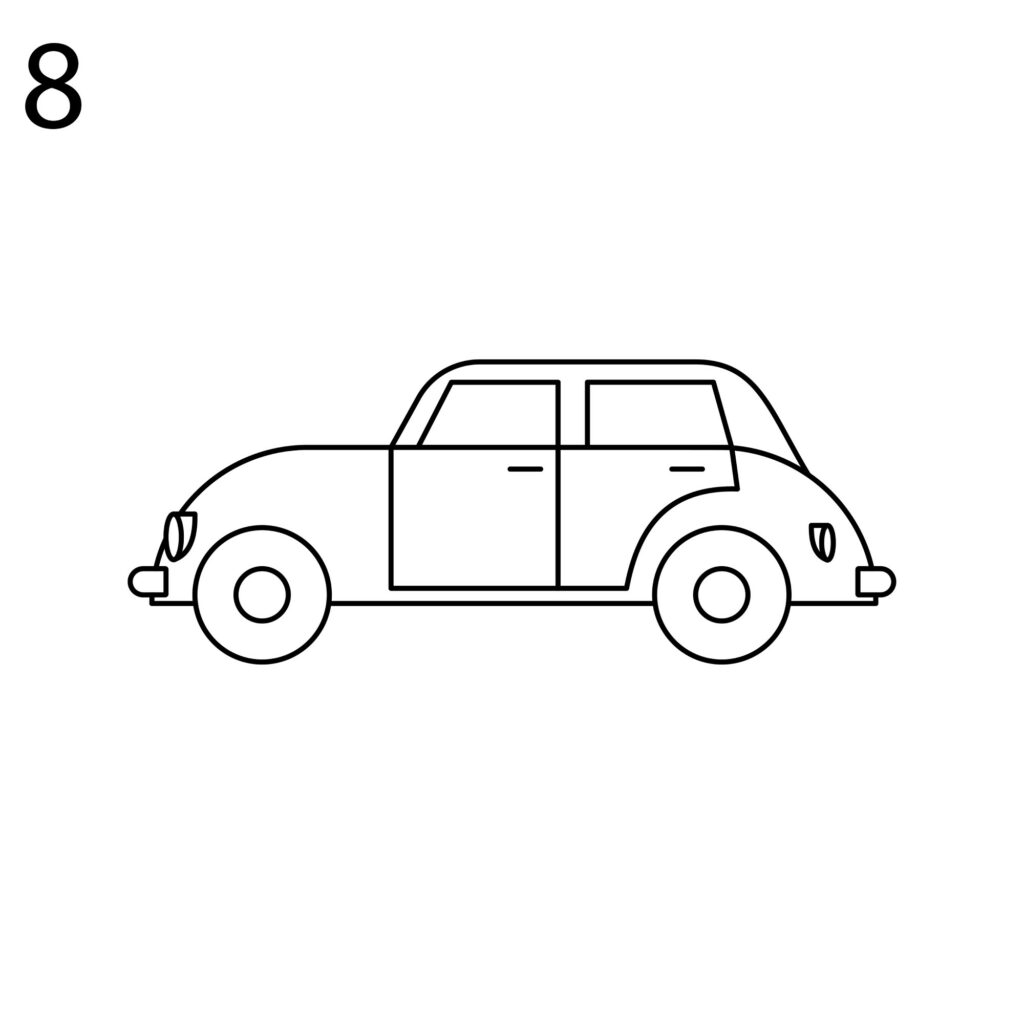
Remember that your drawing doesn’t have to look exactly like ours. It can look better. However, you should not be frustrated if the drawing is not improving even after making changes. It takes time and practice to draw a perfect car.
Taking the Drawing to the Next Level
It is tempting to want to leave your drawing as it is. You should fight the temptation and take it to the next level.
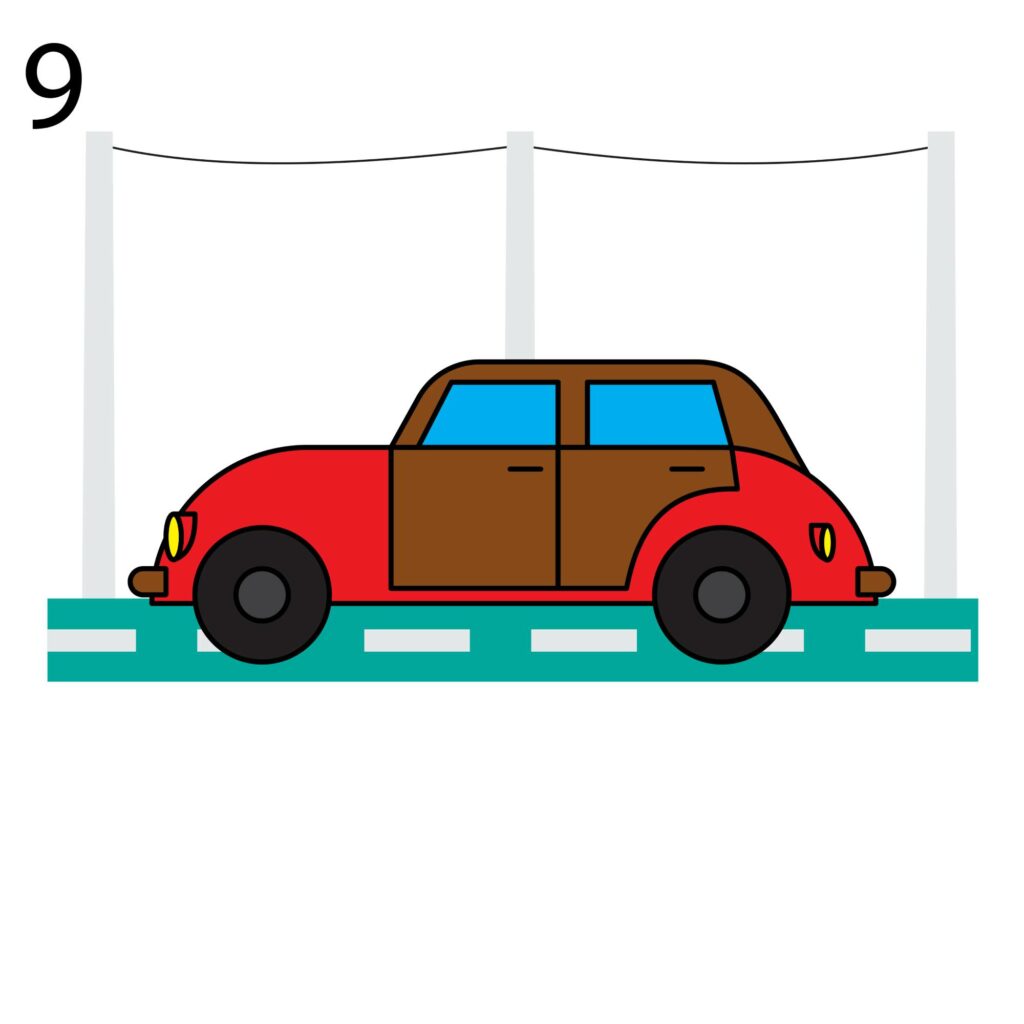
Step 9: Add a Background
The first thing we will add to our drawing is a road. For this, draw two parallel lines right below the vehicle with rectangle shapes to depict road markings. Next, we will add three electric poles in the background with a loose hanging wire connecting them, as shown in the below illustration.

You can add a different background. It doesn’t have to be electric poles. You can add trees, pedestrians, or anything else that you want.
Step 10: Color Your Drawing
The fun part is about coloring your drawing. Go as wild as you want with the colors. Here is what we did with our vintage car.
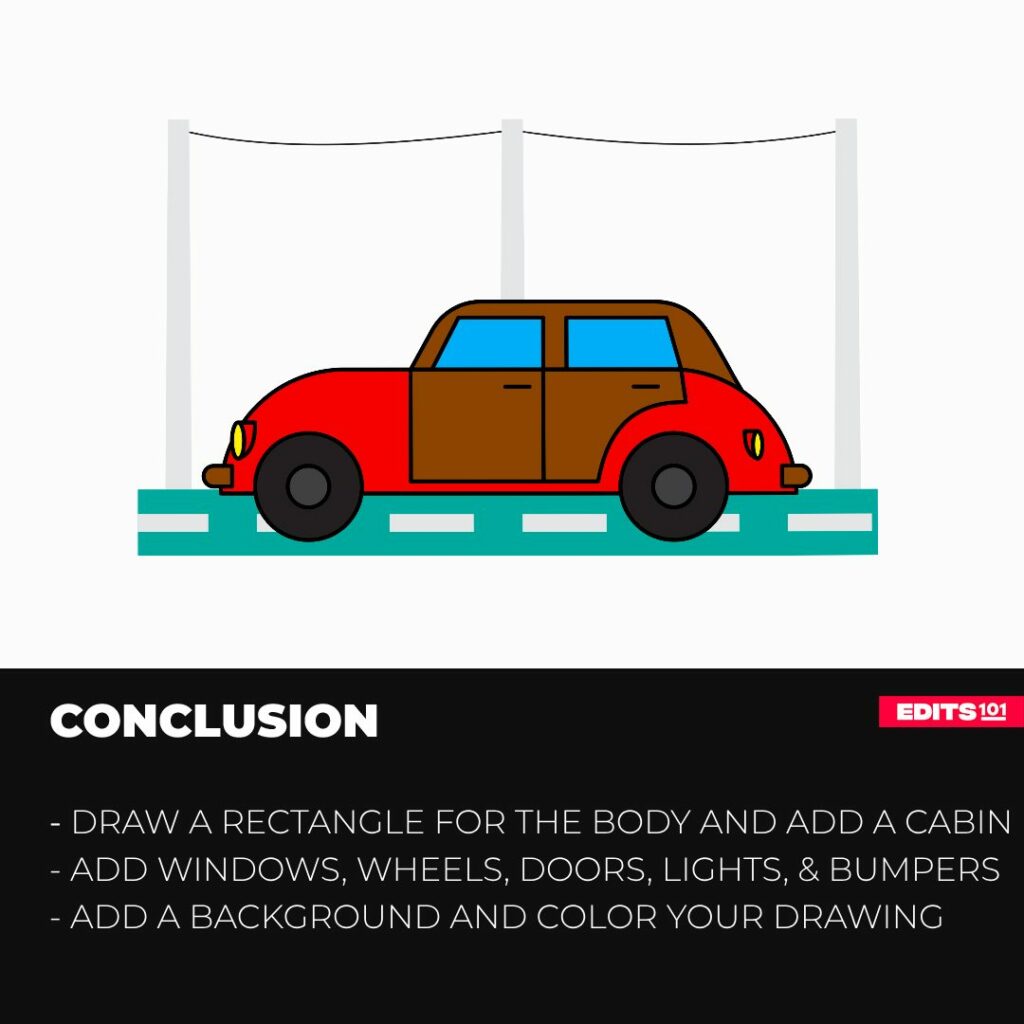
Conclusion
Drawing a vintage car is not that complicated. In our drawing, we started by drawing the body of the car, then added the cabin, windows, wheels, doors, lights, and bumpers.
We advanced our image by adding a road and electric poles in the background. The final step was to color the drawing. Here, you can use any color you want.
Your drawing doesn’t have to be exactly like ours. However, to give you a better understanding, it is always good to follow our steps. You can add more details and change things up in your vintage car later as your skills improve.
As we always say, creating a good drawing takes practice and patience. The key is having fun and never letting frustrations get to you. Happy drawing!
Thanks for reading & feel free to check out more of our articles!
Author Rating
Overall Rating
Summary
Do you want to learn how to draw a vintage car? The post is a step by step guide on how to do so.