
Adding a shadow to an image adds depth and makes it seem more three-dimensional.
Adding shadows can increase the contrast and make the images look realistic, ultimately enhancing the image’s aesthetics.
In this post, we will be looking at how to add a realistic shadow to an image in Photopea.
How to Add a Drop Shadow in Photopea
The drop shadow option is the easiest way to add shadows in Photopea. It gives the impression that a layer is casting a shadow onto a background layer. Drop shadows can be applied to any type of layer in Photopea.
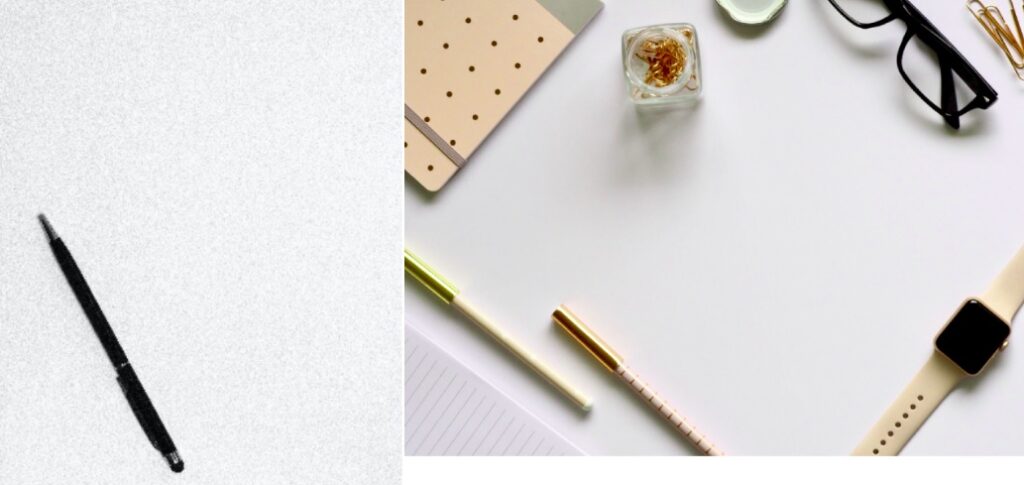
In the first example, we will add the pen to the stationary on the right and a drop shadow to make the composition more convincing.
Step 1: Open the Images
The first step is to load both photos onto Photopea. To do so, go to File >> Open, select your images, and click Open. If you open more than one image, then each image will open in a separate tab.
If you have already created a document and want to import the images into the document, then go to the file menu and choose the Open & Place option.
Step 2: Remove Background
We need to go to the tab with the pen image and select the pen. For fast results, we will use the Remove BG feature. Go to Select >> Remove BG.
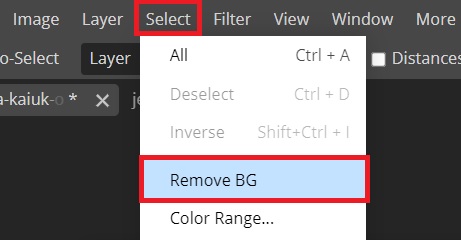
Photopea will delete the background and leave the pen. Next, we need to move the Pen to the tab with the Stationary.
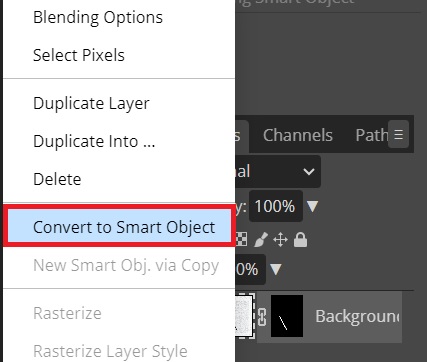
Step 3: Move the Pen to the Stationary
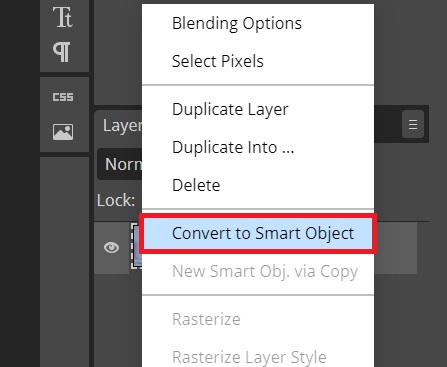
Right-click on the image icon in the Pen Layer and select Convert to Smart Object.
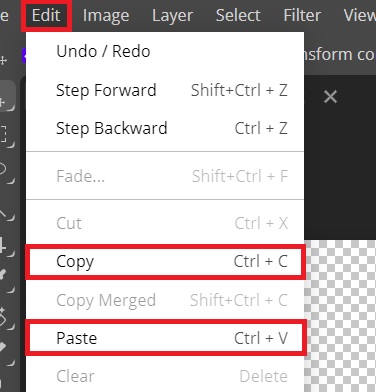
To move the Pen to the tab with the stationary, ensure the layer is selected and go to Edit >> Copy. You then need to move to the tab with the stationary and go to Edit >> Paste.

Use the Move Tool to position and scale the pen in the new image. Once you are done, hit Enter or click the Confirm icon at the top right of the Options Bar.
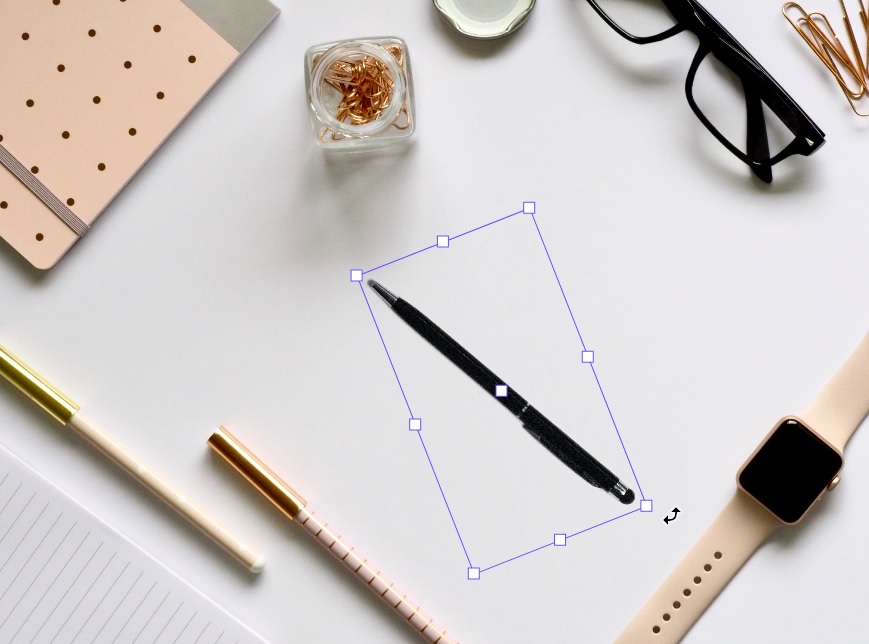
As you can see, the image seems to be floating or out of place because it doesn’t have a shadow. We need to add a drop shadow.
Step 4: Add Drop Shadow
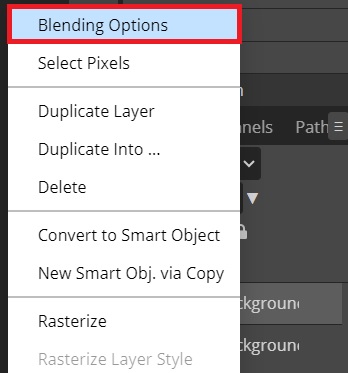
Right-click on the Pen layer and select Blending Options.
The Layer Style window will pop up. On the left panel, select the Drop Shadow.
- The Angle determines the direction that the shadow will fall.
- The distance affects the distance between the Pen and the shadow.
- The spread affects the size of the shadow.
- The size affects the width of the shadow.
- Noise adds texture to the shadow.
Here are the settings we went with. Take note of the direction of shadows from the other objects in order to create a realistic shadow.
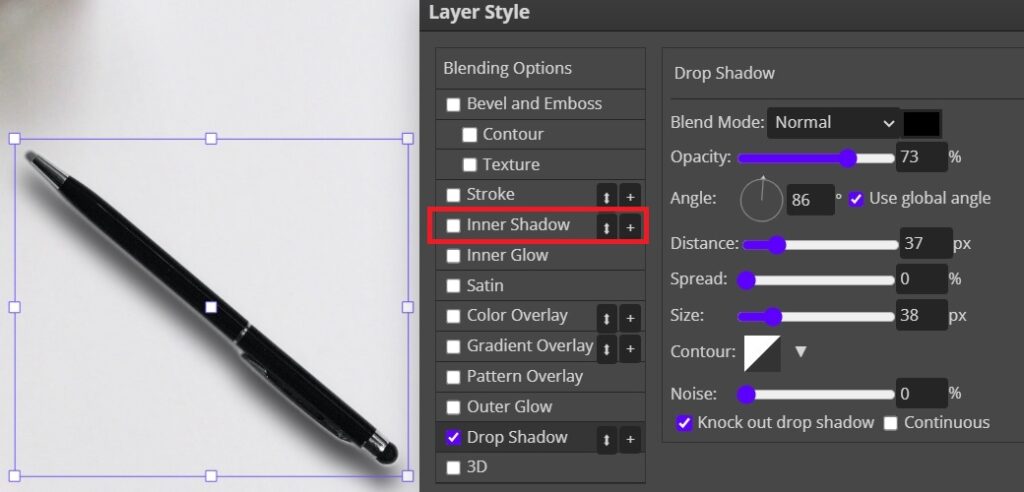
We need to refine our pen image further. We will use the Black colored Inner Shadow to eliminate the edges around the pen. Click OK once you are done.

How to Add Shadows in Photopea Using the Same Layer
In the second example, we will place the model on a white background and add a realistic shadow.
Step 1: Open the Image
Once you have opened Photopea, you can drag and drop the image onto the workspace or go to File >> Open, select the image, and click Open.
Step 2: Remove the Background
The first step to adding a white background is removing the background. With the image layer selected, go to Select >> Remove BG.

Once Photopea removes the background, right-click on the image icon in the image layer and select Convert to Smart Object.
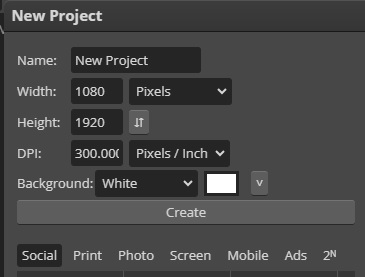
Step 3: Create a New Project
Go to File >> New. Enter the dimensions of your document. For the best resolution, keep the DPI high at about 72 for the web and 300 for print. And select the color of the background; you can leave it to white if you want to.

Once you are done, click Create.
Step 4: Move Your Image to the New Workspace
Go back to the image tab, make sure the image layer is selected, and go to Edit>>Copy. Now go back to the new Document and select Edit >> Paste. The image will now be transferred to the new workspace.
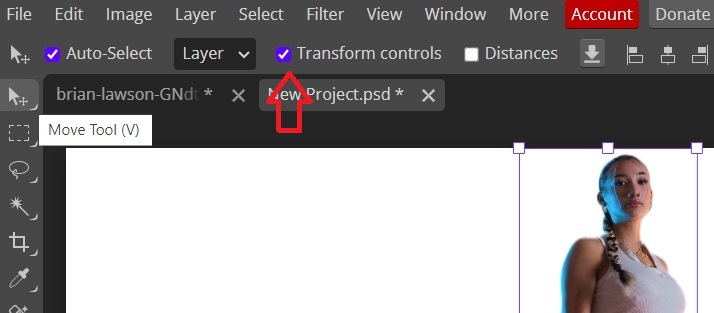
To reposition and resize your image, use the Move Tool and activate the radio button next to Transform Controls in the Options Bar. Grab any of the handles around the image to scale up or down once you are done, hit Enter.
Step 5: Duplicate the Image and Add Color Overlay
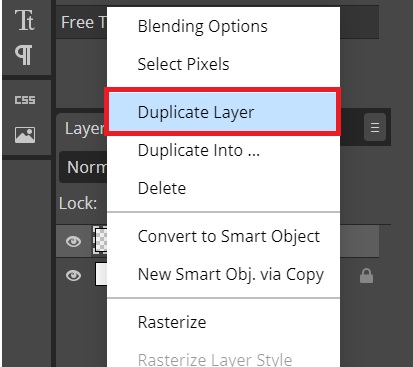
Go to the image layer, right-click, and select Duplicate Layer.
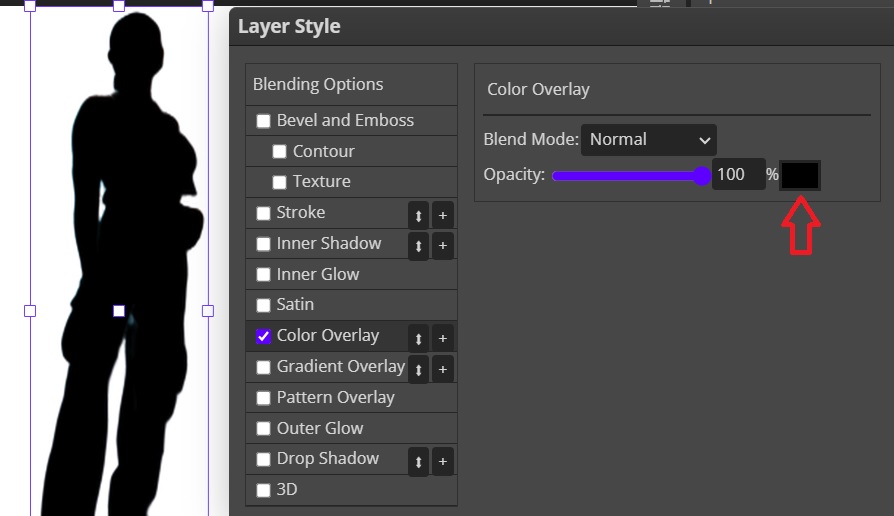
With the duplicate layer selected, go to the Layer Style at the bottom of the Layers Panel and select Color Overlay.
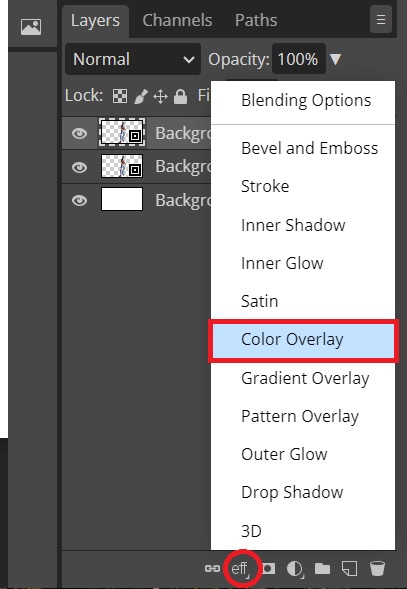
From the Layer Style window, ensure the selected color is Black, then click OK.
Now drag your shadow layer so that it sits below your image layer.
Step 6: Transform Your Shadow
With the shadow layer selected, hold Ctrl (Cmd for Mac), grab the middle top handle, and move it in the direction you want your shadow to fall.
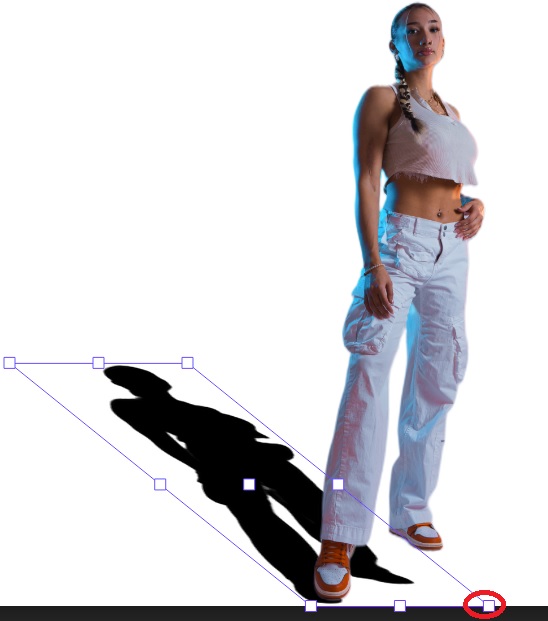
As you can see from the above image, the shadow is not very realistic. First, we need to hold down Ctrl (Cmd) and move the bottom right handle so that the shadow is coming from the model’s left foot.
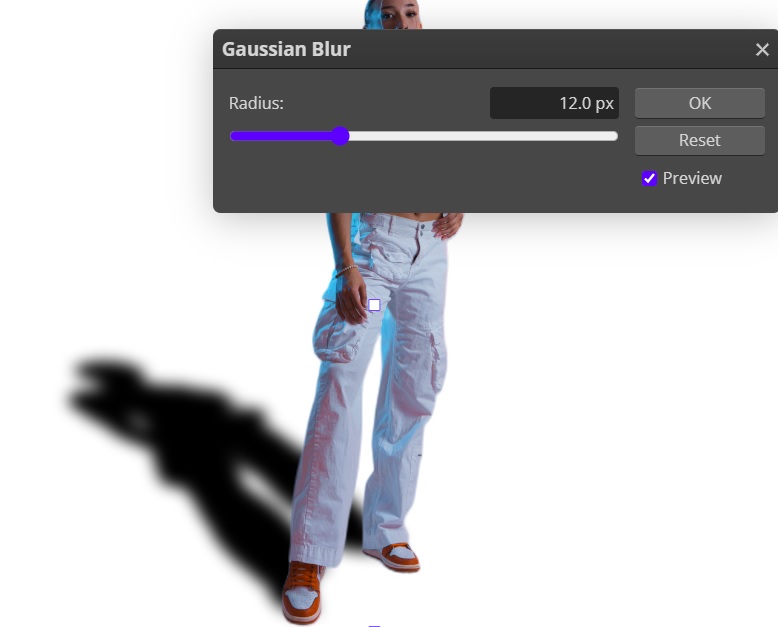
Step 7: Add a Blur
To make the shadow more realistic, go to Filters >> Blue >> Gaussian Blur.
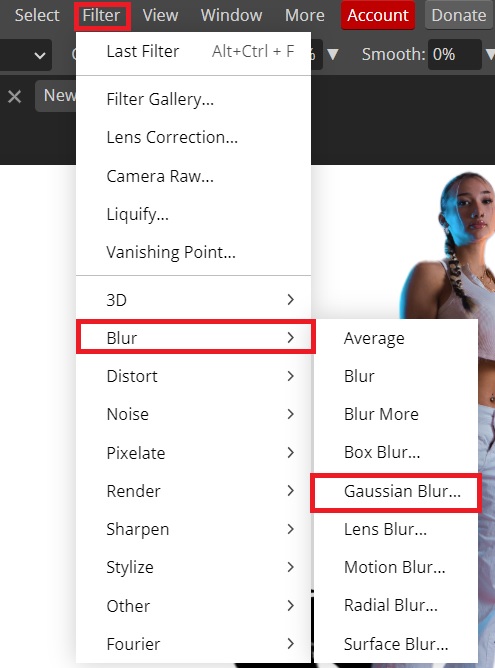
Adjust the radius of the Gaussian Blur to make your shadow more realistic and hit OK.
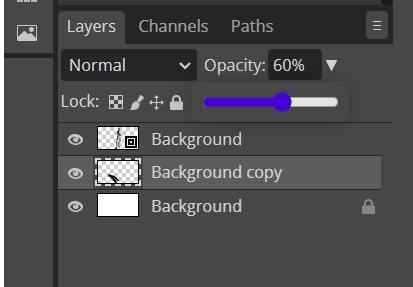
Step 8: Reduce Shadow Opacity
The final step is to reduce the shadow’s opacity to make it more realistic.
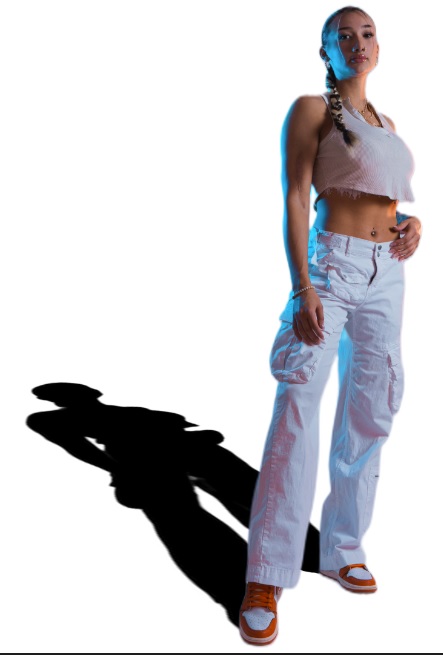
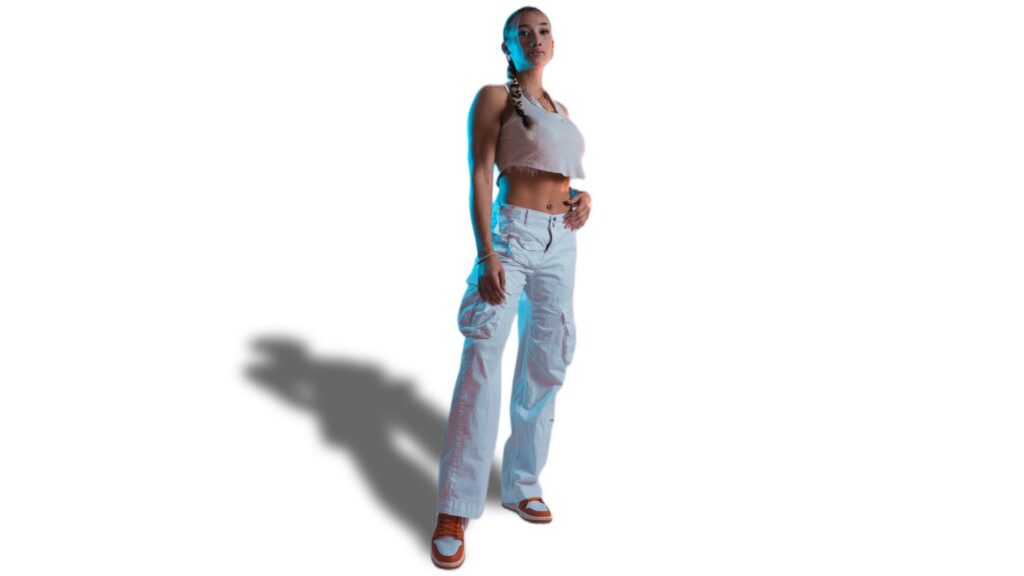
Here are the final results.
You can go ahead and save your work. Go to File >> Export As and choose a file format. To be able to work on the image later, go to File >> Save As PSD.
Adding a Front Shadow in photopea
We can make the shadow fall in front.
Step 1: Create a New Project
For this, we need more space in front of the model. So we need a portrait page.
Step 2: Select the Subject
We can use the Quick Selection tool to select our subject or simply remove the background as we did earlier. Right-click on the image layer and Convert to Smart Object.
Once the image is ready, move the model to the portrait page by going to Edit >> Copy, then go to the newly created document, and go to Edit >> Paste. Scale the image to fit on the new page.
Step 3: Create the Shadow Layer
We will follow the steps from earlier:
- Right-click on the image layer and click Duplicate Layer
- With the duplicate layer selected, go to Layer Style at the bottom of the Layer Palette and select Color Overlay
- In the Layer Style window, make sure the selected color is Black and click OK.
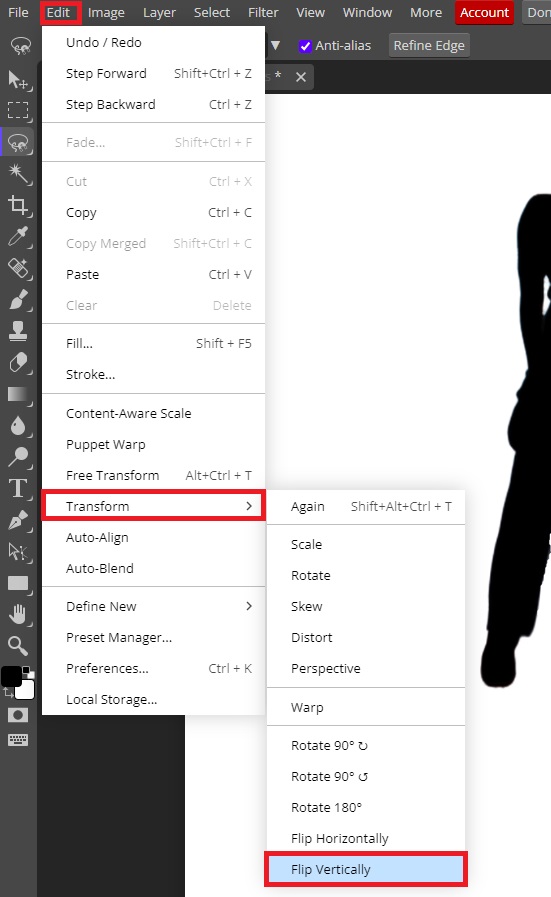
Step 3: Transform the Shadow Layer
We will go to Edit>>Transform>>Flip Vertically to transform the layer.
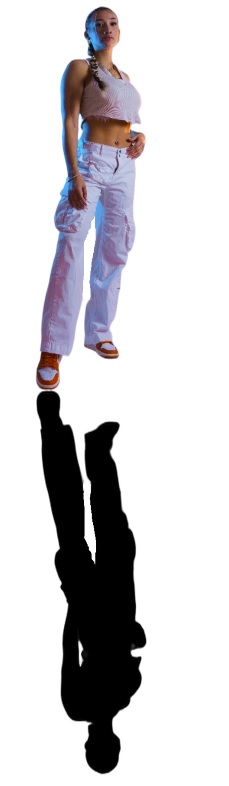
Now we need to use the Move Tool to move the shadow layer down so that it sits below our image, as shown below.
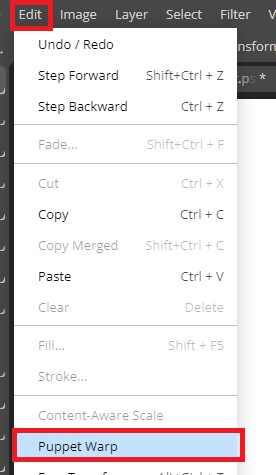
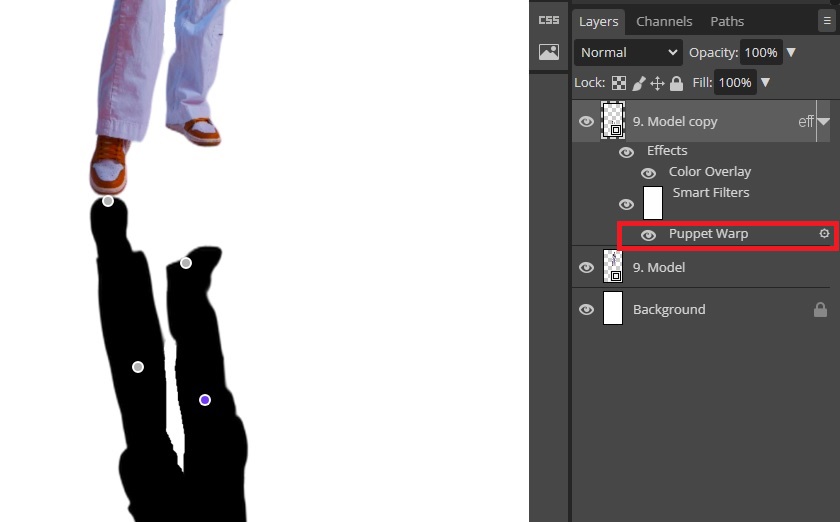
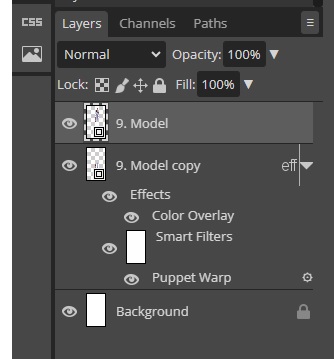
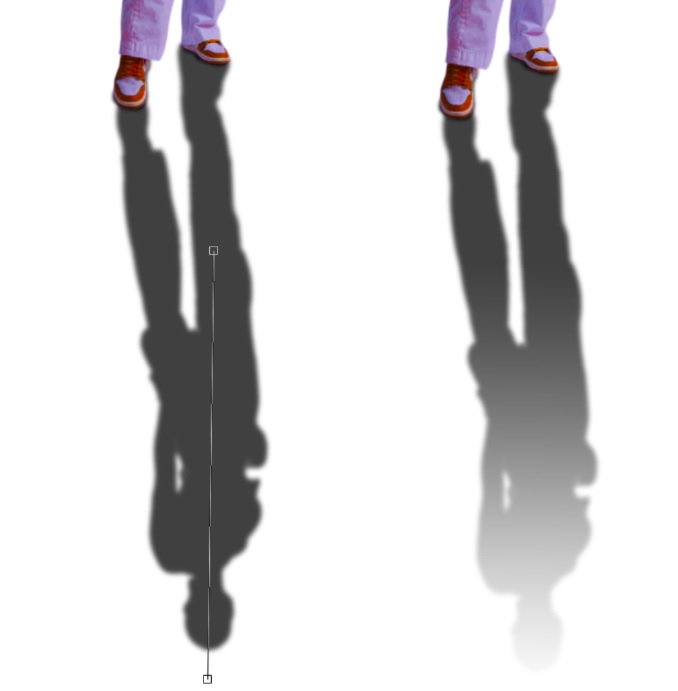
Step 4: Use the Puppet Warp Tool
As you can see, the shadow is not too realistic. The best way to adjust the shadow layer is by using the Puppet Warp Tool.
With the shadow layer selected, go to Edit >> Puppet Warp
For easy manipulation, go to the Options Bar, uncheck the box next to Show Mesh, and click the Confirm Icon.

Next, click on the image to add pins on the areas you want to manipulate and also all over the shadow layer to hold it down when moving the pixels. In our case, we will be manipulating the feet.
If you select a different tool and the pins disappear, double-click on the Puppet Warp (highlighted in the image) to return to the Puppet Warp mode.
To move the shadow, simply hold the pin and move it to where you want it to go. You can rotate the foot by adding another pin to the area you wish to rotate.
You can select a Pin and press the Del key on your keyboard to delete a pin. You can select multiple pins by holding Shift.
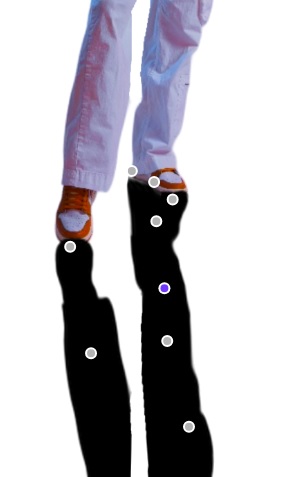
Click the check mark on the Options Bar to commit the changes.
Step 5: Move the Shadow Layer
We need to grab the Image layer and move it up so that it sits above the shadow layer.
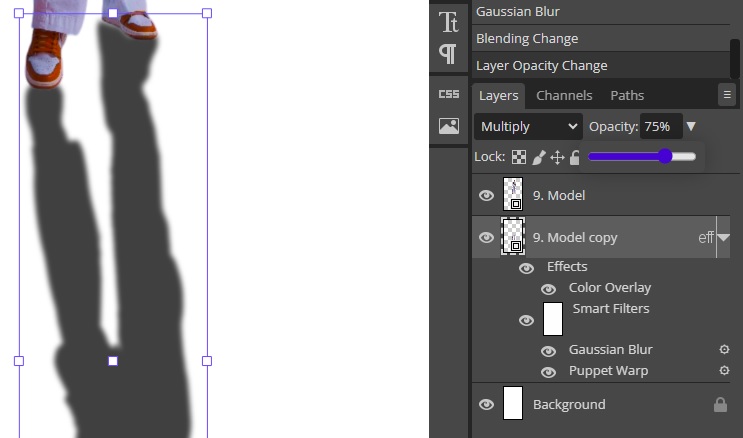
Step 6: Add a Blur
With the shadow layer selected, go to Filters>>Blur>>Gaussian Blur and give the layer an appropriate blur. In our case, we went with 3.5 pixels.
Step 7: Blending Mode
Change the Shadow layer’s blending mode to Multiply and reduce the opacity to about 75%.
Step 8: Add Contact Shadow
Select the Brush Tool, select the black color from the Color Picker (the same color as our shadow), and paint beneath the feet of the model to add a contact shadow.
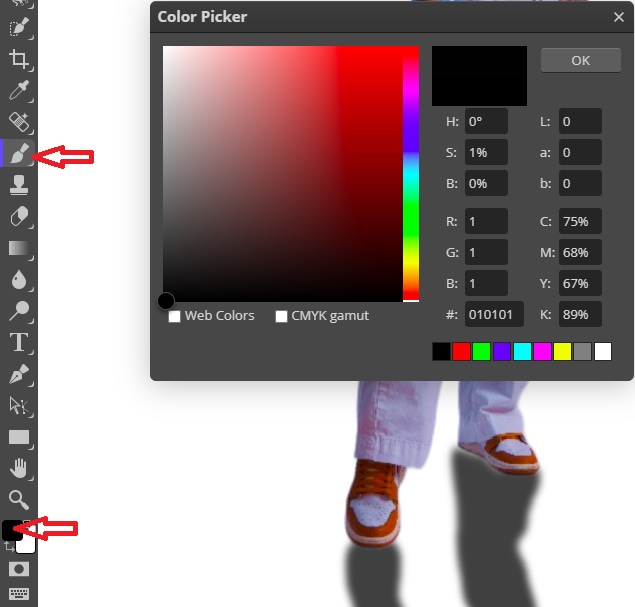
You can reduce and increase the size of the brush using the [and] keys on the keyboard.
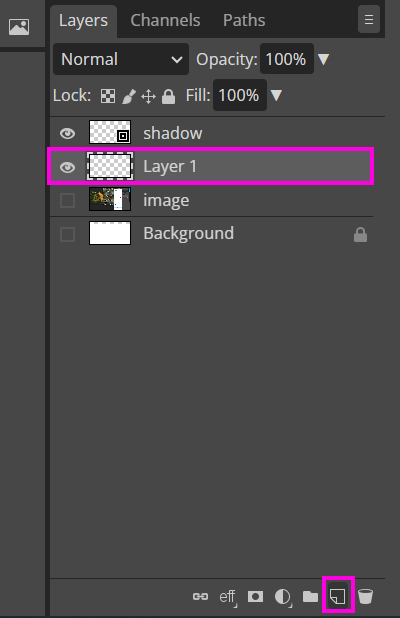
Before you start painting, create a new empty layer by going to the bottom of the layers panel. And don’t forget to place it below the shadow layer.
Paint below the feet and try to achieve the same result you see in the reference image below. Once you are done drawing the contact shadow, go to Filter>>Blur>>Gaussian Blur and set the radius to 3 pixels.

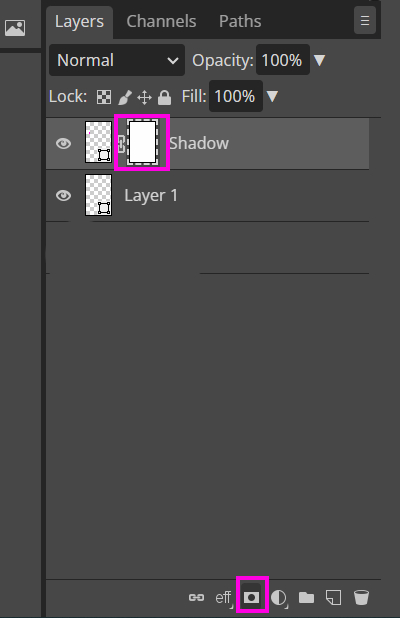
Step 9: Refine the shadow
Select the shadow layer, and add a Mask by clicking on the Add Raster Mask at the bottom of the Layers Panel.
With the Mask selected, go to the gradient tool in the Tools Bar and select a Black to White gradient. You also need to ensure the Reverse radio button is unchecked.
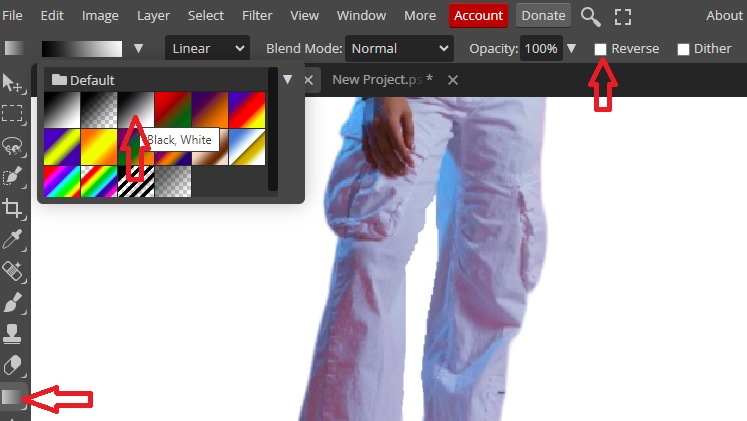
To create a gradient on the shadow, click on the bottom part of the shadow and drag up and release.
This is the final result.
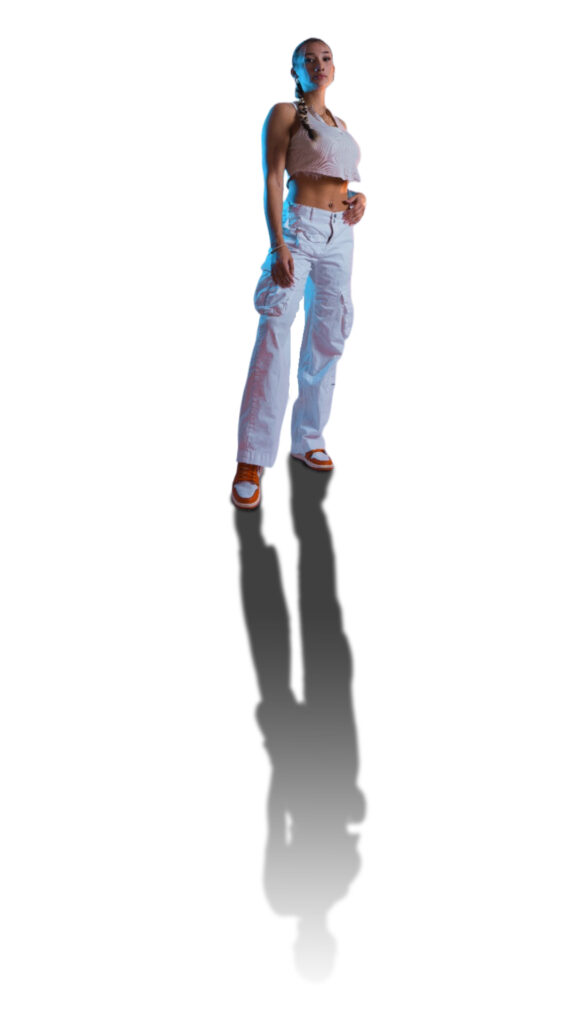
You can change the background if you want to. Just drag and drop a background into the photopea document you are working on. Make sure to place the background behind the model layer in the layers panel.
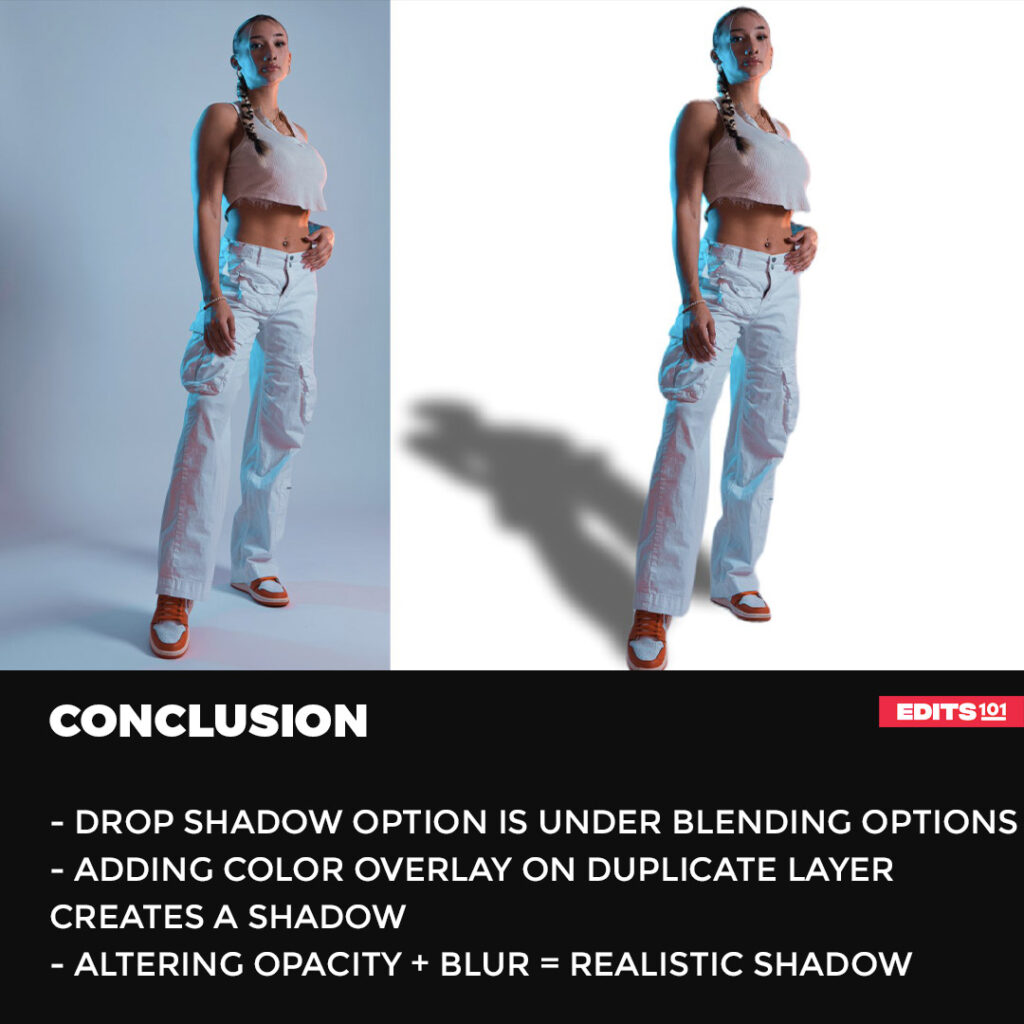
Conclusion
There are two great ways of adding shadows in Photopea. The first method is using the drop shadow under the Blending Options. We looked at how you can change the color of the shadow, direction, and size.
The second way to create a shadow is by duplicating a layer, adding a Color Overlay to the copy, and using the Move Tool to transform it. We applied Gaussian Blur and reduced the opacity to enhance the realism of the shadow.
Thanks for reading & feel free to check out more of our articles!
Expert Rating
Summary
Adding shadows in Photopea involves techniques like using drop shadow effects or manually painting shadows on a new layer. With practice, it becomes more accessible, offering functional and scalable possibilities to enhance depth and realism in graphic design projects.


