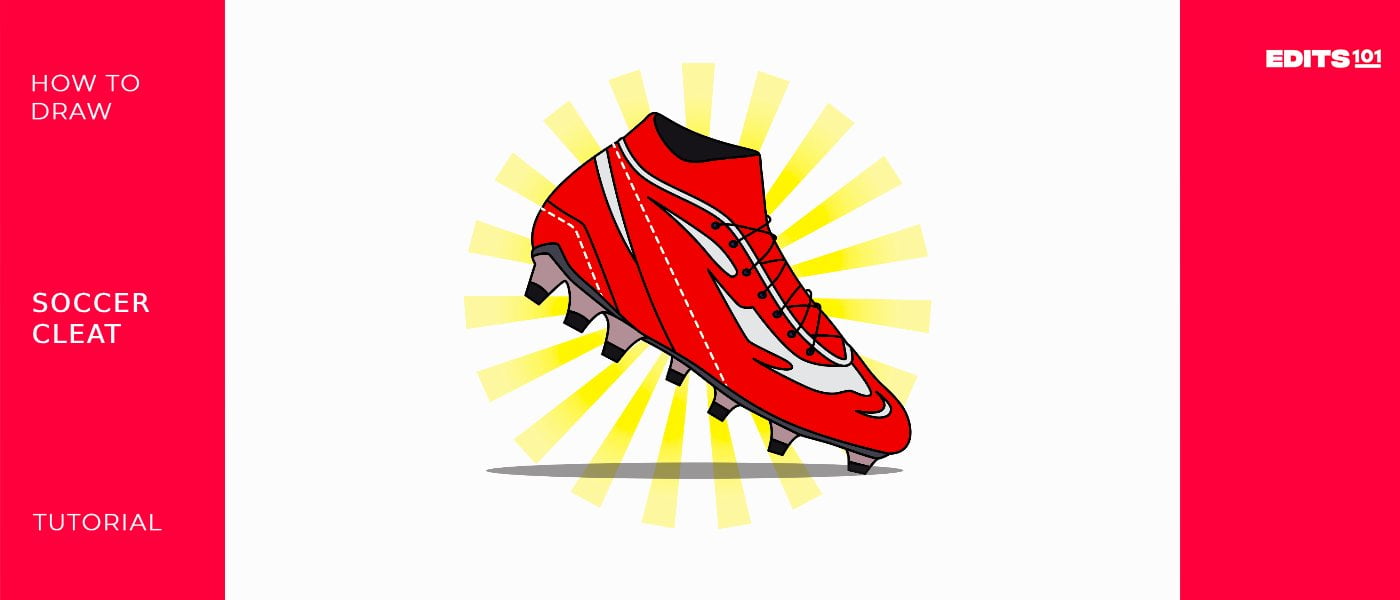
How to Draw Soccer Cleats | in 11 Easy Steps
Soccer cleats, also known as European–football boots, are the kind of shoes soccer players wear both during training and while participating in soccer matches. They’re kind of like American-football cleats, but at the same time….they’re not.
Imagine running up and down a huge soccer pitch, and having to control a ball enough to break through a team’s defence during a blistering summer day or even a cold and windy one, without using your hands at all. That’s got to be difficult for soccer players to do, don’t you think?
This is why soccer cleats are so important for soccer players! It’s also what makes them stand out from American-football cleats and Cricket shoes.
In this tutorial, we will show you how to draw a realistic soccer cleat. We will also give you some tips and tricks on how to make the drawing stand out from a basic soccer cleats sketch.
| Steps | Complexity Level |
|---|---|
| Draw the Outsole | 2 |
| Draw the Spikes | 3 |
| Draw the Body of the cleat | 4 |
| Draw the Lace Guard | 3 |
| Draw the Shoe Lace | 2 |
| Draw the Lace Holes | 2 |
| Add Details to the Sides | 4 |
| Add Patterns to the Front | 3 |
| Draw the Sew Lines | 3 |
What You Will Need
- A pencil
- An eraser
- Ruler (optional)
- A drawing piece of paper or sketchbook
- Coloring supplies
- 30 minutes
How to Draw a Soccer Cleat
While it may seem difficult at first, drawing soccer cleats can be easy to do with a little patience, time and dedication.
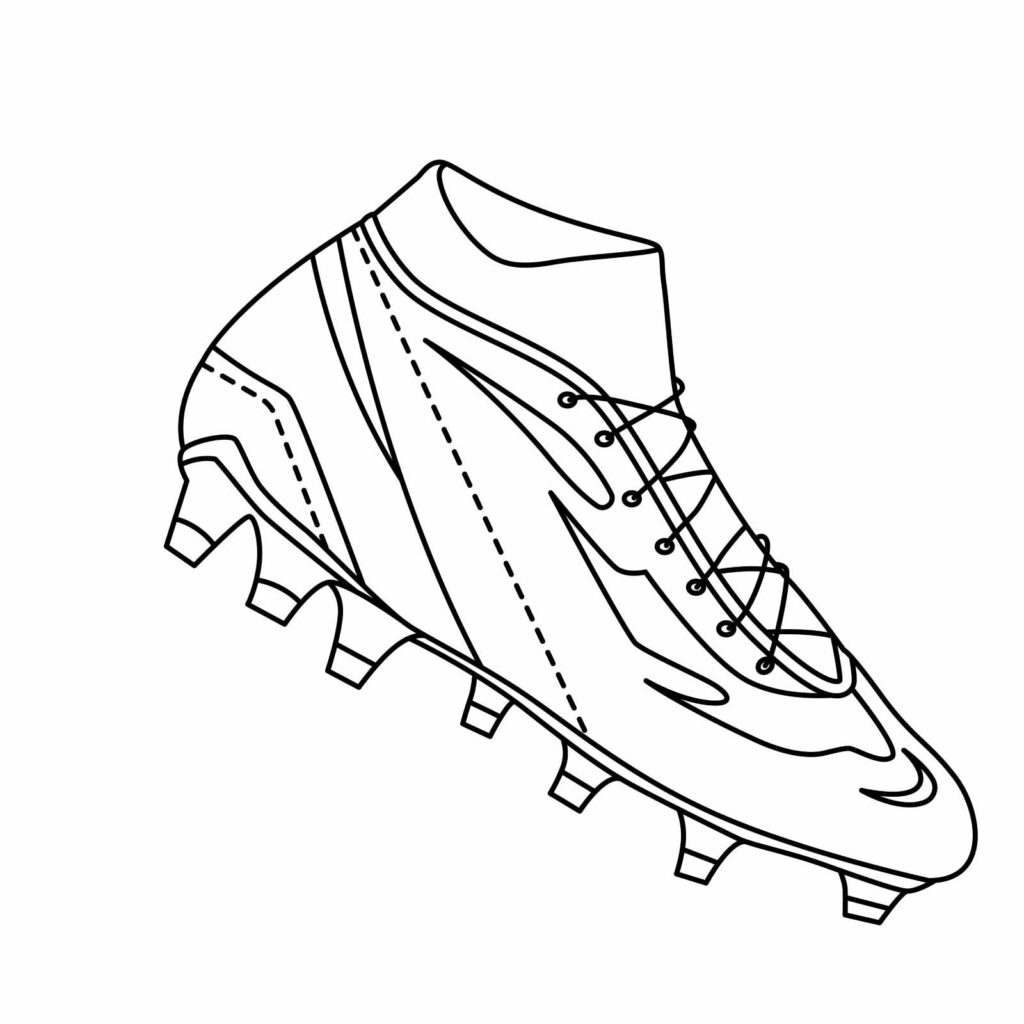
Below is an image with an outline of all the steps. Be sure to study them so that you have a rough idea of what you will be doing in each stage.
(pssst) While, you’re at it, check out how cool the last one looks!
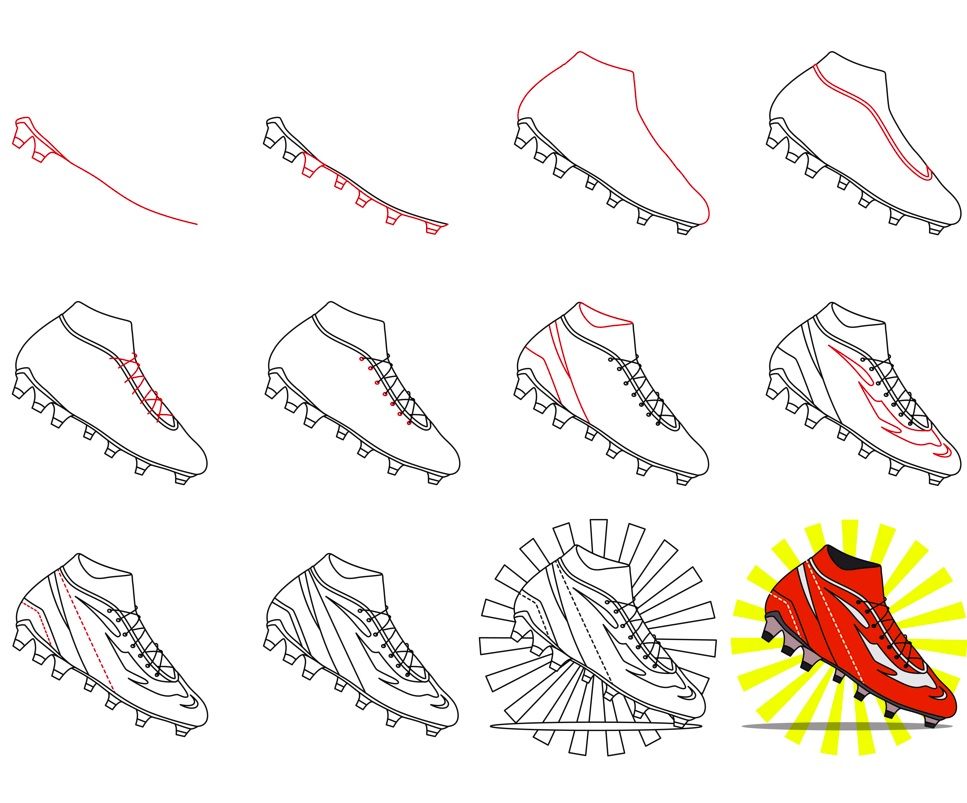
Step 1: Draw the Outsole
The outsole is the bottom part of not only a soccer cleat, but any shoe. The outsole comes into contact with the ground a lot, so it makes sense for you to draw this part first.
In order to sketch the sole, you will need to start by drawing a slightly curved line starting close to the top left part of your page and then ending it off a short distance from the bottom right part of your page. The left edge of this line needs to have a more visible curve going downward, kind of like a hook.
Next, draw a small line from the middle of your hook and then connect it to the line of the sole. Be careful not to make your line too long, though. Check out the image below for accuracy.
Add two spikes by drawing two small square-ish/rectangular-ish shapes beneath the line you just completed, and make sure that your shapes connect nicely with the line.
Lastly, add two horizontal lines in the lower half of your spikes. For accuracy here, you can use a ruler if you’d like.
Once everything is done, it should look like the bottom part of a shoe that’s got two small high heels attached.
This is the basis of the rest of your drawing, so spend your time really getting the dimensions and details on point. With some patience, we’re sure you can do it!
- Draw a slightly curved line to start
- Add two spikes to the bottom of your curved line
- Use ruler if necessary for accuracy

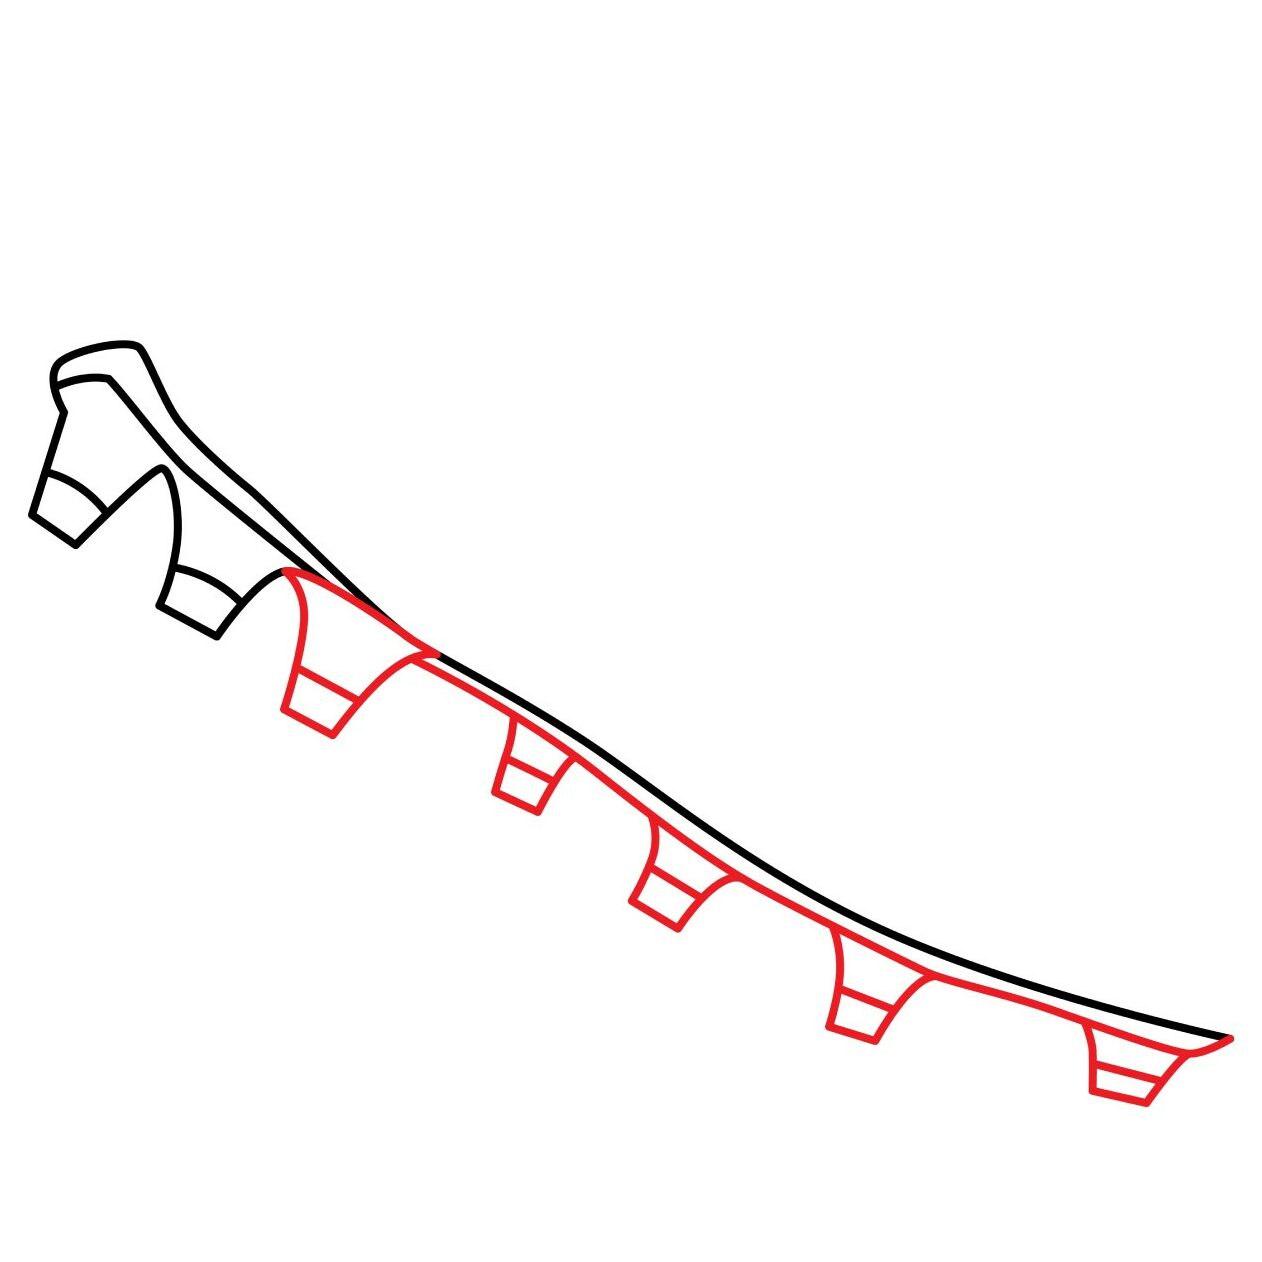
Step 2: Draw the Spikes
Spikes are little projections on the bottom of soccer cleats that help players get a better grip in the soil.
The first two spikes you did in the previous step will now serve as a guide for the size of the rest of them.
For this step, start by adding another spike to both the bottom of the diagonal line you added for the sole in step 1, and the second spike you did in step 1. The top left corner of your new spike should connect to the top edge of the second spike, and the top right corner should connect to the diagonal line.
Once you’re finished, starting from the right side of the spike you just added, draw a horizontal line just below the horizontal line of the sole. This line should run all the way up to the front part of the cleat, and connect seamlessly with it.
After that, you can go ahead and add the rest of the spikes. Make sure they don’t overlap the horizontal line. Like you did with the spikes in step 1, add a vertical line within each of them.
Additionally, make sure you leave some space between the spikes, and change up the size of some of the spikes so they look like they’re on the other side of the sole.
Hmm, this might sound a bit complicated, but if you follow the image below and make use of your eraser whenever you need it, you can accomplish this step easily.
Your drawing should now look like this.
- Use the spikes in step 1 as a guide
- Add five spikes to the sole outline
- Make sure the spikes do not overlap with the outline of the sole
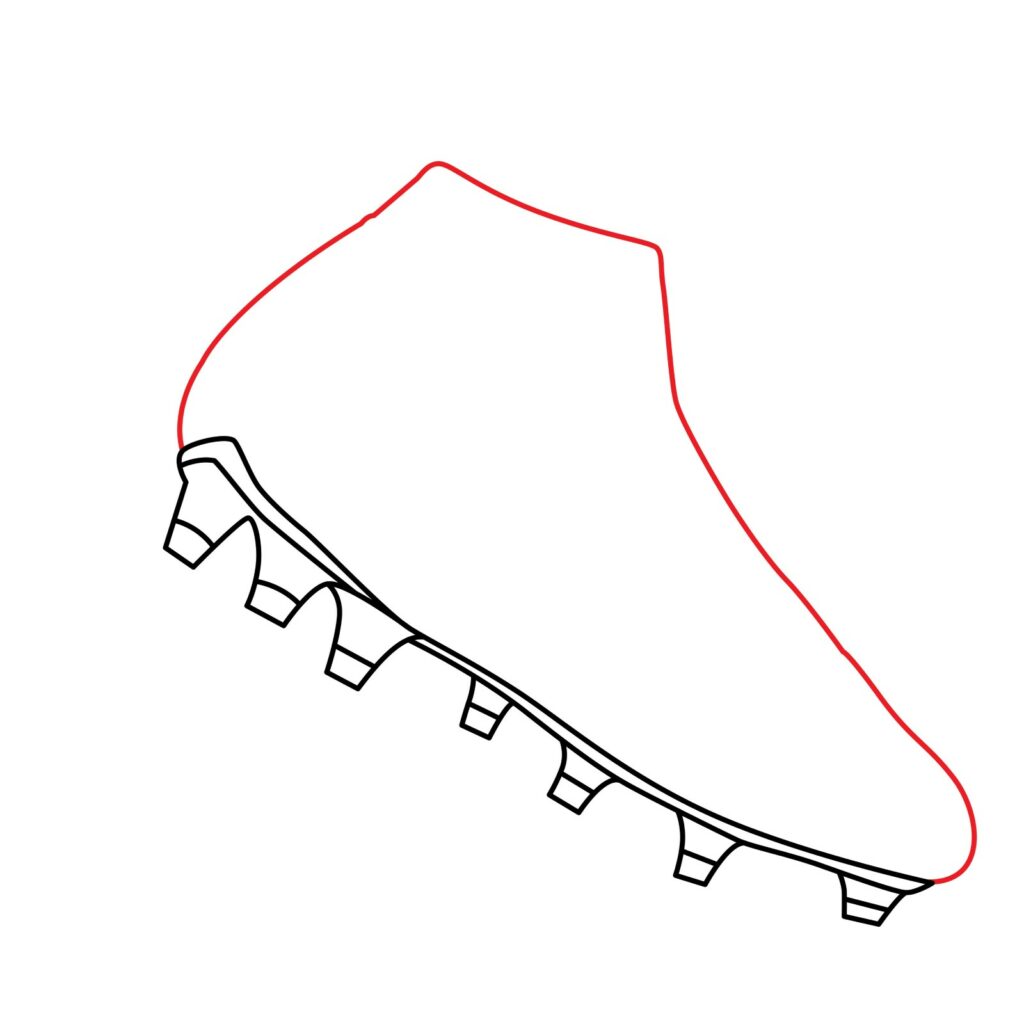
Step 3: Draw the Body of the Cleat
Now that the outsole and spikes are completed, you can go ahead and add the body of the cleat.
This is the portion of the shoe that does most of the mobility support while players move around the pitch.
Starting from the left side of the sole, draw a vertical line that curves slightly – representing a small bump – that ends a good few centimeters above the sole. For this part, you’re going to have to use your imagination a bit. Imagine how you want your cleat to look at the end, and then proportion the length of your lines to match that idea.
Next, starting from the front part of the cleat, draw a curved line. Start with a vertical line, bend it into a diagonal line and then revert back to a semi-vertical line at the top. Remember, the ends of these lines need to be proportioned to size, so you’re going to have to use your guessing skills. When you’re finished, it should look like the front (toe cap) and back (heel) part of a shoe.
Finally, connect the two curved lines you drew with one horizontal line.
If your drawing does not immediately look like the body of a cleat, don’t worry. You can repeat the process until you reach the goal you’re going for!
- Start by drawing a curved vertical line on the left side of the sole
- Draw a wavy vertical line on the right side that becomes a wavy horizontal line
- Remember to make your drawing hand fluid for seamless curves
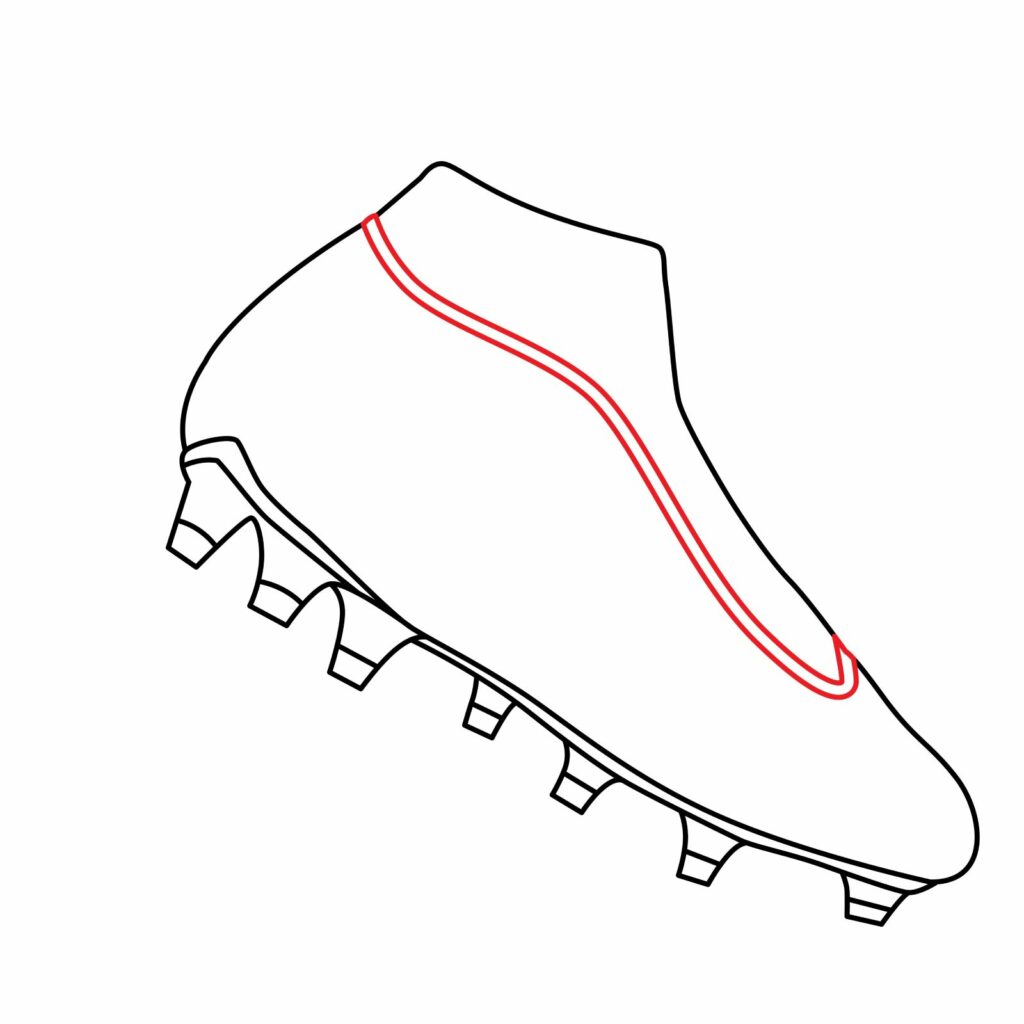
Step 4: Draw the Lace Guard
To be able to fasten the shoe around a player’s feet, shoe laces are needed. However, before you can add shoe laces, you need to add a lace guard.
A lace guard is the structure at the top of any shoe that provides room for shoe laces to enter through, and loop over and underneath one another. Unlike normal shoes though, a football cleat has a very unique lace guard. To provide soccer players with the most support, the lace guard starts from the back of the shoe and extends towards the toe cap.
To add the lace guard, you are going to start by drawing a curved line that starts from the back of the shoe, curves slightly down to along the topline, and then again curves downward to almost the front part of the shoe.
After that, the line curves more visibly before connecting with the right side of the body.
The most important thing to do in this step is to make sure your hand is as loose as possible. You want your pencil to flow freely against your drawing paper.
Add another line below the one you just drew so that the lace guard looks something like the one shown in the picture below.
- Start from the back of your cleat and work your way to the front
- Make sure your lines are wavy
- Keep your drawing hand loose for accuracy
Step 5: Draw the Shoe Lace
Now that the lace guard is ready, you can go ahead and add the shoe laces. For this, you are simply going to draw lines that zigzag on the front part of the lace guard. The lines should cut over the lace guard and sit slightly below the structure.
- Add thin lines on top of the lace guard and right boot ouline
- Make sure the lines zigzag over each other
- A few lines should curve to resemble loops and end below the lace guard
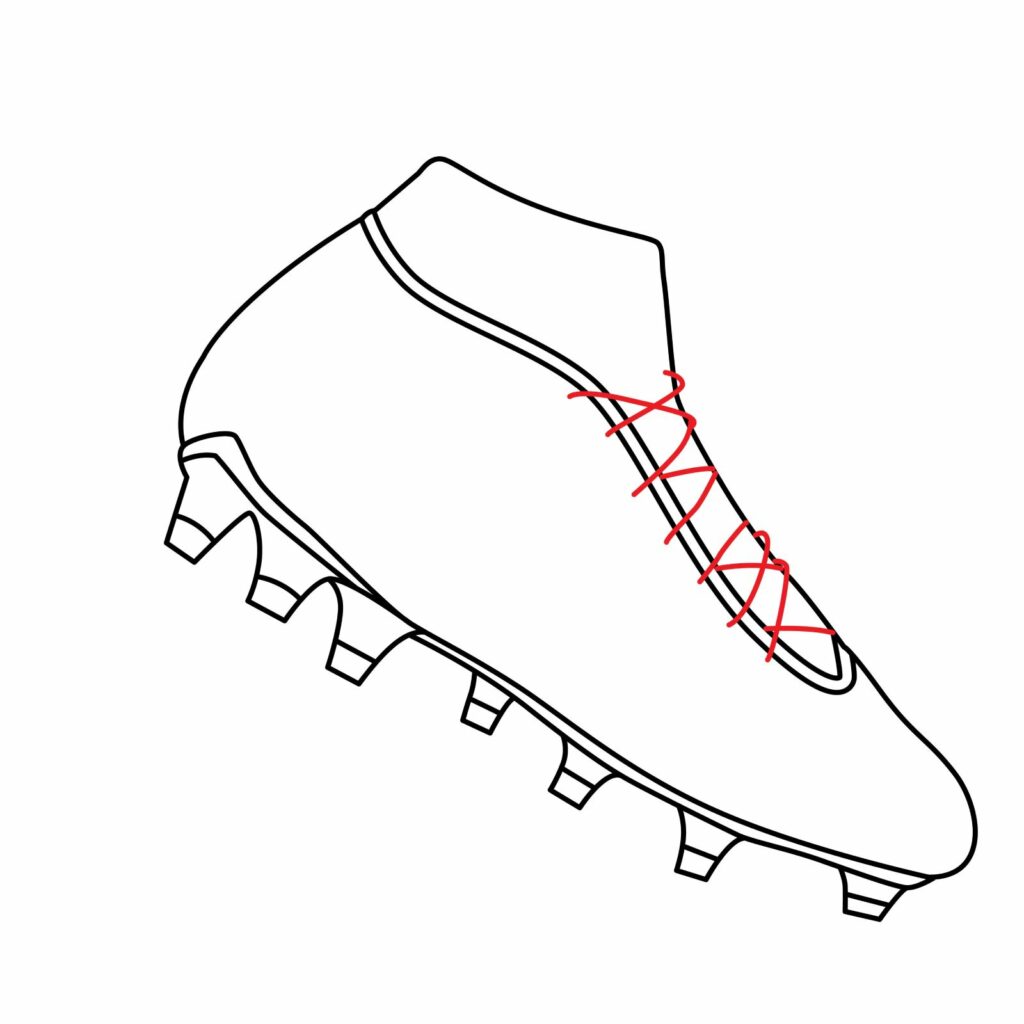
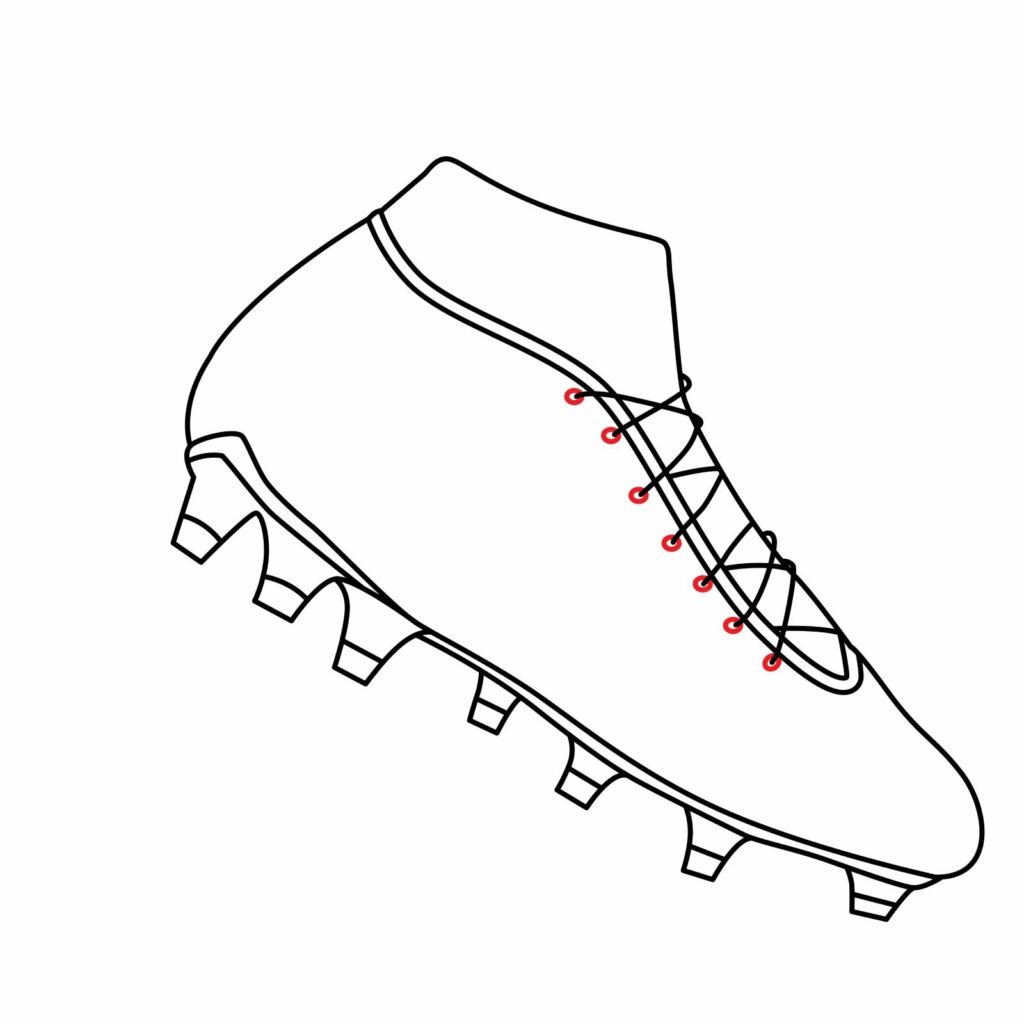
Step 6: Draw the Lace Holes
To make our soccer cleat more realistic, we will not leave the laces floating. We are going to add some lace holes. The holes will be located along the bottom part of the lace guard. The part of the laces that went over the lace guard should be surrounded in tiny circles which will serve as our lace holes.
- Add small circles around the ends of the laces
- Only add these circles to the lines that run over the lace guard
- Keep your circles as neat as possible
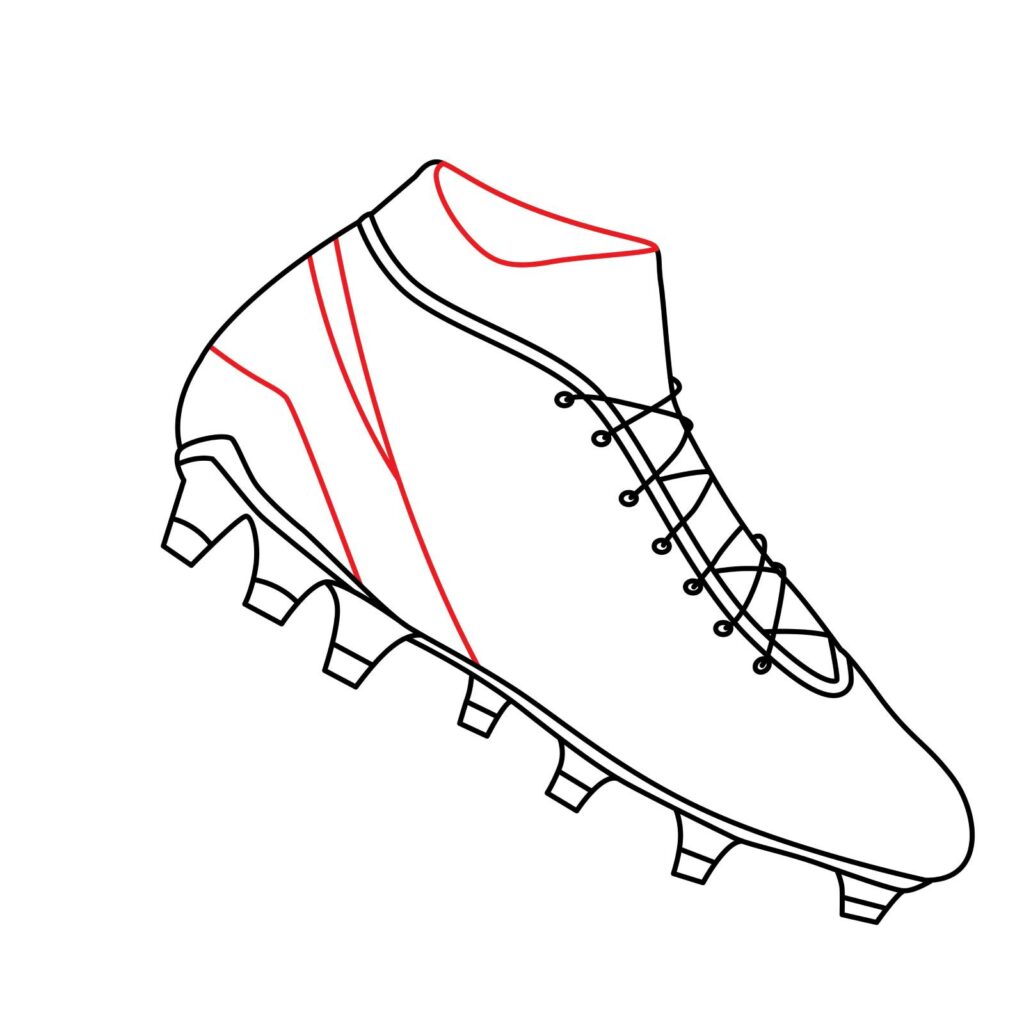
Step 7: Add Details to the Sides
The next thing you will do is add some details to your shoe.
You will start with the details on the heel cap. For that, you are going to add a couple of lines.
You’ll start with some diagonal lines and then some curved lines.
To finish the topline, you are going to add a curved line to indicate that the top of the shoe is open.
Here is what we did to our drawing, and what yours should relatively look like.
- Use a combination of vertical and horizontal lines
- Add lines for some detailing to the heel cap
- Make the entry spot for feet look as though open with a curved line
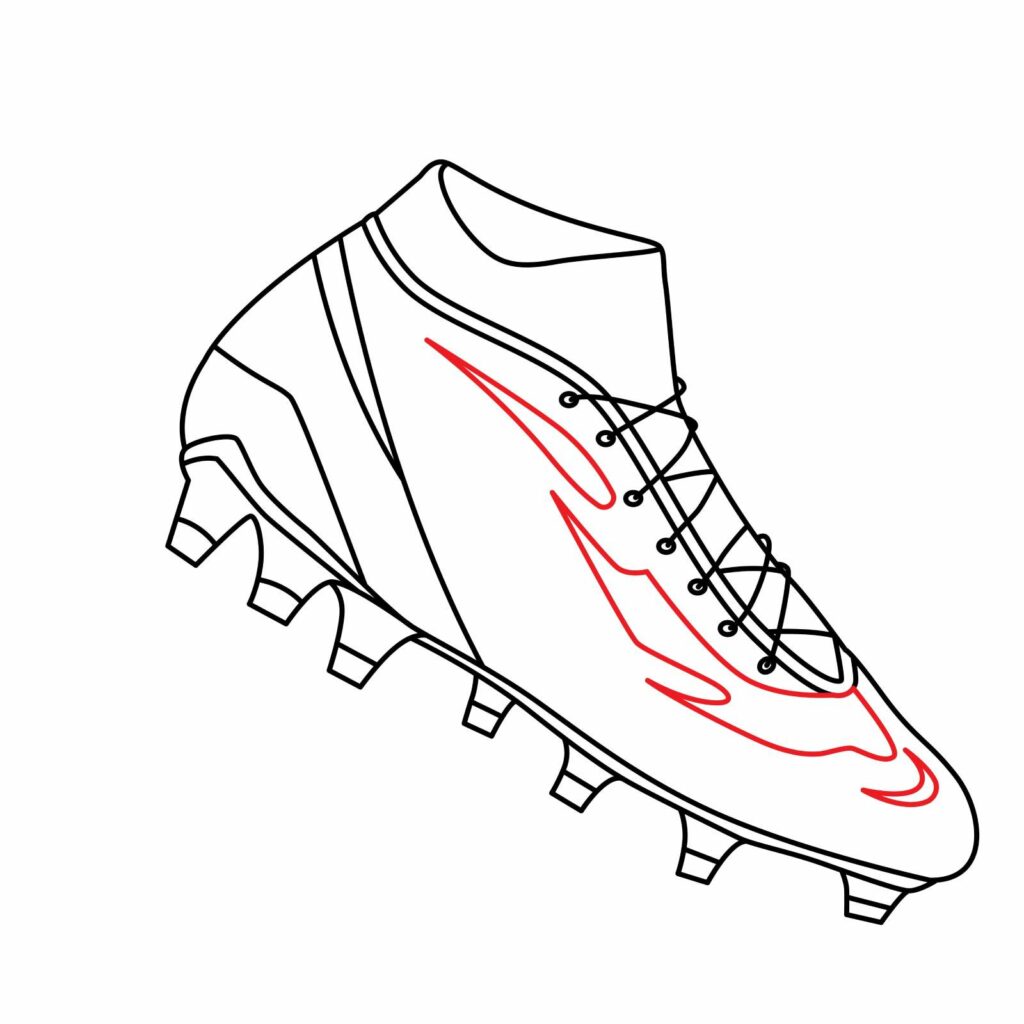
Step 8: Add Patterns to the Front
Now you’re going to decorate the front part of your shoe some more. In our drawing, we opted for some flame-like shapes below the lace guard, but of course, you can use any shape you want. They don’t necessarily have to be similar to ours.
- Add patterns to your soccer cleat for individuality
- Choose shapes or illustrations you prefer
- Make sure your patterns are eye-catching and unique
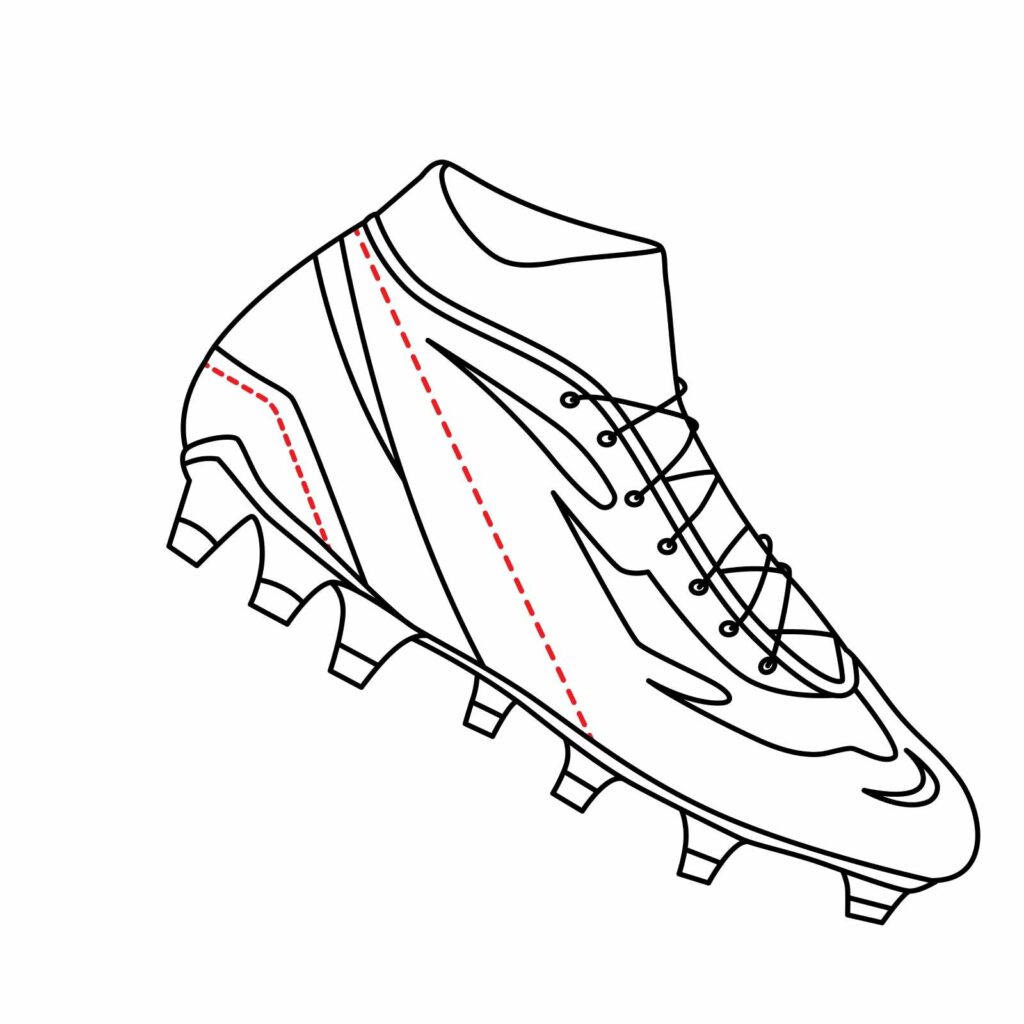
Step 9: Draw the Sew Lines
Soccer cleats are constructed using various pieces of leather that are sewn together. Because of that, you’re going to need to add some sew lines on the shoes. This step just gives the drawing so much more detail, so be sure to include it in yours.
In order to add sew lines, draw dashed lines starting from one edge of your cleat and ending at another.
Here is what we did to our drawing. Make sure that the ones you add to your shoes start and end at similar spots.
- Add some dashed straight lines to represent seams
- Aim for the back of your boot when adding sew lines
- Place sew lines below and above the pattern lines
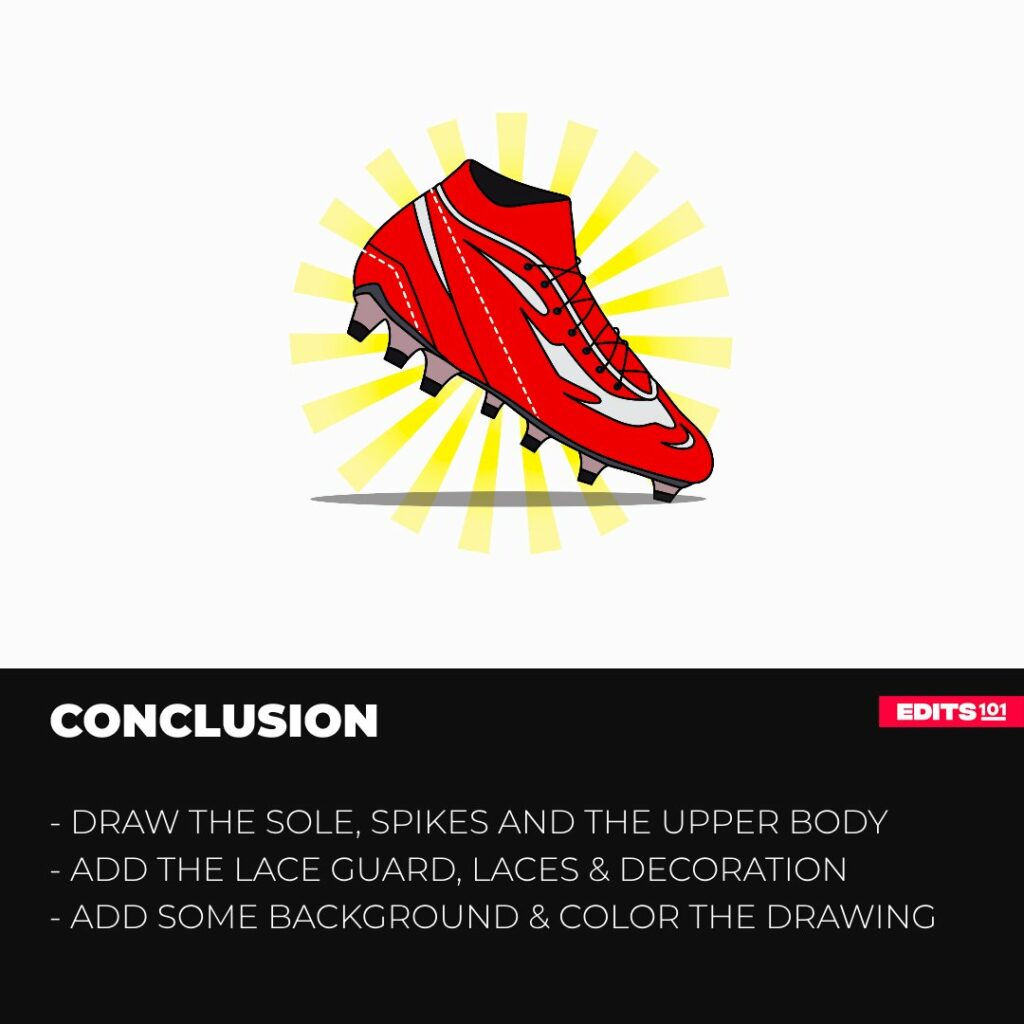
Congratulations! Your Soccer Cleats Drawing is complete
Whoa, take a step back and admire the work you’ve just done. You went from a blank page to a super cool drawing in a matter of minutes. That’s surely an achievement and something to feel proud about, so take a little break and give yourself a well-deserved pat on the back!
Taking your Drawing to the Next Level
If you’re happy with the results you’ve got so far, you can leave your drawing as is. However, if you want to add some flavor and make your drawing stand out among the rest, complete the following steps.
Do as Vincent Van Gogh said, “I am seeking. I am striving. I am in it with all my heart.” and push yourself to go even further than what you have already done!
Step 10: Adding a Background
Now that all of the technical work is out of the way, it’s time to have some fun!
In any piece of art, a background is always a good idea. It opens up the scope of the drawing and sometimes it can really compliment the object you’ve drawn. In this case, there are a number of things that can compliment a soccer cleat.
You can add a soccer ball in the background if you please, or some grass at the bottom of your cleat.
You can even go big and draw some seats to represent a stadium far off in the distance, or you can add a name or logo to the side of the shoe, and make it your very own brand.
If you like the look of the background we have chosen for our drawing, you can go ahead and copy that as much as you’re possible.
Here you will need to use your ruler to make rectangular shapes that surround your cleat, similar to a shining star.
Make sure your lines don’t go over any part of your cleat. You want the cleat to stand out, after all. Below, draw a spear-like shape just beneath the lowest point of your cleat. This will be a shadow when colored in black.

Step 11: Adding Color
Once everything is ready, the only thing left to do is to add some color to both the soccer cleat and the background you’ve chosen. For this step, use your coloring supplies to make your drawing as vibrant as possible.
You can pick any color for the body of your boot, but make sure the color you choose is different than the colors you pick for the heel cap and the patterns.
If you’ve decided to use the same background as ours, shade the rectangular shapes surrounding the cleat with yellow – make the color lighter the further away it gets from the cleat.

Bonus Tips
Additionally, you can also add some cool detailing to your drawing to take it to the next level. Add some bumps or indents to the front part of the soccer cleat to make it look like your cleat has just come into contact with a ball.
You could even add some shadows over certain parts by shading your color a little darker than the rest, or using a gray color, to make it look like a soccer ball is looming over your cleat.
Additionally, check out some other tutorials on soccer related items for some inspiration. Like our tutorial on how to draw a soccer field, a soccer player or a soccer jersey.
Conclusion
Your soccer cleat is now complete! If you’ve followed all the steps and made it this far, well done. If your drawing doesn’t look the same as ours, don’t get frustrated. It doesn’t necessarily need to look exactly the same, as long as you gave it your all and managed to complete it.
Remember, the more practice you put in, the better your results will be. You have read and hopefully learnt so much from today’s tutorial; like how to outline a sole, how to draw spikes, lace guards, a heel cap and even some patterns. For that, give yourself a pat on the back. So many more tutorials await. See you next time!
Thanks for reading & feel free to check out more of our articles!
Author Rating
Overall Rating
Summary
Learn how to draw a soccer cleat. The post is a step-by-step guide that covers every step you have to take to complete a beautiful soccer cleat.