How to Draw a Roller Coaster | In 7 Easy Steps
Roller coasters are thrilling amusement park rides characterized by steep drops, sharp turns, and high speeds.
They were first created in the late 19th century as a form of entertainment and excitement for the public.
Since then, roller coasters have become popular all over the world, providing riders with an adrenaline rush and a sense of thrill as they navigate through various twists, turns, and loops.
In this tutorial, we’re going to cover all you need to know in order to draw your very own roller coaster in seven easy steps!
| Steps | Complexity Level |
| The Upper Track | 1 |
| The Bottom Track | 1 |
| The Pillars | 2 |
| The Car | 2 |
| Two Cars & Wheels | 3 |
What you will need
- Drawing paper or sketchbook
- Pencils (2b, 3b or 5b)
- An eraser
- A ruler
- A protractor (optional)
- Color Supplies
- 25-30 minutes
How to Draw a roller coaster
Drawing a roller coaster may seem challenging at first, but it’s entirely achievable with a little time, patience and dedication.
Just ensure you have all the required drawing tools on hand, thoroughly browse the outline provided below to prepare you for the steps coming up, and you’ll find you’re gliding through the process!
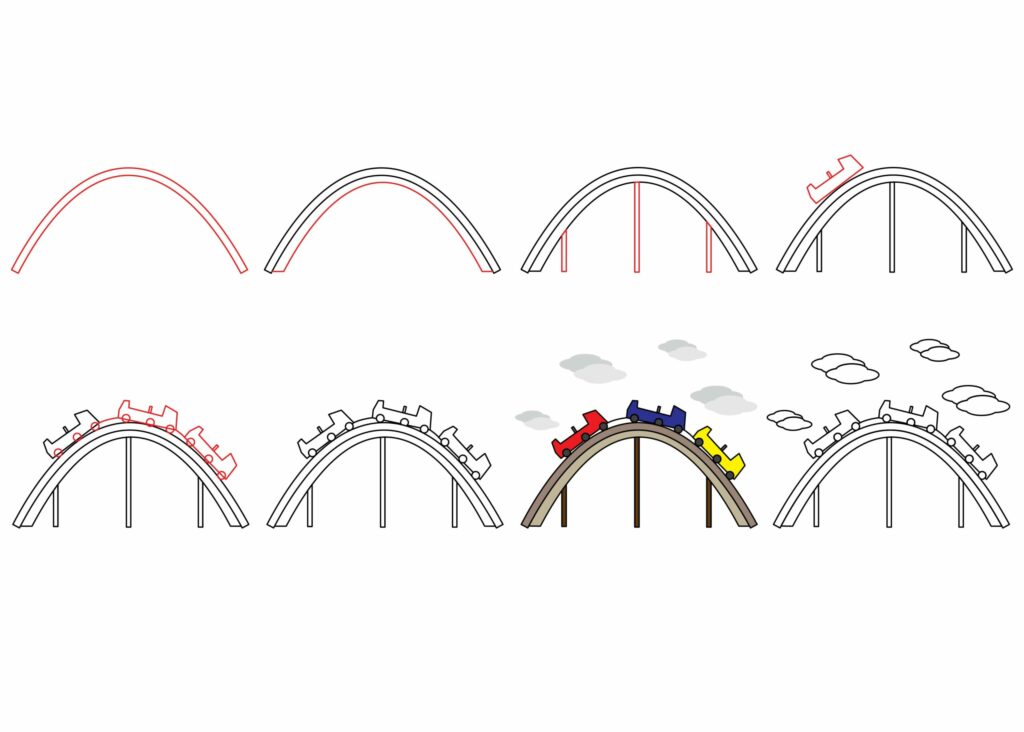
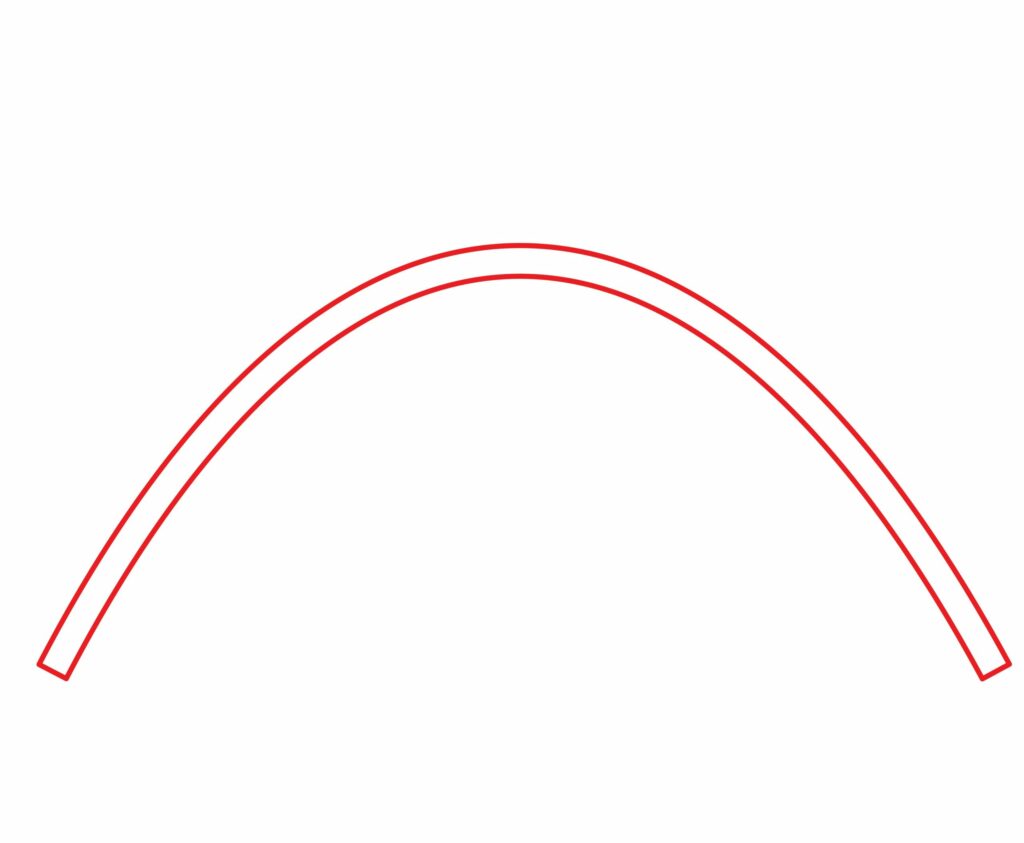
Step 1: Draw the Upper Track
The tracks of a roller coaster are typically made of steel and are used for guiding the movement of the roller coaster cars throughout the ride.
To complete this step, first decide which way you would like to angle your drawing paper. A portrait orientation will result in a compact roller coaster sketch, while a landscape orientation will provide you with way more room to draw!
Then, start by drawing a horizontally curved rectangle in the middle of your page. Ensure the lines of your rectangle are nice and smooth, which you can do by using a mathematical protractor or a drawing compass.
- Flip your drawing paper into a preferred orientation
- Draw a horizontally curved rectangle in the middle of your page
- Make use of drawing tools to ensure smooth lines
Step 2: Add the Bottom Track
To add a little bit more structure to the track, it’s best to add a bottom track. This will make your drawing look all the more realistic!
Complete this step by drawing another horizontally curved rectangle directly beneath the upper track drawn in step one.
Make sure you maintain an even amount of space throughout the curve, and that your lines do not overlap along the bottom corners.
- Draw another horizontally curved rectangle below the upper track
- Maintain an even amount of space throughout the curve
- Ensure your lines don’t overlap along the bottom sides

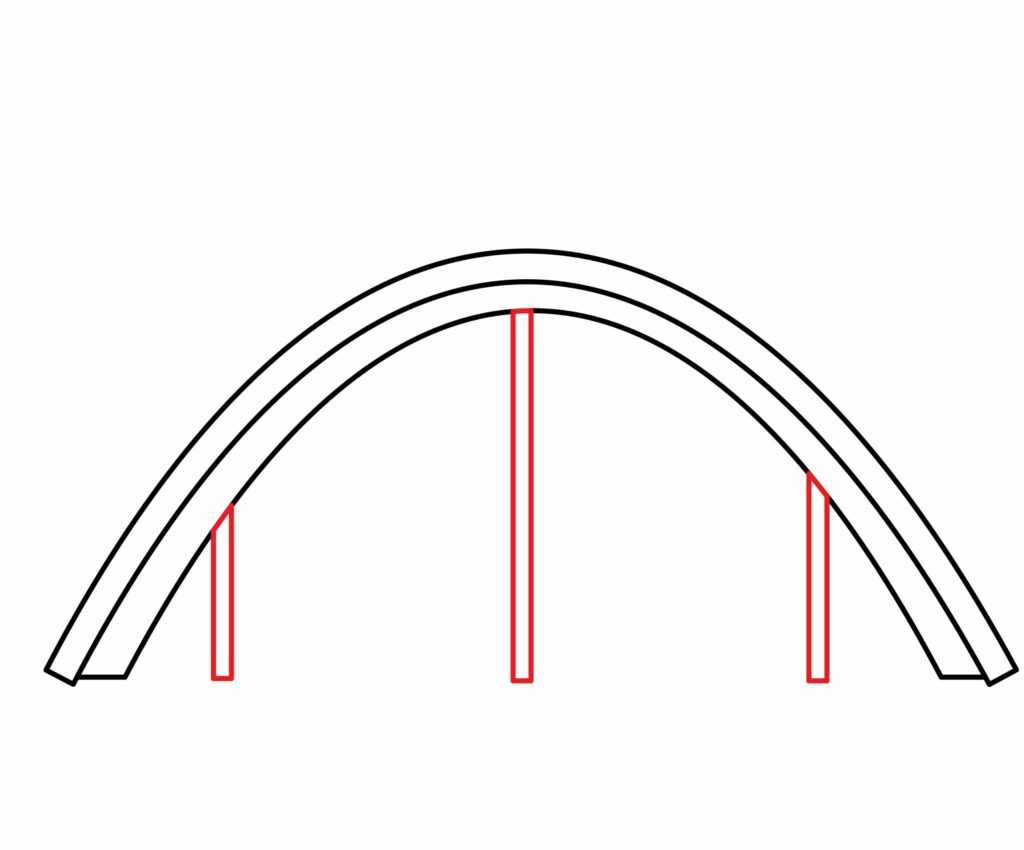
Step 3: Draw the pillars
The pillars of a roller coaster are usually made of steel or concrete and are used to support the track structure, providing stability and safety for riders.
First, just beneath the tracks you have sketched, you are going to add three thin vertical rectangles. These will represent the upright pillars. Ensure the rectanges are nice and straight by making use of a ruler.
You want these pillars to appear as though they’re holding the track up, so ensure each rectangle is evenly placed: one against the left-side, one in the middle, and one against the right-side.
Lastly, always make sure that none of your pillars overlap with the track and that the bottom of each pillar is in alignment with the bottom of the track.
- Draw three vertical rectangles beneath the tracks
- Ensure each rectangle is evenly placed
- If necessary, use a ruler for straight lines
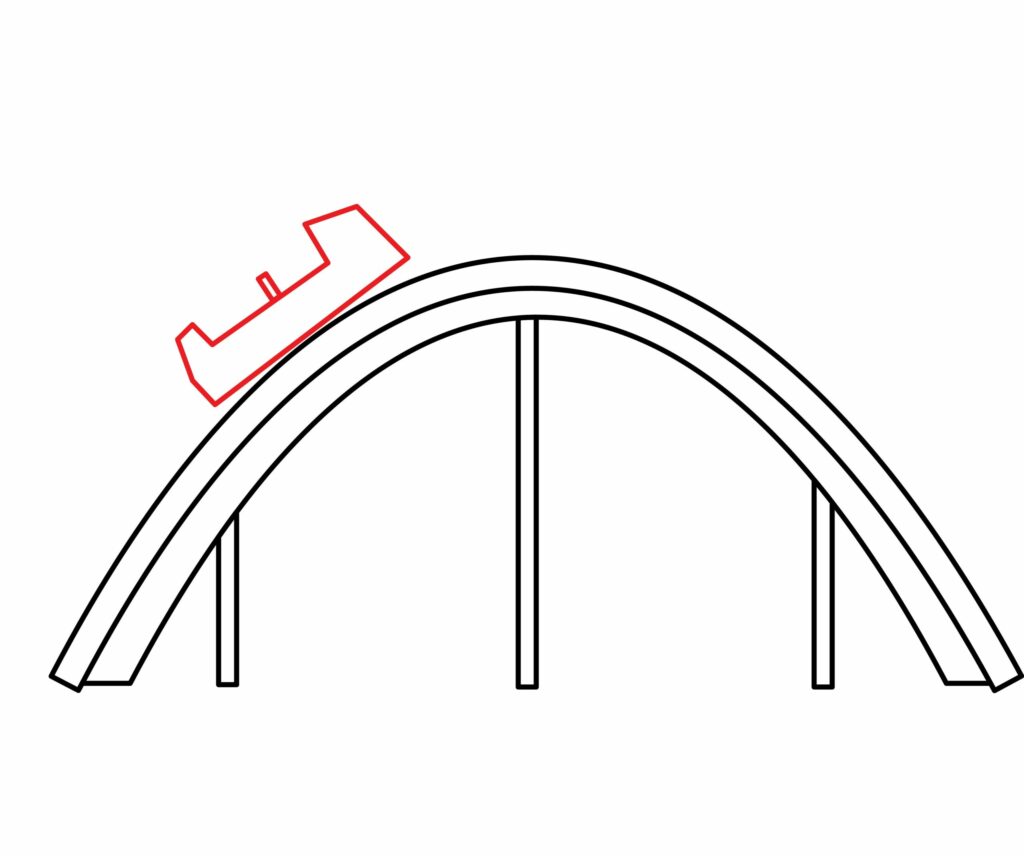
Step 4: Draw the car
The cars of a roller coaster are passenger compartments that travel along the track and are used to carry riders throughout the thrilling experience.
To add the car, begin by positioning your pencil above the left-side of the track. Draw a small rectangle for the outline of the coaster car, aligning it with the upper part of the track.
Next, erase the middle part of the rectangle, and draw a dipped curve instead. It should resemble a basket in the center once you’re finished, indicating the seating area for passengers.
Finally, draw a small rectangle in the middle of your car to denote the backrests of the seat.
- Draw a small horizontal rectangle above the upper-left curve of the track
- Erase the middle part of the rectangle and replace it with a dipped curve
- Draw a small rectangle in the center of the car to resemble a backrest
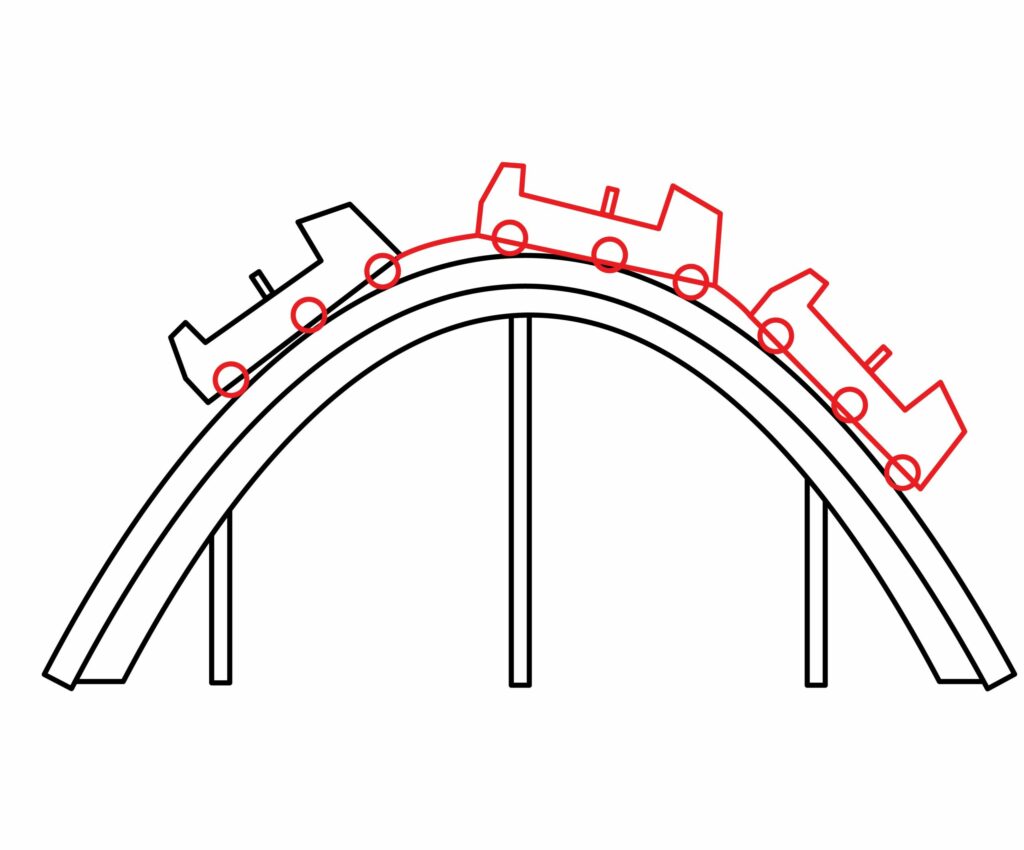
Step 5: Add Two more cars and wheels
Your roller coaster sketch is now nearly complete! All that’s left to do is add some more cars plus wheels to give it an extra touch of authenticity.
First, start by adding the cars. Next to your previously drawn car, draw another one following the same process above the center part of the track and above the right-side of the track.
Lastly, draw three small circles along the bottom of each car, and attach each car to one another with a line in between them.
- Follow the same process to add the two cars
- Draw three circles along the bottom of each car to resemble wheels
- Draw a line between the cars, connecting the center car to the others
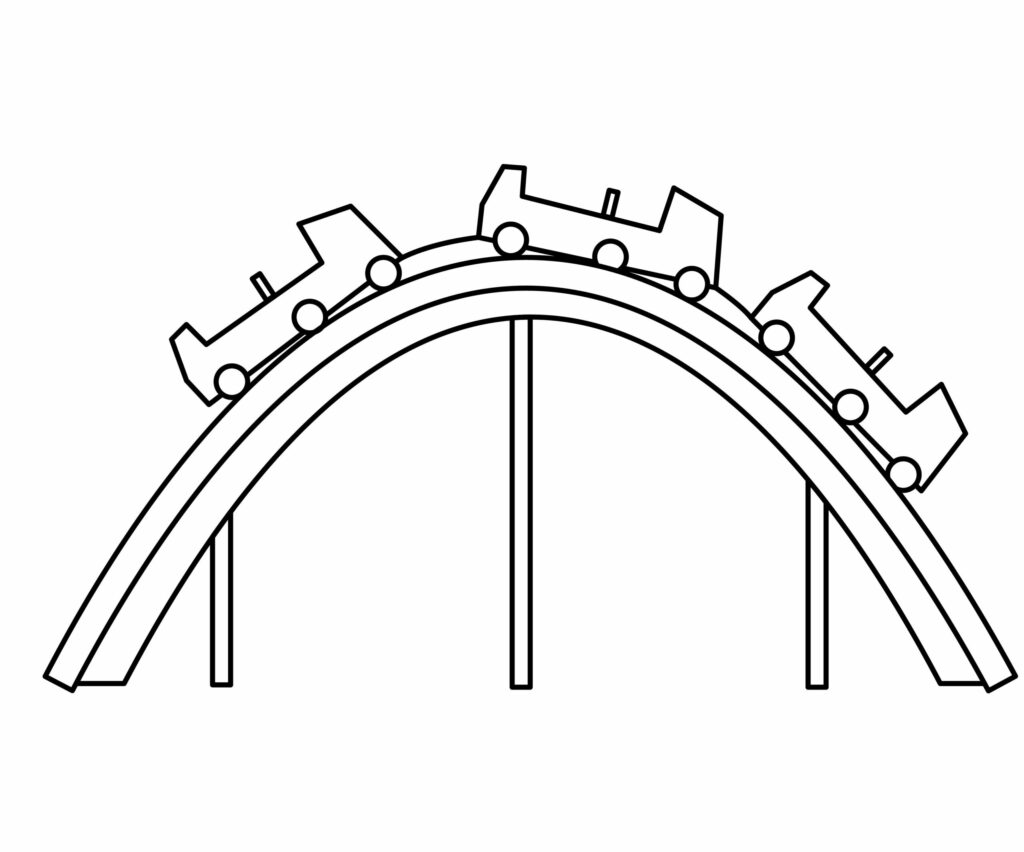
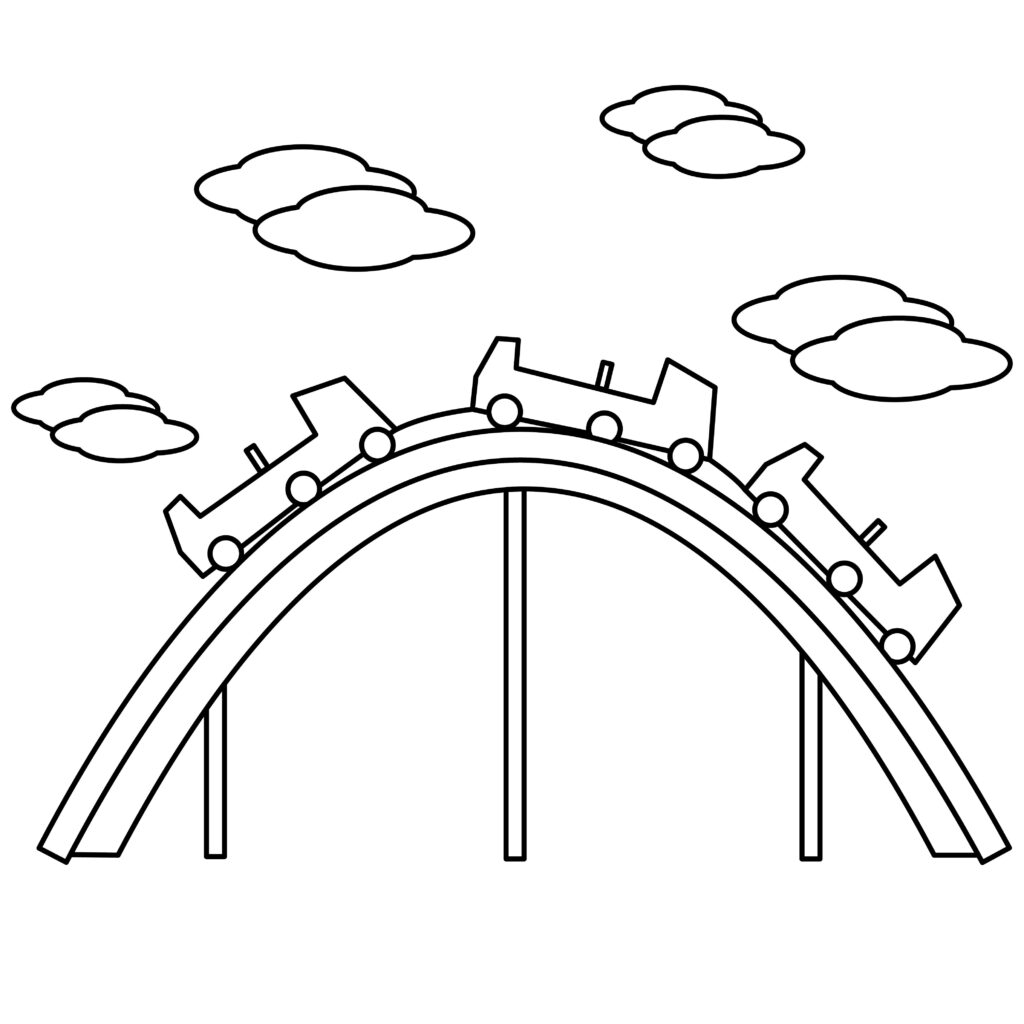
Congratulations! Your Roller Coaster Drawing is Complete
And just like that, you’ve crossed the finish line and your roller coaster is ready to roll! Take a moment to admire your handiwork.
You’re welcome to use the image below as reference for any possibly corrections you’d like to make. Ensure everything looks exactly as you want it to before you continue on with the rest of the tutorial.
Taking your drawing to the next level
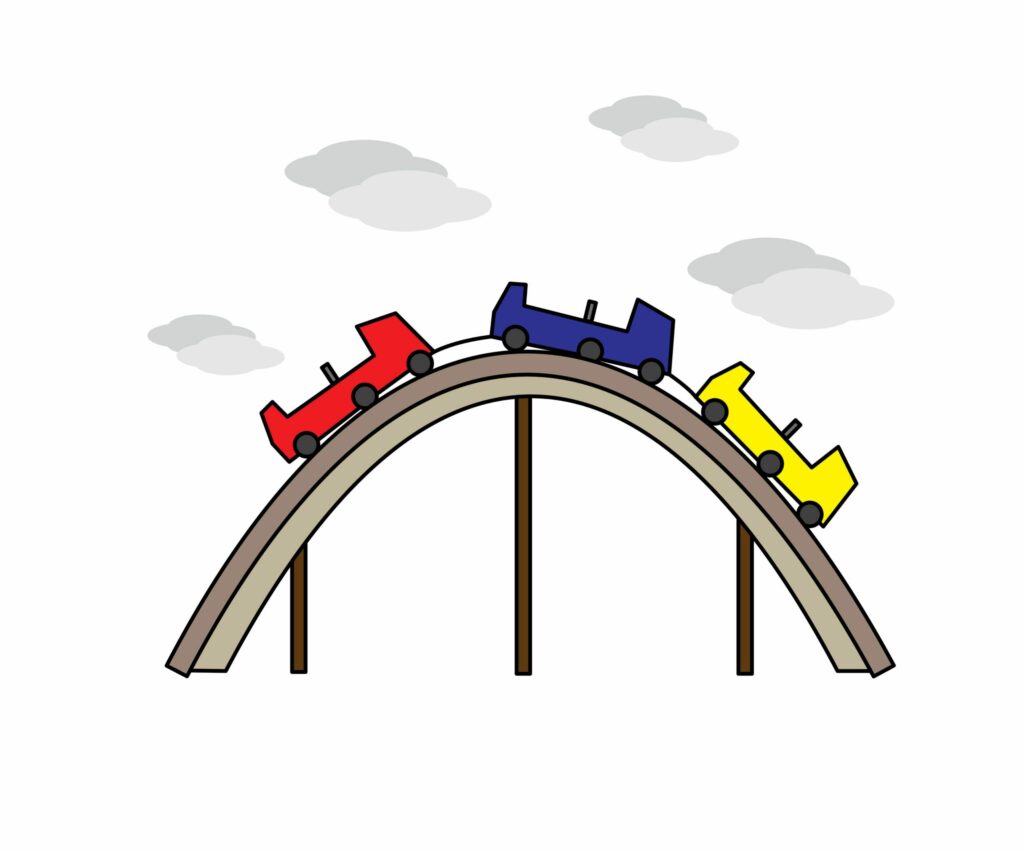
Let’s dive into the fun part—adding some flavor with backgrounds and colors! Think of your drawing as the main character in its own story, and ask yourself, what kind of world does it live in? Follow these steps to establish some scenery for your roller coaster, and bring it to life with vibrant colors!
Step 6: Adding a background
Adding a background to a roller coaster sketch enhances the composition: by providing context, setting, and atmosphere, it creates a more complete and engaging visual experience for the viewer!
For example, placing a roller coaster sketch in an urban environment with buildings and city streets can add realism to the drawing as amusement parks are often found in city centers. Check out this tutorial for a few tips on how to draw some skyscrapers.
Additionally, including details like clouds, trees, mountains, or even people surrounding your roller coaster can really complement the main subject. The background in this tutorial accurately denotes how to draw clouds, while this tutorial provides great insight on how to draw trees.
Be sure to watch some YouTube videos as well for some added inspiration for a cool background design.
Step 7: Adding color
Finally, complete your roller coaster sketch by incorporating some color onto your page. Real-life roller coasters often come in bright colors, so don’t shy away from lively tones and accents as your color in your drawing.
You’re encouraged to use different coloring supplies to ascertain which tools works best of your sketch. Additionally, ensure you use different colors for each element to guarantee each part stands out.
Bonus Tips
Look at real roller coaster pictures for structure inspiration.
Add motion elements, such as speed lines or excited passenger expressions.
Apply shading and lighting to highlight areas and create depth.
Add your name to the page for a personalized touch.
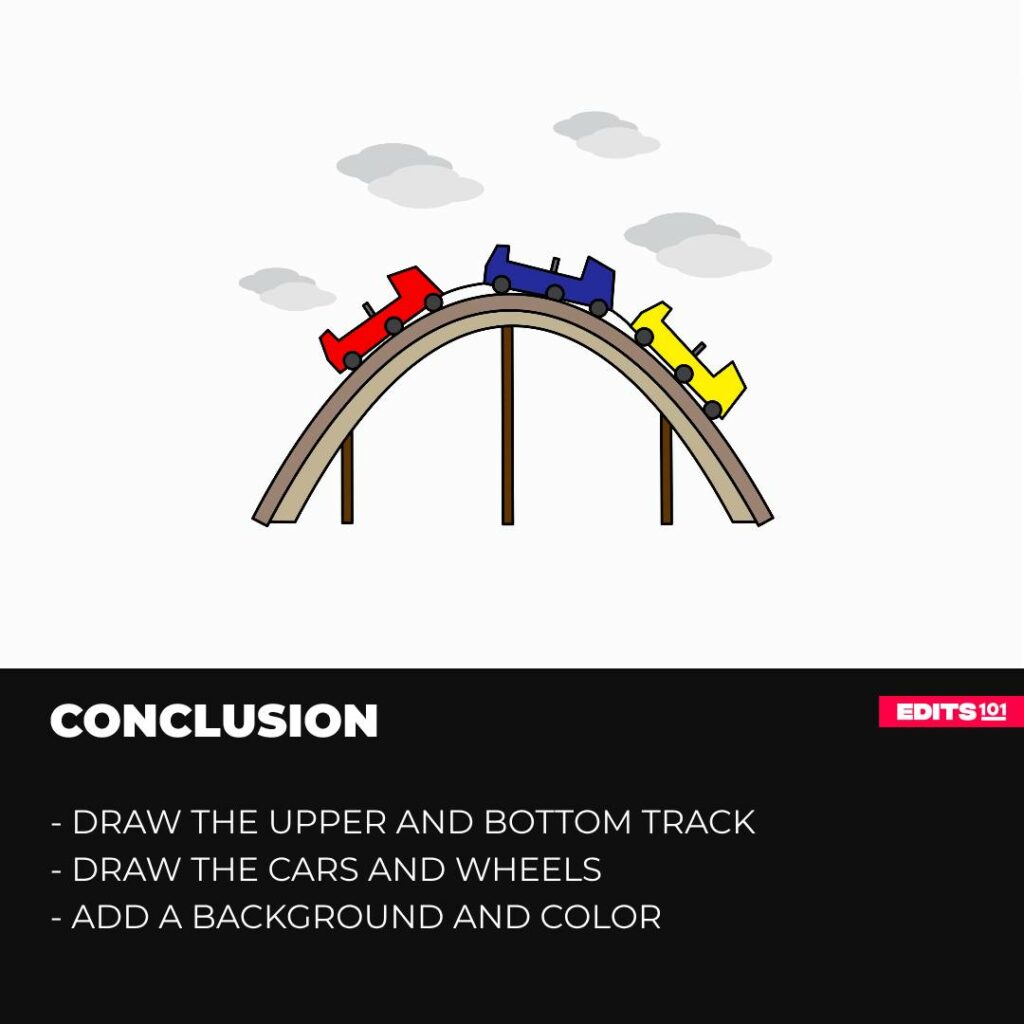
Conclusion
Congratulations for reading through all the steps and making it this far. Job well done! You have read and hopefully learned so much from today’s tutorial; like the functionality of roller coasters, how to draw roller coaster tracks, pillars, and cars For that, be proud of yourself! Remember, the more practice you put in, the better your results will be, so keep on drawing and designing new things!
Thanks for reading & feel free to check out more of our articles!
Author Rating
Overall Rating
Summary
This tutorial teaches the fundamental steps involved in sketching a roller coaster. It also covers how to boost the quality of a roller coaster design by incorporating color and a background.