How to Draw a Dump Truck | Step by Step
The dump truck is one of the many types of machines and vehicles used in clearing garbage and debris. It is a large vehicle used in the transportation of loose materials such as gravel, demolition waste, and sand to or from construction sites.
In our lesson for today, we will be learning how to draw a realistic dump truck from scratch. We will also be sharing a few interesting facts about these vehicles while at the same time educating you on the different parts that make up a dump truck.
| Steps | Complexity Level |
| Drawing the Driver’s Cabin | 2 |
| Drawing the Bottom Frame | 3 |
| Drawing the Dump Box | 2 |
| Adding Bumpers and Lights | 2 |
| Drawing the Wheels | 1 |
| Drawing the Cabin Door and Window | 2 |
| Decorating the Dump Box | 2 |
| Adding Some Load | 1 |
| Adding Some Background | 2 |
| Coloring the Drawing | 1 |
What You Need
- A pencil
- A drawing piece of paper
- A ruler
- An eraser
- Coloring supplies
- 20 minutes
How to Draw a Dump Truck
Did you know that a dump truck is also known as a tipper truck? This is because in most dump trucks, the dump box tips backward to offload the weight.
In our tutorial, we will be drawing the dump truck from the side view so as not to make the drawing too complicated. Once you grasp the concept of drawing a truck this way, you will be able to draw one from a real photograph and from any perspective.
The below image has the steps we will be taking. Study the image closely so that you are better prepared for each step of our drawing process.

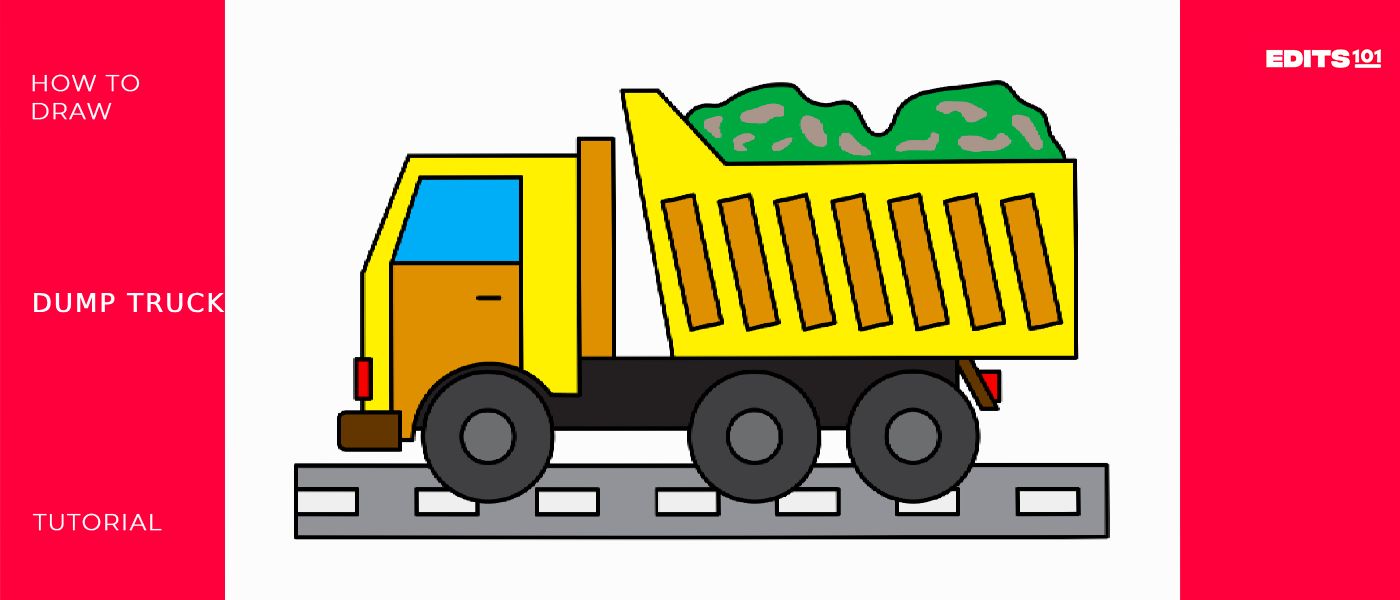
Step 1: Draw the Driver’s Cabin
Also known simply as the cab, the driver’s cabin is the front end of a dump truck. As you may have guessed, this is where the driver sits. We will be adding the driver’s cabin on the right part of our drawing paper.
The first thing you should do is draw a vertical rectangle close to the right margins of your drawing paper. To turn the rectangle into a cabin, add a groove at the bottom part of the rectangle. The groove will be for the front wheel. Next, add a diagonal line that starts a short distance from the top left corner and connects to the left side of the rectangle in the middle.
Erase the portions of the rectangle that cut through the groove and the portion that sits to the left of the diagonal line we just added so that your drawing looks like this.
- Draw a vertical rectangle on the left part of your drawing paper
- Replace the bottom part with a groove for the front wheel
- Use a diagonal line to replace the top half, left side of the rectangle
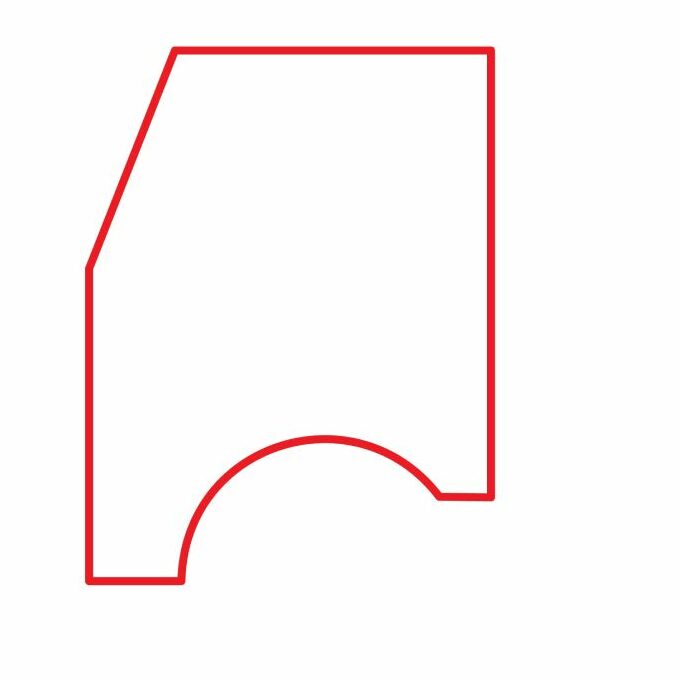
Step 2: Draw the Bottom Frame
The next thing we are going to do is add the bottom frame of the dump truck. If you want, you can refer to this as the chassis. It is the base of the truck that everything is mounted on including the engine, driver’s cab, and dump box.
To draw the frame, add a flattened horizontal rectangle beneath the cab and extend it to the right. Make sure there is ample space between the end of the rectangle and the right margin. We need the space for other details of both the dump truck and the background later. Erase the part of the rectangle that cuts through the cab.
Next, the driver’s cabin needs to be protected from the items being ferried in the dump box. For that, we will add a narrow, vertical rectangle behind the cab. The rectangle should start at the top of the bottom chassis and extend slightly above the roof of the driver’s cabin.
- Draw a horizontal rectangle below the driver’s cab and extend it to the right
- Add a vertical rectangle behind the driver’s cab
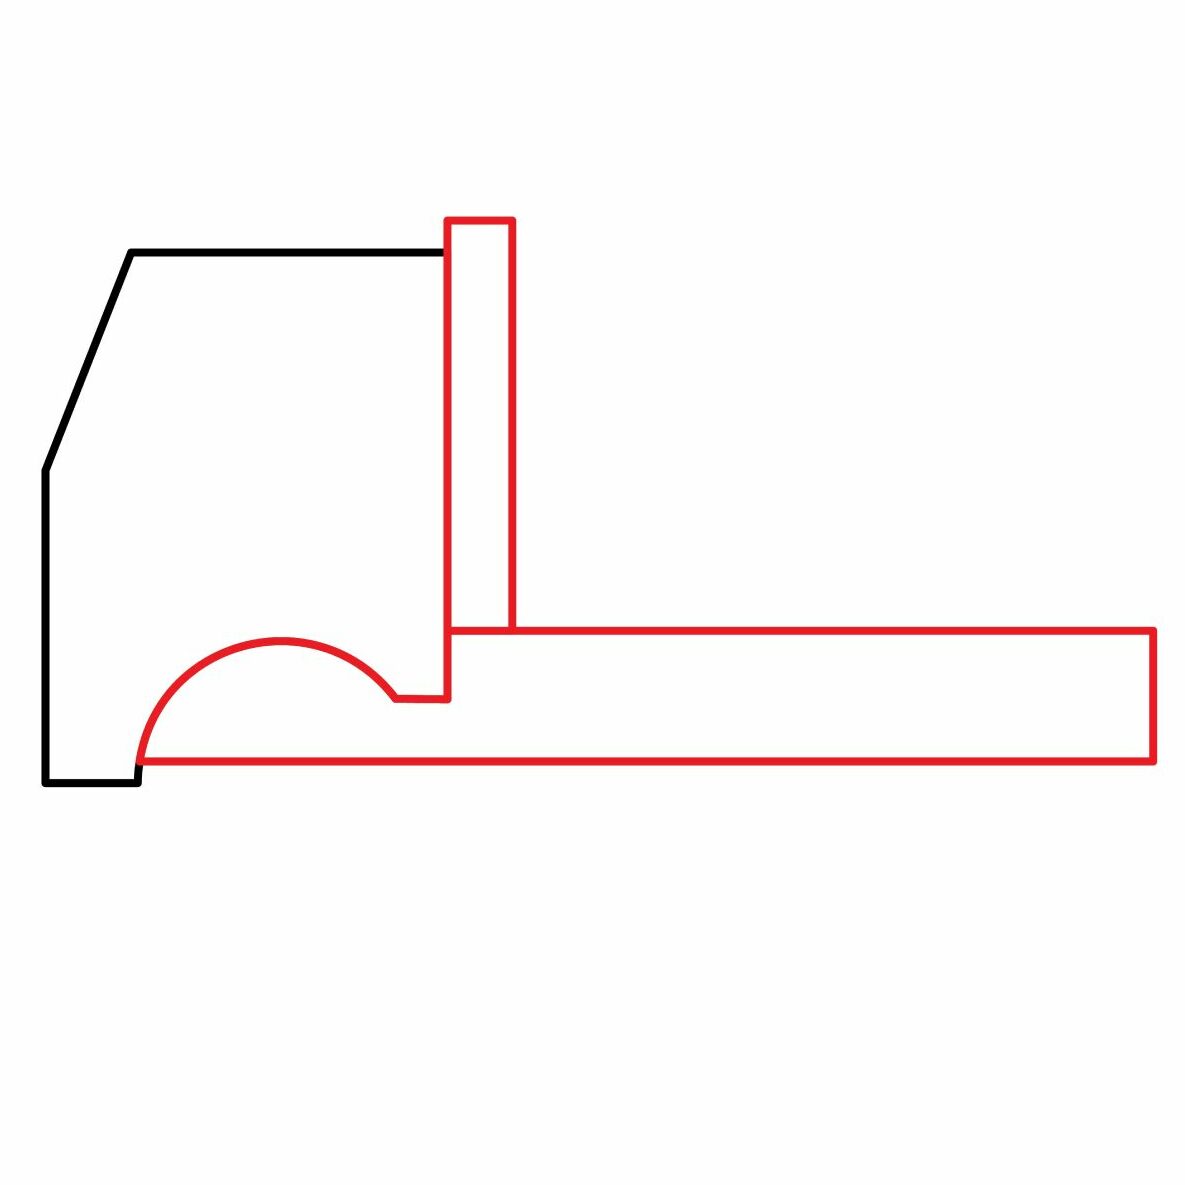
Step 3: Draw the Dump Box
Just like a garbage truck, a dump truck carries heavy loads in a large bucket-like structure known as the dump box. It is made of reinforced steel so that it can transport all manner of items without getting damaged.
To draw the dump box, draw a rectangle behind the cab and above the chassis. The rectangle should be the same height as the cab and should extend a little bit past the length of the chassis to the right. This is because we are drawing a tipper truck.
Next, we need to make the left side of the dumb box bent. For that, draw a line starting a short distance from the bottom right part of the cab. The line should rise diagonally towards the left, and stop a short distance above the roof of the cab. Erase the part of the rectangle that sits to the left of this diagonal line.
To keep debris from falling on the cab’s roof, the top part of the dumb box close to the cab is usually raised. From the top of the diagonal line we added, we will add a short horizontal line and then a diagonal line that slants towards the right and connects to the top of the rectangle. Use your eraser to remove the part of the rectangle that cuts through the new shape.
- Make the left part of the dumb truck bent using a diagonal line
- Add a shape to make the part of the dump truck next to the cab raised
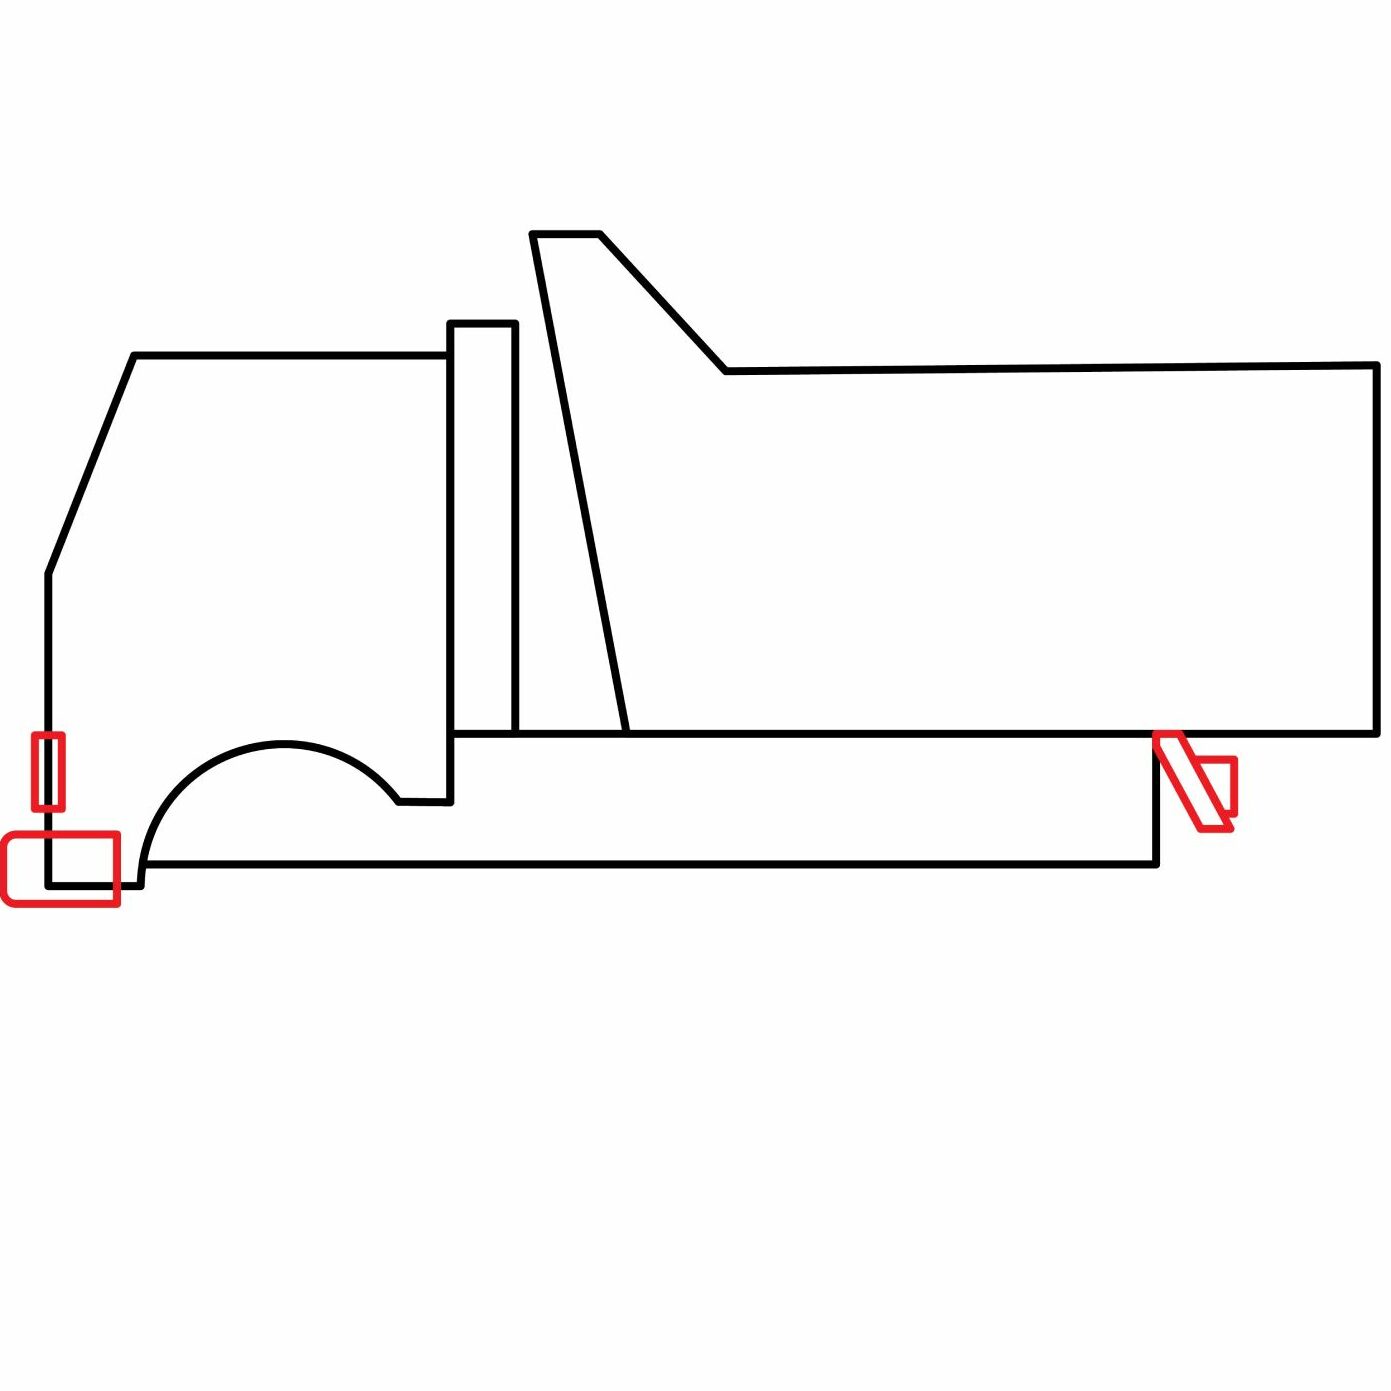
Step 4: Draw the Bumpers and Lights
A bumper is a structure at the bottom of a vehicle’s body that absorbs impact in slow-speed collisions. A dump truck has a more pronounced bumper on the front.
To add the bumper, draw a rectangular shape at the bottom left part of the driver’s cab. Make the corners of the bumper a bit rounded then erase the part of the driver’s cab that cut through it.
For the front headlights, add a small vertical rectangle right above the bumper. The rectangle should not be too long or too wide. Erase the line that cuts through the rectangle.
For the rear lights, we will first start by adding a rear fender. The fender keeps debris lifted by the wheels from flying up in the air while the truck is moving. To add the fender, simply add a small rectangle that slants toward the right. The rectangle should start at the section where the dump box and the chassis connect. It should extend downwards and close to the bottom of the chassis.
On the right side of the rear fender, we are going to add an upside-down triangle to serve as the rear lights.
- Add a small rectangle close to the bottom left side of the cab to form the front bumper
- Add a small vertical rectangle above the bumper to form the headlights
- Draw a small slanted rectangle starting from where the dump box and chassis connect to form the rear fender
- Add an upside-down triangle on the right of the fender to form the rear lights
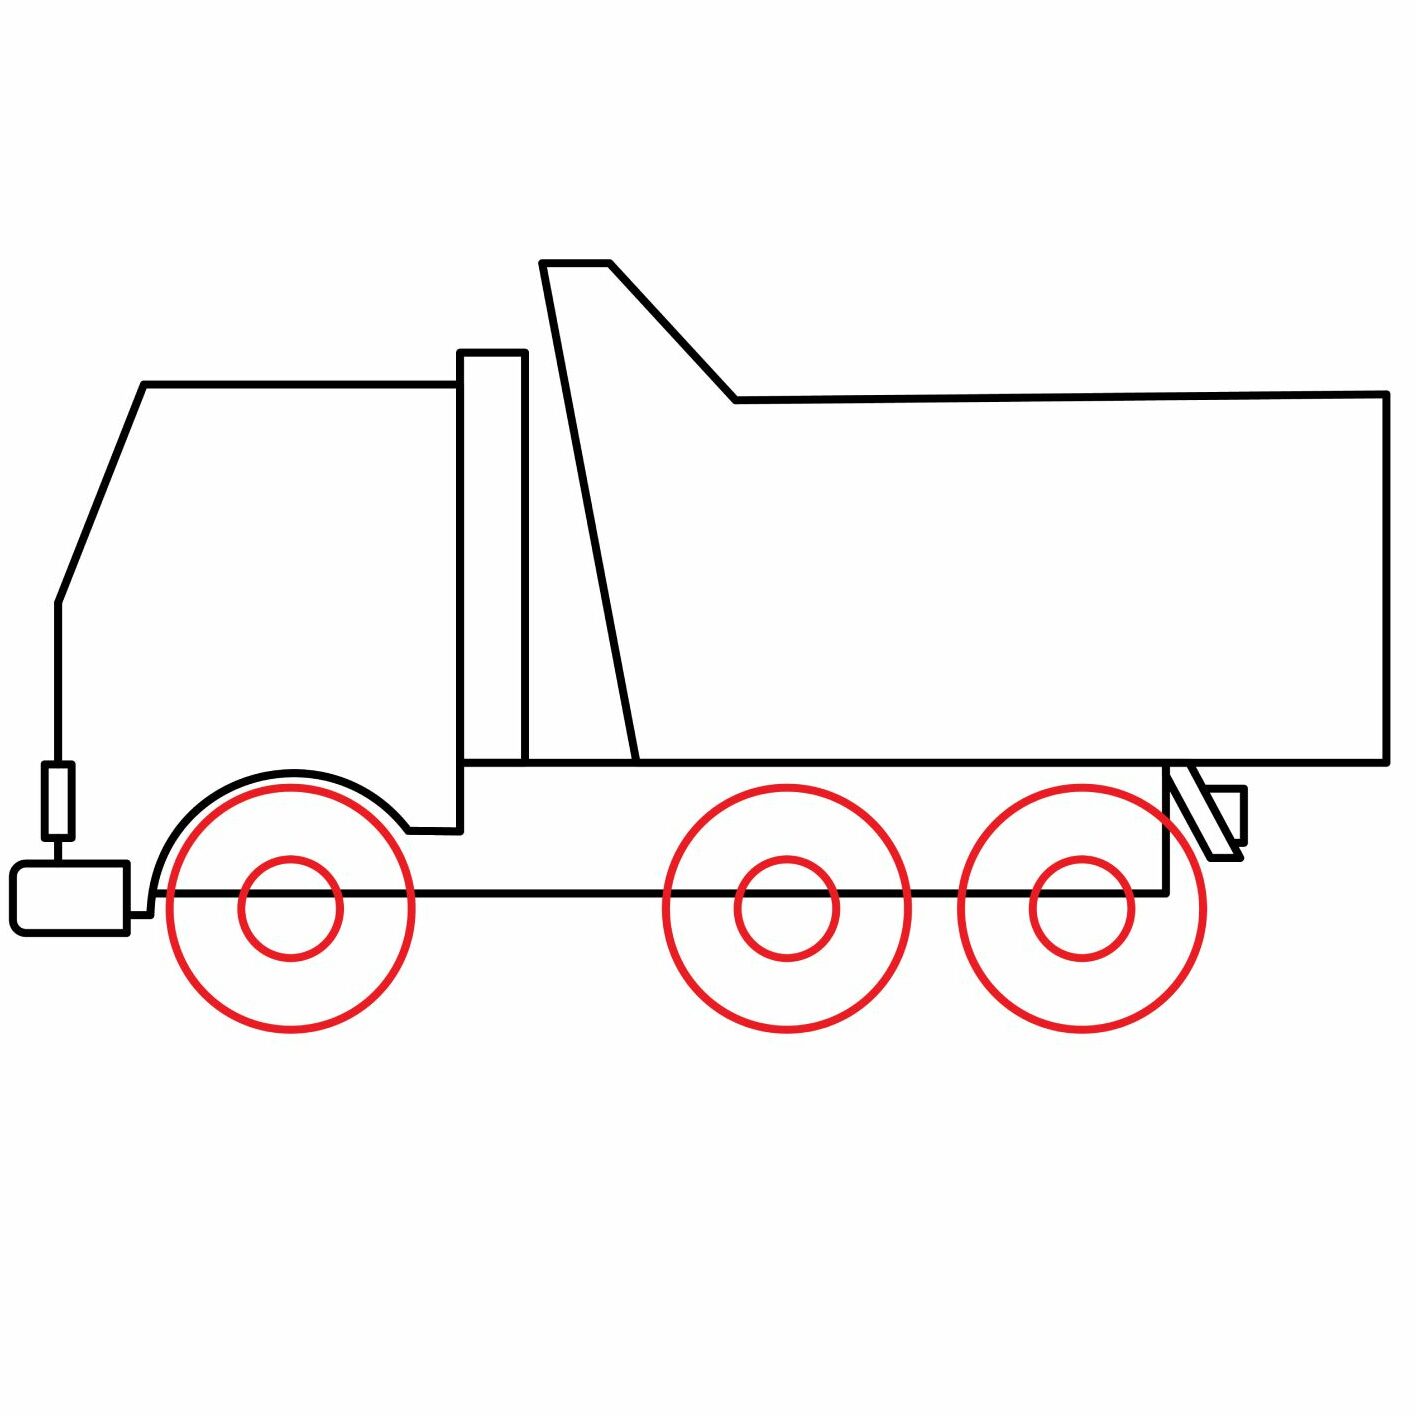
Step 5: Draw the Wheels
We are now going to add the wheels starting with the front wheel. Draw a circle that fits inside the groove we added below the driver’s cab. Try and make the circle as smooth as possible. The circle will serve as the tire. For the rim, we will draw another smaller circle inside the circle. Use your eraser to remove the lines that cut through the wheel.
To be able to carry heavy loads, large trucks such as dump trucks and recycling trucks usually have four rear wheels on each side. Since we cannot see the other wheels, we are only going to add two rear wheels, next to each other. We will do so below the dump box. We will use the same process we did for the front wheel to add one wheel below the front end of the dump box and another wheel towards the end of the chassis.
Make sure all the wheels are of the same size then erase the lines that cut through them.
- Draw the front wheel in the groove on the driver’s cab
- Draw two wheels next to each other below the dumb box
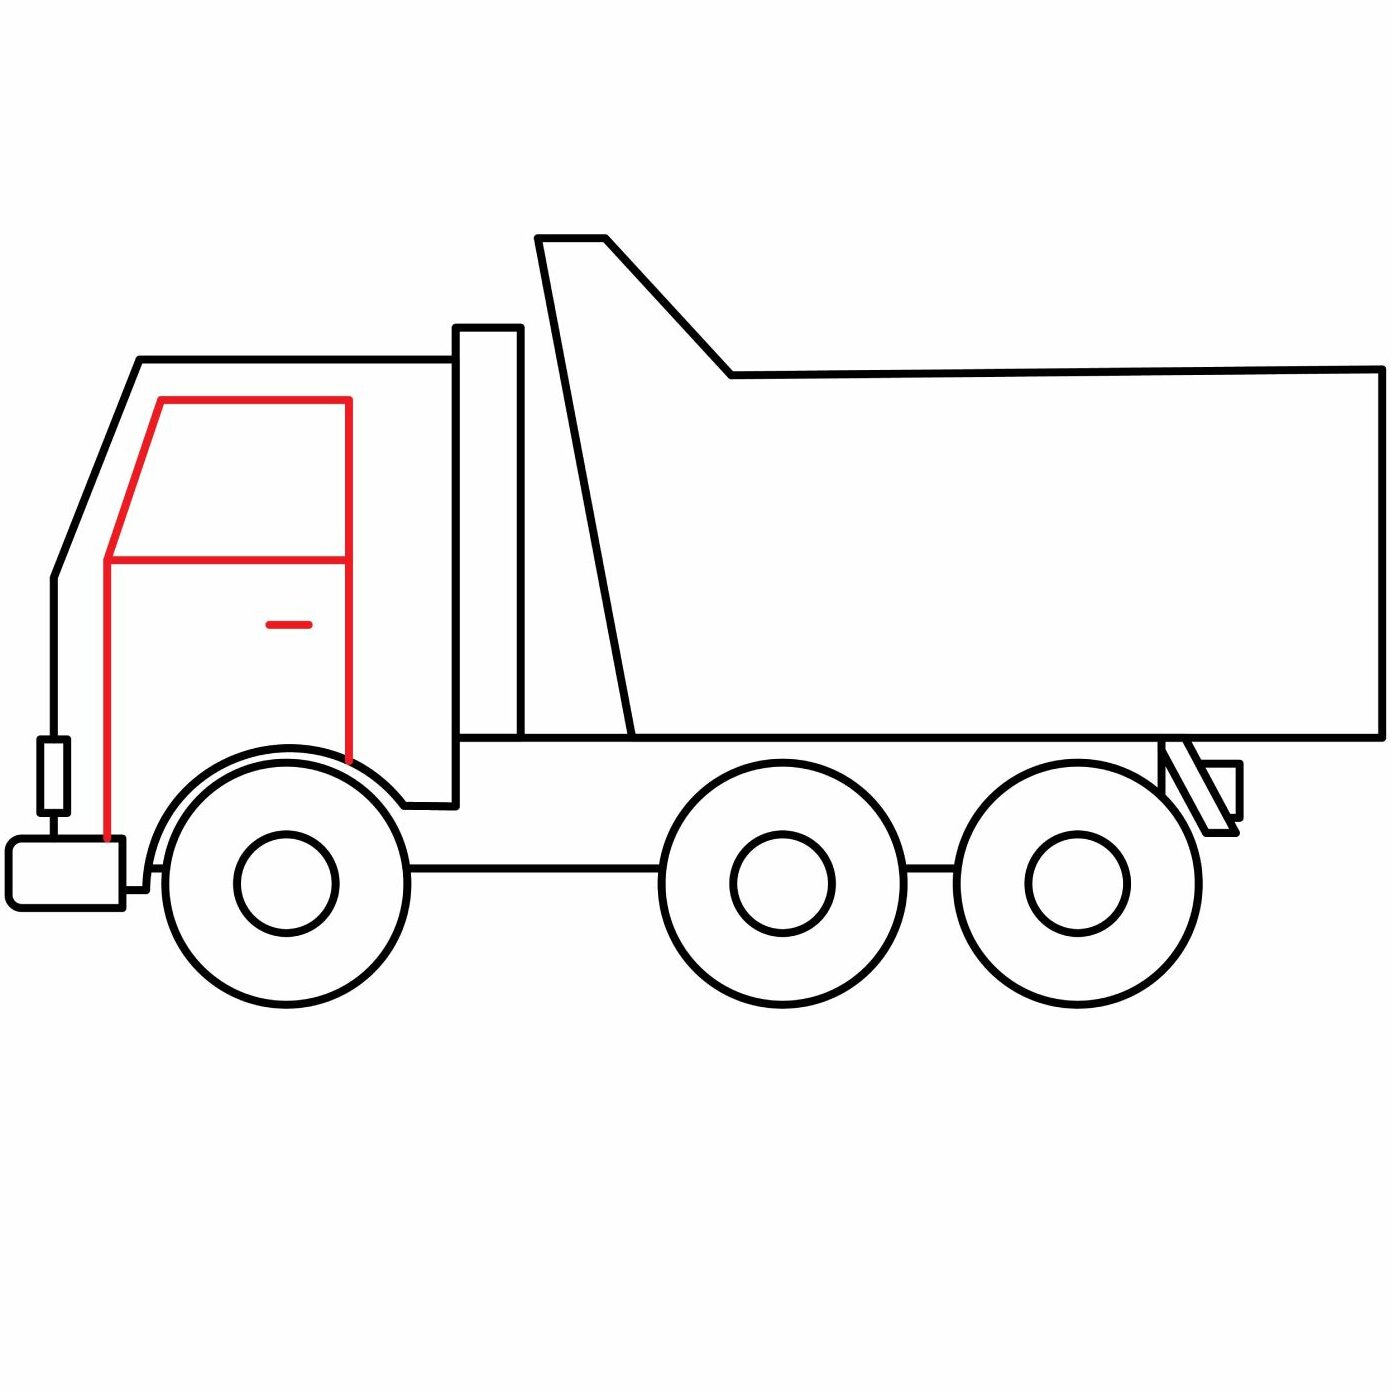
Step 6: Draw the Cabin Door and Window
For the cabin door, draw a vertical rectangle that starts from the chassis and stops halfway through the height of the driver’s cab. Use your eraser to remove the parts of the rectangle that cut through the wheels and bumper.
For the window, add another rectangle on top of the one we added for the door. We will, however, make the left side of the rectangle diagonal so that it doesn’t cut through the windshield. Here is what you should have.
- Draw a vertical rectangle that stops in the middle of the cab’s height to form the door
- Add another rectangle on top of the first rectangle and bend the left side to form the window.
Take the Drawing to the Next Level
Our truck is now ready. This doesn’t, however, mean that we can’t advance our drawing further. To help our dump truck stand out, we are going to add some more details.
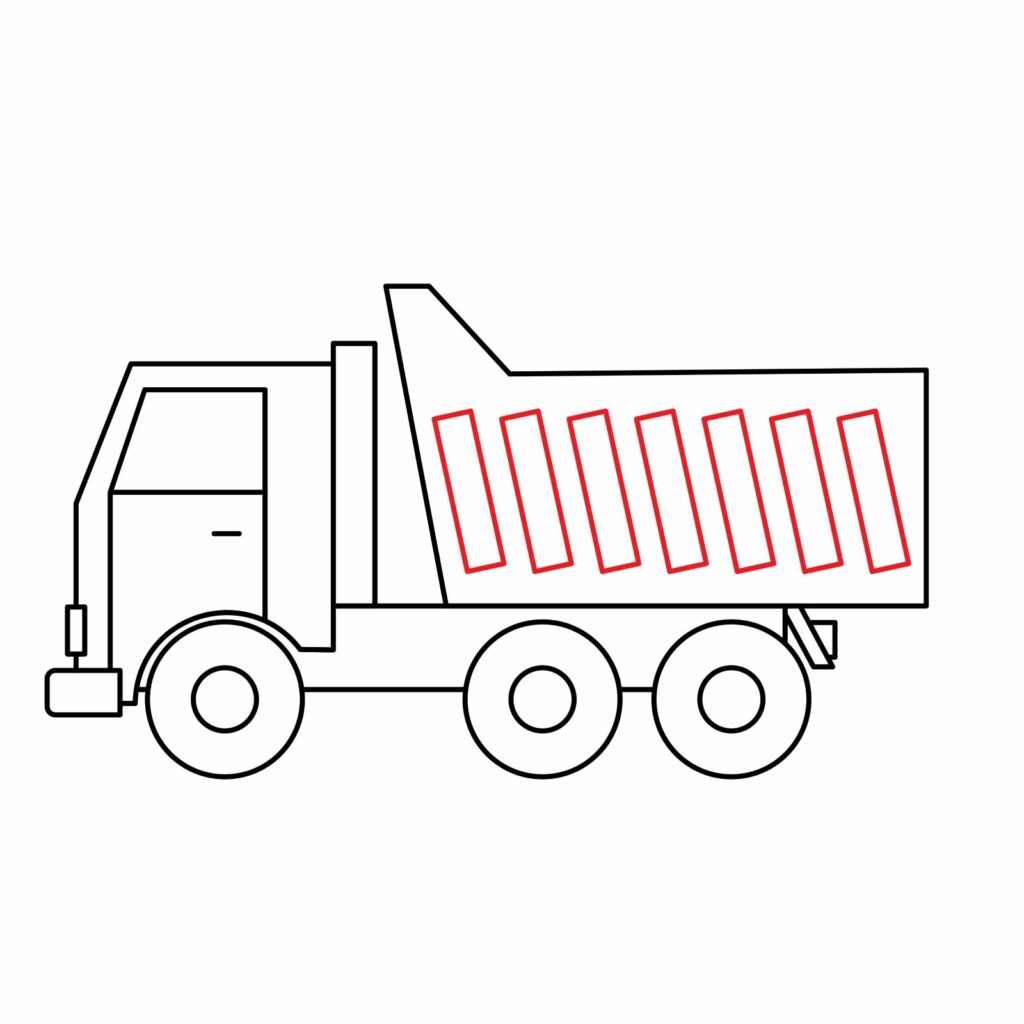
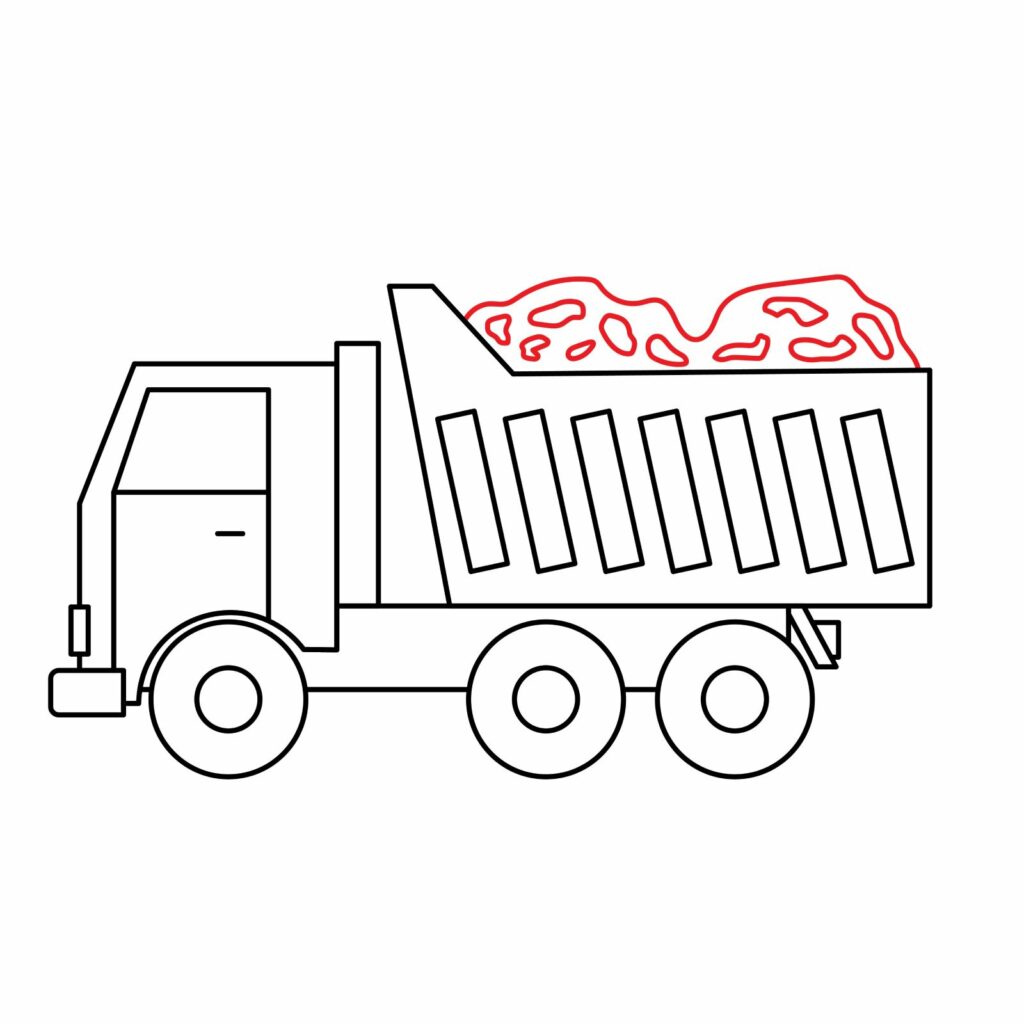
Step 7: Decorate the Dump Box
The dump box of a real dump truck usually has some patterns. The pattern may be horizontal, vertical, or diagonal indentations. For our truck, we are going to add a series of diagonal shapes on the side of the dump box. On your next attempt at drawing a dump truck, you can use a different pattern but for now, use what we have used so that we are on the same page.
- Add diagonal shapes on the side of the dump box
Sep 8: Add Some Load in the Dump Box
To show that our dump truck is transporting something, we are going to add some sand to the dump box. Use some rough lines with some random shapes to indicate that the dump box is full of waste materials.
- Use rough lines to add some sand on the dump box
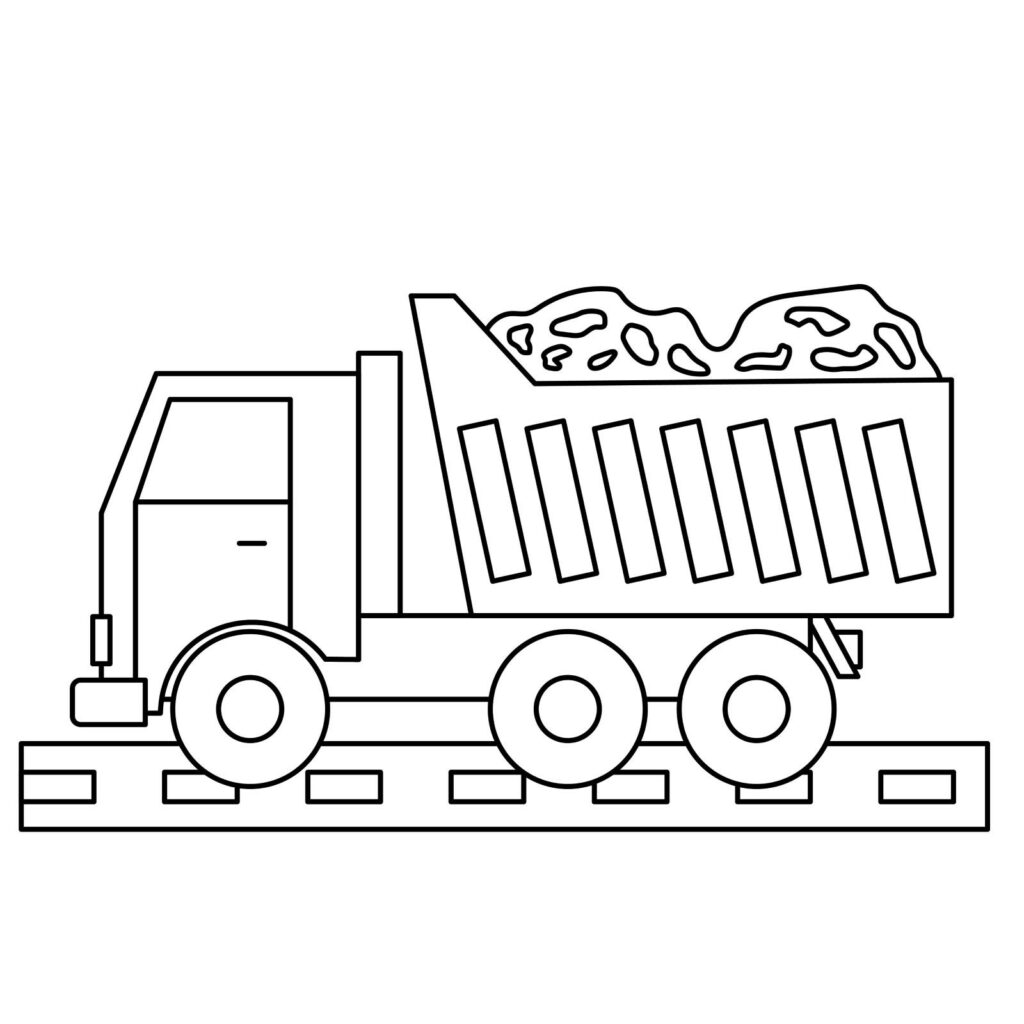
Step 9: Add Some Background
For the background, we simply added a road beneath the dump truck. You can go further by adding more details such as some clouds and trees in the background, some grass below the road, and a name on the side of the dump truck. Show us how creative you are.
- Use rectangles to add a road below the truck
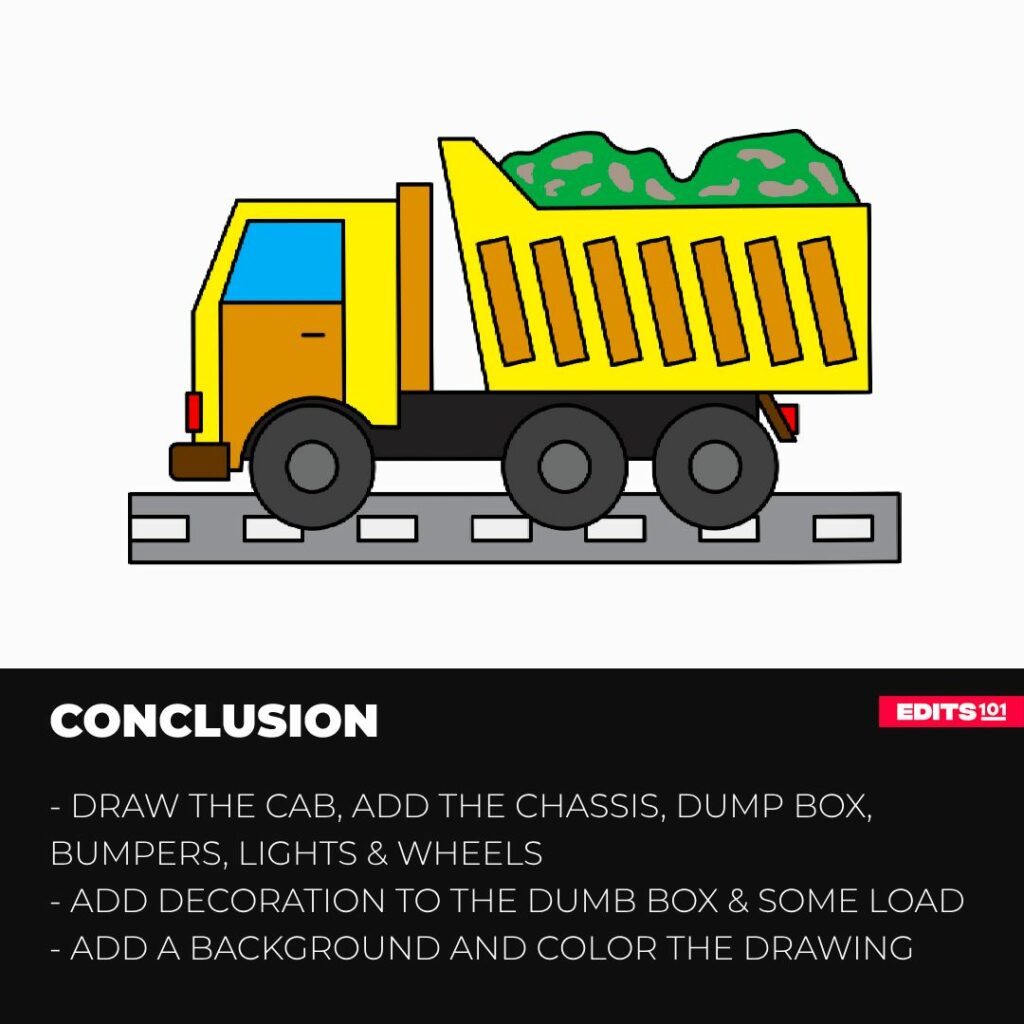
Step 10: Color Your Drawing
You should not color your drawing until you are certain that you have added all the details you wanted. That way you will avoid the issue of colors spilling over areas you don’t want to color. Here is what we did to our drawing. You can do more with yours.
- Use your coloring supplies to color your dump truck

Conclusion
We have looked at the simplest way of drawing a dump truck using shapes and lines. We started by drawing the driver’s cabin and then added the chassis, dump box, bumpers, lights, and wheels. To advance our drawing, we added some details to the dump box, some sand, background and later colored our drawing.
You should not be frustrated if your drawing does not shape up as you want it to. There is always room for improvement. You will notice a significant improvement on your next attempt at drawing the dump truck. Keep practicing and always remember to have fun!
Thanks for reading & feel free to check out more of our articles!
Author Rating
Overall Rating
Summary
Learn important facts about dump trucks as well as how to draw one step by step.