
TikTok has taken the world by storm with its short-form, attention-grabbing videos. While built-in editing tools in the Tiktok app are useful, they may not be enough for those looking to take their videos to the next level.
DaVinci Resolve is powerful video editing software that offers advanced features for editing Tiktok videos. And most importantly, it’s free to use for everyone.
In this step-by-step guide, we will explore how to edit TikToks using DaVinci Resolve 18 for free. Whether you’re a beginner or a pro, this guide will walk you through the process of creating amazing and high-quality videos for TikTok.
Getting Started With Tiktok Editing in Davinci Resolve
Before we dive into the specifics of editing TikToks in DaVinci Resolve 18, let’s go over the basics of how to get started with the software.
Download Da Vinci Resolve 18
You can download Da Vinci Resolve 18 from the official Blackmagic Design website. The software is available for Windows, macOS, and Linux.
Download Davinci Resolve.
Install the software
Once you have downloaded the software, follow the installation instructions to install it on your computer.
Create a new project.
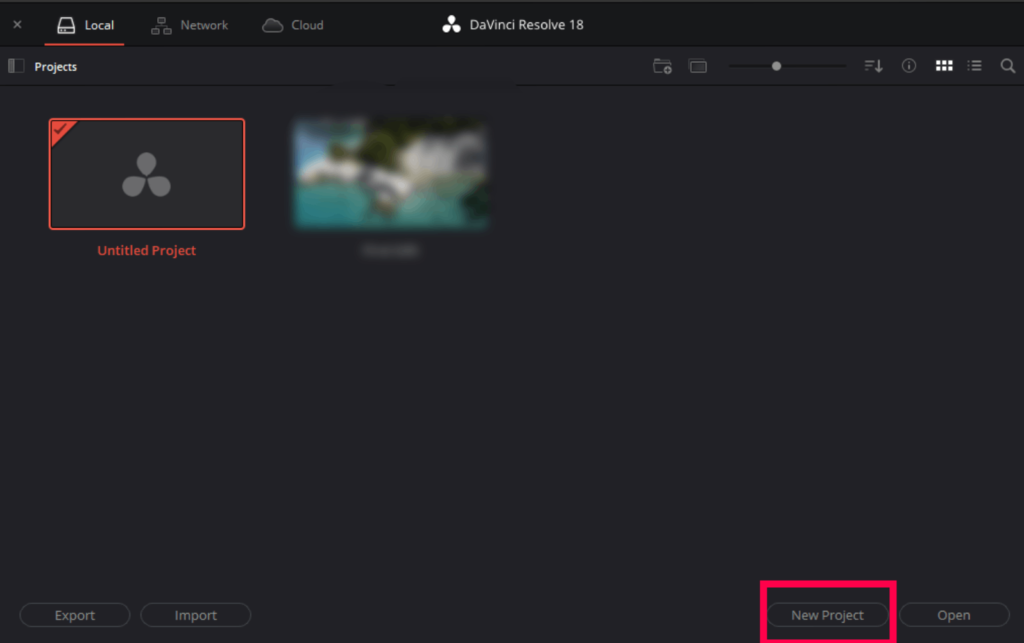
When you first open Da Vinci Resolve, you will see the project manager, you can open previous projects if you have worked on any, or you can create a new project in two ways.
- Double click on the untitled project.
- Click on the New Project button at the bottom and enter the project name and click Create.
Use any of the above methods and create a new project.
Create a New Timeline
Now that we have created a new project, now it’s time to create a new timeline.
While creating the timeline, we will decide the following things:
- Resolution of the video
- Framerate of the video
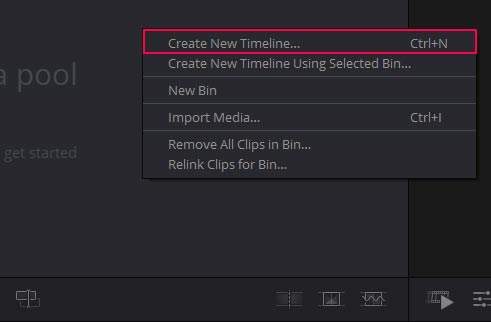
Go to the Cut Page, then head over to the media pool.
Right-click inside the media pool and click on Create New Timeline option.
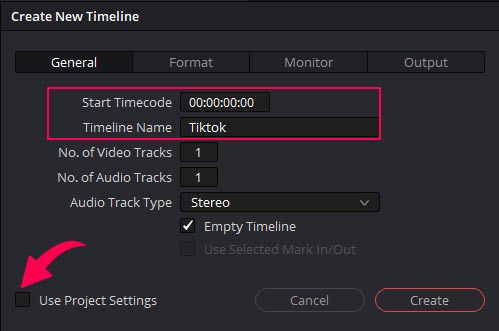
A new box will pop up in the General tab:
- Set the timecode to 00:00:00:00.
- Choose the name from the timeline.
- Uncheck the box “use project settings”
Go to the format tab:
- Set the resolution to 1080*1920.
- Or click on the check box “Use vertical resolution”
- Choose the framerate according to the framerate of your video.
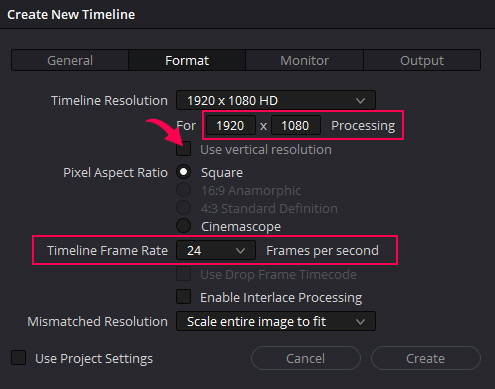
Click on Create, and your timeline will be created.
Import your footage
To start editing your TikTok video, you will need to import your footage into DaVinci Resolve. You can do this by:
- Go to the edit page.
- Right click inside the media pool and choose the Import footage option. Or Press Ctrl or Cmd + I.
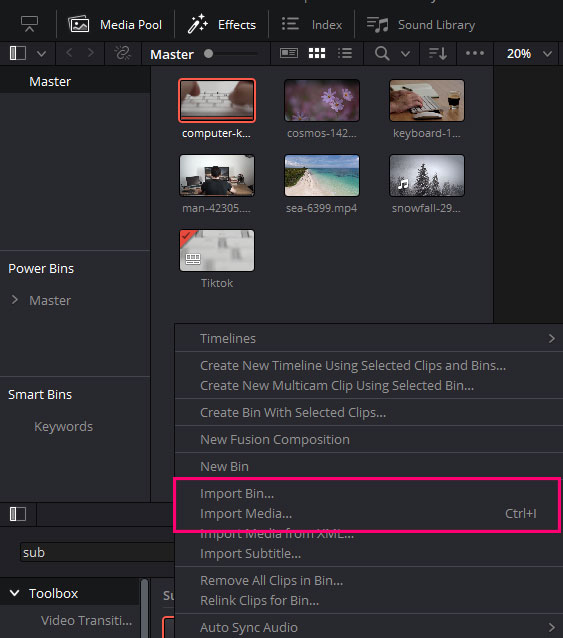
- A new window will pop up, find the folder where you have stored your footage.
- Select the footage and click open.
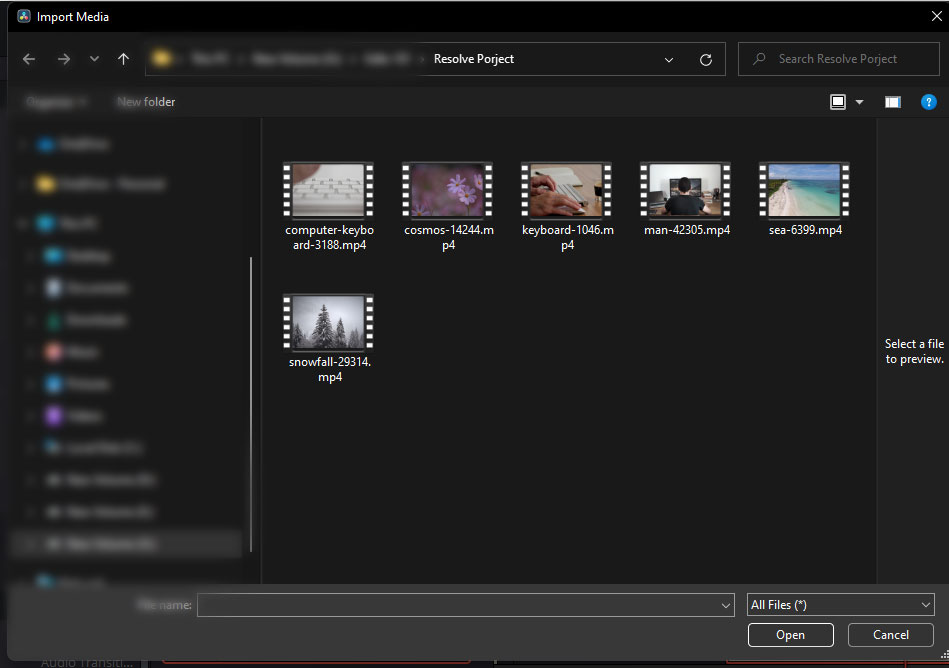
- You can also drag and drop your video or audio clips inside the media pool.
Make sure to import everything you intend to use in the TikTok video, including music, sound effect, and graphics.
Bring Footage To the Timeline
Now it’s time to import the footage to the timeline and start editing.
To bring the footage to the timeline:
- Go to the edit page.
- Head over to the media pool.
- Select the clips you want to bring to the timeline.
- Drag and drop the clips into the timeline.
If it asks you to change the frame rate, click on don’t change as you have decided the frame rate in the timeline settings.
Editing TikToks in DaVinci Resolve 18
Now that you have imported your footage, it’s time to edit the TikTok video in DaVinci Resolve. Here’s a step-by-step guide on how to do it:
Arrange your clips
First, you want to arrange your video clips in the order that you want them to appear in your TikTok video.
To do this, simply drag and drop the clips into the timeline in the order you want them to appear.
Fill the Screen
If you are using a 9:16 video to create a Tiktok, it will be in the middle of the screen, and areas above and below the video will be empty.
To fill the screen, you can use two methods.
- Zoom in the video to fill the screen.
- Use the Effect called Blanking Fill.
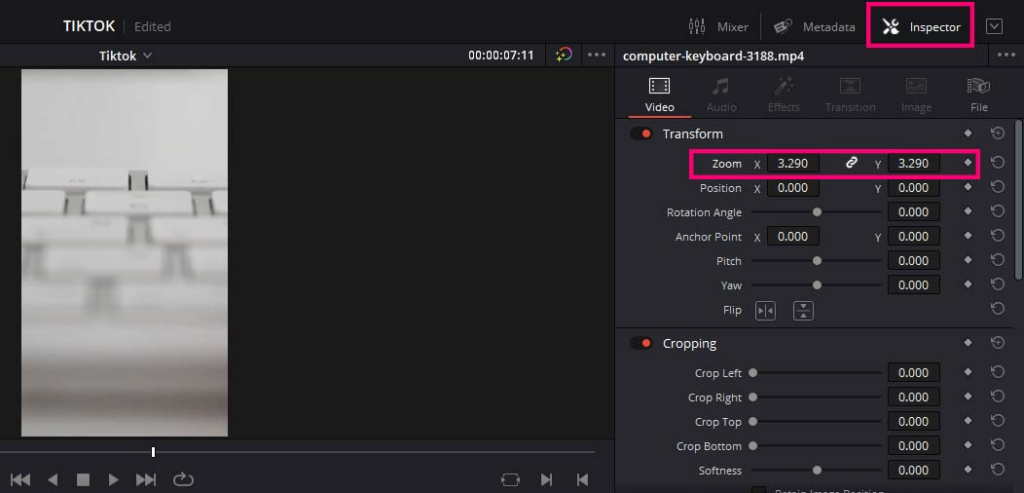
Zoom in To fill the Screen In Davinci Resolve
To zoom in:
- Select your clip.
- Go to the inspector panel.
- Hover over the zoom property, click, and drag.
- Drag until the footage has filled the screen.
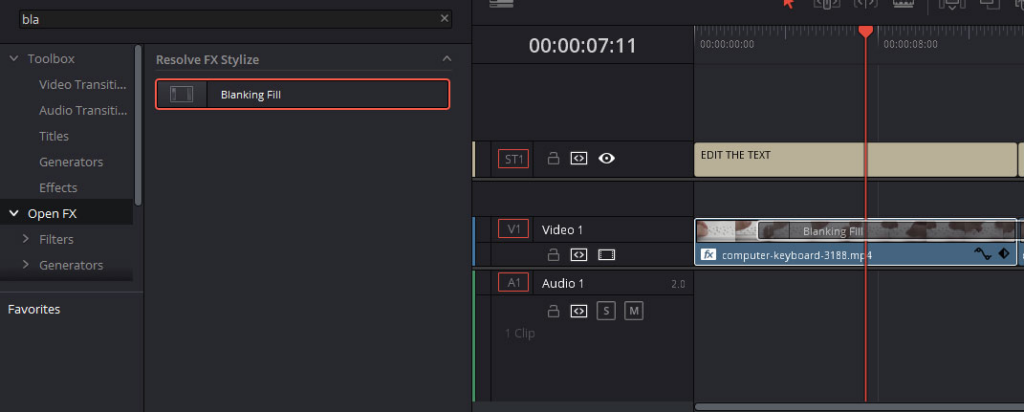
Use the Effect called Blanking Fill In Davinci Resolve
To apply the blanking fill effect:
- Go to the effects panel.
- Click on open fx.
- Search for blanking fill.
- Drag and drop the effect on your clip.
Go to the inspector panel and click on the source tab and make the cropping 0.
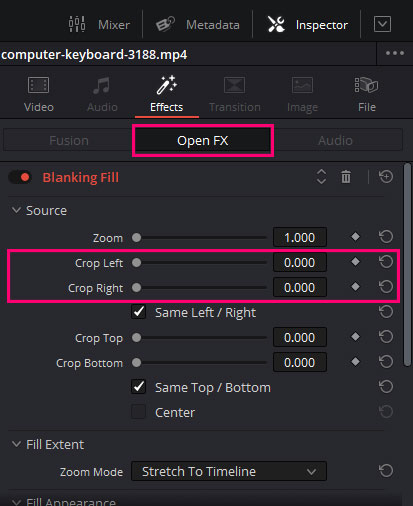
Play with the other settings according to your liking.
Trim your clips
Once you have filled the screen with all the clips, now you can start trimming the clips to the desired length.
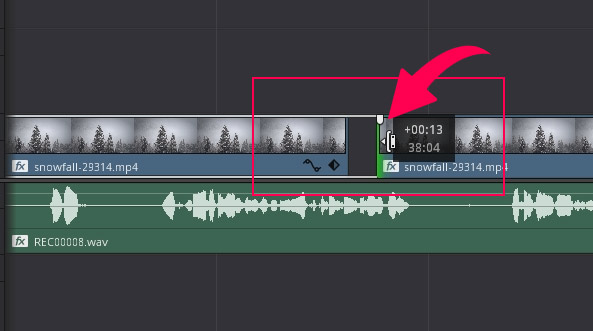
Use Trim Handles
To do this, select a clip in the timeline and use the trim handles to adjust the start and end points of the clip.
Go to the end or beginning of the clip, the shape of the cursor will change, now click and drag towards left or right to trim the clips.
Use Balde Edit Tool
- Use shortcut Ctrtl or Cmd + B to add cuts.
- Use the blade Edit tool to make cuts. Press B on the keyboard to select the blade tool.
- Press delete to remove the clips or part of the clip you have made cuts to.
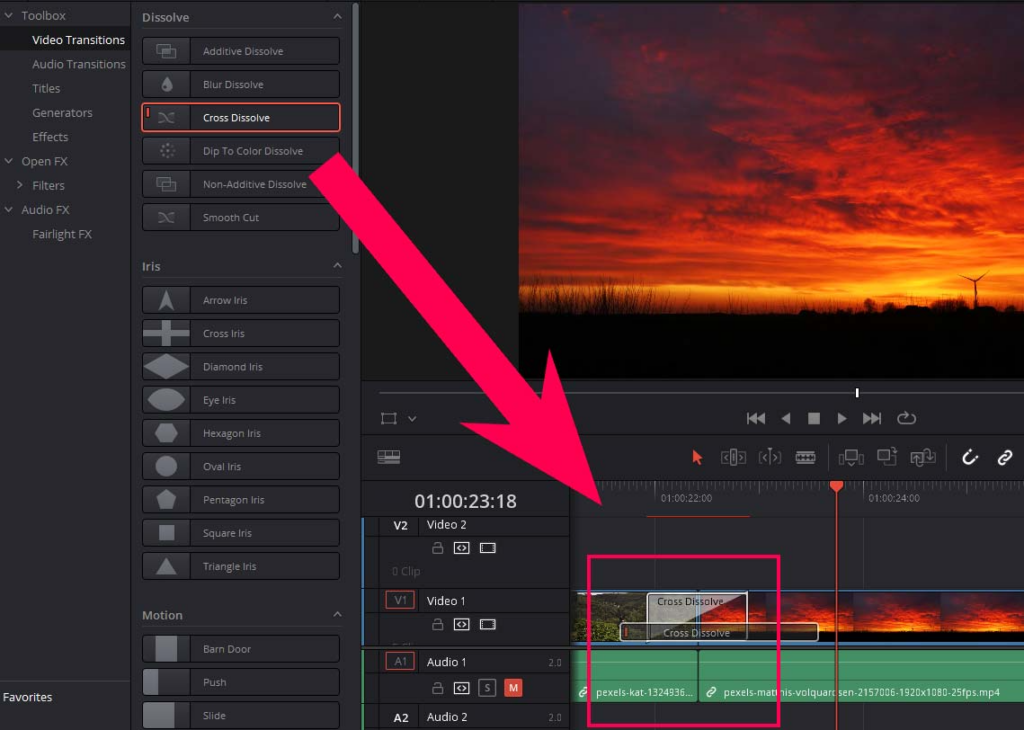
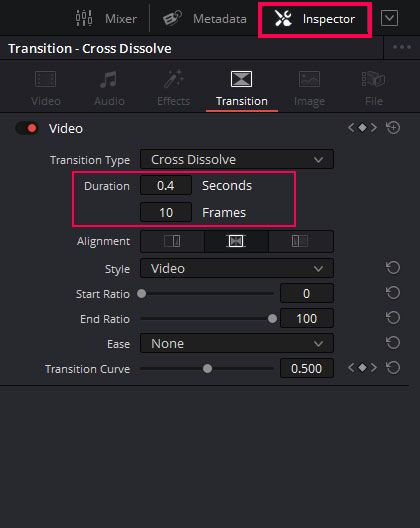
Add transitions
Adding transitions between clips can help make your TikTok video flow smoothly from one clip to the next.
Go to the “Effects” tab in the top left corner to add a transition.
- Click on video transitions, and all the transitions will appear, click and drag the transitions between two clips.
Select the transition and go to the inspector panel to adjust the settings.
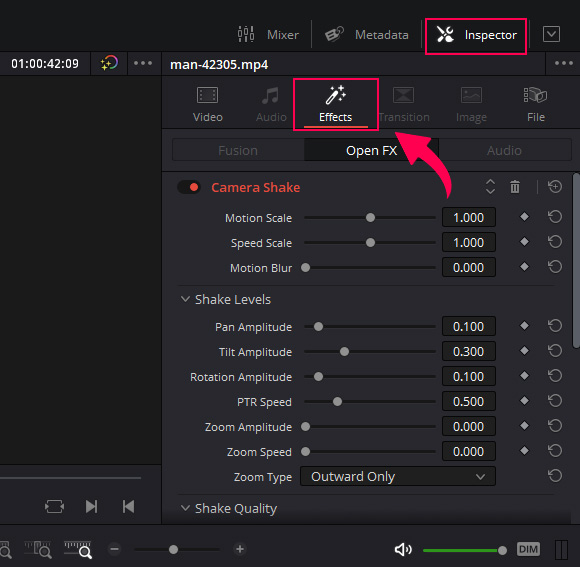
Add Effects in Davinci Resolve
Da Vinci Resolve 18 provides users with a wide range of effect options to choose from.
To add an effect in Davinci Resolve, select the clip and then click on the “Effects” tab to browse all the effects.
Click and drag the effect onto the selected clip, just like in the case of the transition.
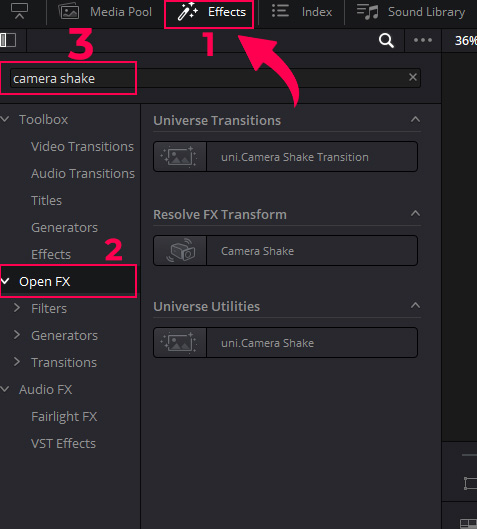
Then go to the inspector panel to adjust the settings of the particular effect inside Davinci Resolve.
There are plenty of effects available, not every effect will look good on every video, so we will leave it to you which effect you want to use in your videos.
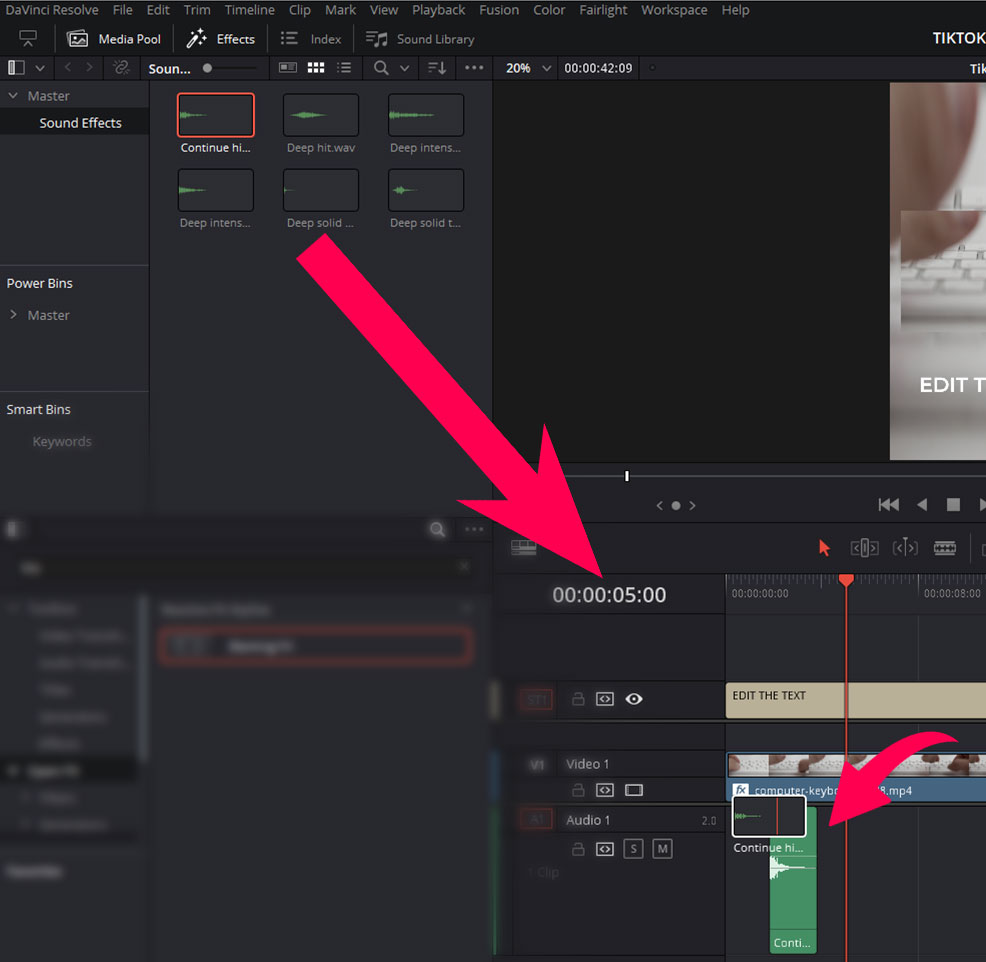
Add Sound Effects In Davinci Resolve
If you have recorded the audio with the video, it will automatically be imported with the video clip.
To import the background music or sound effects:
- Go to the media pool and drag the audio into the timeline under the video tracks.
How to Add Subtitles In Davinci Resolve?
You cannot create auto-captions in the free version of the Davinci Resolve. So you have to take the manual route.
To create the captions:
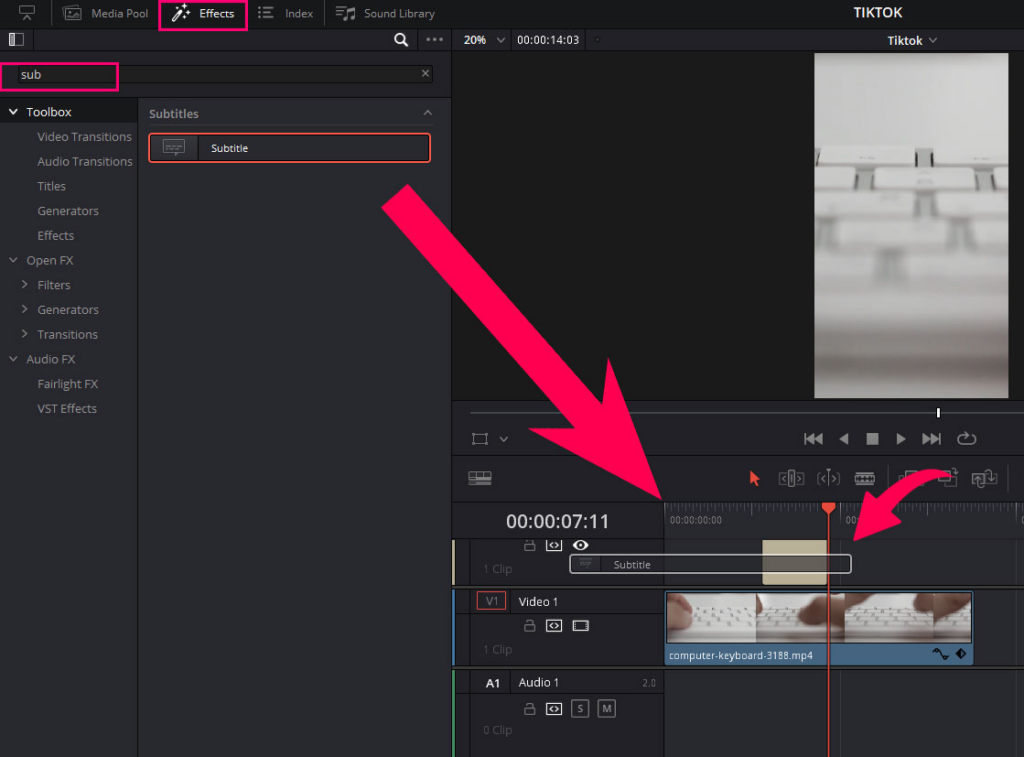
- Go to the effects panel.
- Click on the toolbox group.
- Search for subtitle effect.
- Drag and drop it over the video track.
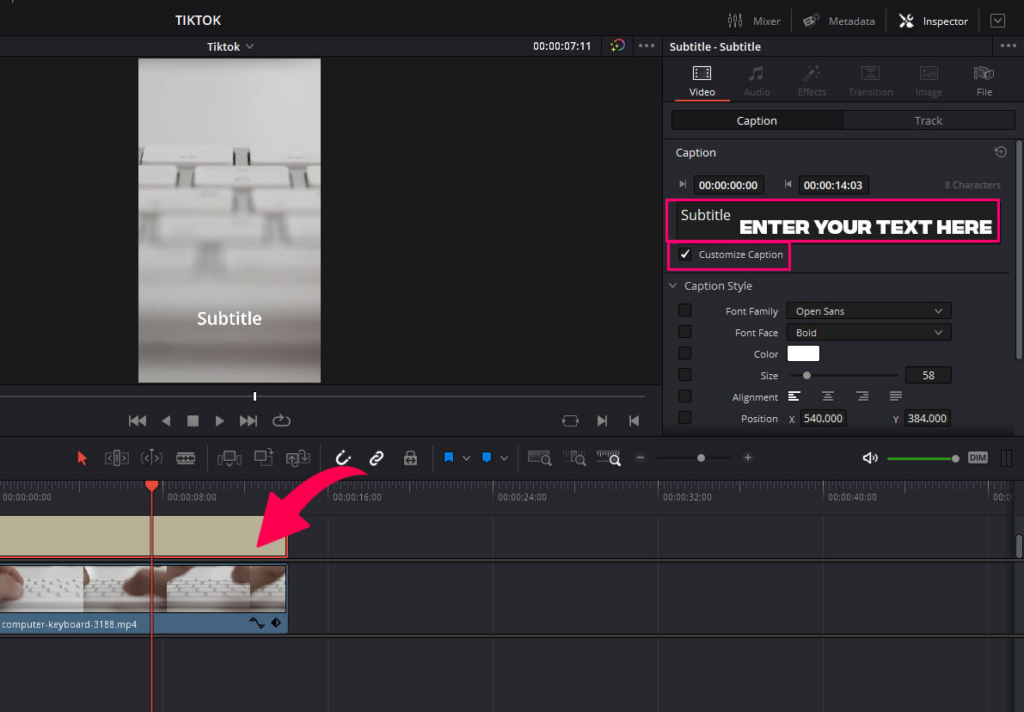
Edit the subtitle text In daVinci resolve
Select the subtitle and go to the inspector panel. There you will find a box to edit the text.
Click on Customize captions, and you will get extra settings to stylize the text. Change the text and adjust the text settings according to your liking.
Then come back to the timeline and duplicate the subtitle.
Hold the alt or option, click, and drag the subtitle layer toward the right. It will be duplicated with all the settings you have changed above.
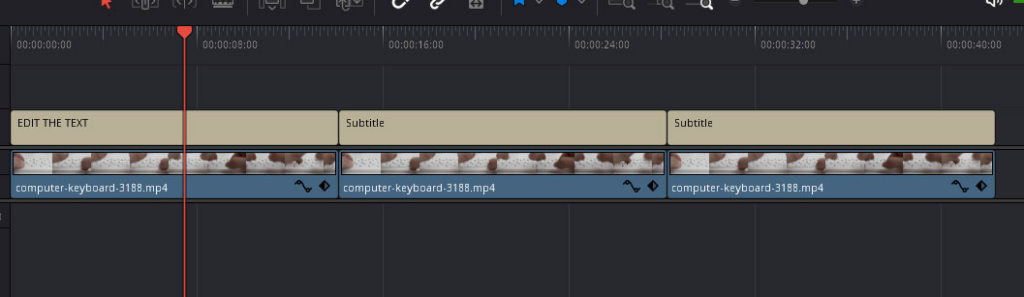
And change the text according to the video.
Keep doing it until all the subtitles are done.
Color grade your footage
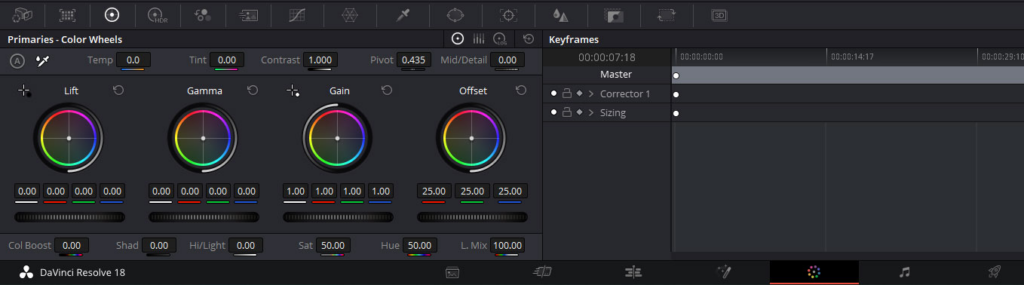
One of the unique features of Da Vinci Resolve 18 is its powerful color grading tools. You can use these tools to enhance the colors and overall look of your TikTok video.
To color grade your footage, select the clip that you want to color grade and then click on the “Color” tab.
From there, you can adjust the brightness, contrast, saturation, and other color properties of your video clips to create the desired look.
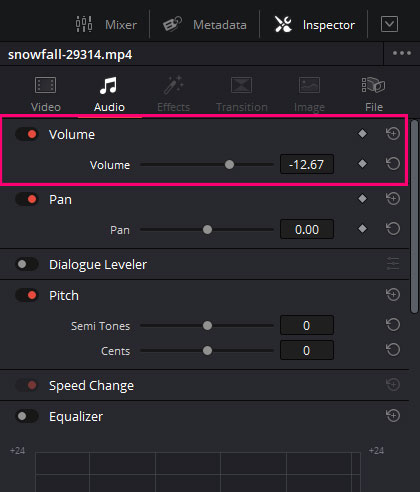
Edit the Audio
Make sure that your dialogue is louder than the music so that it can be heard clearly.
To change the volume of the background music:
- Go to the inspector panel.
- Then go to the audio tab.
- Change the volume setting.
Check out this detailed tutorial on adding audio effects in Davinci Resolve.
Detailed guide on adding audio effects.
Export Tik toks in Davinci Resolve
Once you have finished editing your TikTok video in DaVinci Resolve, it’s time to export it.
To do this, click on the “Deliver” tab and select your video’s desired output format and settings.
Check out this detailed tutorial on mastering the export page in Davinci Resolve.
Detailed guide on the export page.
Choose the name of the file and where you want to save it.
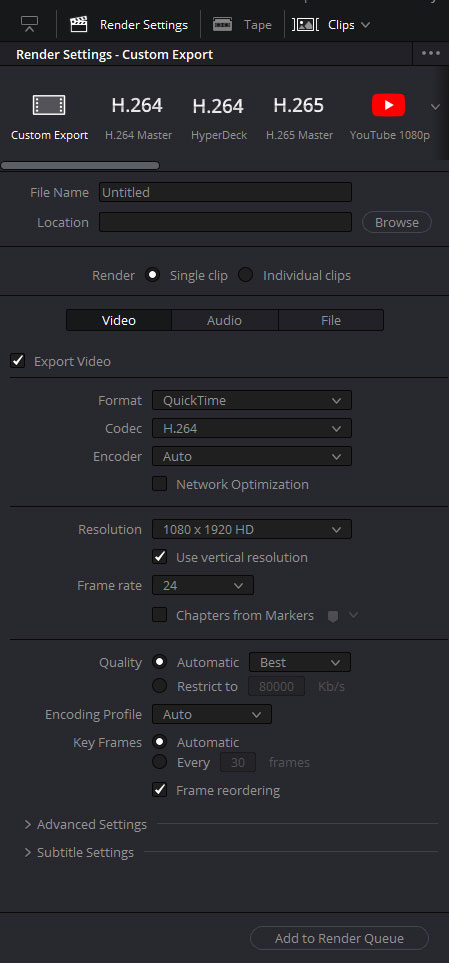
As we have already set the resolution and framerate, make sure it aligns with the timelines settings, and leave everything else to auto.
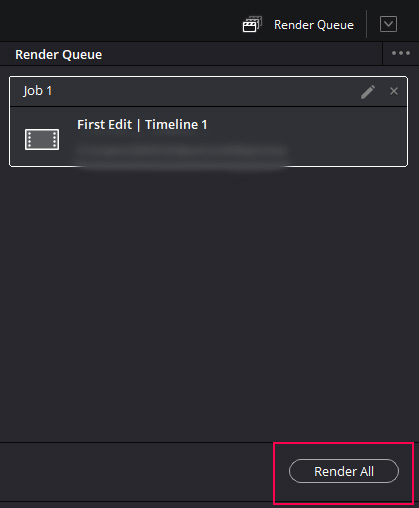
Click on the render queue option.

Then click on render all to export the final video.
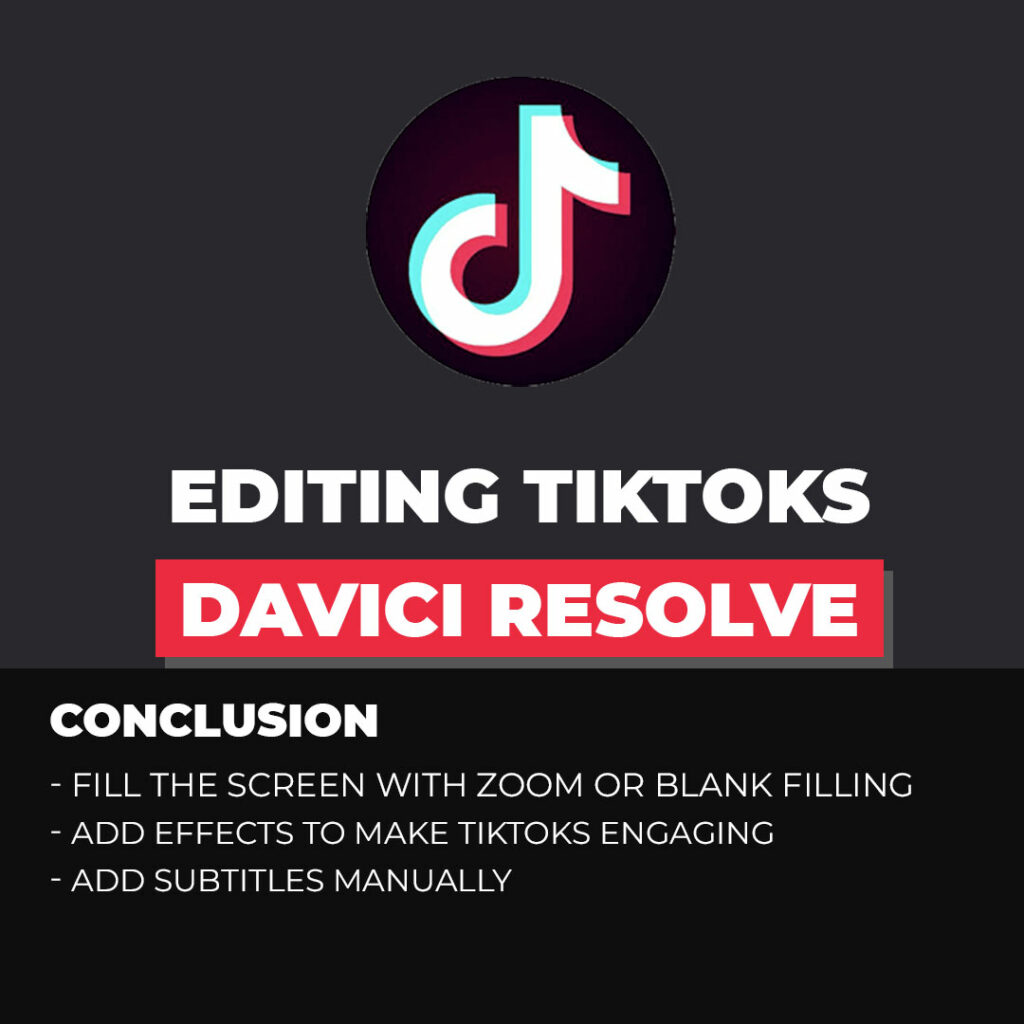
Conclusion
Davinci Resolve can take your Tiktok videos to the next level, as we have described in this step-by-step guide. We started with opening the software and creating a new project through the project manager.
Then we created a timeline with the vertical resolution 1080*1920 and set the framerate to 24. Then we imported the footage and discussed how you could fill the screen if you are using footage other than 1080*1920.
Then we discussed how you could trim the clips with trim handles as well as with the blade tool. You can add the video effects from the effects panel on the edit page.
You can also add sound effects and background music by importing it into the timeline and placing it under the video track. Go to the color page to color correct your footage. Edit the audio inside the inspector panel to make it sound amazing.
In the end, go to the delivery page to export your video.
Thanks for reading & feel free to check out more of our articles!
Expert Rating
Summary
Learning how to edit TikToks in DaVinci Resolve 18 provides a wide range of features and tools that can enhance the editing process, allowing you to create high-quality TikToks with ease. DaVinci Resolve 18 is highly functional and scalable, meaning that you can take your TikTok videos to the next level.


