How to Draw a Parachute | A Simple 6-Step Tutorial
Hello, champs! Are you ready for a gliding adventure? We will soar in the sky while drawing a parachute.
The Latin word “para” (which means “against” or “counter”) and the French word “chute,” which means “fall,” are the sources of the word “parachute.” “Parachute,” therefore, actually means “against the fall.” Do you know that canvas was used at the beginning and later silk for parachute material? Parachutes were employed by observers to leave tethered hot air balloons during World War I, but they were deemed impracticable for use by airplanes.
Now buckle up! We are going to draw an amazing piece of art.
What you will need
- A pencil
- An eraser
- A sheet of paper
- Coloring kit
- Ruler
- 30 minutes
how to Draw a parachute
To draw a parachute, we will follow this guide. This procedure roughly comprises 5 to 6 steps, and our drawing will be ready. Without wasting any time, we will begin the process.
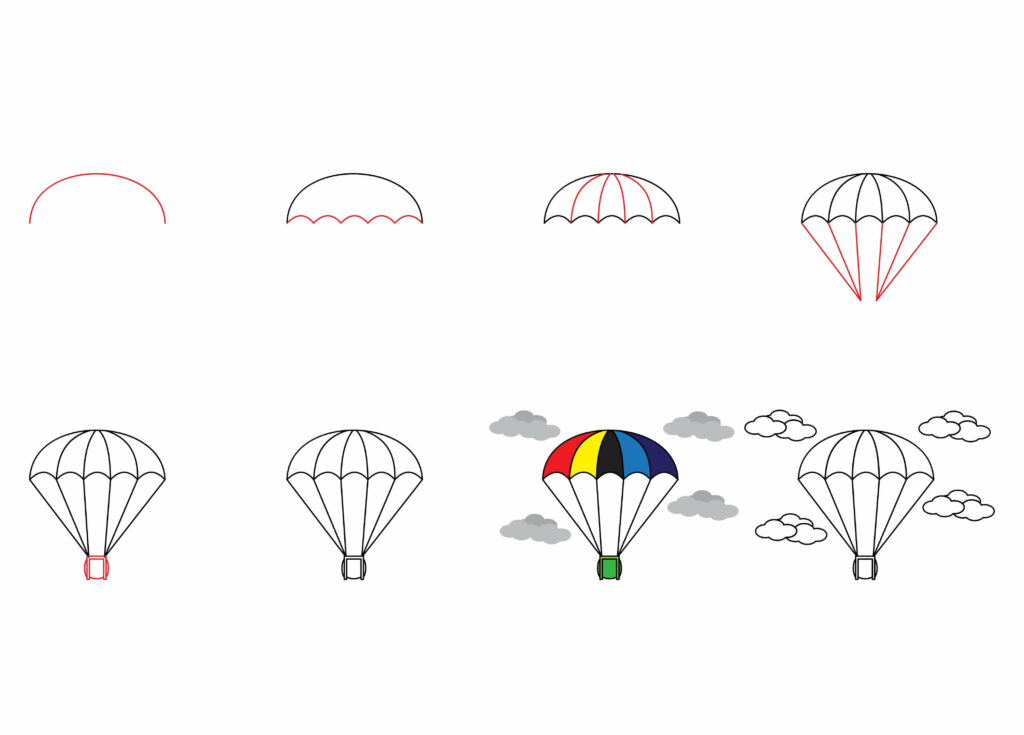
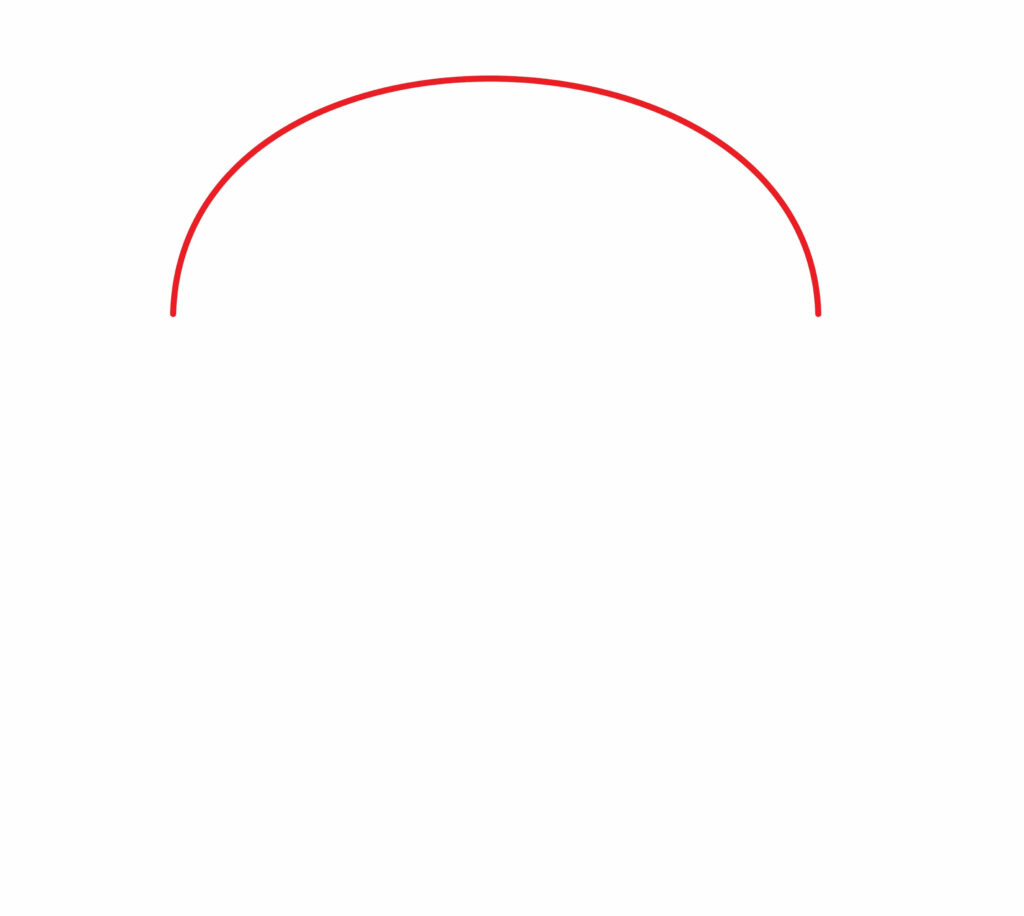
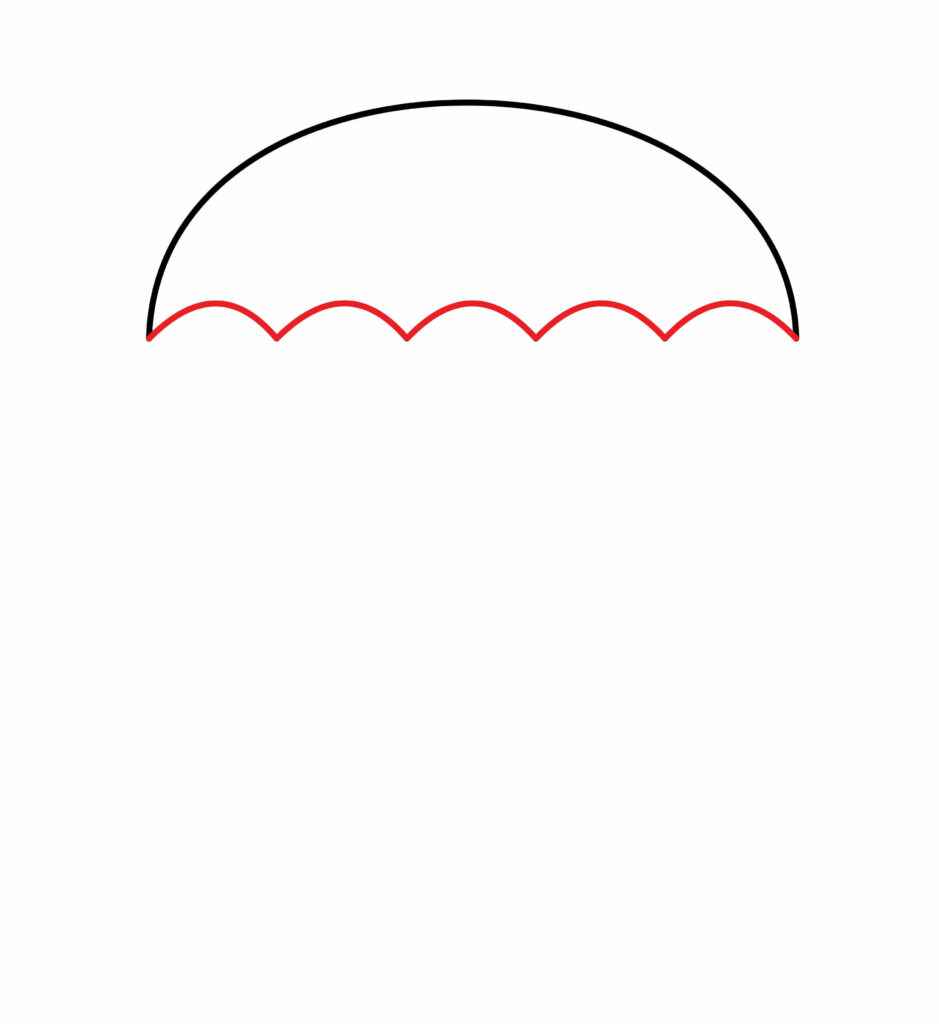
Step 1: Draw the canopy
The first step in drawing a parachute is to make its canopy. The canopy is the main part of the parachute that is made up of cells that inflate the fabric for a slow descent of the jumper. The canopy of a parachute comes in a variety of colors and shapes.
To make the canopy, draw an oblong shape on the center of the paper and erase its lower half, creating a semi-oblong shape.
Great job! The remaining steps are even more easy.
Step 2: Draw the ridges
We are done with the canopy, so now we are going to make the base of the canopy look like a small ridge.
To draw the base ridges, draw small interconnected inverted semi-circles as drawn in the picture. The size of the ridges should be such that 5 or 6 semi-circles cover the base area of our canopy. If you are having a problem making semi-circles, you can also draw 5 small circles below the half-oblong shape.
You can use a circular object like a bottle cap to make perfect circles. If nothing is available, you can also draw free-hand circles by placing a dot in the center and then putting four dots around that dot on the top, bottom, left, and right. When you are done with circles, erase the lower part to get perfect semi-circles. Remember to interconnect them as we do not want any gaps in our parachute.
Step 3: Draw the lines
The parachute we are drawing has a pattern of rainbow. So, we will connect the connection point of semi-circles with the top central part of the oblong shape, or you can call it the parachute’s canopy.
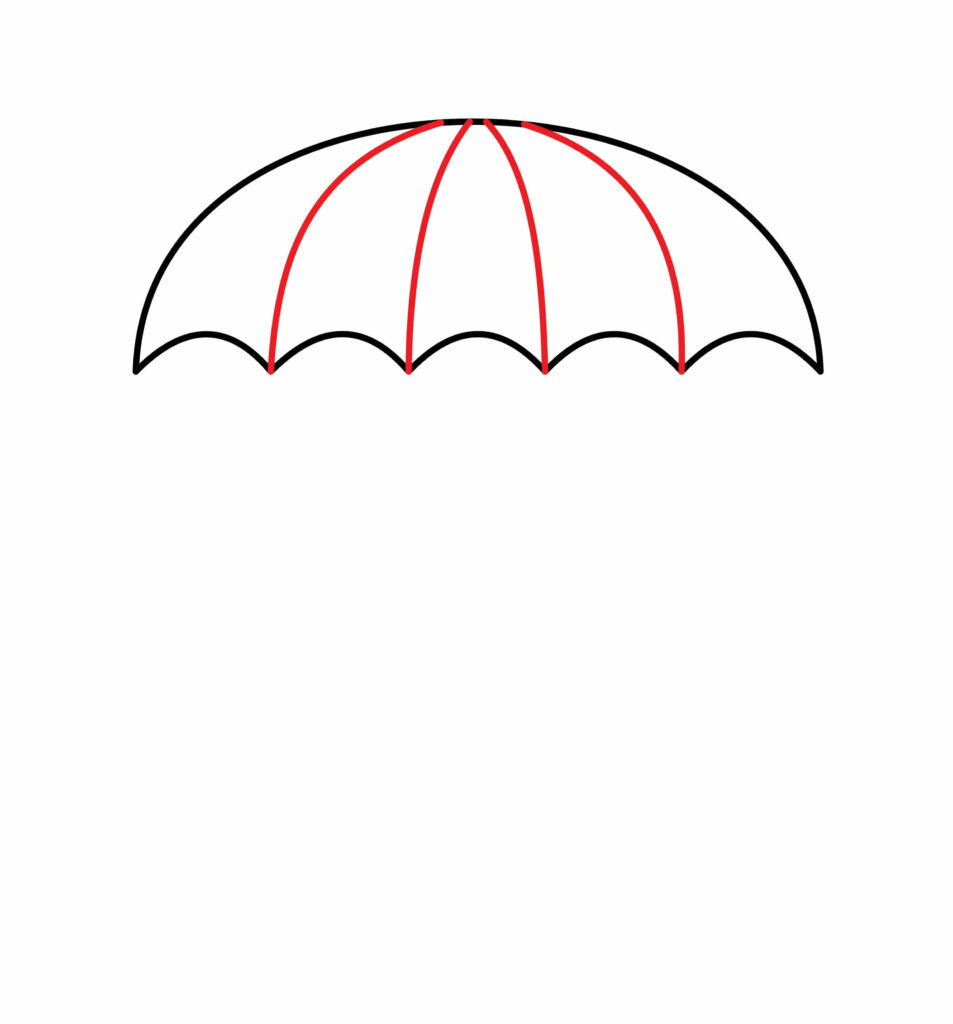
To connect the points, extend curved lines from the point where semi-circles are connected to the center top of the canopy. You will exactly need four curved lines for five semi-circles. This is all done inside the canopy.
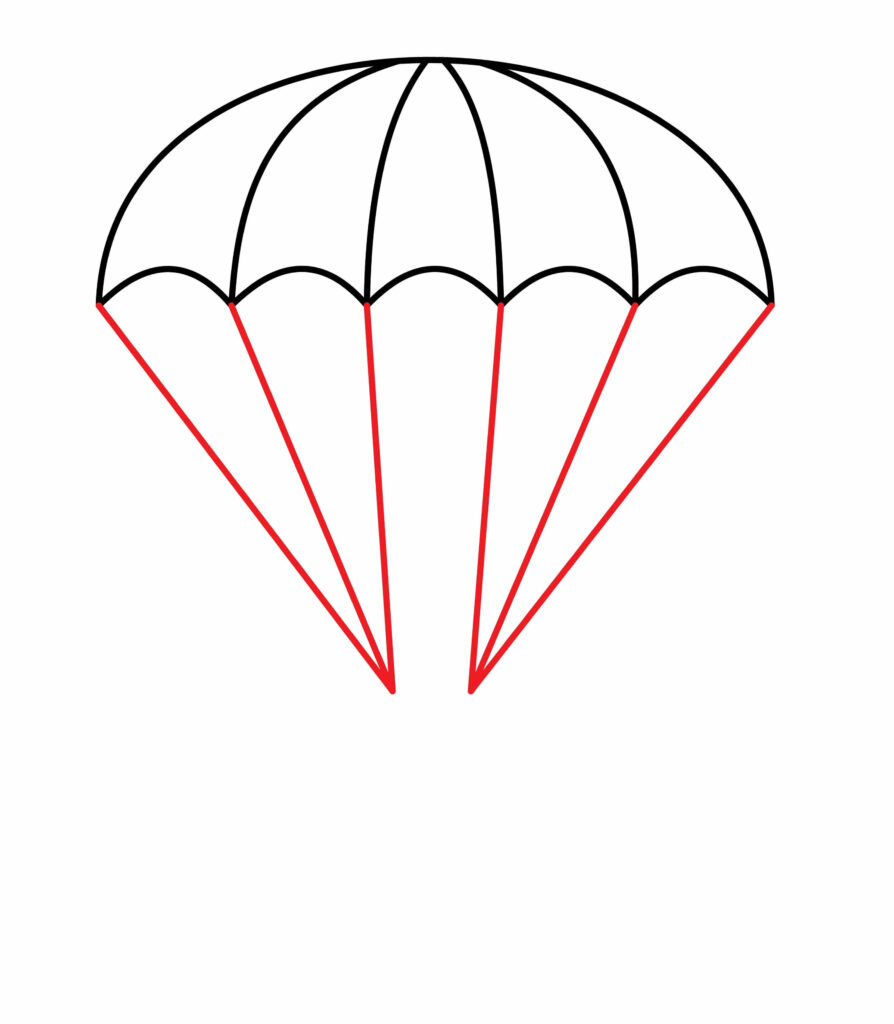
Step 4: Draw the suspension lines
The cords that link the parachute canopy to the parachute harness are known as suspension lines. The canopy’s net or skeleton is created by the suspension lines.
To draw the suspension, we will extend oblique lines from the outer corners of the interconnected semi-circles that we drew in our previous step. Draw 3 oblique lines from the right side of the canopy merging towards the center. Repeat the same step on the left side by extending three lines merging towards the center. Remember, the direction of these suspension lines is downward. These are very important in a parachute as these lines will hold the person paragliding.
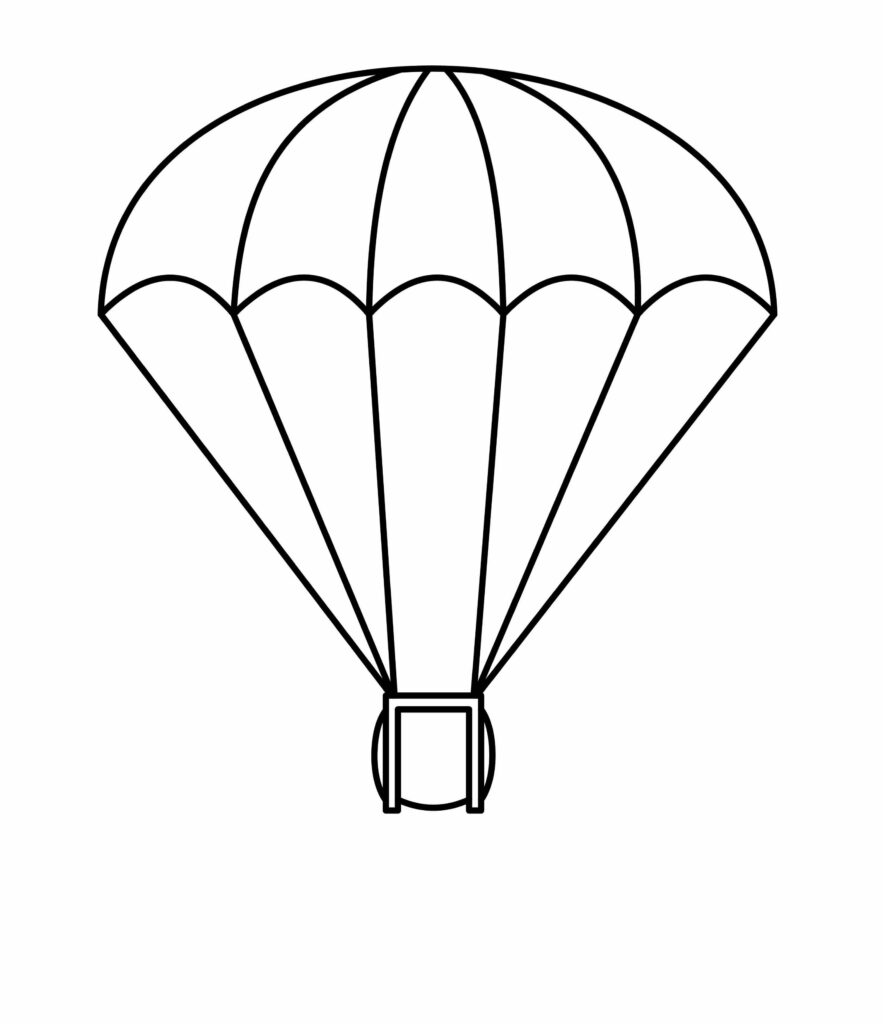
Step 5: Draw the harness
The harness in the parachute mostly consists of risers and links. The harness system is part of the parachute system and has two purposes: it fastens the skydiver’s body to the parachute and supports the containers of the parachute.
To draw this harness, draw a circle connecting the suspension lines pair. You can erase the above part of the circle to avoid overlapping.
Now, we will draw a double-lined rectangle over the circle, but its base will be erased later on. To draw a double-lined rectangle, draw 2 horizontal parallel lines and 2 vertical parallel lines. All four lines should be perpendicular to each other. After that, double-line your rectangle and erase its base that is overlapping with the circle.

Step 6: The parachute is ready
And voila! Our beautiful parachute is ready for skydiving in the air. The rainbow pattern also came out very well. We hope you followed every step and were able to do an amazing job.
Something’s missing in our parachute. Can you guys guess what it is? Yes, exactly. Our drawing lacks color and emotion. Pick up your art kit to make our drawing stand, as we are not done yet.
We will do magic and put life into our drawing. Let’s keep it up, champ!
Taking your parachute drawing to the next level
Art is fun, as we all know. Now is the time to let our imaginations run wild and produce a truly remarkable drawing. We must experiment with several techniques to make our drawing seem its best. Don’t stop at the basic drawing; give it an artistic touch. But how do we go about doing this? Don’t worry; we will help you. The actions listed below can help your drawing stand out.
Adding background to your drawing
Our parachute is plain and mundane. So we are going to play with colors. We have kept the design of our parachute-like rainbow-colored umbrella so that we can add rainbow colors in the canopy, like red, blue, yellow, green, or any of your favorite colors.
Another thing that we can do is to outline our drawing with a black marker or outlining pen. This step will enhance the depth of the drawing, and it will look more neat.
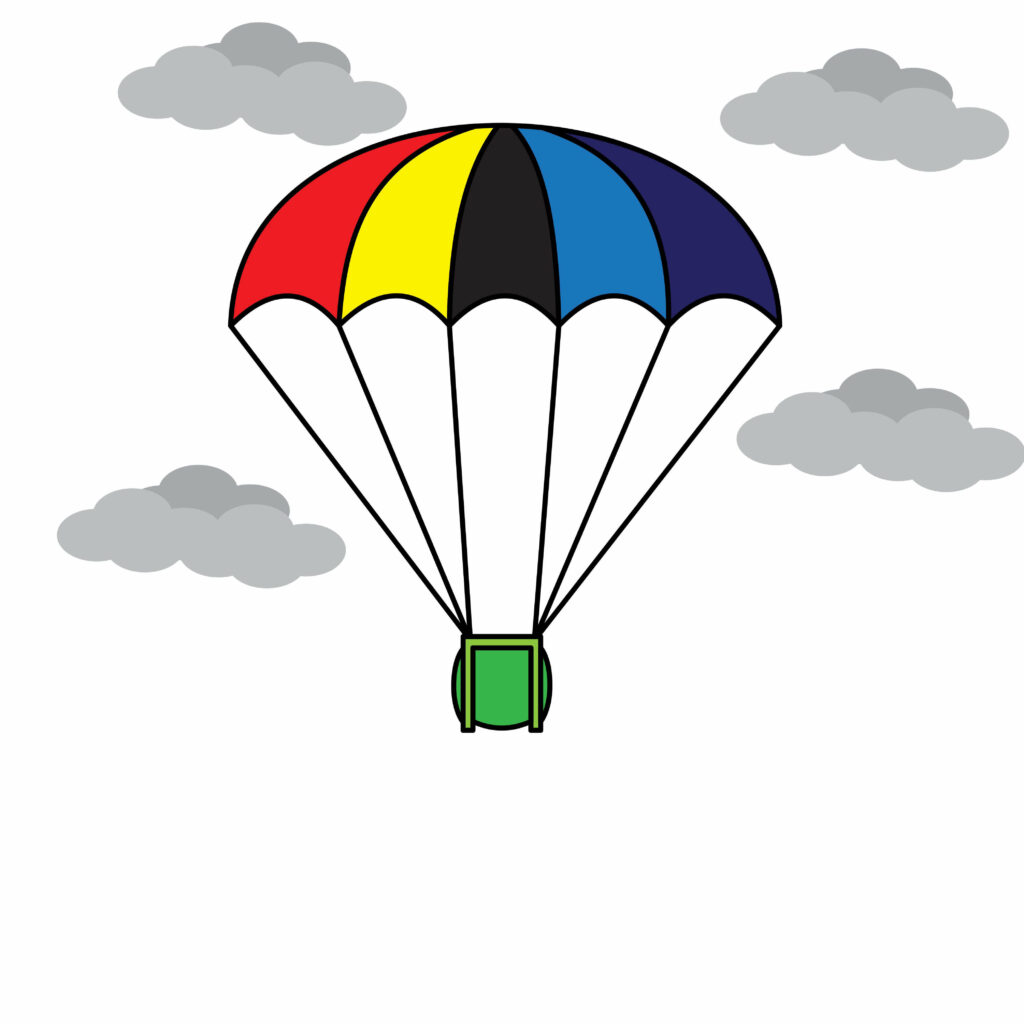
Now, the parachute we drew is present in the air. We will give a background to our drawing to give a complete perspective. This will complete the story. For the background, you can draw a beautiful blue sky with white clouds like cotton candy. For an idea, an image of a parachute with clouds is provided.

If you like nighttime, add a starry sky as a background with a shining moon on the side. The harness of the parachute can hold a person or object. You can draw a person skydiving or attach an object to the harness.
You can also go creative with the shape of the canopy. It can be of circular or rectangular shape. The design of the canopy can also be of your choice.
Adding colors to your drawing
Now, take a brush in your hand and add some magic to your project. These spells will give your drawing charm and attractiveness. Colors may be employed in a variety of industries to define experiences and achieve goals since they assist us in communicating thoughts and emotions. Ultimately, colors enrich our lives and aid in our navigation of the environment.
Different colors have an impact on how we feel and think. It will seem as though the image is alive. This section focuses on how color is used in creativity. You can choose any colors you want for the background and the parachute. Color your design neatly; neatness is the secret to a great drawing. Test out several hues in the canopy’s many parts. You’ll eventually adore your work.
P.S Bonus Tips
Creation starts with imagination. You will do what you imagine; then, you produce what you will after imagining what you want. Our imagination is limitless. You can alter your drawing in any way you can think of by utilizing your creativity. We’ll provide you with some suggestions so you may personalize your drawing.
Imagine having designs on the canopy of the parachute, like some flowers or anything you like. How amazing that would be! You can draw, even write your name on the canopy, or draw an object you like.
You can draw a clear blue sky for the background or a sky with fluffy clouds. We can also add some cute little birds around the parachute.
A person on the harness of the parachute will be the icing on the cake.
Excellent! Our illustration is beautiful! These are only a few suggestions, to be clear. You need to try a ton of different things and determine what works best for your drawing.
Conclusion
You are done! Now, you have made an extraordinary piece of art. Your drawing skills have developed exceptionally.
Drawing is not tough if you follow the steps given in this guide and add your creativity. For making the parachute, we drew the canopy and then drew the base of the canopy. Later, we made the suspension lines and the lower part of the parachute, the harness.
As you sketch, go slowly and pay attention to each step. Remember that it takes practice to acquire perfection.

Thanks for reading & feel free to check out more of our articles!
Author Rating
Overall Rating
Summary
This guide is all about how to make an amazing parachute. It also explains fun facts about the parachute.