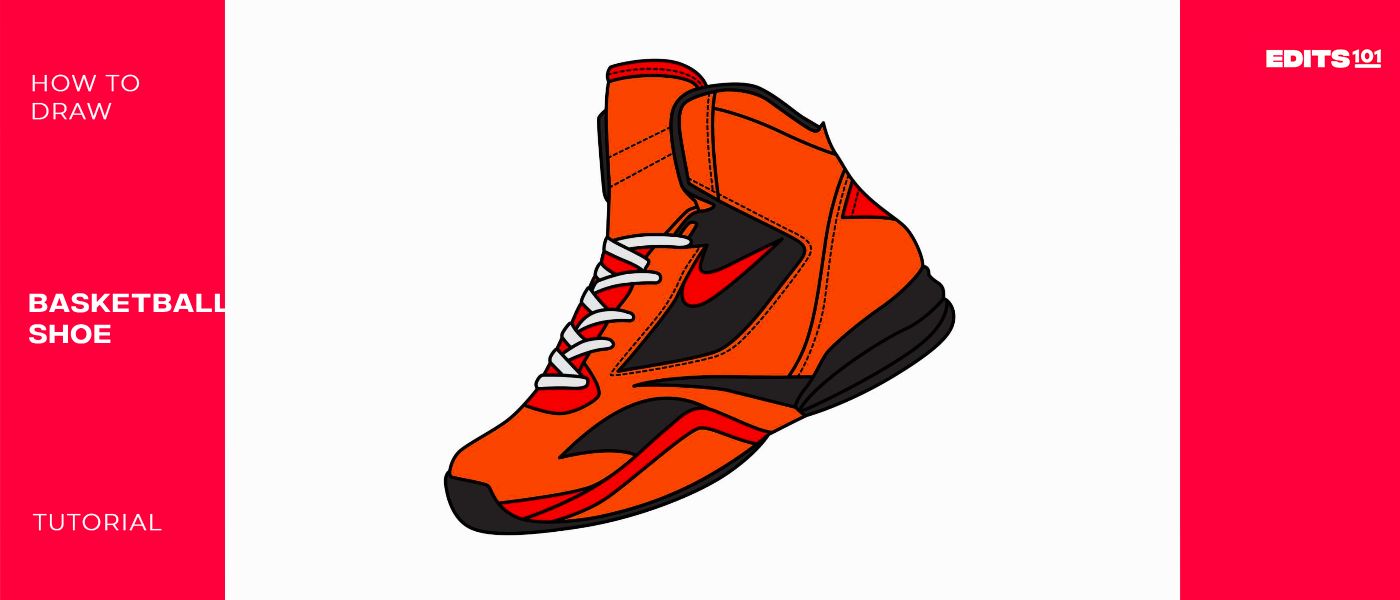
How to Draw Basketball Shoes | Step by Step
Learning how to draw basketball shoes will arm you with the skills you need to draw just about any type of sneaker. All that you need is to follow our steps carefully and you will become an expert in no time.
As you may already know, basketball shoes have an outsole that is generally flat in order to help the players achieve great traction while on the paved court. Unlike soccer cleats, basketball shoes don’t have spikes. They have a heavier and more durable rubber outsole for wear resistance. To draw these shoes, you will need a couple of things.
| Steps | Complexity Level |
| Drawing the Sole | 3 |
| Drawing the Upper Part | 3 |
| Drawing the Laces | 3 |
| Adding Patterns | 2 |
| Drawing the Sew Lines | 2 |
| Coloring the Drawing | 1 |
What You Will Need
- A pencil
- A rubber (for erasing mistakes)
- Coloring supplies (markers, colored pencils, or crayons)
- Drawing paper
- 25 minutes of your time
How to Draw a Basketball Shoe Step by Step
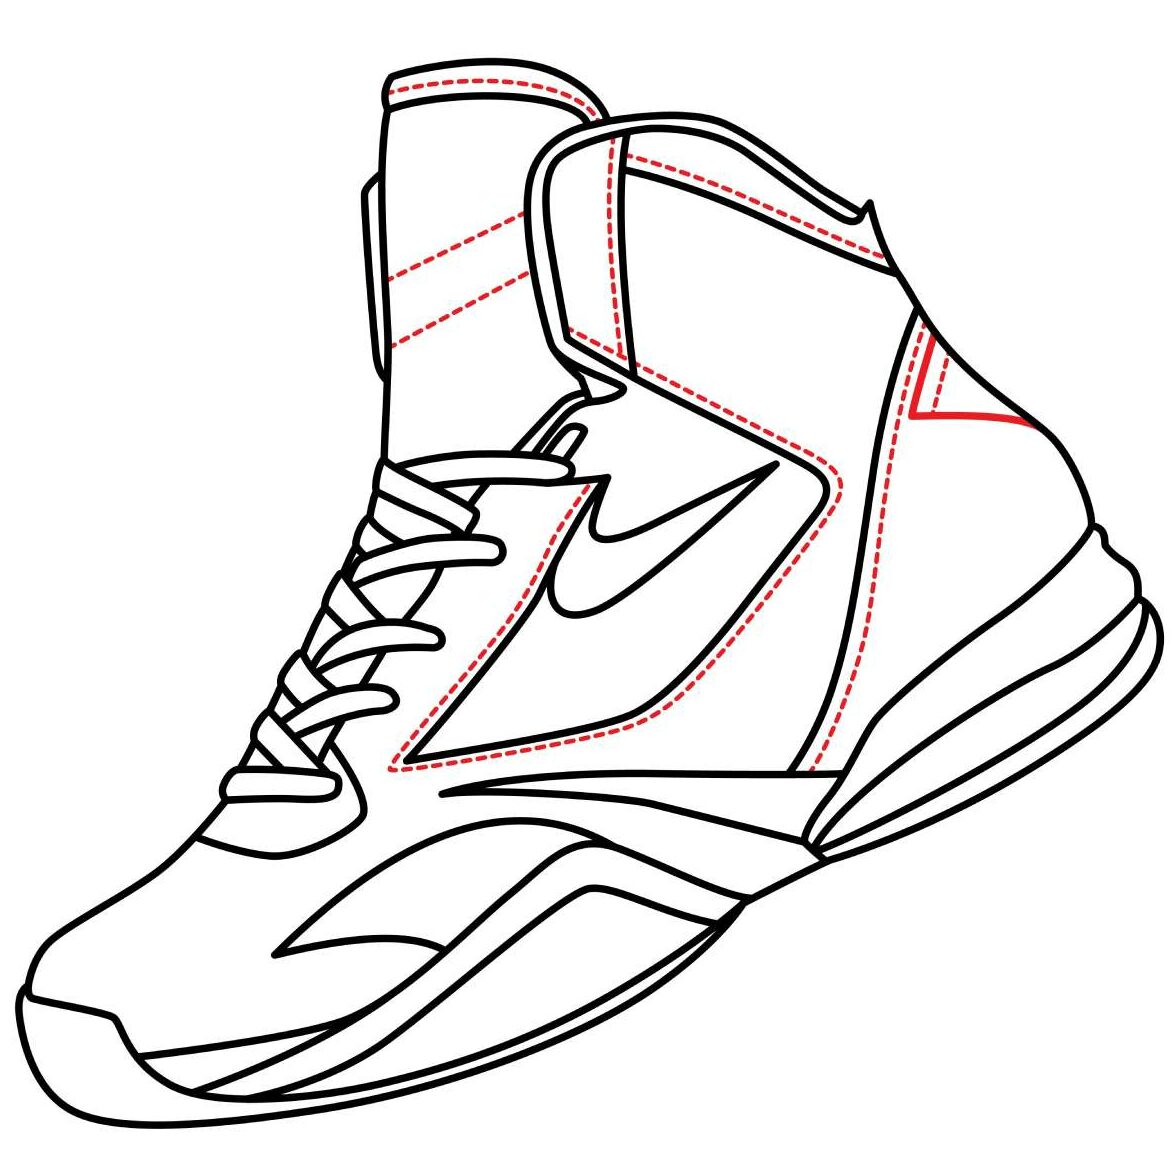
Before we get started on today’s lesson, we encourage you to study the below image. It contains all the steps we will be taking in this step-by-step guide. Studying the steps will keep you from making a mistake that may force you to start over.
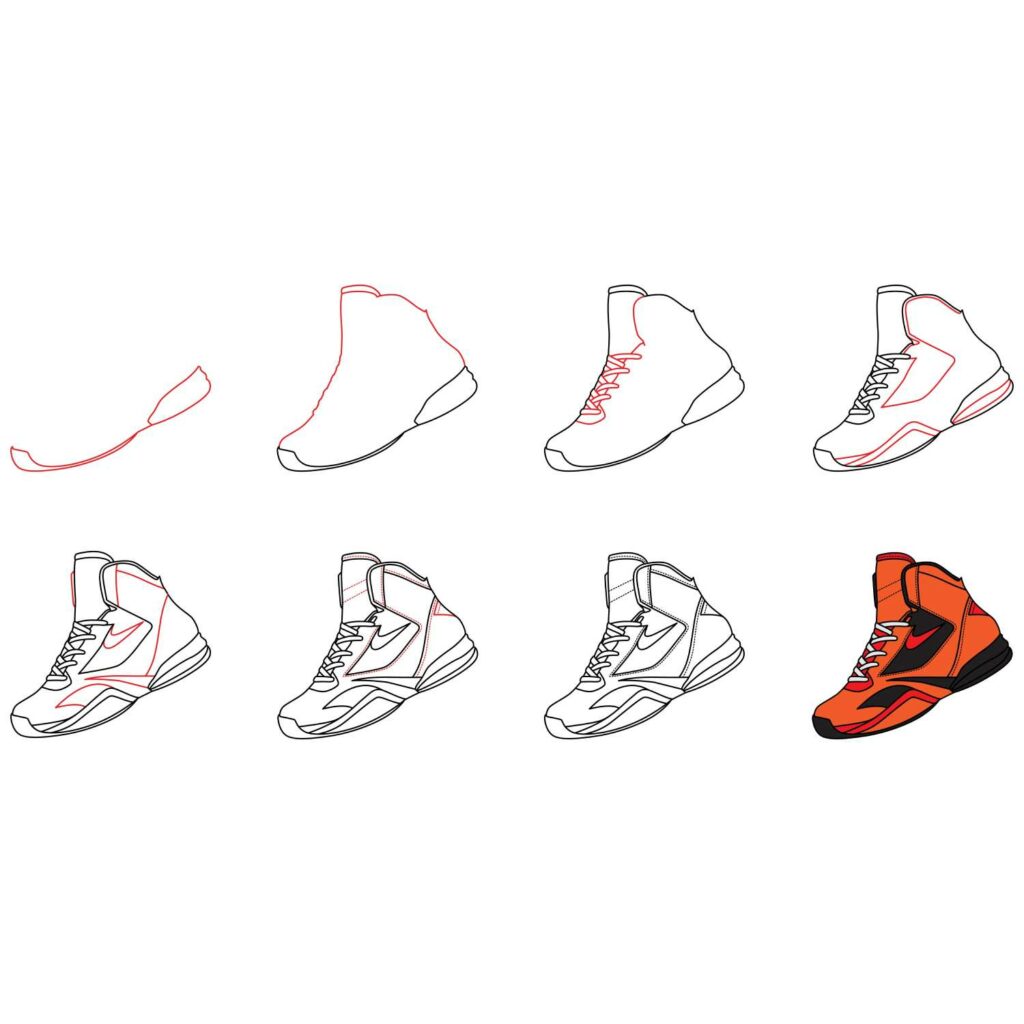
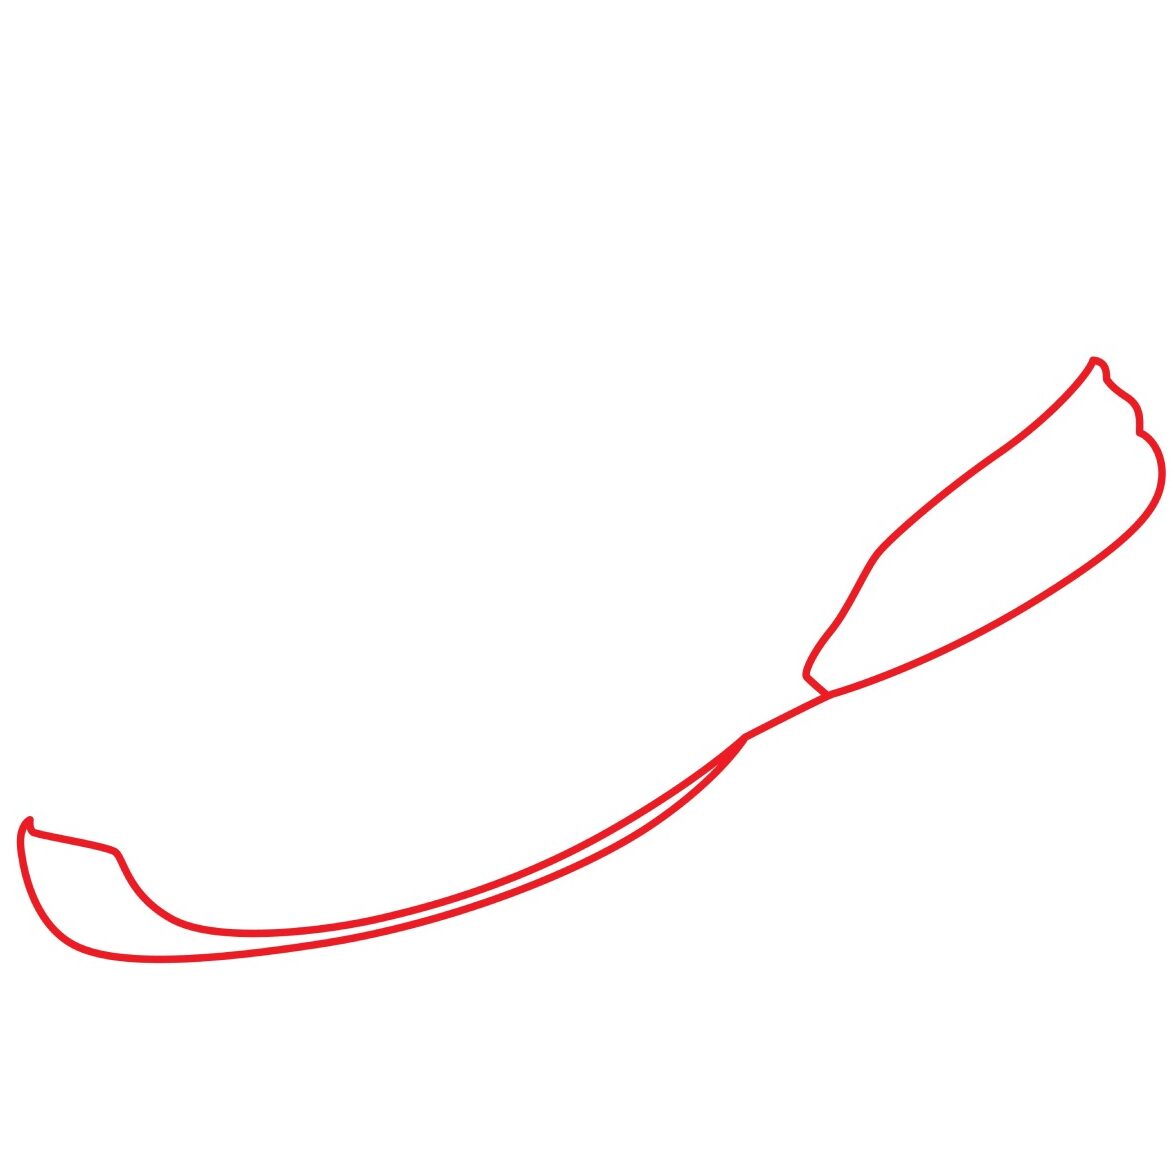
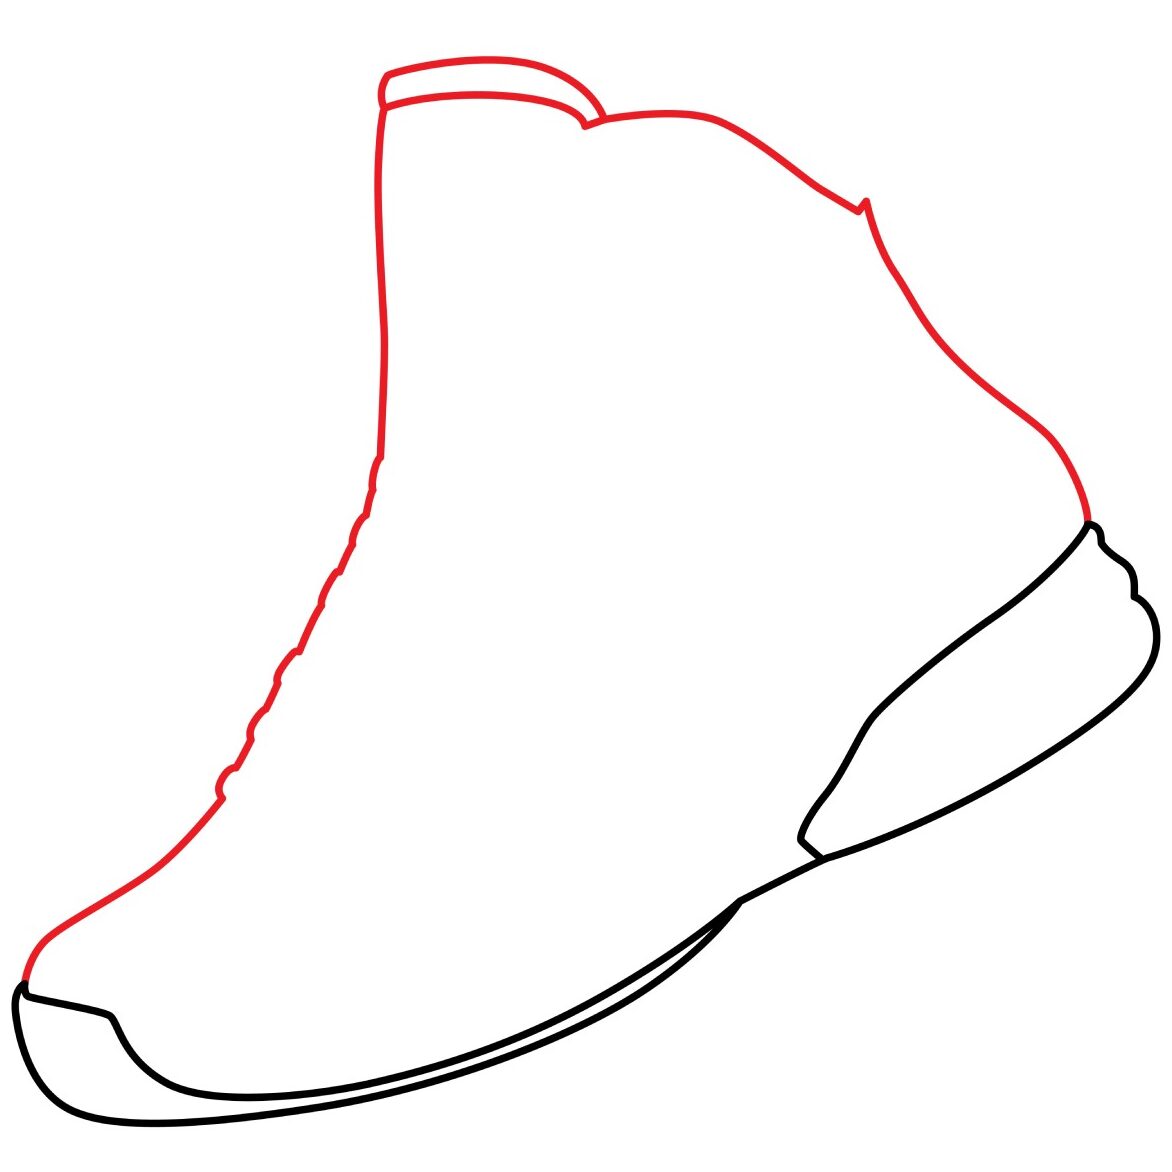
Step 1: Draw the Sole
Begin by drawing the sole of the basketball shoe in the center of your paper. For this, we will use a combination of lines and shapes.
Draw a curved line that starts from the bottom left corner of your drawing paper, rises diagonally towards the right, and stops slightly before the right margin. For added support, make the heel thicker by adding an elongated shape that covers a quarter of the right side of the curved line we added for the sole.
The toes of the player also need to be protected. That is why we need to add some padding to the front part of the sole. Add a curved shape that covers the right part of the curved line.
- Draw a curved line stretching from the bottom left margin to the right margin
- Add an elongated shape on the right of the curved line for the heel
- Add a curved shape on the left for toe padding
Step 2: Draw the Upper Part of the Shoe
We are now going to draw the upper part of the basketball shoe. This is the area that goes around the feet of the player. Just like normal shoes, the upper part of the basketball shoe is made of the front of the shoe (vamp) the sides and back of the shoes (quarters), and the linings. We will be adding these details later in the drawing. For now, we will use a series of lines to create the shape of the upper part of the basketball shoe.
Draw a line that starts from the top of the curved structure we added for the toes. The line should slant towards the right slightly to form the vamp then bend upwards and stop close to the top margins of your drawing paper to form the shoe tongue. Add a curved shape at the top of the tongue for realism.
We are then going to move the curved line downwards to form the collar and quarter of the shoe. For realism, we will slant the line slightly down while moving towards the right. Make the line wavy and extend it until it connects with the top part of the structure we added for the padded heel.
- Draw a curved line starting from the toes, bending upwards, and slanting downward to connect with the heel
- Add a curved shape at the top for the tongue
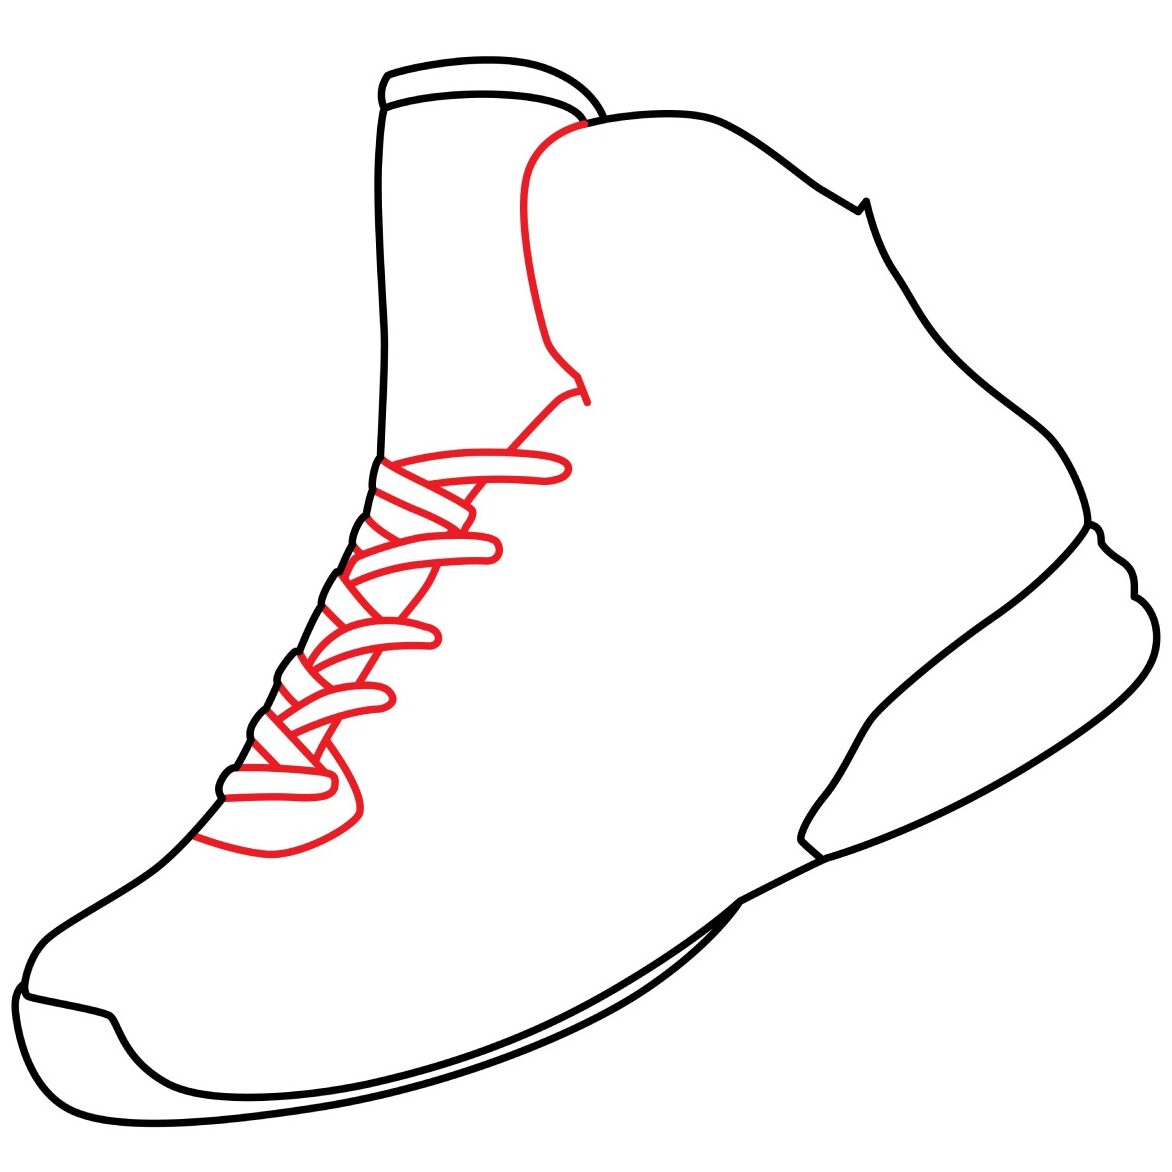
Step 3: Draw the Laces
The basketball shoe has to be strapped tightly around the feet of the player. This is why we will be using curved lines to create the lacing pattern. But first, for the shoe laces to work, we first need to add the throat. This is the area that rests atop the foot’s instep.
To add the throat, draw a line starting from the vamp of the shoe bend the line downwards then curve it upwards. From the end of the line, add a diagonal line that rises upwards and towards the right. The line should go to about three-quarters the height of the shoe. Next, add a curved line that starts from the end of the diagonal line, rises upwards, and connects with the top part of the shoe.
For the laces, we are going to add tube-like structures that crisscross along the length of the bottom part of the throat. Make sure the lines you use for the shapes don’t overlap.
- Draw a curved line from the vamp to the collar of the shoe to form the throat.
- Use tube-like structures that crisscross to depict the laces
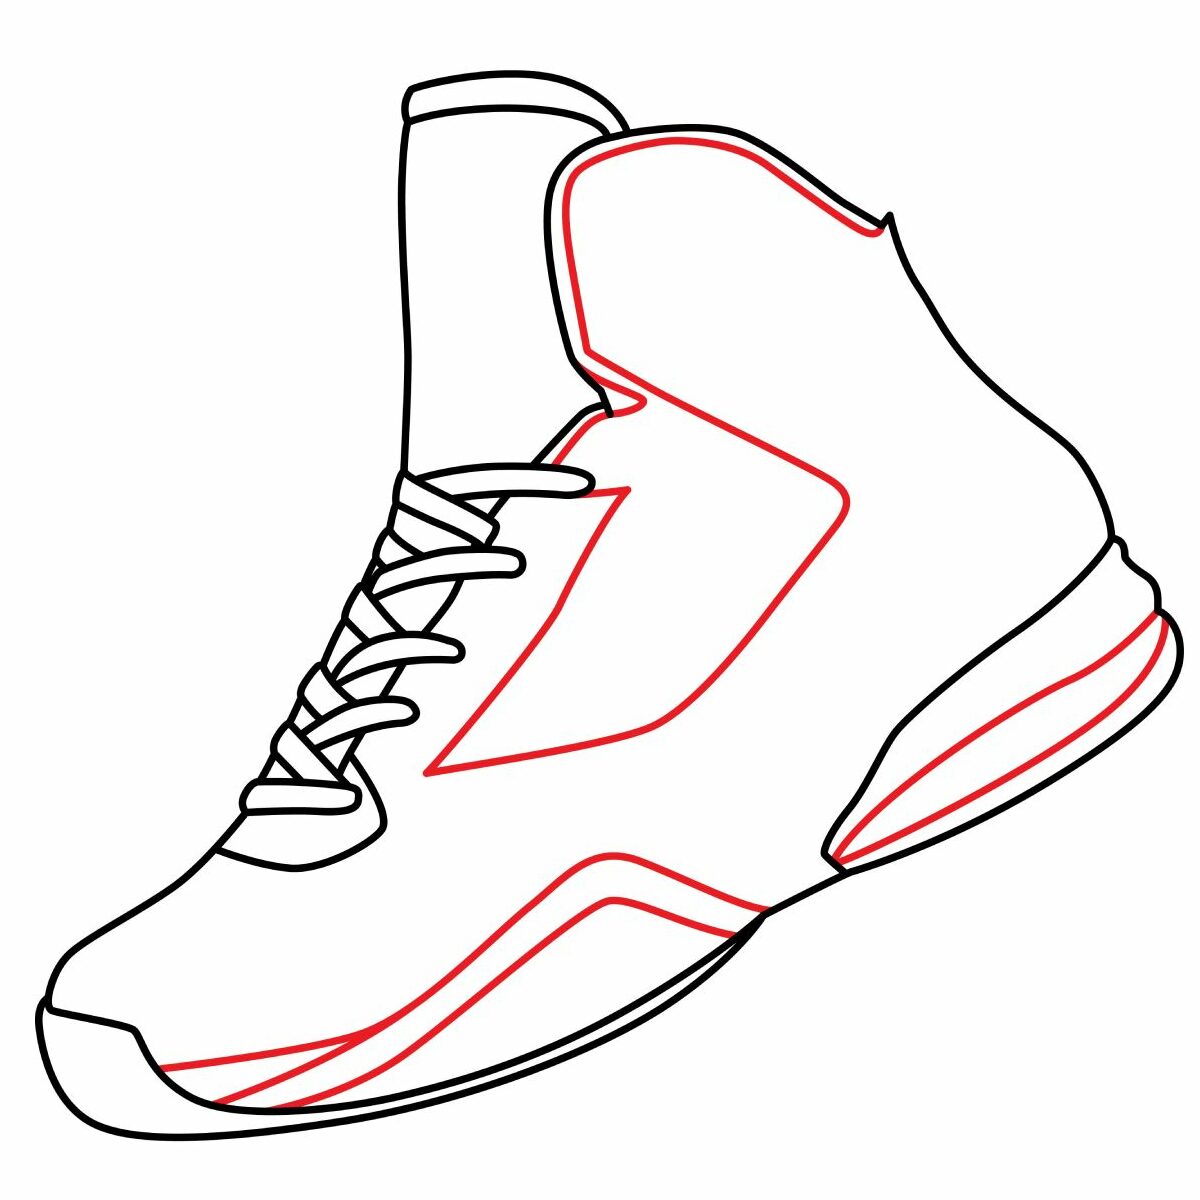
Step 4: Draw the Patterns of the Shoe
To keep the basketball shoe from being boring, add some unique patterns to it. To make our basketball shoe look amazing, we will add some patterns to it.
We will start by adding an elongated oval shape in the middle of the heel. We will then add a bent, tube-like structure on the area above and between the toes and the heels. For the final detail, we will add a shape in the area below the throat and add a line that goes under the collar of the shoe.
- Add an elongated oval shape in the middle of the padded heel
- Add a pattern in the area between the toe and the heel
- Add details in the area below the throat
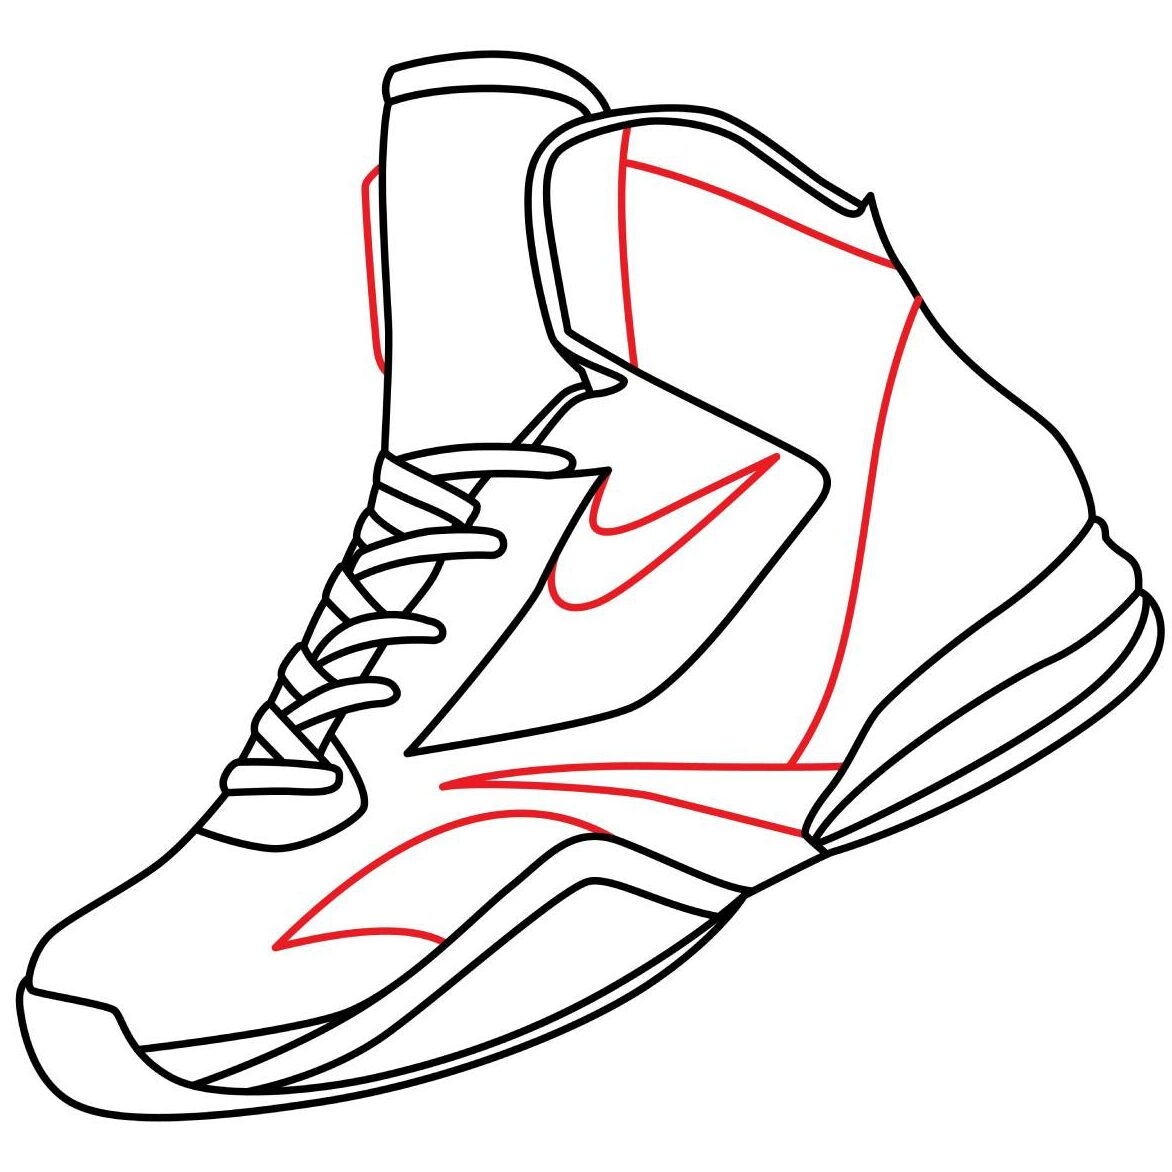
Step 5: Add Some More Details
To make the shoe stand out, we are now going to enhance the shoe’s appearance by adding stitching and a logo. Most basketball shoes are from renowned brands. In this example, we are going to add The Swoosh logo in the area below the shoe laces. We are also going to add a line on the back end of the shoe, a rectangular-like shape starting from the heel and bending towards the laces, and two more lines below the collar of the shoe.
- Add the Swoosh logo below the laces
- Add a diagonal line on the back of the shoe
- Add a rectangular-like shape between the heel and the laces
- Add a horizontal and vertical line below the collar
Step 6: Draw the Sew Lines
To make the shoe look authentic, we are going to draw sew lines using dash lines along the edges. These lines simulate the stitching that holds the shoe together. Since the sew lines are made when attaching the different pieces that make up a basketball shoe, we will add them in areas where two pieces are being combined.
- Use dash lines to add sew lines where two pieces attach
Step 7: Congratulations! Your Drawing Is Ready
By following our steps, the drawing of your basketball shoe should now be ready. Below is the fantastic basketball shoe we have drawn. If yours doesn’t look exactly like ours, don’t be frustrated. It takes practice to get better and you will notice a significant improvement on your next attempt.

Take the Drawing to the Next Level
To make your artwork even more impressive, you should consider adding a few more details. You can do such things as adding a background such as basketball or a court. You can also add a name to the side of the shoe and most importantly, color the shoe.
Since our drawing is meant to arm you with the basics of drawing a realistic basketball shoe, we will not go too much into the details.
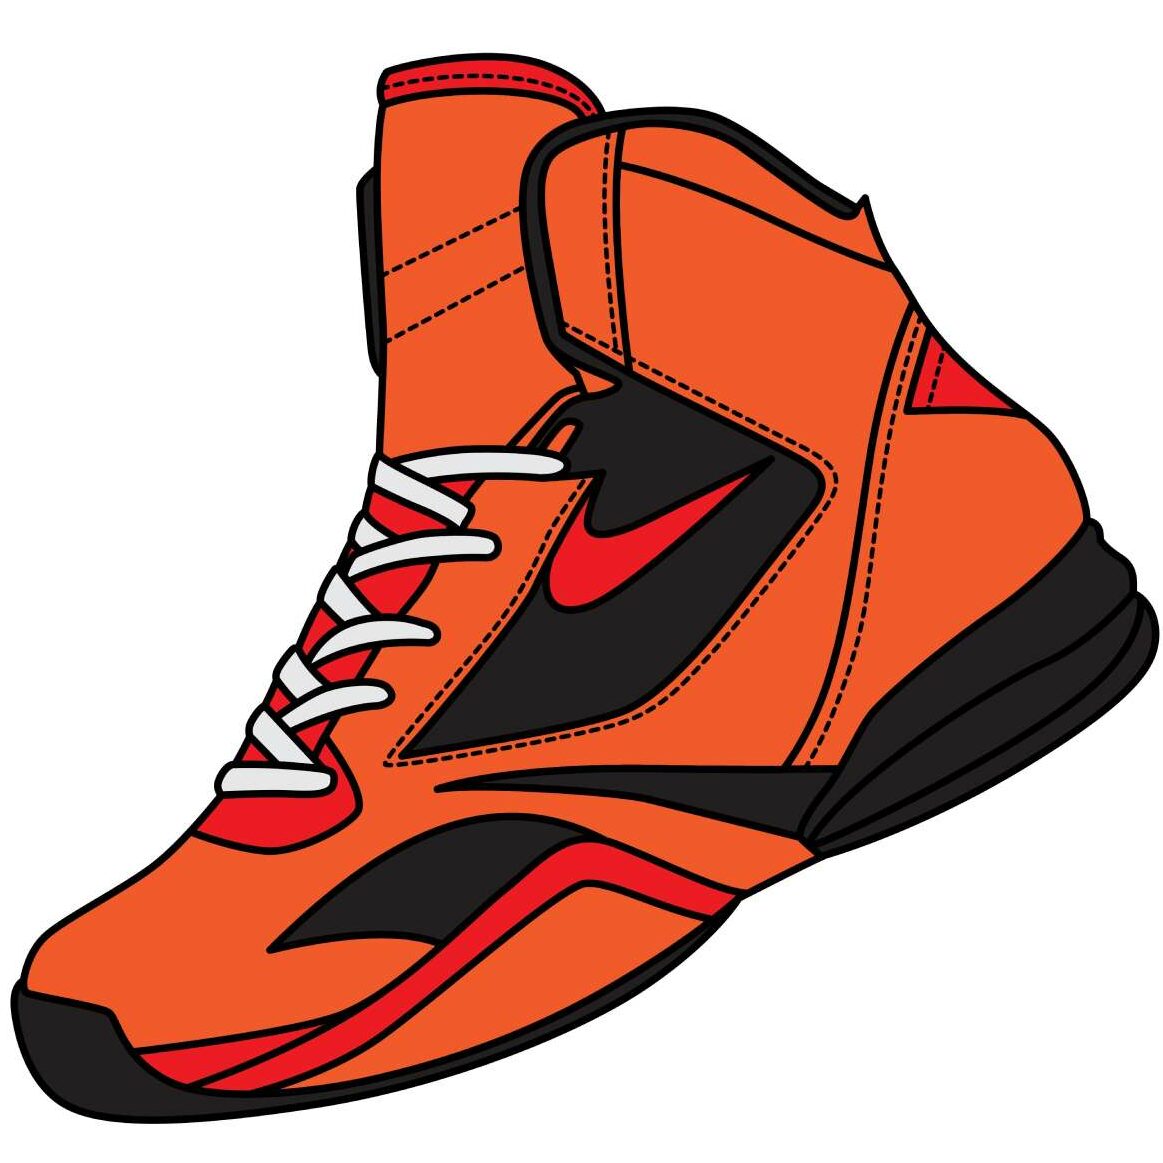
Step 8: Color the Shoe
What we are going to do now is color our drawing. Take out your coloring supplies and let your imagination go wild. Remember that this is your drawing so you can use any combination of colors that you want. Here is what we did to our drawing. You can do more.
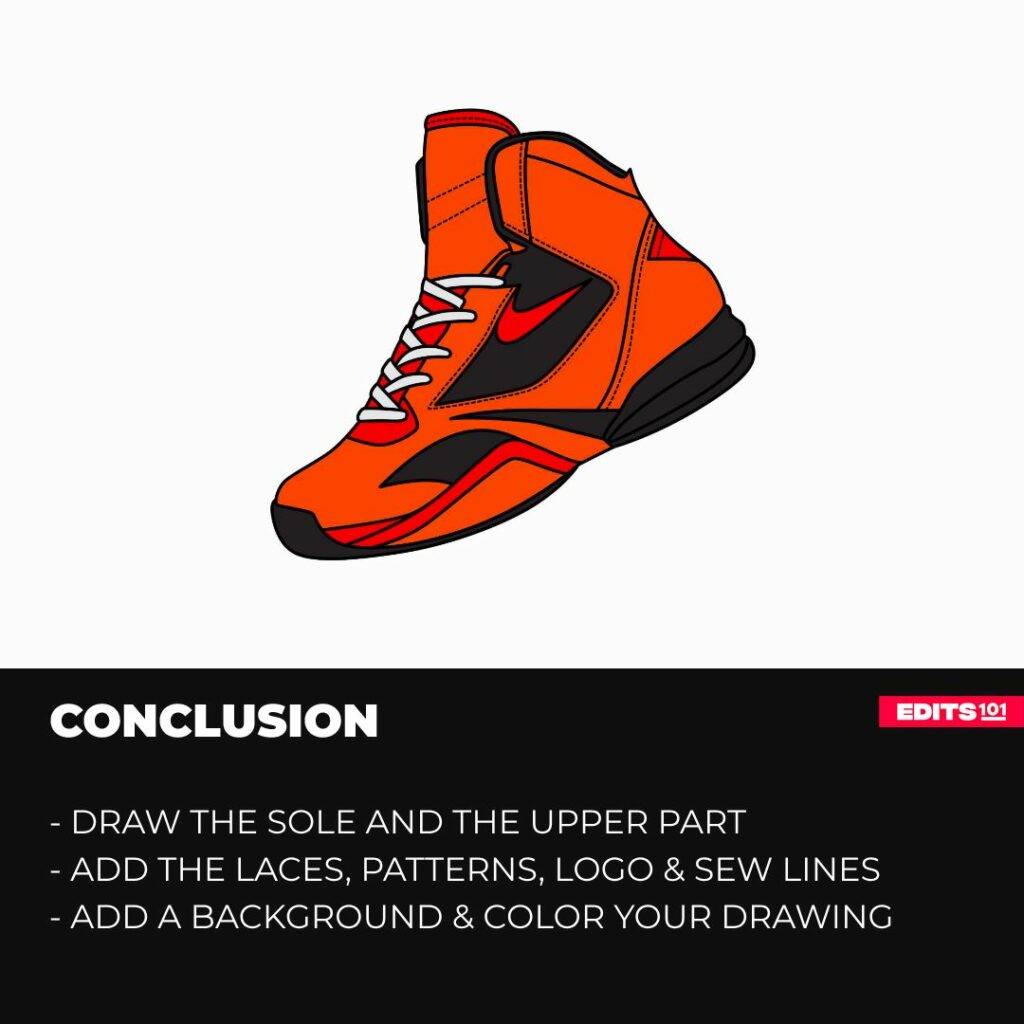
Conclusion
Drawing a basketball shoe is a rewarding experience when you take it step by step. We have taken you through each step from drawing the sole to coloring your creation. We started with a curved line for the sole and added the upper part of the shoe, throat, laces, and patterns. To elevate our drawing, we incorporated the logo, sewed lines, and added vibrant colors.
You can use these steps to draw various types of sneakers and even design your own unique footwear. The possibilities are endless. Moreover, you can use the steps in this guide to draw a basketball shoe on your favorite sketching app. These steps can also be used to draw a basketball shoe from a real photograph or a physical shoe.
Thanks for reading & feel free to check out more of our articles!
Author Rating
Overall Rating
Summary
Learn the basics of drawing a basketball shoe. In the process, you will also learn about drawing sneakers and how to make them look impressive.