How to Draw an Ice Hockey Rink | A Fun Tutorial for Kids and Adults
Unlike normal hockey which can be played outdoors or indoors on a field, ice hockey is played indoors on an ice-covered surface known as a rink.
The ice rink, also referred to as an ice skating rink, is a frozen body of water or an artificial sheet of ice that is created using hardened chemicals. The ice hockey players wear skates to enable them to move easily on the rink. In our tutorial, we will be learning how to draw a realistic ice hockey rink step by step.
| Steps | Complexity Level |
| Drawing the Outline of the Rink | 1 |
| Drawing the Goal Line and Goal Crease | 2 |
| Drawing the Center Line and Face-off Circle | 1 |
| Drawing the Blue Lines | 1 |
| Drawing the Face-off Circles | 2 |
| Drawing the Penalty Bench and Face-off Spot | 2 |
| Coloring | 1 |
What You Will Need
- A drawing piece of paper or a sketching app
- A pencil
- An eraser for correcting mistakes
- Coloring supplies (preferably colored pencils or markers)
- A ruler
- 10 Minutes
How to Draw an Ice Hockey Rink Step by Step
As you will find out in today’s lesson, drawing an ice hockey rink is the simplest thing you will ever get to do. This is because you only need to combine shapes and straight lines to create a realistic ice hockey rink.
However, to ensure you don’t make mistakes, we have shared an image with the steps that will be involved in the lesson. Study the below image to understand what will be involved in each step.
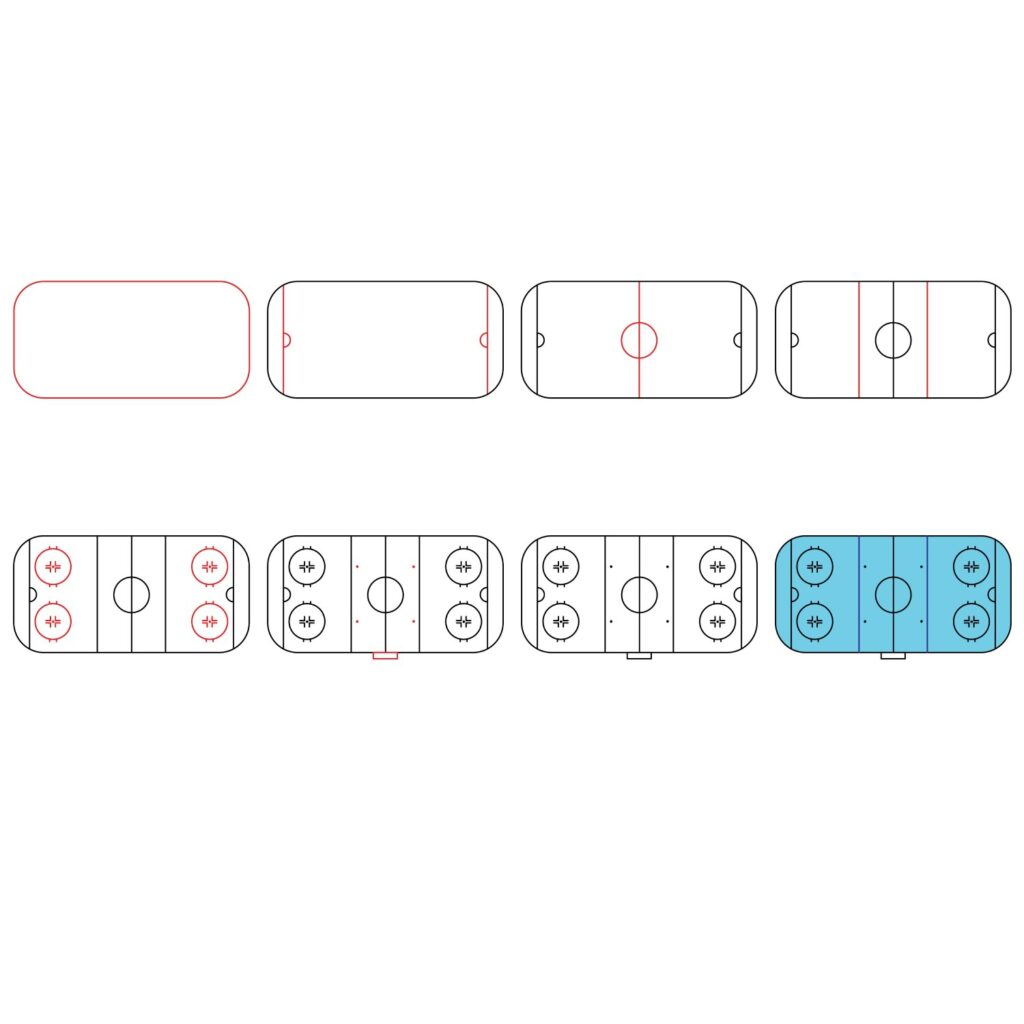
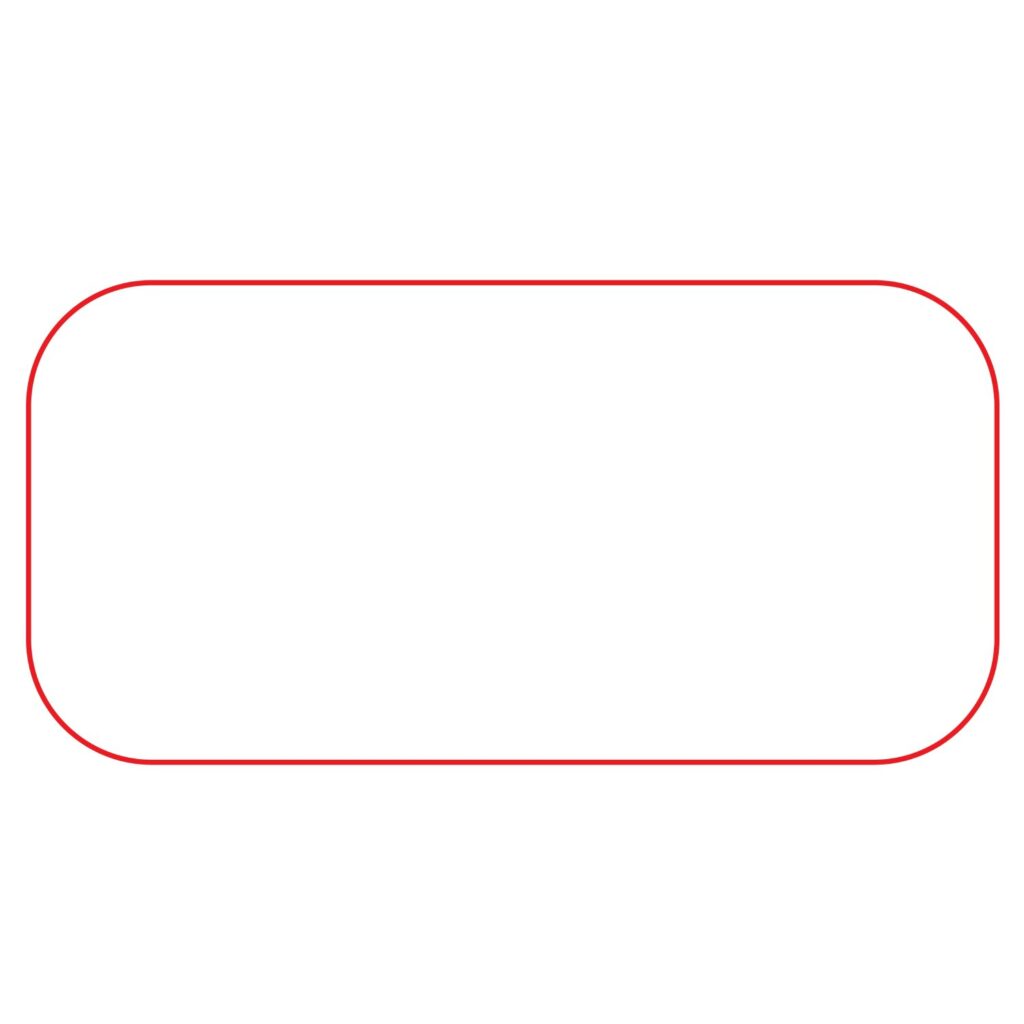
Step 1: Draw the Outline of the Rink
The first thing we need to do is to outline the rink. This is the perimeter of the ice hockey rink. For this, start by positioning your drawing paper in a landscape orientation. Use your ruler to draw a horizontal rectangle that stretches from the left margin to the right margin.
To turn the rectangle into a realistic ice hockey rink, you need to make the corners rounded. Add curved lines on the inside of the corners then use your eraser to remove the sharp corners. The rectangle will serve as the foundation for your ice hockey rink.
- Position your drawing paper in a landscape orientation
- Draw a horizontal rectangle that covers the width of the paper
- Make the corners rounded
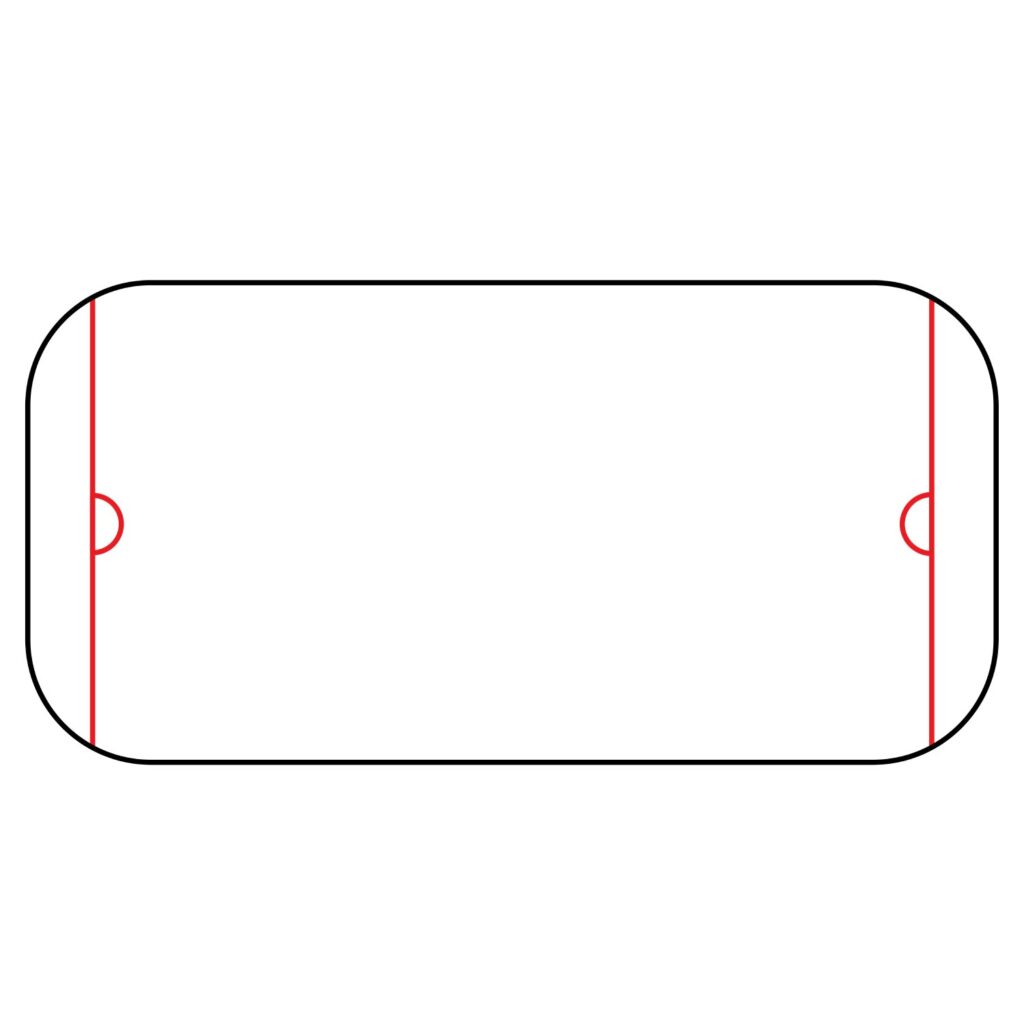
Step 2: Draw the Goal Line and Goal Crease
We are now going to add the goal line. This is a line placed 11 feet from the inside facing the end boards. The line is parallel to the end boards and extends across the width of the ice rink. It is the line on which the goal cage sits. The line is usually red.
To add the goal line, use your ruler to draw a vertical line that is parallel to the side of the rectangle. The line should start within the curved corners. Add another line on the other end of the ice hockey rink.
Next, add the goal crease in the middle of the goal line. We will do so using semi-circles. On the left goal line, add a semi-circle on the right. The semi-circle should be small and in the middle of the line. Do the same for the goal line on the right and add the semi-circle on the left side of the line, in the middle.
- Draw a vertical line within the curved part of the rectangle
- Add another vertical line on the other side
- Add a semi-circle in the middle of the vertical line for the goal crease
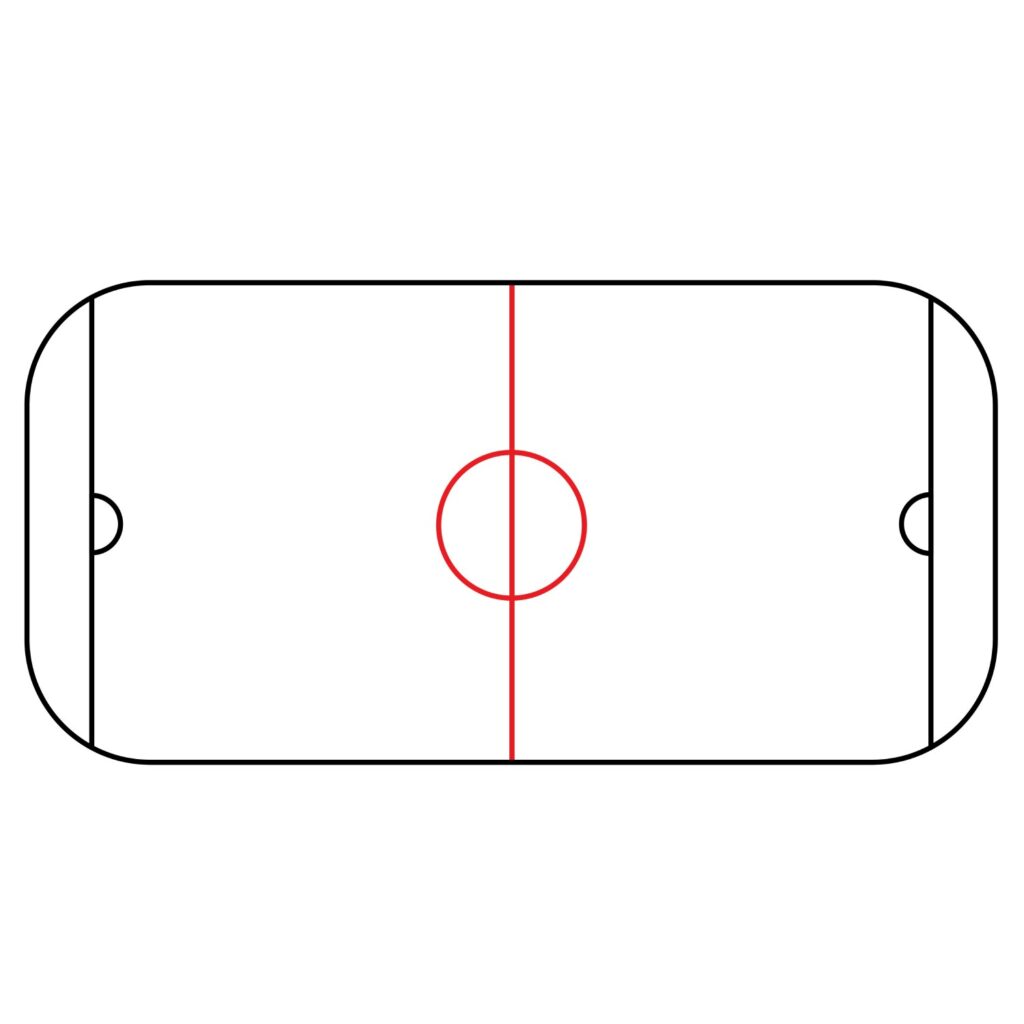
Step 3: Draw the Center Line and Center Face-Off Circle
We are now going to add the center line, also referred to as the red line. This is the line that cuts through the middle of the ice hockey rink. Use your ruler to draw a vertical line in the middle of the rink.
Next, we are going to add the center face-off circle. This is the only place that an ice hockey official can drop the ice hockey puck to start the game action. To add the face-off circle, simply add a circle in the middle of the center line.
- Draw a vertical line in the middle of the rink to form the center line
- Add a circle in the middle of the of the center line to form the face-off circle
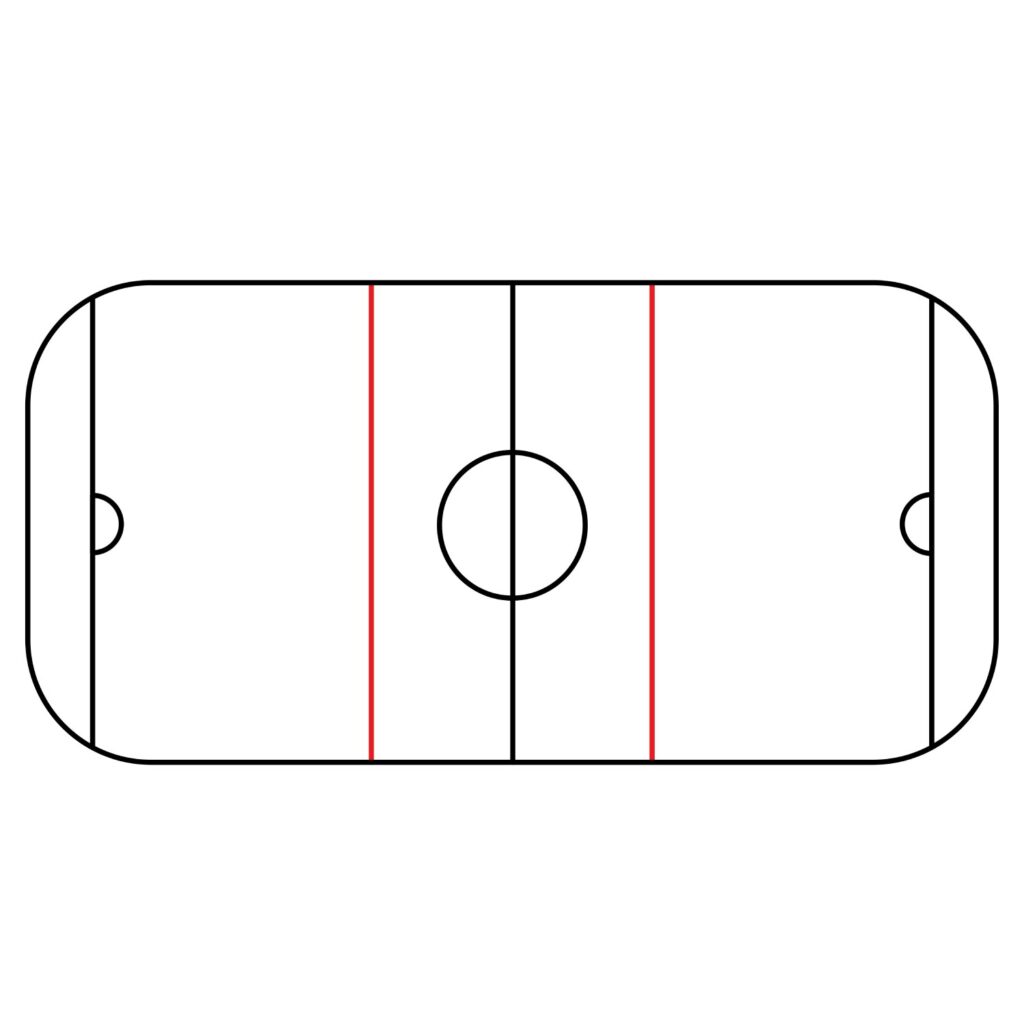
Step 4: Draw the Blue Lines
To give the ice hockey rink a more authentic look, we are going to add the blue lines. These are vertical lines that divide the hockey rink into three zones.
- Defensive zone. This is the area between the goal line and the blue line.
- Neutral zone. The area between the two blue lines.
- Offensive zone. The area between the blue line and the goal line of the opposing team.
To add the blue lines, you simply need to use your ruler to draw two vertical lines on either side of the red line. The area between the two blue lines is where the game’s intensity unfolds.
- Draw two vertical lines on either side of the center line
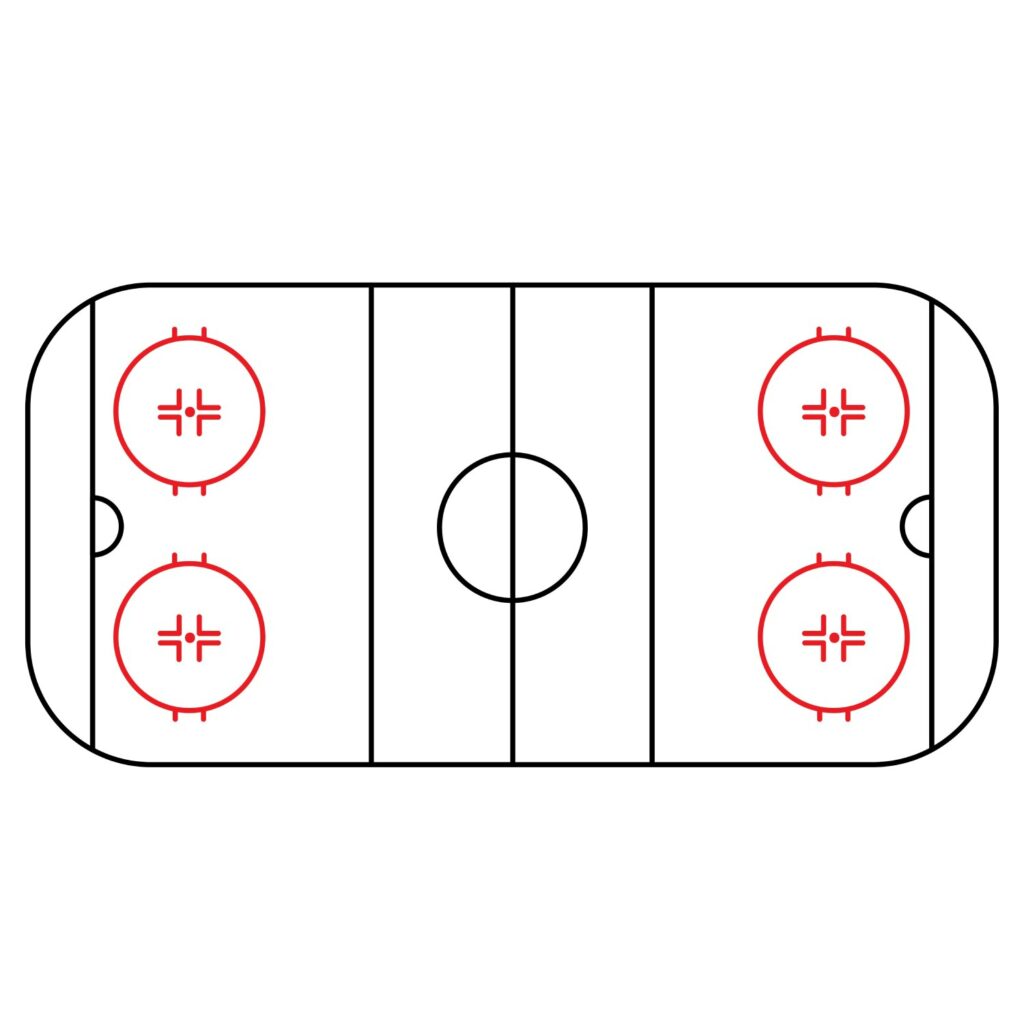
Step 5: Draw Face-Off Circles
Also known simply as the dots or the face-off spots, an ice hockey rink has four face-off spots. These are usually marked by a hash mark inside a circle. They indicate where an ice hockey player should stand.
Start by drawing two circles on both sides of the end zone. The circles should be on either side of the goal crease as shown in our illustration below. To make them look right, add some extra lines inside and a small dot in the center. The dots represent where the players will clash for the ice hockey puck! You can add small lines on the top and bottom part of the circle for more realism.
- Draw four circles, two on either side of the goal crease
- Use lines to add a hash mark in each circle
- Add a dot inside each of the circles
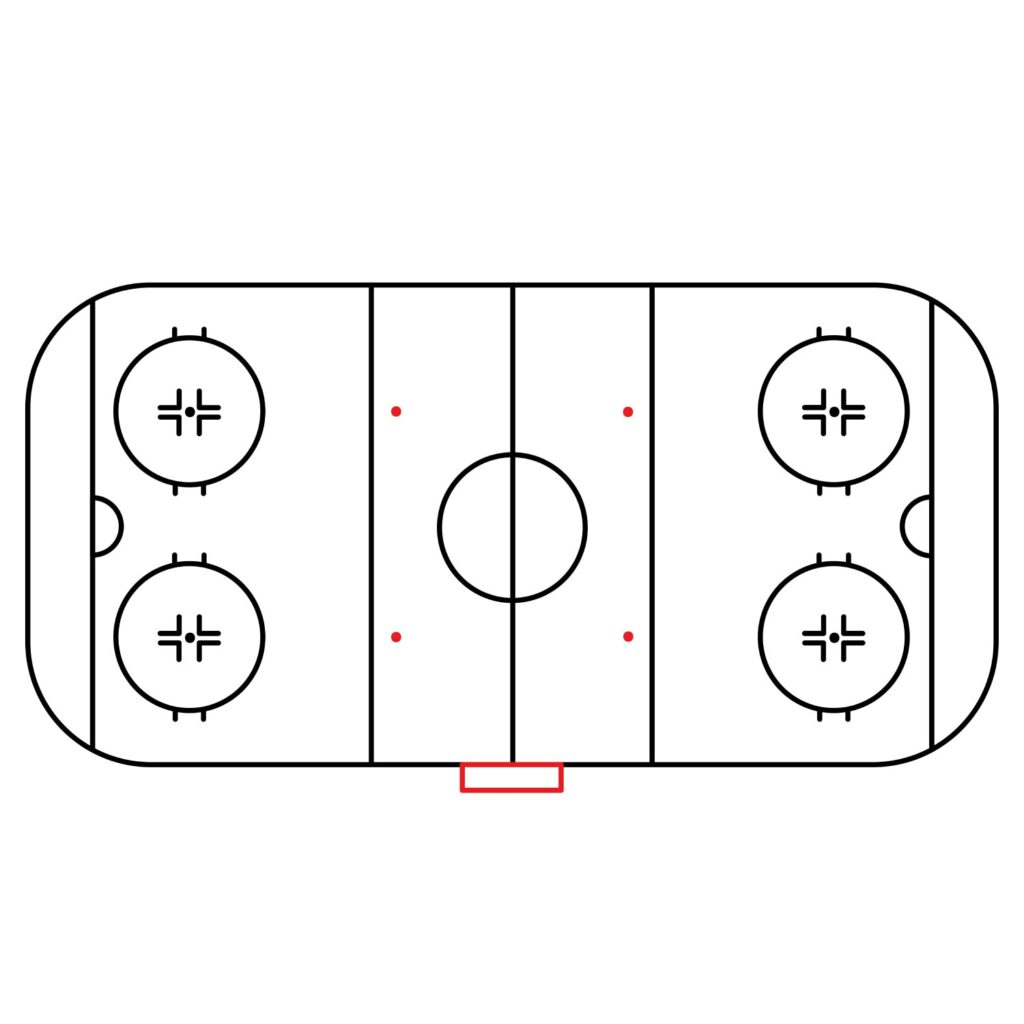
Step 6: Draw the Penalty Bench and Face-Off Spot
The final details we are going to add are the penalty bench and the face-off spots. The penalty bench area is made of seats or a bench that can accommodate up to 8 people. The area is used for seating players that have been penalized. The penalty timekeeper, official scorer, and game timekeeper also sit here. This bench has to be positioned a substantial distance from the player’s bench.
To add the penalty box, draw a flattened rectangle at the bottom of the ice hockey rink. The bench should be at the center of the rink as shown in our illustration.
The face-off spots, also referred to as dots, indicate where the players should take their positions. There are eight of them. We have already added the first four in the face-off circles. The remaining four are located in the neutral zone.
Using your pencil, add four dots close to the blue lines. The dots should be parallel to the ones we added in the face-off circles.
- Draw a flattened rectangle below the rink to add the penalty bench
- Add four dots inside the neutral zone for the face-off spots
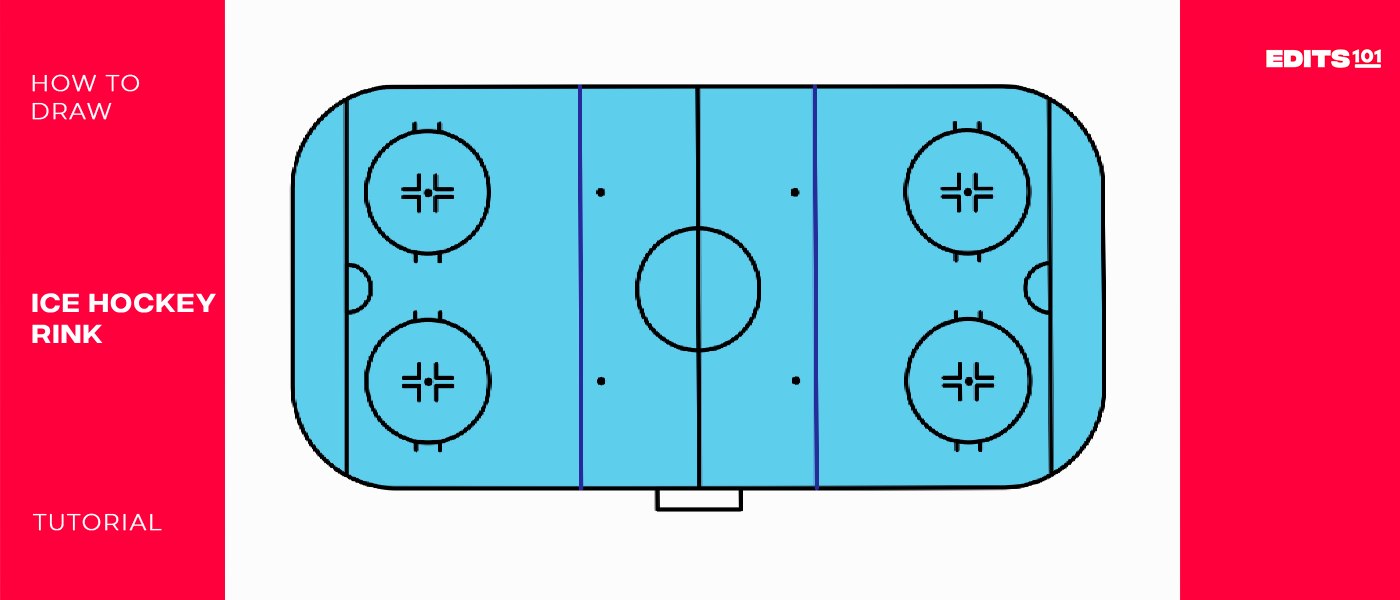
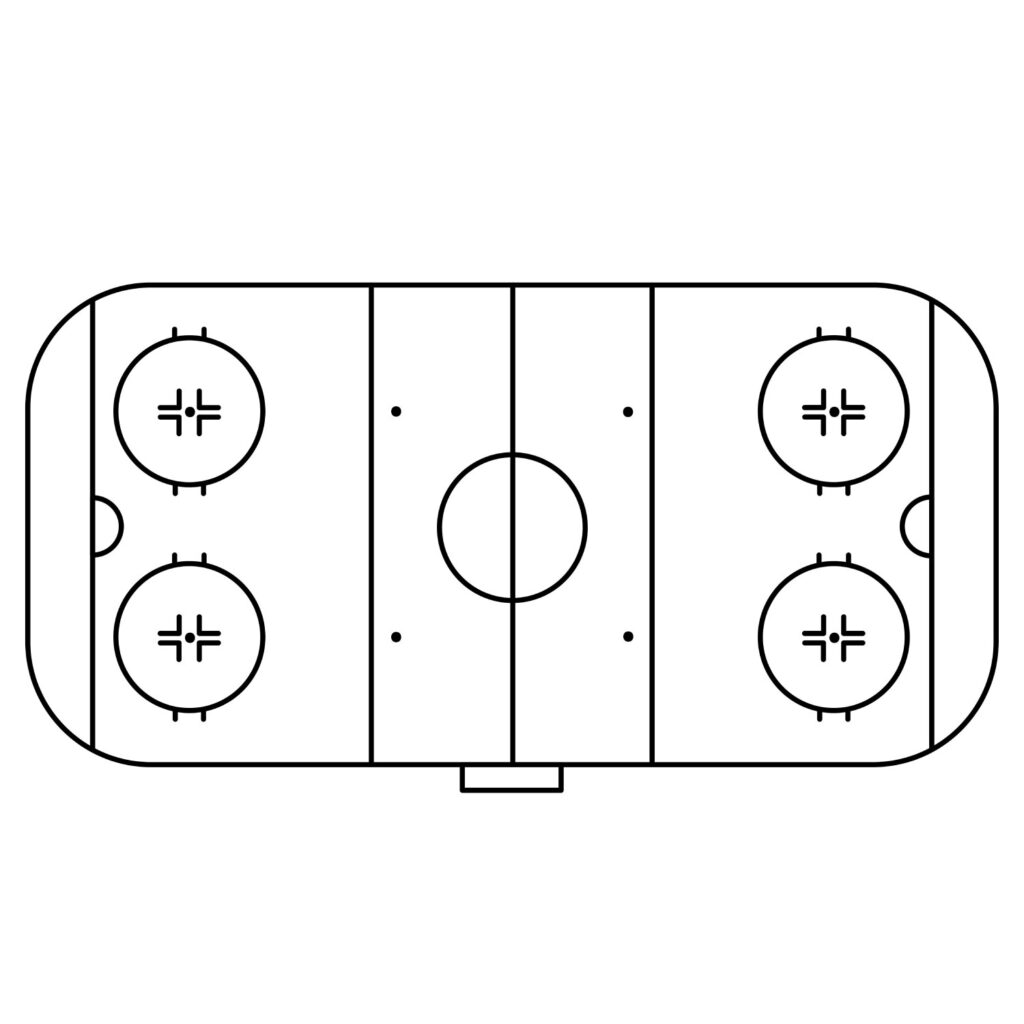
Congratulations! Your Ice Hockey Rink Is Complete
The ice hockey rink is now ready. By following our simple steps, you should have something that looks like what we have below. Don’t feel bad if your drawing is not as good as ours. You will notice a significant improvement on your next attempt.
Take the Drawing to the Next Level
It is okay if you wish to leave your ice hockey rink drawing as it appears above. However, to improve your drawing, you should consider adding a few more details. One of the things you can consider adding is the players’ bench. This will be on the opposite side of the rink from the penalty bench. Add two rectangles on either side of the center line for both teams.
If you are confident, you can add some crowd in the stands. You may also consider adding a small rectangle behind the goal crease to represent the goal cage. In our case, we are going to do the most important thing of all: coloring our drawing.
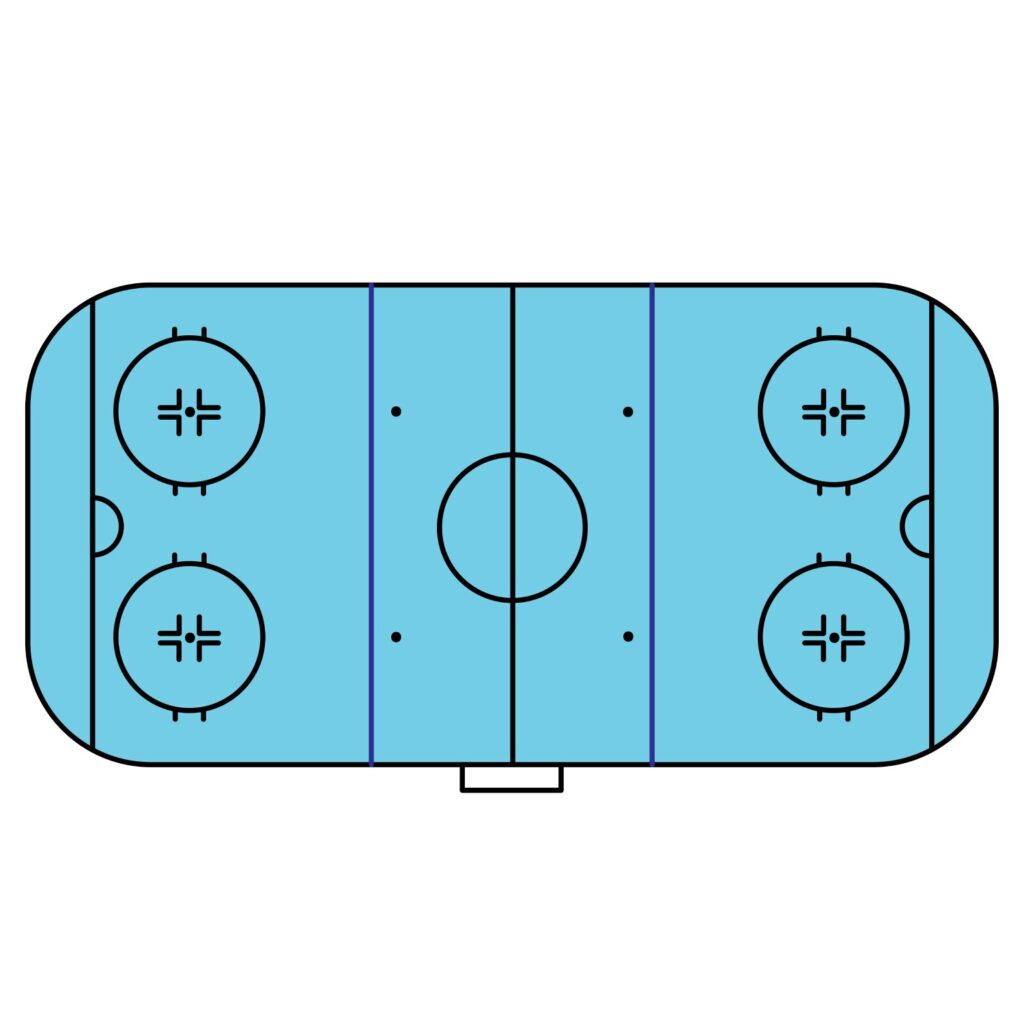
Color Your Drawing
Using your coloring supplies, add some color to your ice hockey rink. This is your rink so you can use any colors that you like. In our drawing, we used a light blue color for the surface of the rink and a dark shade of blue for the blue line.
Only start coloring after adding all the details you want in your drawing in order to keep the colors from spilling outside the desired areas. You should also decide on the colors you want to use before you get started on coloring. This is more so when using marketers since you cannot erase them like you would a pencil.
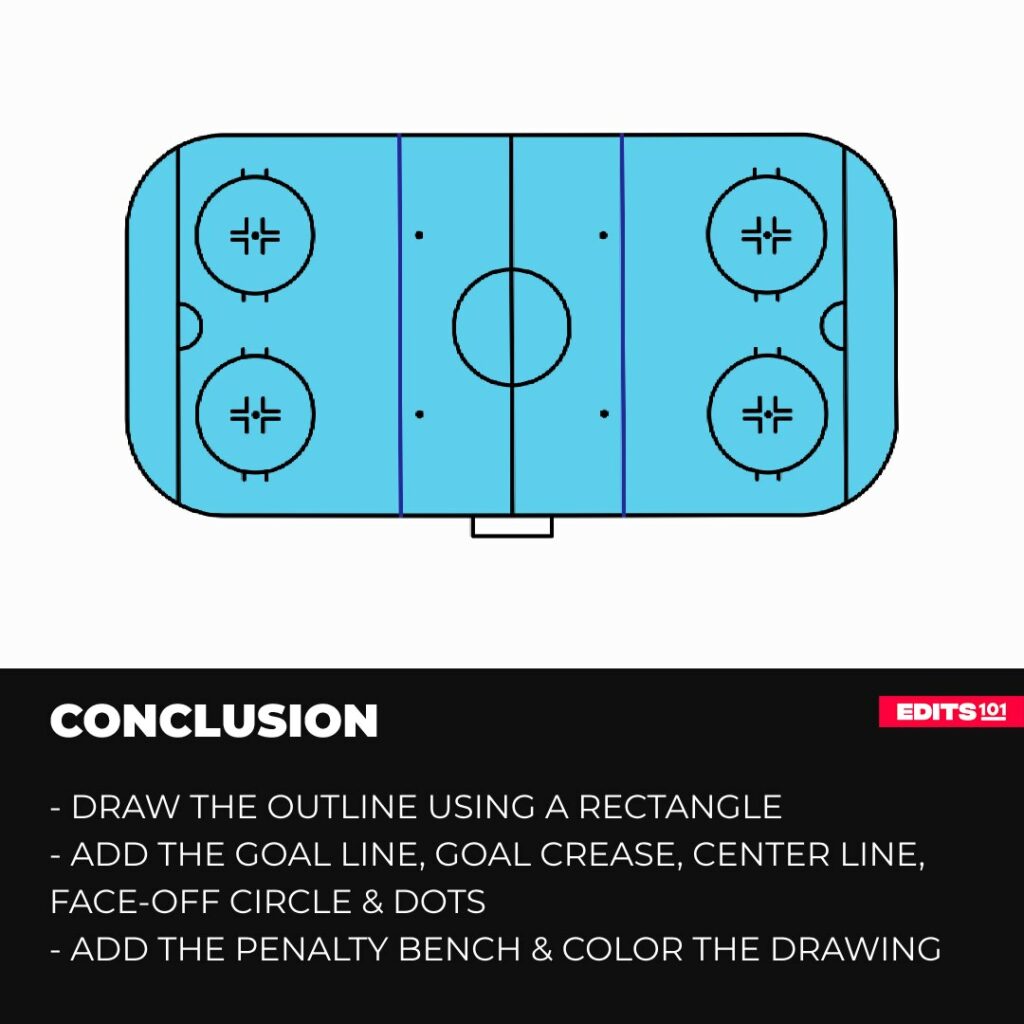
Conclusion
Drawing an ice hockey rink is pretty easy. You only need to combine a couple of shapes and lines. In our tutorial, we started by outlining the ice hockey rink using a rectangle with rounded corners. We then added the goal line, goal crease, center line, and the center face-off circle. To make our drawing more realistic, we added the blue lines, face-off circles, and dots, and later the penalty bench. We brought our drawing to life by coloring it.
You can use these steps to draw an ice hockey rink on your favorite sketching app too. Moreover, once you understand the basics of drawing a rink, you can go ahead and draw it from different perspectives.
Thanks for reading & feel free to check out more of our articles!
Author Rating
Overall Rating
Summary
Learn how to draw a realistic ice hockey rink with all the crucial details.