

We will explain how backgrounds can be removed and changed, and show some examples of how to do it. We will delve into the tools you can use to make this happen and how they work differently.
Selection Brush Tool in Affinity Photo (W)
The most common way to remove background is by using the Selection Brush Tool in Affinity Photo. With this tool, you can paint over the areas you want to select.
Affinity Photo will automatically create a selection around the area you painted. You can then use the Invert command to select everything except the area you painted.
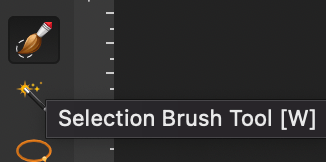
This tool is found on the left side screen on the toolbar. The icon is recognizable because it looks like a paintbrush with a dotted circle at its tip. If you’re not sure how to use this tool, don’t worry! We will walk you through the steps of using it to remove a background.
First, open the image you want to remove the background from. Make sure it is a pixel layer and it is not locked. To make it so, right-click on the image layer and select ‘Rasterize & Trim’. Then, select the Selection Brush Tool from the toolbar or press the keyboard shortcut ‘W’.
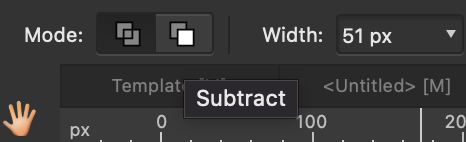
Adjust the size of the brush by changing the Width from the Context Toolbar or by pressing ‘[‘ or ‘]’ on your keyboard.
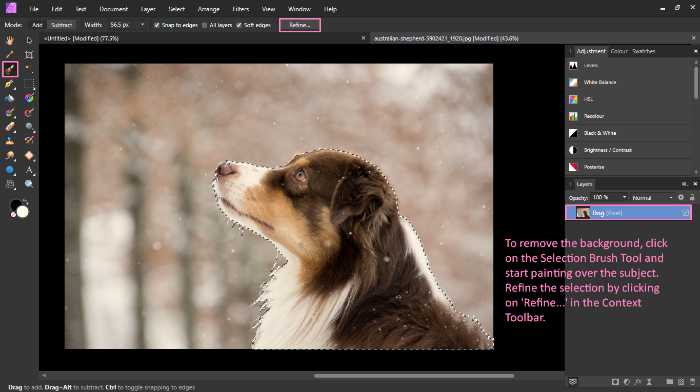
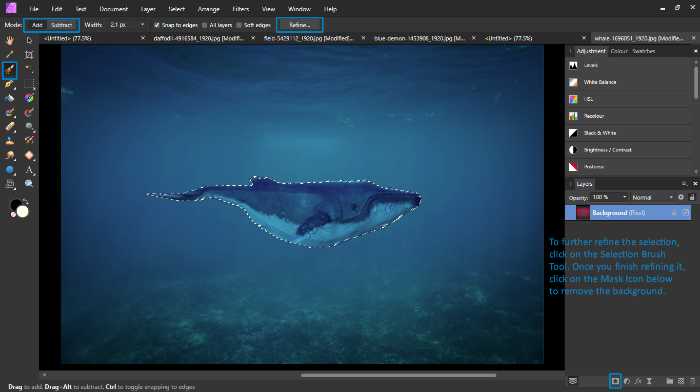
Then, start painting over the area you want to select. Affinity Photo will automatically create a selection around the area you painted. If you make a mistake, don’t worry! You can undo your last action by pressing ‘Ctrl’ + ‘Z’.
Choose Subtract from the Context Toolbar to remove some of the selected parts. You can also hold ‘Alt’ (Windows) / ‘Option’ (Mac) on your keyboard while selecting to perfect the selection.
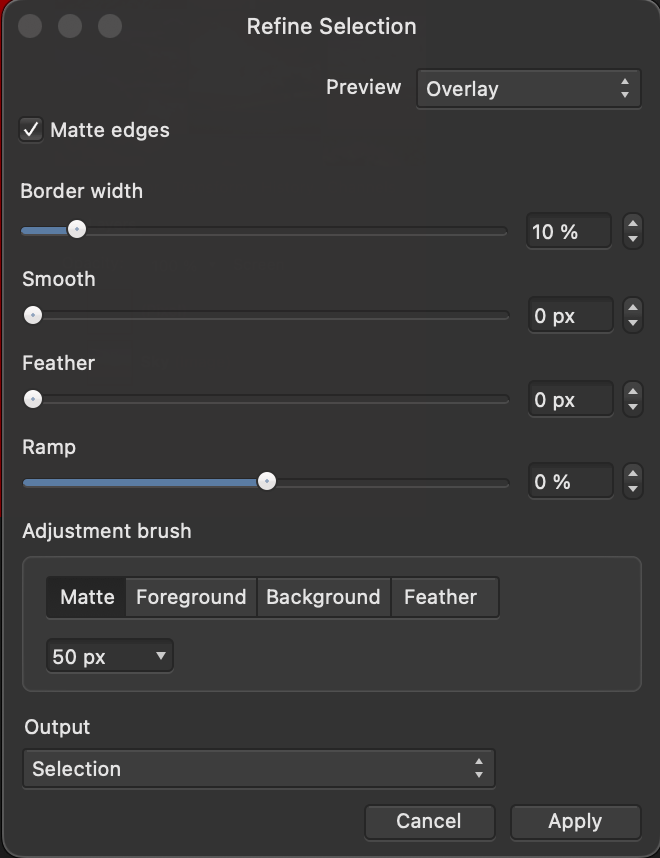
To refine your selection, click on ‘Refine…’ from the Context Toolbar. The Foreground and Background are the two settings you should focus on. Paint over the areas you want to refine and Affinity Photo will automatically update the selection. When you’re happy with your refinement, click on ‘Apply’.
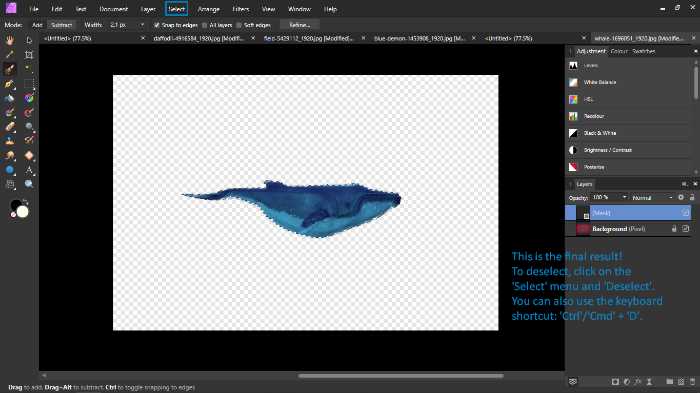
Now that you have your selection, it’s time to remove the background. To do so, click on the ‘Delete’ key on your keyboard. The background will become transparent, and you can see the checkerboard pattern that indicates transparency.
To remove the selection, simply click on the ‘Select’ menu and ‘Deselect’ or press ‘Ctrl’ (Windows) or ‘Cmd’ (Mac) + ‘D’ on your keyboard.
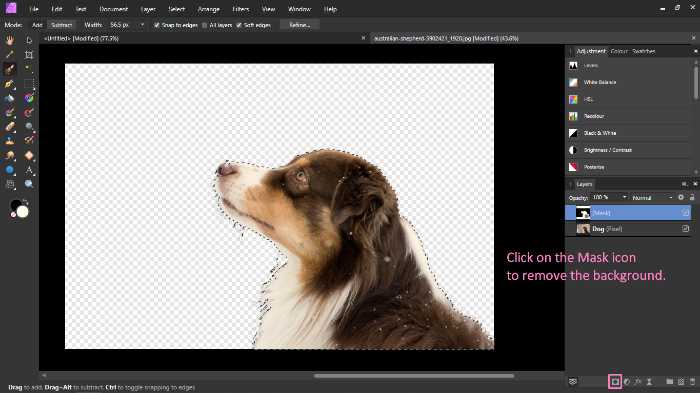
Another way would be to invert the selection by clicking on the ‘Select’ menu and then ‘Invert Pixel Selection’ or ‘Ctrl’ (Windows) or ‘Cmd’ (Mac) + ‘Shift’ + ‘I’. The selection will be inverted, and everything except the area you selected will be selected.
Then, click on the ‘Mask’ icon from the Layers Panel or click on the ‘Layer’ menu and ‘New Mask Layer‘. The areas you selected will be masked, and the background will become transparent. To deselect, click on the ‘Select’ menu and ‘Deselect’ or press ‘Ctrl’ (Windows) or ‘Cmd’ (Mac) + ‘D’ on your keyboard.
Background Erase Brush tool in Affinity Photo (E) (Destructive)
The Background Erase Brush tool is another way to remove a background. This is best used when the background is a solid colour. This is because this tool removes pixels having a similar colour. Note that if the background is not a solid colour, it will be more difficult to remove.
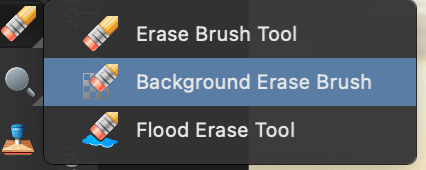
This tool can be found in the toolbar on the left side of the screen, and its icon is recognizable because it looks like a pencil with a chequered square in the background. The keyboard shortcut to access this tool is ‘W’. When you select this tool, you can adjust the settings in the Context Toolbar.
One setting you should mainly focus on is the Tolerance setting. ‘Tolerance’ determines how similar the colours must be for the tool to remove them. The higher the tolerance, the more colours will be removed. The lower the tolerance, the more precise the tool will be.
The ‘Sample continuously’ setting allows you to determine how Affinity Photo samples the colours. ‘Contiguous’ will take a sample of the colour as you move your brush.
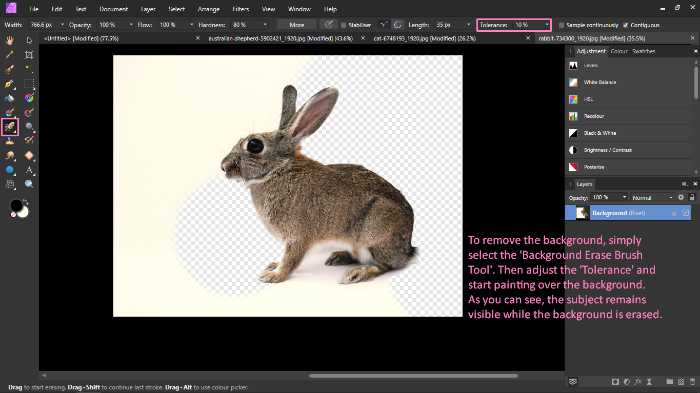
To use this tool, open the image you want to remove the background from. Simply select the tool from the toolbar and start painting over the background. Keep in mind that this is a destructive method.
Affinity Photo will automatically remove the pixels with a similar colour. If you make a mistake, you can use the ‘Undo’ function or press ‘Ctrl’ (Windows) or ‘Cmd’ (Mac) + ‘Z’.
Flood Select Tool in Affinity Photo (W)
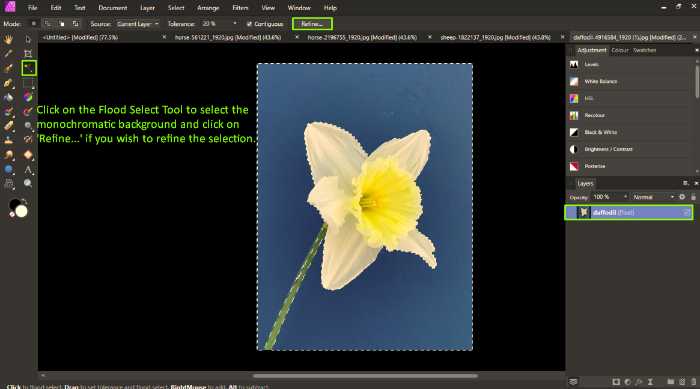
The Flood Select tool is used to select large areas of solid colour. This tool allows you to click on an area and Affinity Photo will automatically select all the pixels with a similar colour. This can be useful if the background you want to remove is a solid colour.
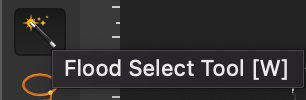
This tool can be found in the toolbar on the left side of the screen, and its icon is recognizable because it looks like a magic wand. The keyboard shortcut to access this tool is ‘W‘. Simply click and paint over the area of solid colour that you want to remove. Affinity Photo will automatically select all areas of similar colour and remove the background.
The contextual toolbar also has a few settings that can be adjusted. The ‘Tolerance’ setting, as with the Background Erase Brush tool, determines how similar the colours must be for Affinity Photo to select them. The higher the tolerance, the more colours will be selected. The lower the tolerance, the more precise Affinity Photo will be.
Similarly to the Selection Brush Tool, the ‘Refine…’ setting of the Flood Select tool allows you to refine your selection by painting over the areas you want to include or exclude. From the Mode setting, you can add or subtract areas from the selection. Holding the ‘Alt’ key (Windows) or ‘Opt’ key (Mac) and painting will exclude the areas you paint over from the selection.
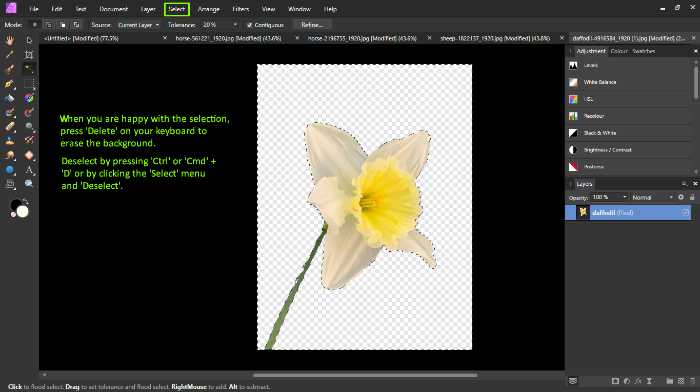
When you’re happy with your selection, simply press ‘Delete’ on your keyboard to remove the background.
Another way would be Create a Mask. Invert the selection by clicking on the ‘Select’ menu and then ‘Invert Pixel Selection’ or ‘Ctrl’ (Windows) or ‘Cmd’ (Mac) + ‘Shift’ + ‘I’. Then, click on the ‘Mask’ icon from the Layers Panel or click on the ‘Layer’ menu and ‘New Mask Layer’.
The areas you selected will be masked, and the background will become transparent. To deselect, click on the ‘Select’ menu and ‘Deselect’ or press ‘Ctrl’ (Windows) or ‘Cmd’ (Mac) + ‘D’.
Pen tool in Affinity Photo (P)
The Pen Tool can also be used to remove backgrounds in Affinity Photo. This tool is used to create a path around the object you want to keep and Affinity Photo will remove everything outside of that path.
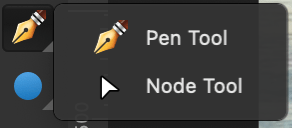
The Pen Tool can be found in the toolbar on the left side of the screen, and its icon is a pen. The keyboard shortcut for this tool is ‘P’.
To use the Pen Tool, simply click around the object you want to keep. Affinity Photo will create a path around that object. If you make a mistake, you can press ‘Ctrl’ (Windows) or ‘Cmd’ (Mac) + ‘Z’ to undo.
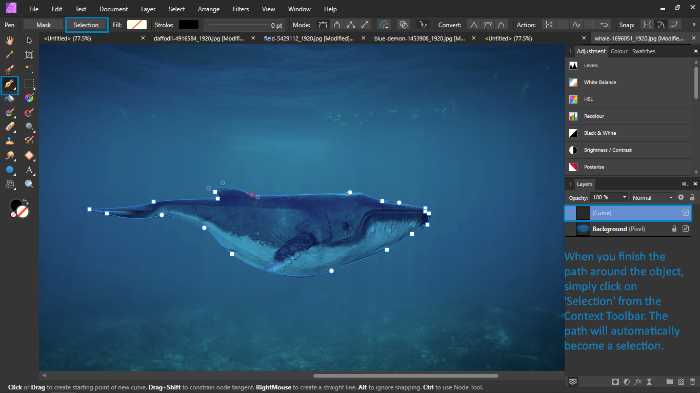
To close the path, hover over the first point you created with the Pen Tool and click on it. After you’ve closed the path and you have perfected it using the Node Tool, simply click on ‘Selection’ from the Context Toolbar. You will notice that the path has automatically been transformed into a selection.
If you’re not happy with the result, you can always adjust the path by using the Selection Brush Tool to add or remove areas. You can also refine the selection by clicking on ‘Refine…’ in the Context Toolbar.
To remove the background, click on the ‘Mask’ icon from the Layers Panel or click on the ‘Layer’ menu and ‘New Mask Layer’. Affinity Photo will automatically mask the area inside the path and remove the background. To deselect, click on the ‘Select’ menu and ‘Deselect’ or press ‘Ctrl’ (Windows) or ‘Cmd’ (Mac) + ‘D’.
Replacing the background
Replacing a background in Affinity Photo is super easy and there are a few ways you can do it. First, you have to remove the background using of the methods we’ve described above. Then, simply follow these steps:
The first way is to use the ‘Flood Fill Tool’. This tool can be found in the toolbar on the left side of the screen, and its icon is a paint bucket. The keyboard shortcut for this tool is ‘G’. This tool is used to fill the background with a solid colour.
To use the Flood Fill Tool, simply click on the area you want to fill. Affinity Photo will automatically fill that area with the chosen colour. If you make a mistake, you can press ‘Ctrl’ (Windows) or ‘Cmd’ (Mac) + ‘Z’.
You can also use an image as a background. To do this, simply open the image you want to use by clicking on the ‘File’ menu and ‘Open…’. Then, copy or cut the image by clicking on ‘Edit’ and ‘Copy’ or ‘Cut’.
After you’ve copied or cut the image, go back to the image with the background you have removed and paste the new background by clicking on the ‘Edit’ menu and ‘Paste’ or by pressing ‘Ctrl’ (Windows) or ‘Cmd’ (Mac) + ‘V’ on your keyboard . Affinity Photo will automatically create a new layer with the image.
You can use this image as the background by dragging the layer below the layer with the object you’ve removed the background from. You can also change the blending mode or opacity of this layer to get different results.
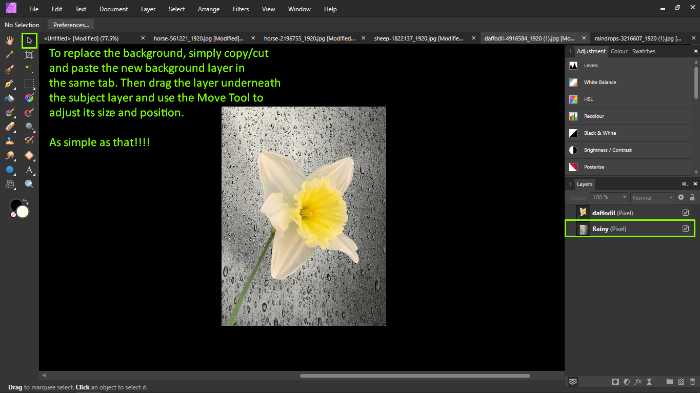
To change the position of the images, click on the ‘Move Tool‘. This tool is found in the toolbar on the left side of the screen, and its icon is an arrow. The keyboard shortcut for this tool is ‘V’. This tool is used to move the selected layer.
To use the Move Tool, simply click and drag the image to the desired position. Affinity Photo will automatically move that layer. To resize the image, simply click on the corner of the image and drag it in or out. Affinity Photo will automatically resize that layer.
Make sure you put the new background behind the layer you just masked! (In the layers panel)
Websites which remove the backgrounds without Affinity or Photoshop (Free)
There are multiple ways to do this but we recommend 2:
- Pixlr – Removes background in a good way but sometimes it doesn’t hit the mark
- Remove.bg – Does a very good job at cutting out objects, however, the free version outputs a low res image.
We are not affiliates with them, we just think they are good free alternatives.
Expert Rating
Summary
For beginners this might be a difficult technique as it incorporates multiple advanced techniques to go with it. Takes average practice time with decent scale & functionality for the future.
Conclusion
And that’s it! As you can see, there are a few different ways to remove or replace backgrounds in Affinity Photo. We hope you found this guide helpful.
Experiment with each method to see which one works best for you and the project you’re working on. With a little practice, you’ll be able to remove or replace backgrounds like a pro!
Thanks for reading & feel free to check out more of our articles!


