
Does your video footage look blurry or lack the sharpness you want? That’s where video sharpening and removing haze in Davinci Resolve can help.
Video sharpening and removing haze can improve the clarity and sharpness of your whole footage or just a part of it, like the face or the eyes.
In this step-by-step guide, we will cover effective and practical tools and techniques available in Davinci Resolve, which will help you dehaze and sharpen your videos and add a bit of crispiness to enhance the quality of your videos.
Remove Haze In Davinci Resolve
There are multiple ways to remove haze from your videos and add some more clarity to make them professional. Some of them only work in the studio version of Davinci Resolve. But we will also cover the ones that work in the free version of Davinci Resolve.
There are two main ways to remove Haze:
- Using curves to add contrast
- Dehaze Effect (studio version)
We will cover all of the above methods in detail.
Removing Haze In Davinci Resolve With Curves
The first method to remove haze in Davinci Resolve is through curves, and the best part is it can be used in the free version of the Davinci Resolve first.
How it works is you create an S curve to remove the haze.
This is the step-by-step process of removing Haze with the curves tool:
- Go to the color page and select the clip you want to dehaze.
- Then go to the curves panel present in the middle menu of the color page in Davinci Resolve.
- Locate the panel and click on the “Curves” button. This will open up the curves panel.
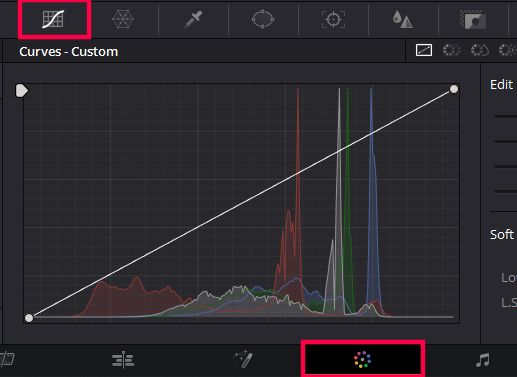
- In the curves panel, you will see a graph with a diagonal line running from the bottom-left to the top-right corner. This represents the current state of the image’s tonal range.
- We’ll create an S curve by adjusting the points on the curve line to remove haze.
- Click on the curve line to add control points. Add one control point towards the bottom-left of the graph and another towards the top-right.
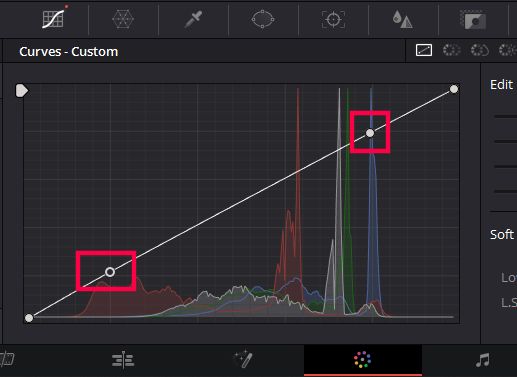
- Once you have added the control points, adjust their positions to create an S shape. (see the reference image)
- The control point at the bottom-left will bring down the shadows, while the one at the top-right will lift the highlights. This contrast adjustment will help in removing the haze.
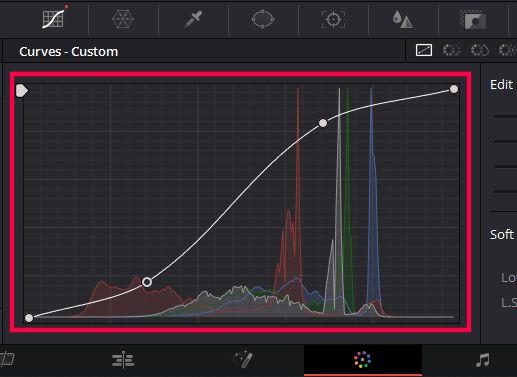
- You can add additional control points if needed but try to keep the curve as simple as possible for natural-looking results.
- While adjusting the curve, keep an eye on the image preview to see the changes in real time.
- You can also toggle the “Before/After” button in the viewer to compare the original and modified versions.
- Once you are satisfied with the dehaze effect, you can refine the video clip using other color tools like contrast, saturation, or white balance, if needed.
Keep things subtle. Going too far can make the footage look fake, and that is something no content creator or editor wants.
Removing Haze In Davinci Resolve With Dehaza Effect
This method can only be used if you have the studio version of Davinci Resolve. Otherwise, you can use the above method, which is available in Davinci Resolve’s free version.
- Go to the color or edit page and search for the dehaze effect. We will apply it on the color page.
- Apply the dehaze effect on the clip by dragging and dropping it on the node.

- Now go to the settings tab.
You will find all the settings you can adjust to remove the haze.
- With the Haze strength slider, you can adjust how much haze you want to remove.
- Display depth will show a depth map of the haze.
- You can also choose the color of the haze to tell Davinci Resolve what color to look for when removing the haze.
- Then you can adjust the shadow and highlight values to decide how much haze you want to remove from dark and brighter parts of the image.
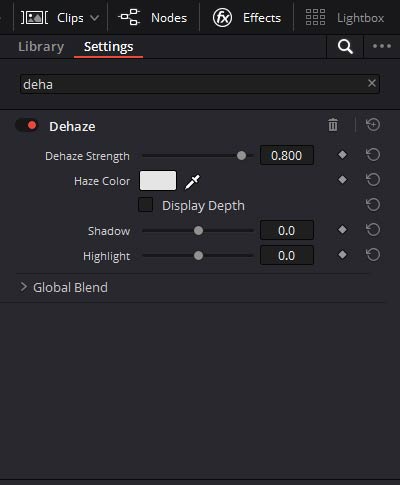
Keep things as subtle as possible otherwise, it can make the footage look fake and artificial. Remember that subtlety is the key when removing haze in Davinci Resolve.
Sharpen Video In Davinci Resolve
The following two methods can help you sharpen your footage if you have a blurry video or want to make it clearer.
The two ways to sharpen the footage are:
- Blur tab on the Color Page
- Sharpen effect in the effects tab.
Sharpen the Video on The Color Page
Now, let’s move on to the process of sharpening your video.
Go to the color page and Look for the ‘Blur’ section in the panel, which is represented by a teardrop and a triangle icon. This is where you can make the necessary changes to sharpen your video.

In this section, you will find an option called ‘Radius,’ which is the key when adding sharpening to your video.
- By dragging the Radius slider down, you can increase the sharpness of your video.
- We usually recommend a Radius value of around 0.40 but feel free to try different values and see what works best for your video.

It’s important to note that if you reduce the Radius too much, your video might become overly sharp and look unnatural. On the other hand, increasing the Radius will make the video appear softer.
Coring softness
This will soften the sharpened edges and will remove any harsh edges you may get after applying the sharpening.
Level
This will decide how much effect you want sharpening to have on your video. Adjust it according to the needs of your video.
That’s it! You have now successfully sharpened your video using DaVinci Resolve, making it more crisp and professional. This method is effective and easy to apply to multiple video clips if needed.
Sharpen Video With Sharpen Effect
This also required you to have the studio version of the Davinci Resolve. If you dont have it, use the method above, as it has more controls for getting professional results.
- Go to the edit page and search for Sharpen effect.
- Drag and drop it on the desired clip.
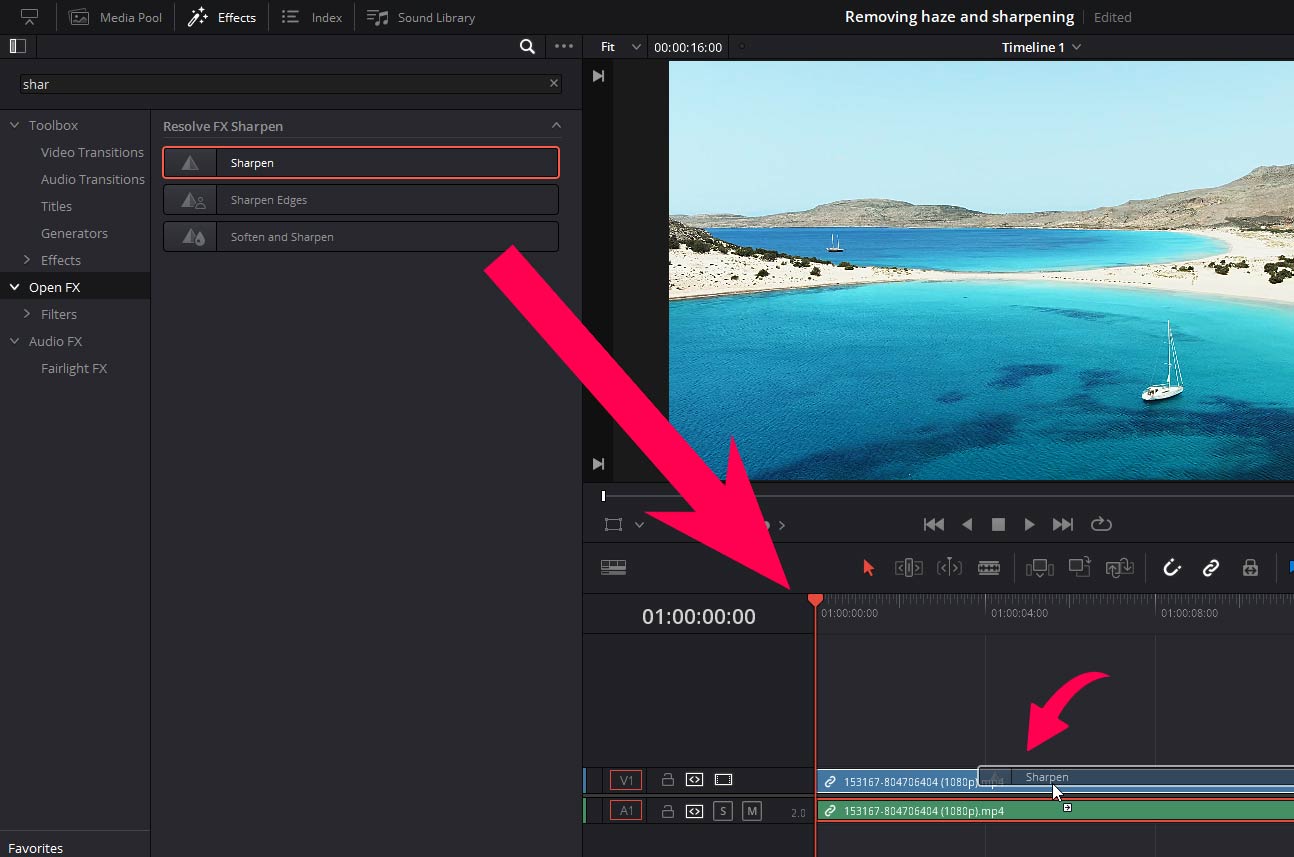
You will get different sliders; the most important one is the “Sharpen amount.”
- Drag the slider towards the right side to increase the sharpening amount.
Use the “Detail Levels” section to target different areas of the footage, like fine, medium, and large details.
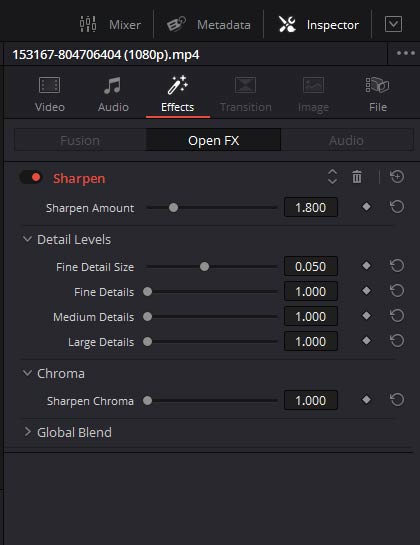
Play around and find the best settings that work well for your video.
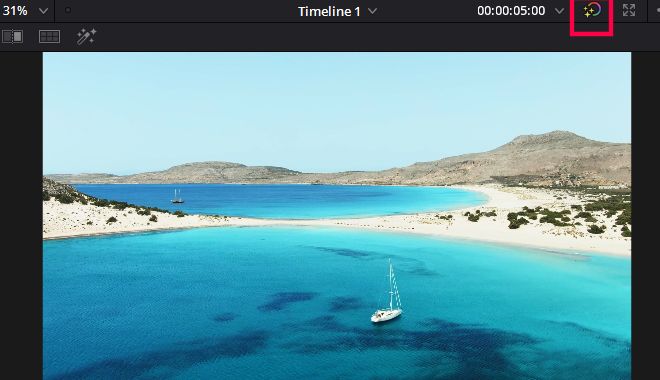
Before and After
This is the result after removing the haze and adding the sharpening.

Conclusion
It can be frustrating if you have a blurry or hazy video, but the good thing is there are solutions available, which we have covered in the above guide.
The first method to remove haze is to use the curves tool on the color page. The process is very simple, you need to create the s curve to boost the contrast of the video and play a little bit with shadow and highlight values, and you will get clear video footage after a bit of hard work with the curves tool.
The second method is the Dehaze effect which requires you to have the studio version of Davinci Resolve. After applying the effect, adjust the sliders available to remove the haze.
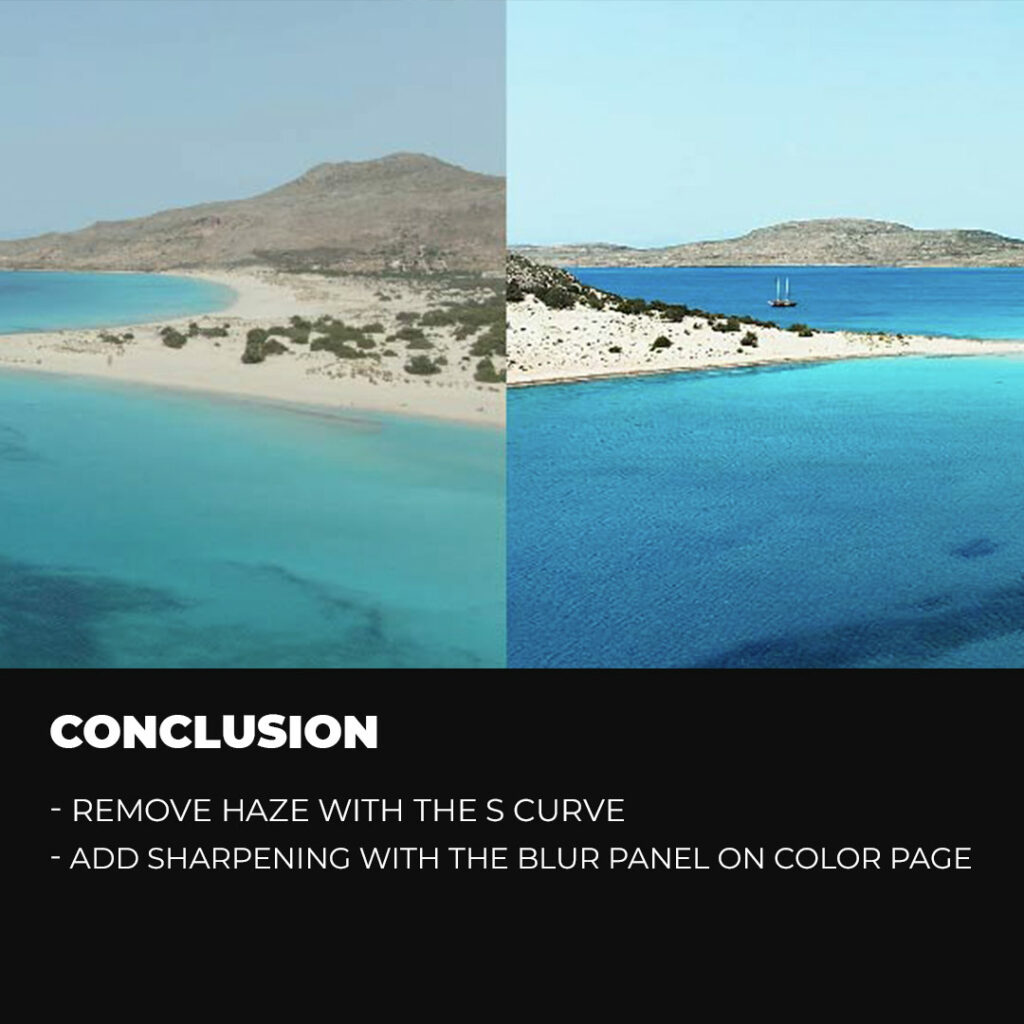
To sharpen the footage, you can use the blur panel on the color page of Davinci Resolve and adjust the slider value to 0.45 or whatever works best for your video.
You can also use the sharpen effect, but if you have a studio version, then you can use it.
We have covered both free and paid methods to remove haze and add sharpening to your videos. The free methods are more than enough to get the desired results, but if you have the paid version of the software, there is no shame in trying the paid tools.
Thanks for reading & feel free to check out more of our articles!
Expert Rating
Summary
Removing haze and adding sharpening in DaVinci Resolve requires some practice to become proficient, but it is a powerful and functional tool that offers scalability for various projects and workflows. With dedication and hands-on experience, you can master these techniques and achieve professional results in your videos.


