How To Draw A Softball Helmet | Simple And Effective
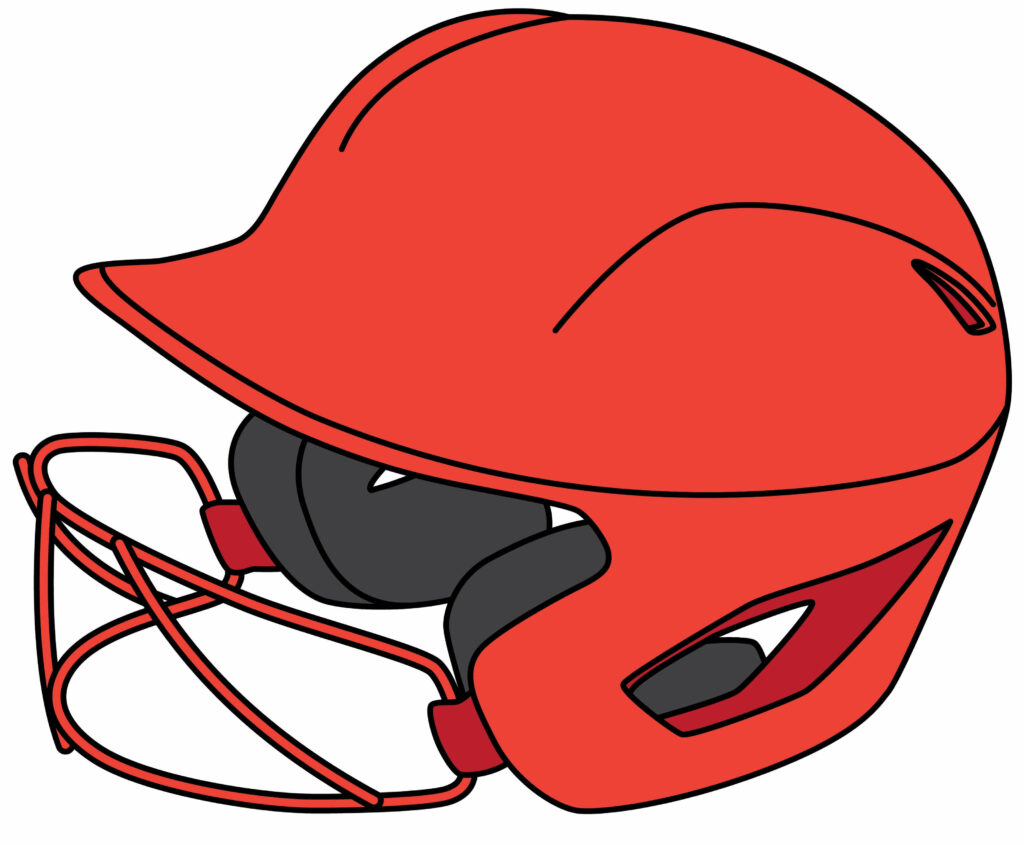
Baseball and softball are two of the most popular summer sports. An essential piece of gear for any player is a well-designed protective helmet. A softball helmet is a crucial piece of protective equipment worn by softball players. It safeguards the player’s head from potential impact, particularly during batting and fielding. Softball helmets typically consist of a hard outer shell made from materials like high-impact plastic or composite materials. This shell provides structural integrity and absorbs and disperses energy upon impact.
Inside the helmet is a cushioning or padding system made of foam or similar materials. This padding helps absorb shock and provides a comfortable fit for the player. Softball helmets also feature an adjustable chin strap to secure the helmet in place during play.
| Steps | Complexity level |
| Draw the shell | 3 |
| Draw the jaw guard | 3 |
| Draw the ventilation | 4 |
| Draw the face guard | 3 |
What You Will Need
- Paper
- Pencil
- Eraser
- Colors
How to Draw a Softball Helmet
Learning to draw a softball helmet is fun for sports fans and great drawing practice. In this tutorial, we’ll break down the process of illustrating a softball helmet step-by-step. With just a pencil, eraser, and paper, you’ll be able to craft a detailed helmet ready for artistic extra innings.
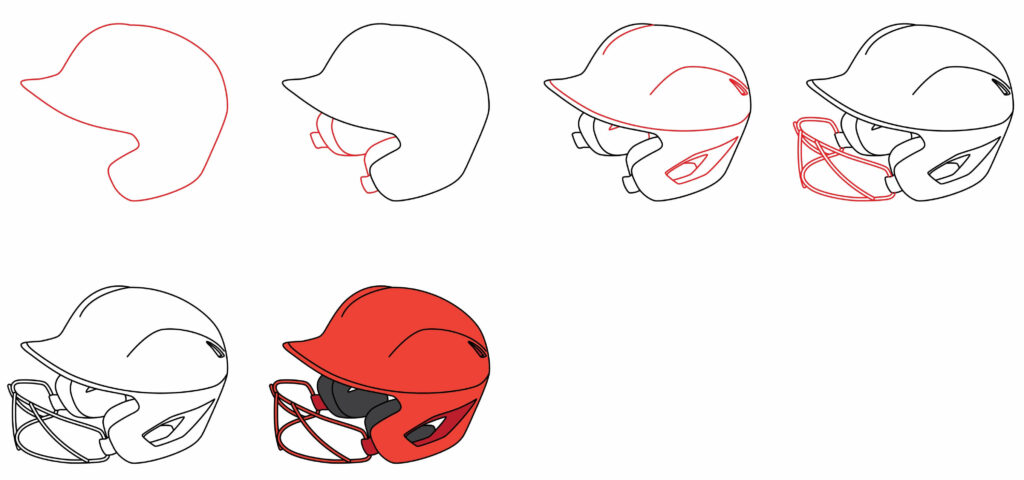
Step 1: Draw the shell
To begin, lightly sketch the outer shell of the softball helmet in the center of your paper. Start with an oval or egg shape for the main dome of the helmet.
Then, draw another oval inside that is a little smaller to represent the padding lining the inner shell. Draw gently at first as you map out the overall form.

Finish the shell by adding curved lines for the ear flaps on each side. Pay attention to the proportions to capture the iconic softball helmet shape. Once you have the basic outline mapped out, you can refine the contours in the next steps.
- Start with an oval shape for the main outer helmet shell
- Add a slightly smaller oval inside for padding
- Include curved lines on the sides for ear flap shape
- Lightly sketch basic proportions first
Step 2: Draw the jaw guard
The next key feature to add is the jaw guard portion under the front of the helmet. This is what protects the player’s face. Lightly sketch a U-shape that extends down from the bottom of the main helmet shell. Then, draw another U-shape inside of it to define the chin cup area.
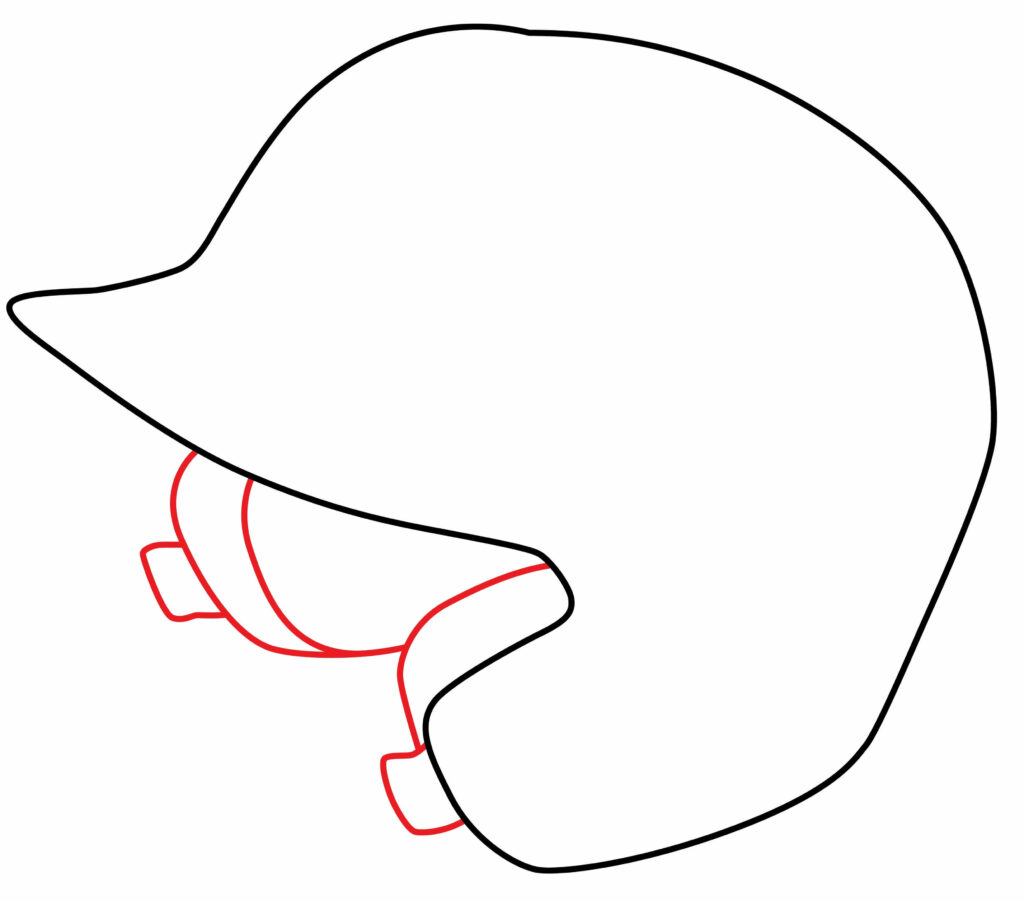
Add some small lines indicating the ventilation perforations along the jaw guard. This allows for breathability. Finally, draw curved lines connecting the jaw guard area to the sides of the earflaps. Take care to get the proportions accurate. With the jaw protection section done, your softball helmet outline is really taking shape!
- Sketch the outer U-shape of the jaw guard area
- Add another U-shape inside for the chin cup
- Include ventilation perforation lines
- Connect jaw guard to earflap sides
Step 3: Draw the Ventilation
An important functional feature of a softball helmet is the ventilation system. This allows airflow to keep the player’s head cool. To draw this, add a grid-like pattern of lines along the top and sides of the outer helmet shell. Space the lines evenly to represent the ventilation perforations or holes.
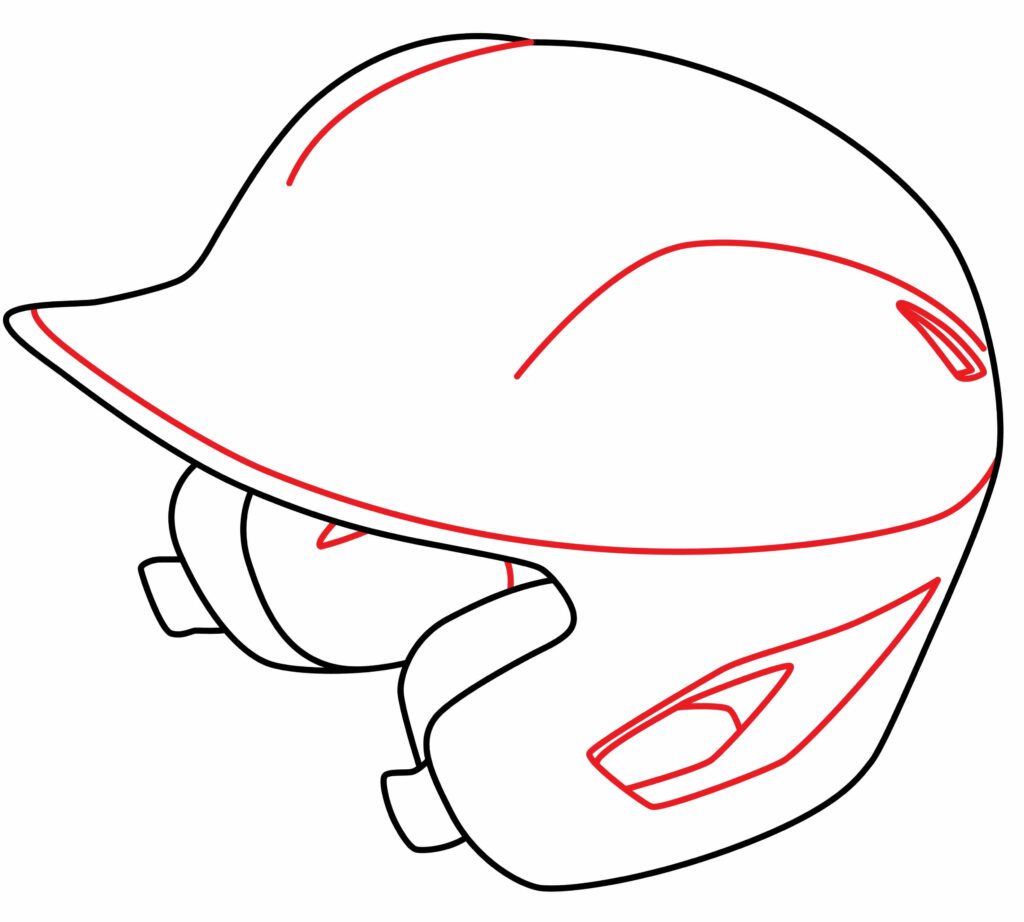
Make the ventilation lines follow the contour of the curved helmet surface. Add varying lengths and thicknesses for realistic variety. Finer details like this add to the realism and dimension of your softball helmet drawing. Take your time making the ventilation pattern look evenly spaced and proportional.
- Add a grid of lines for ventilation perforations
- Space lines evenly along the top and sides
- Follow the curvature of the helmet surface
- Vary line lengths and thicknesses
- Brings realism through precise details
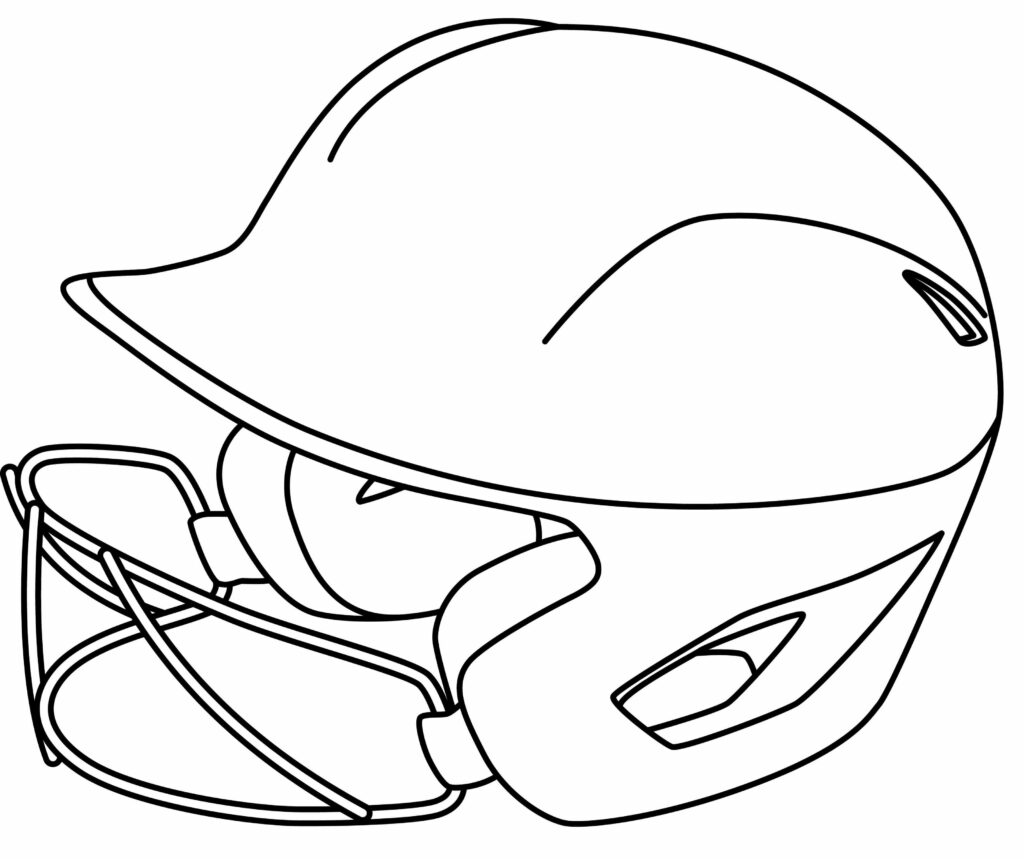
Step 4: Draw the face guard
Now tackle the face guard portion, which protects the player’s face. This area requires careful line work. Use straight lines to sketch out the crisscross pattern of the metal face guard bars. They should angle diagonally down from the sides to the chin cup area.
Try to space the bars evenly. Making them get slightly closer together as they converge at the chin guard creates depth. Connect the ends of the face guard bars to the edge of the helmet shell with short perpendicular lines for support. Take your time on this step to practice drawing straight lines at precise angles. The face guard adds important visual interest!

- Use straight lines for crisscross face guard bars
- Bars angle down diagonally from sides to chin cup
- Space bars evenly, closer to the chin cup
- Connect ends of bars with short perpendicular lines
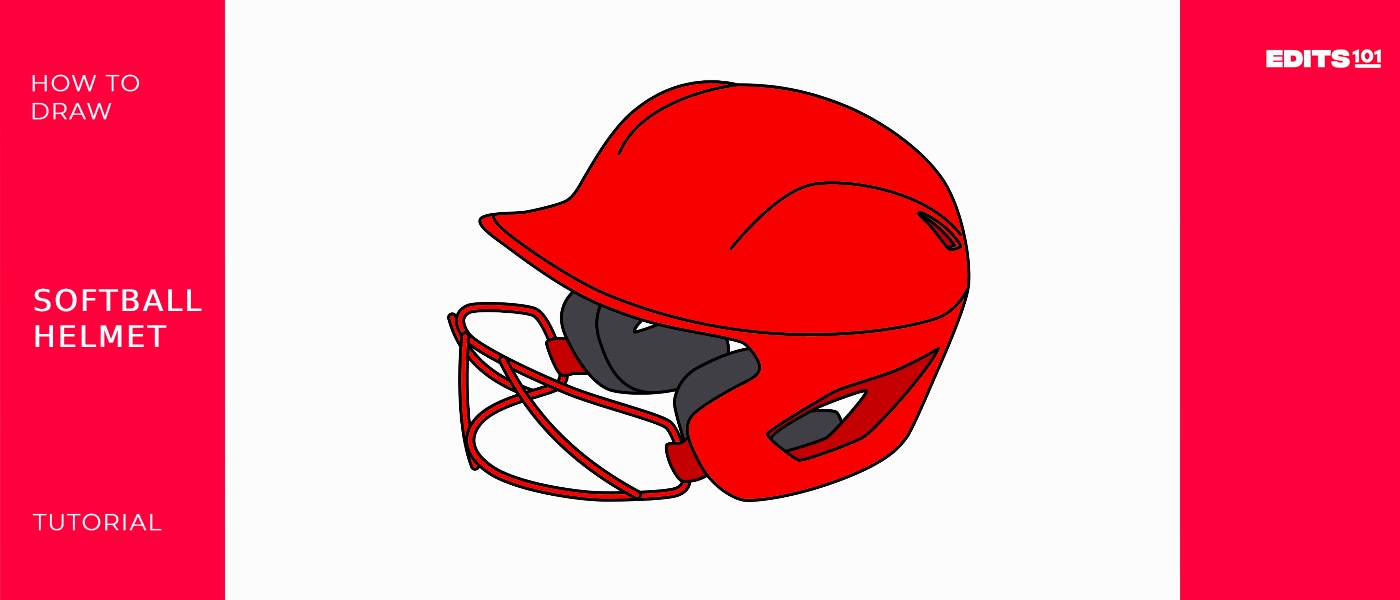
Step 5: The softball helmet is ready
Great job! The softball helmet is ready to be used in a match. You did an excellent job creating it, and we’re sure you followed every instruction. To make the drawing stand out, you can outline it with a marker. To improve the appearance, we will remove the pencil marks after tracing.
The actual fun is about to start. We are going to improve and add authenticity to our drawing. Can you produce a more refined picture with your creativity and imagination?
Taking your Softball helmet drawing to the next level
Like any other skill, sketching requires practice. Set aside time each day to sketch, even if it’s only for a little while. Be mindful of your surroundings. This enhances comprehension of details, dimensions, and forms. You can start with the basics and work up to more complex topics. Experiment with different drawing tools like charcoal, colored pencils, watercolors, markers, and pencils. Every medium has unique characteristics that could help you identify your preferences.
You can also play with basic hatching, blending, shading, and cross-hatching techniques. Understanding these techniques will greatly enhance the complexity and realism of your drawings. When you’re drawing, use your imagination and try out new concepts.
Adding a Background
The background of your softball helmet drawing provides context and visual interest. Start by choosing an appropriate scene like a baseball field, dugout, or locker room. Sketch out simple horizon lines to establish perspective. For a field, draw the edge of the grass and some baseline texturing. In a dugout, add wooden benches and the cage framing. In a locker room, include lockers, towels, and equipment bags to set the scene.
You can also just hint at the environment by adding selective details like a corner of a chainlink fence, a few blades of grass, or glimpses of other equipment. Try different angles, like a worms-eye view from ground level, looking up at the helmet placed on a bench. Keep the background graceful and balanced to elevate the main subject without distraction.
Adding Color
Color brings vibrancy and realism to your softball helmet drawing. Carefully observe color patterns and shades on actual helmet designs for reference. Use a darker tone for the main outer shell, adding dimension with lighter accents. Color the vents and perforations in a contrasting tone from the shell. The face guard often has a metallic shine, so use reflective colors like silver, gold, or gunmetal. Any decals or text should pop clearly against the base color.
Don’t forget small details like making the chinstrap a deep leather brown with metal buckles. Add depth by using lighter shades on protruding elements and darker shades in recessed areas. Vary the tone and intensity of your palette for a more natural, nuanced look. Lay down smooth base colors first, then increase contrast and detail in additional layers. Creative color use makes your sports art more vivid and engaging.
Bonus tips
Take your softball helmet illustration to the next level with techniques like adding glossy surface textures, scuffs for wear and tear, precise details from photo reference, and fun accessories like decals or visors. Get creative with more dynamic angles like 3/4 or profile views instead of just side and front. Draw the helmet on a player in an active scene to provide engrossing context and scale. Play with lighting effects like shadows or sun glare to increase visual drama. Enhance form and realism through shading techniques like crosshatching, blending, and stippling. Throughout the process, focus on practicing clean line work for crisp, polished edges. With artistic nuances like varied textures, accessories, contexts, angles and lighting, your softball helmet drawing can go from good to great.
Conclusion
If you’ve followed the step-by-step process in this tutorial, you now have the artistic skills to draw your unique softball helmet. We started with basic shapes, built up key features like the ventilation and face guard, and then brought it to life with color and scene details. Drawing sports objects like this improves your technical ability while allowing creativity.

Thanks for reading & feel free to check out more of our articles!
Author Rating
Overall Rating
Summary
This guide explain how to draw a softball helmet that is used a protective gear during softball game.