How to Draw a 3D Boxing Ring | In 7 Easy Steps
Today, we’re stepping into the world of boxing with an informative step-by-step tutorial on how to draw a 3D boxing ring. Are you ready to get started?
Boxing rings have been a key component of boxing matches for centuries. The invention of the modern boxing ring is often attributed to Jack Broughton, an English bare-knuckle fighter, who introduced the concept in the mid-18th century.
Initially, these rings were simply marked out areas on the ground where boxers would engage in matches. Over time, as the sport became more organized and regulated, the design of boxing rings evolved to include ropes and elevated platforms to ensure fairness and safety for boxers.
In this tutorial, we’re going to cover all you need to know in order to draw your very own boxing ring in 7 easy steps.
| Steps | Complexity Level |
| The Platform | 2 |
| The Corner Bars | 3 |
| The Rope Posts | 4 |
| The Ropes | 3 |
| The Corner Pads | 3 |
What You Will Need
- Drawing paper
- Pencils (2b, 3b or 5b)
- An eraser
- A ruler
- Colored pencils or markers
- 30-35 minutes
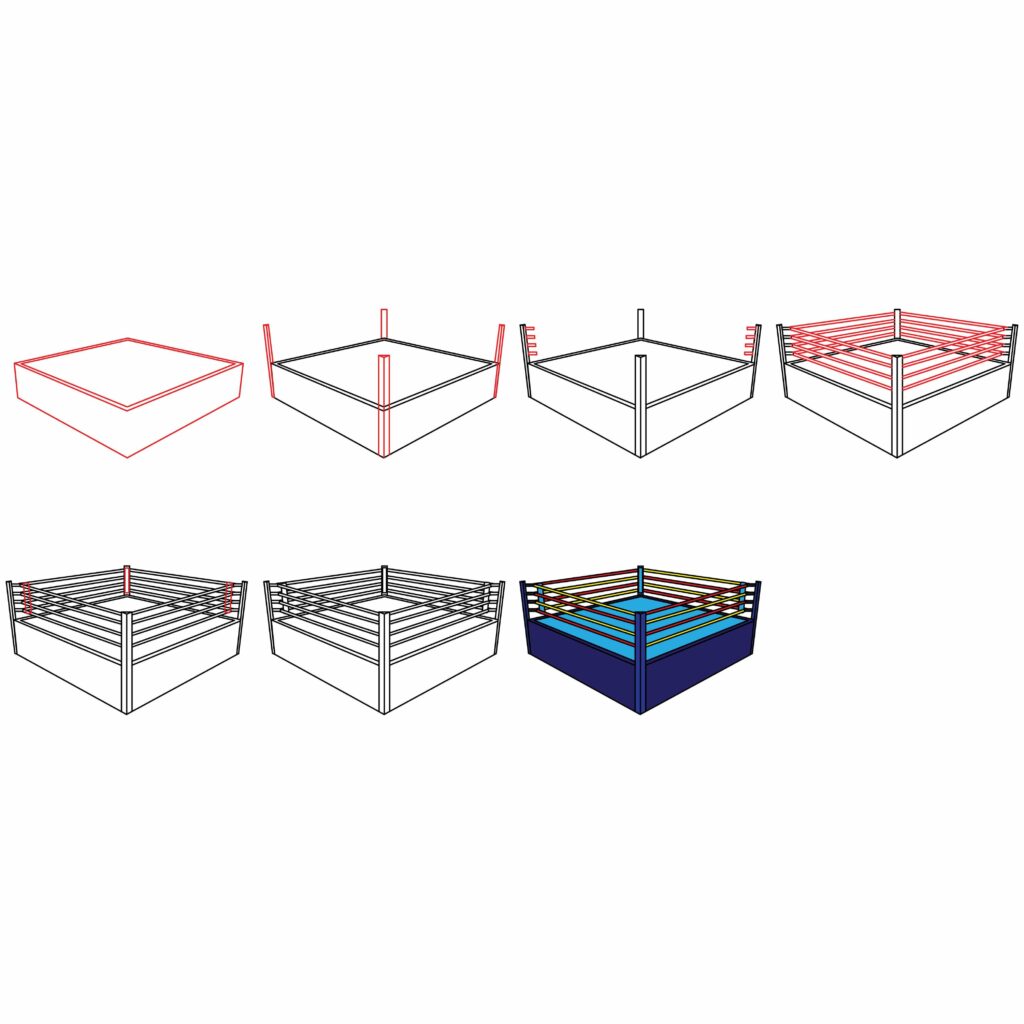
How to Draw a Boxing Ring
Drawing a 3D boxing ring can be quite challenging due to the complex shape and perspective involved. However, with patience and attention to detail, it is definitely achievable.
In this tutorial, we’re going to start by sketching out the basic shapes such as the platform, corner bars and rope pads. We’re then going to gradually add in more intricate details like the ropes and corner pads as we progress.
Make sure you have all of the required drawing tools handy, check out the outline below to prepare yourself for each upcoming step, and without any further ado, jump right in!
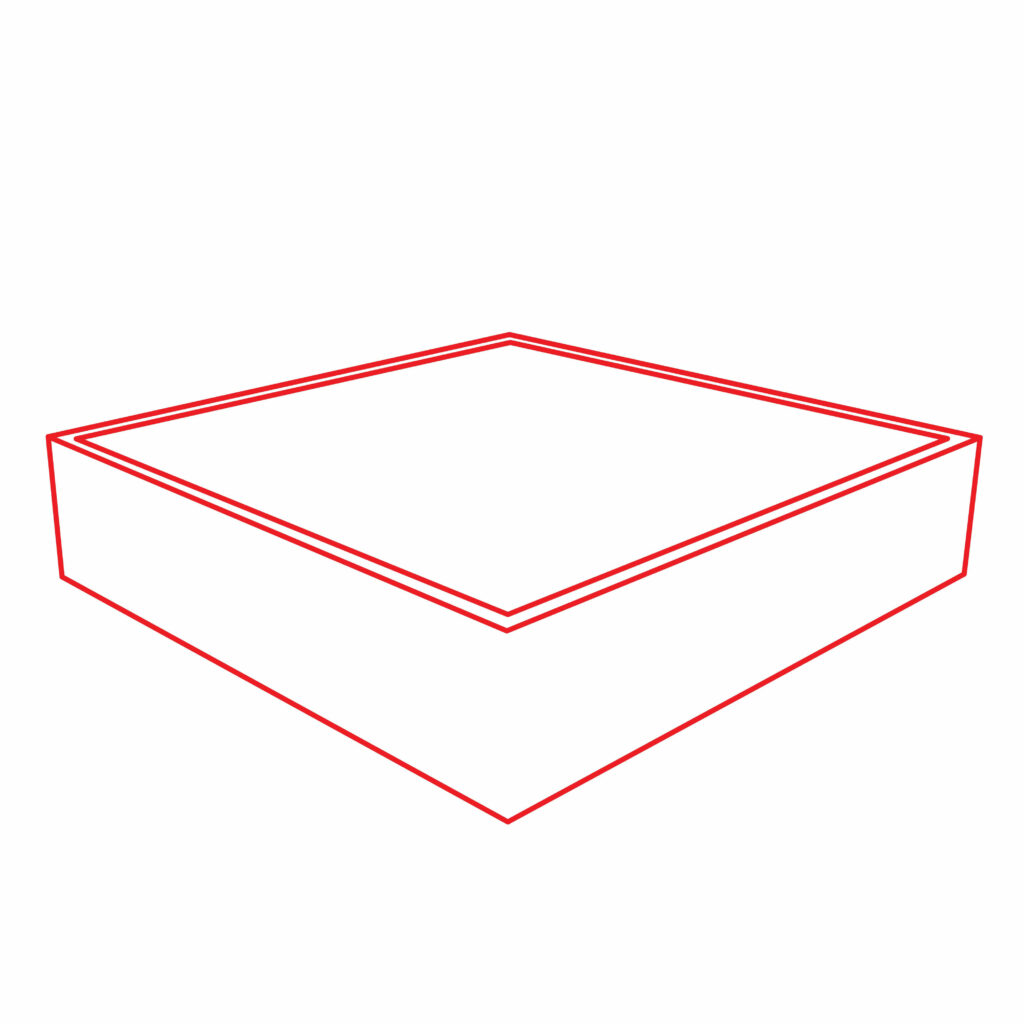
Step 1: Draw the Platform
Boxing ring platforms are a raised and enclosed area that ensures a safe and regulated environment for boxers to compete in. It’s the foundation of the boxing ring, thus we’re starting off our drawing with this step.
First, using your ruler, start by drawing a large diamond shape in the lower center of your drawing paper to leave room for the upper part of the ring. Then, draw a small vertical line extending downward starting from each pointy side of the diamond.
Once complete, draw two diagonal lines starting from the bottom of each line you just completed, and connect them together in a shape that resembles a wide “V”. All of these shapes placed together ought to represent a large cube. Pay attention to the proportions of the cube and ensure the width is not too thick.
- Start by drawing a large cube in the center of your page
- Ensure the width of your cube is not too thick
- Draw a diamond shape within the upper cube’s surface along the border
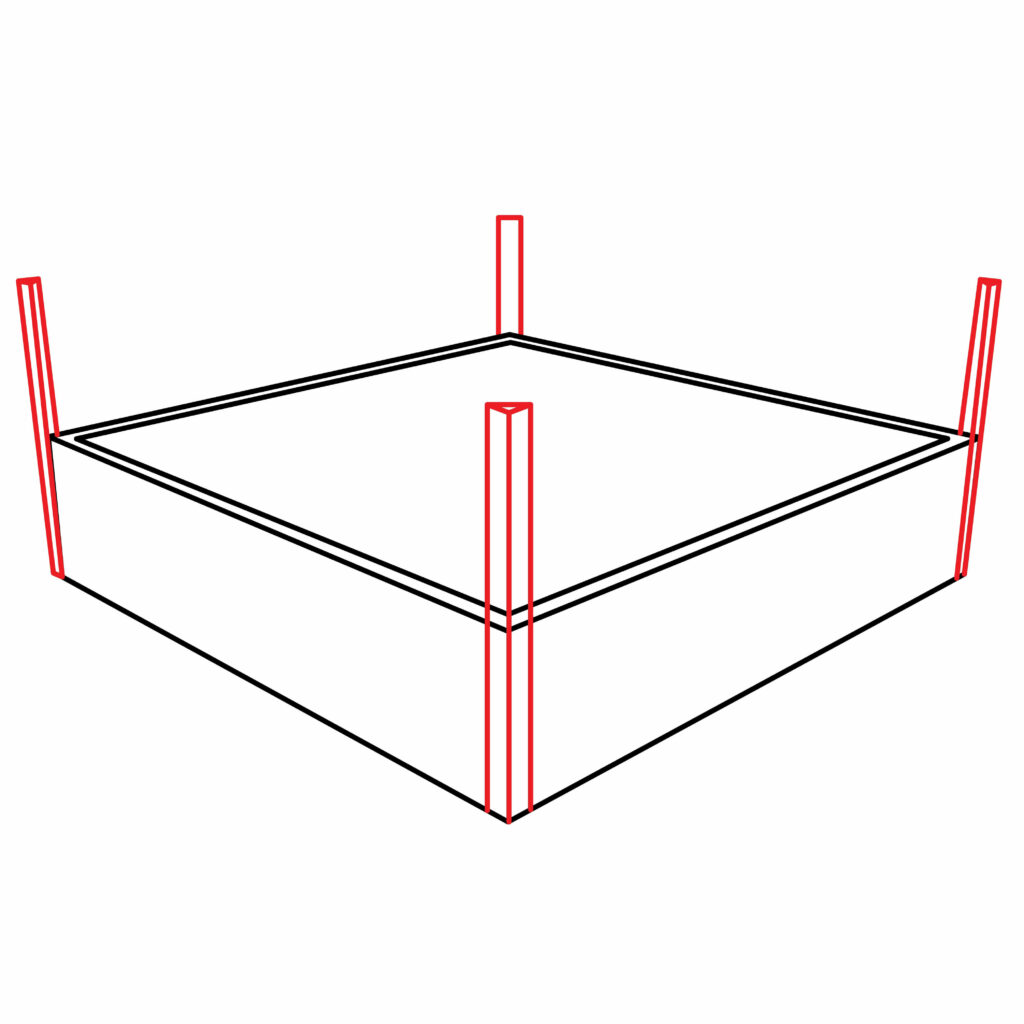
Step 2: Draw the Corner Bars
The corner bars are upright posts at each corner of the boxing ring, intent on supporting the corner pads which you will add later on.
For now, complete this step by drawing four vertical rectangles at each upper corner of the platform established in step one.
For the three corners in front, ensure they cover the bottom length of the cube and a space above, as well. Then add a vertical line within all three rectangles to gain a three-dimensional effect.
Lastly, add the fourth corner bar above the back-center’s corner by drawing a smaller vertical rectangle on the cube’s point.
- Draw four vertical rectangles against each corner of the cube
- Add a vertical line within the front facing and side rectangles
- Ensure the center-back rectangle is shorter than the other three
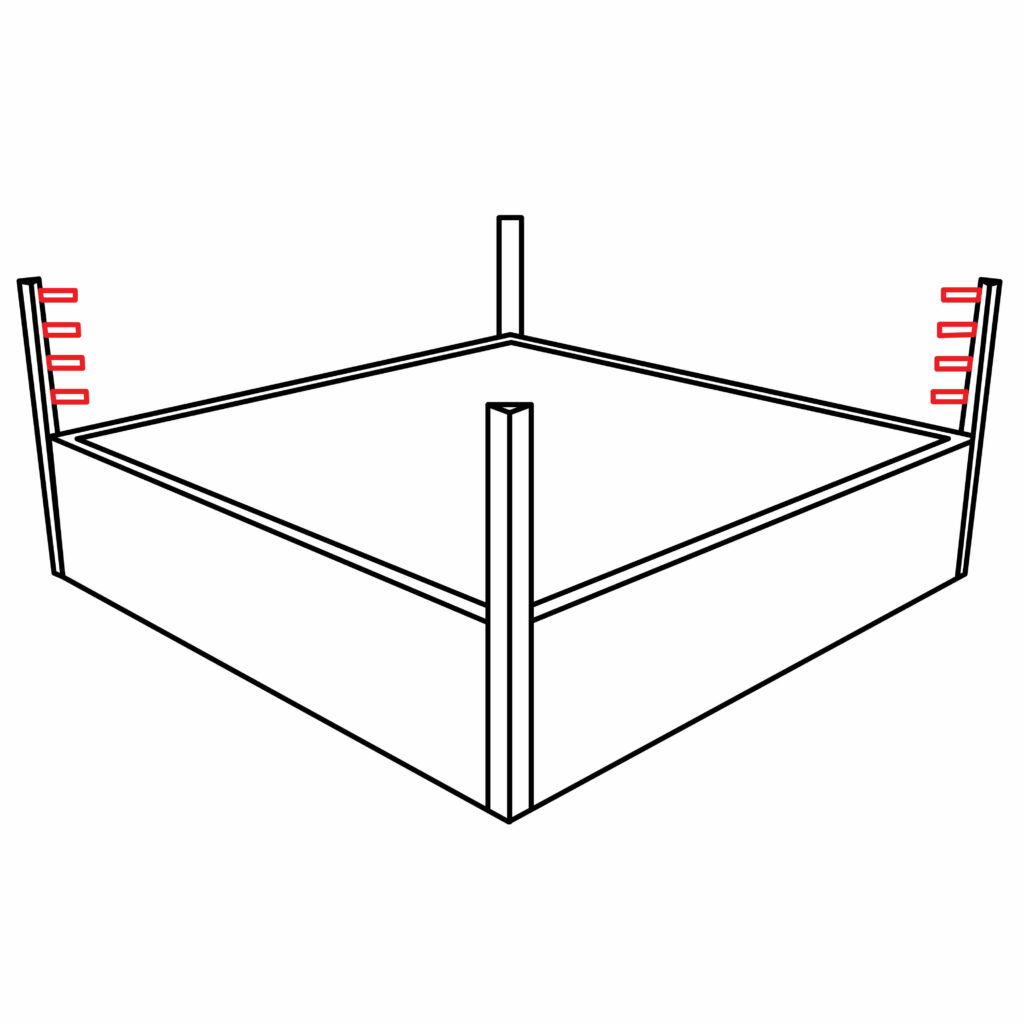
Step 3: Draw the Rope Posts
The rope posts of a boxing ring are used to support and secure the ropes that run around the perimeter of the ring.
To complete this step, draw four horizontal rectangles evenly spaced apart along the inner side of the left corner bar.
Repeat the same process on the corner bar on the right, and your rope posts should effectively be added to your boxing ring sketch.
- Draw four small horizontal rectangles along the inner side of the left corner bar
- Draw four horizontal rectangles along the inner side of the right corner bar
- Ensure all rectangles are evenly spaced apart
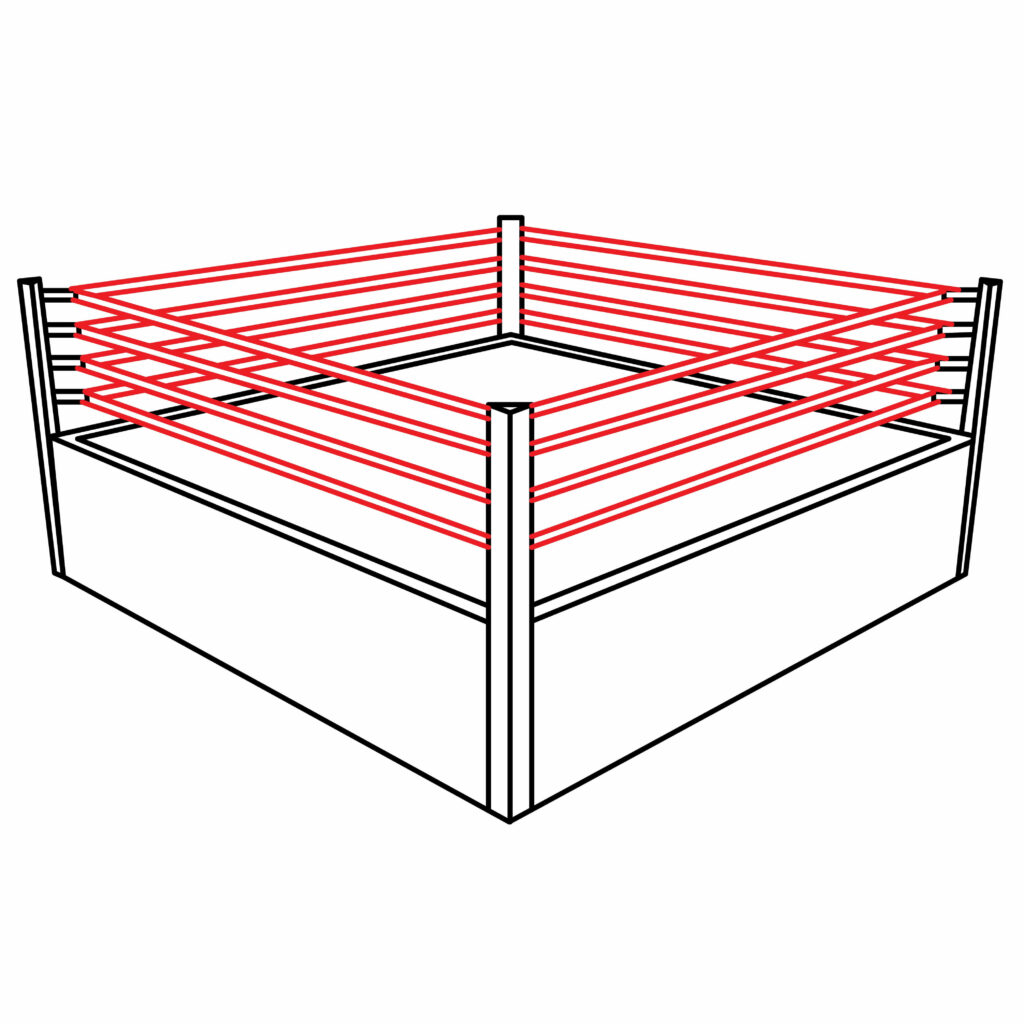
Step 4: Draw the Ropes
The ropes are commonly made of steel cables covered in canvas or vinyl. They serve as a boundary that keeps the boxers inside the ring during a match and provides support for them to lean against when needed.
To complete this step, grab your ruler again to ensure straight lines. Draw long diagonal rectangles starting from each rope post and connect them to the closest posts. In other words, there should be four ropes along each side of the boxing ring.
Pay attention to small details such as the spacing between each rope and how they connect to the corner bars and rope posts. To ensure a wonderful 3D effect, start with the back ropes and then draw the front ropes over them.
- Draw four diagonal rectangles on each side of the ring to resemble ropes
- Ensure the ropes are evenly spaced apart
- Start with the back ropes and then add the front ropes
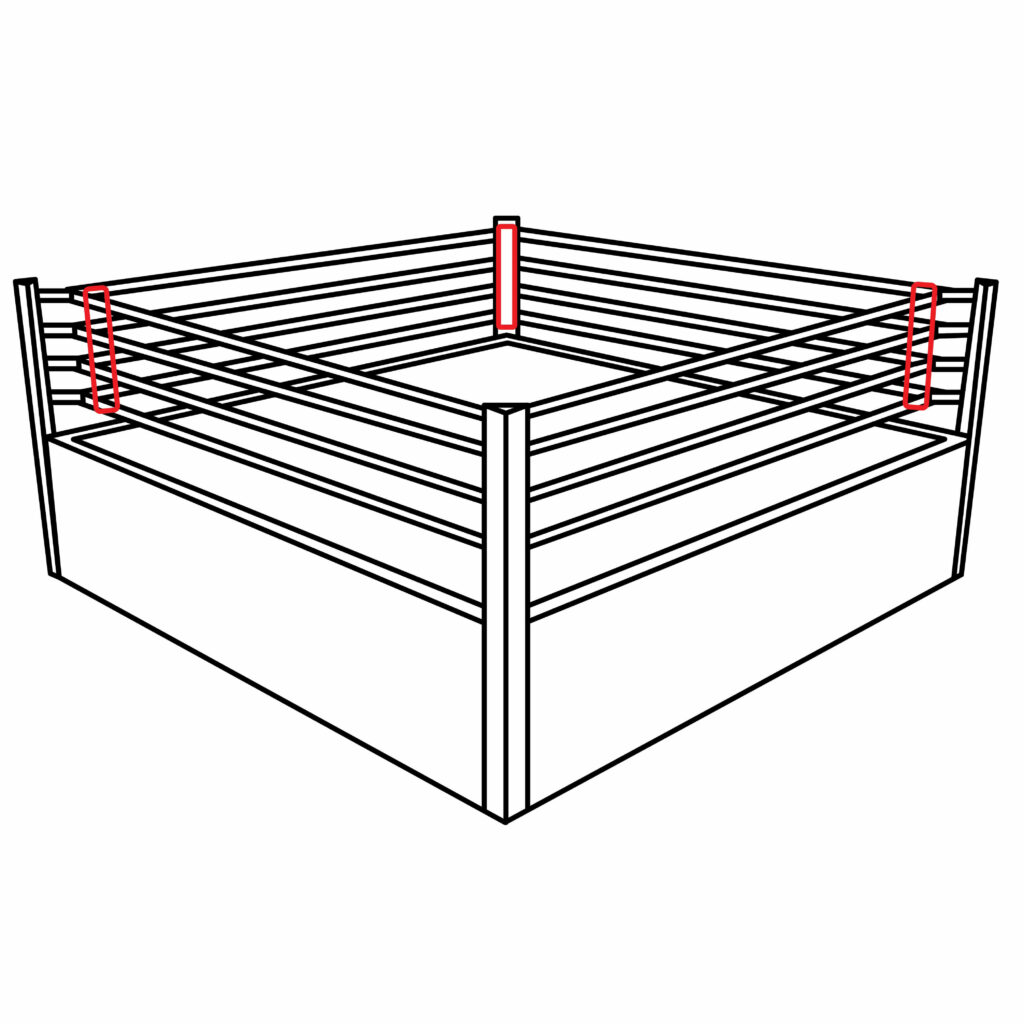
Step 5: Draw the Corner Pads
The corner pads are cushioned pads made of foam located at each corner of the ring to protect boxers from injury if they collide with the ropes or corners during a match.
To complete this step, simply draw a small vertical rectangle along the width of all the corner bars added in step two except the one in the front-center.
Erase the lines of the rectangles that overlap with the ropes on the sides, and use your pencil to refine some of the rope lines if necessary.
- Draw a small vertical rectangle along the width of each corner bar
- Erase the lines of the rectangles that overlap with the ropes on the sides
- Use your pencil to redraw and refine the rope lines that have been erased
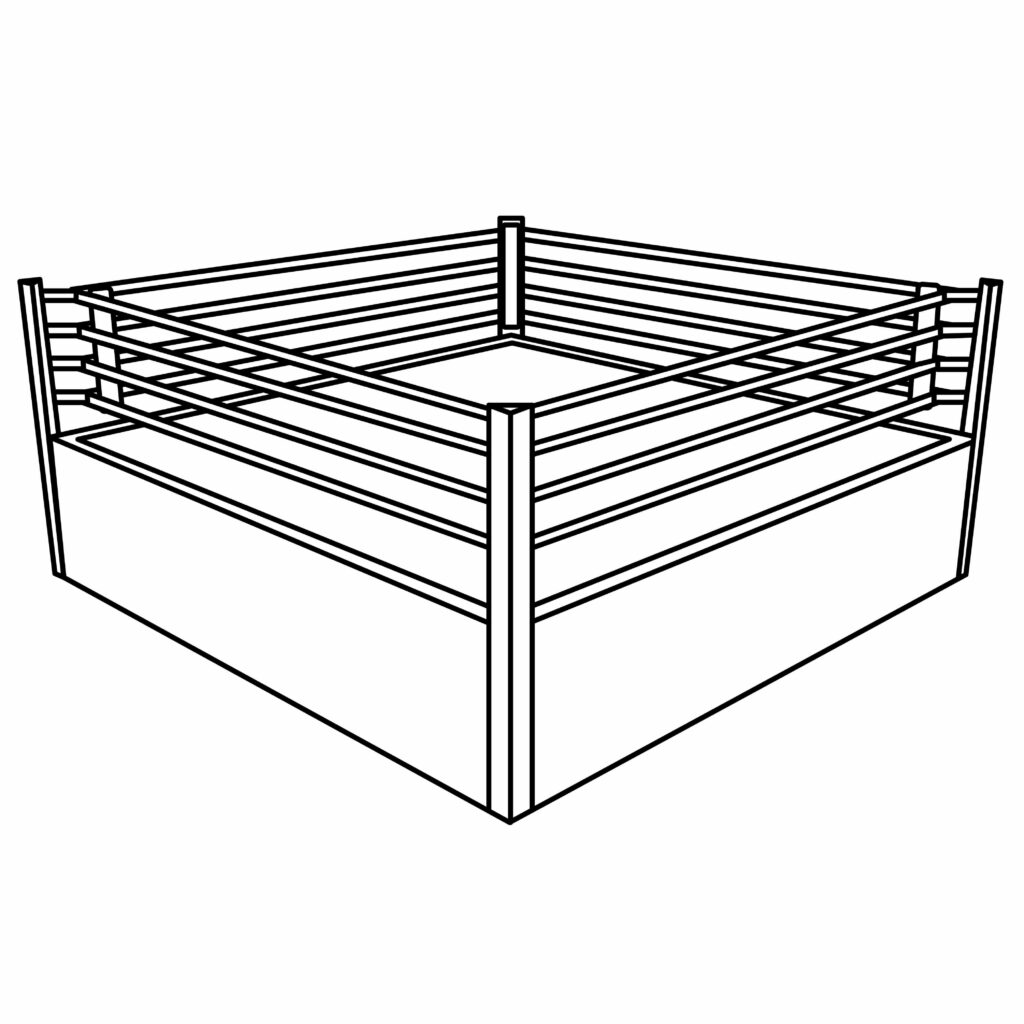
Congratulations! Your Boxing Ring Drawing is Complete
Take a moment to acknowledge the fact that you have transformed a blank page into something new. Additionally, take some time to give your drawing hand a little break.
Once you’re ready, assess the outcome of your boxing ring drawing to make sure you’re happy with the final product. If there are any parts you’d like to correct, now would be the time to do so. Use your eraser and perfect the little inconsistencies, if any.
Taking Your Drawing to the Next Level
You are more than welcome to leave your black-and-white boxing ring drawing as is. Although, if you would like to add some flavor and make your drawing stand out among the rest, follow these steps.
Step 6: adding a Background
There a few ideas to play around with when adding a background to a boxing ring drawing. It all depends on the scenery you want to incorporate and the story you’re trying to tell.
You could add a crowd of spectators in the background, cheering and waving flags. You could also include the cornermen for each boxer, providing them with water, a place to rest, and advice between rounds.
Another idea is to have the referee in the background maintaining order and overseeing the match.
Additionally, adding other boxing equipment surrounding your ring, like a pair of boxing gloves hanging over a rope, a stray boxing shoe lying next to the ring, a mouthguard or boxing headgear laying on the surface of the ring could add to the realism of your sketch.
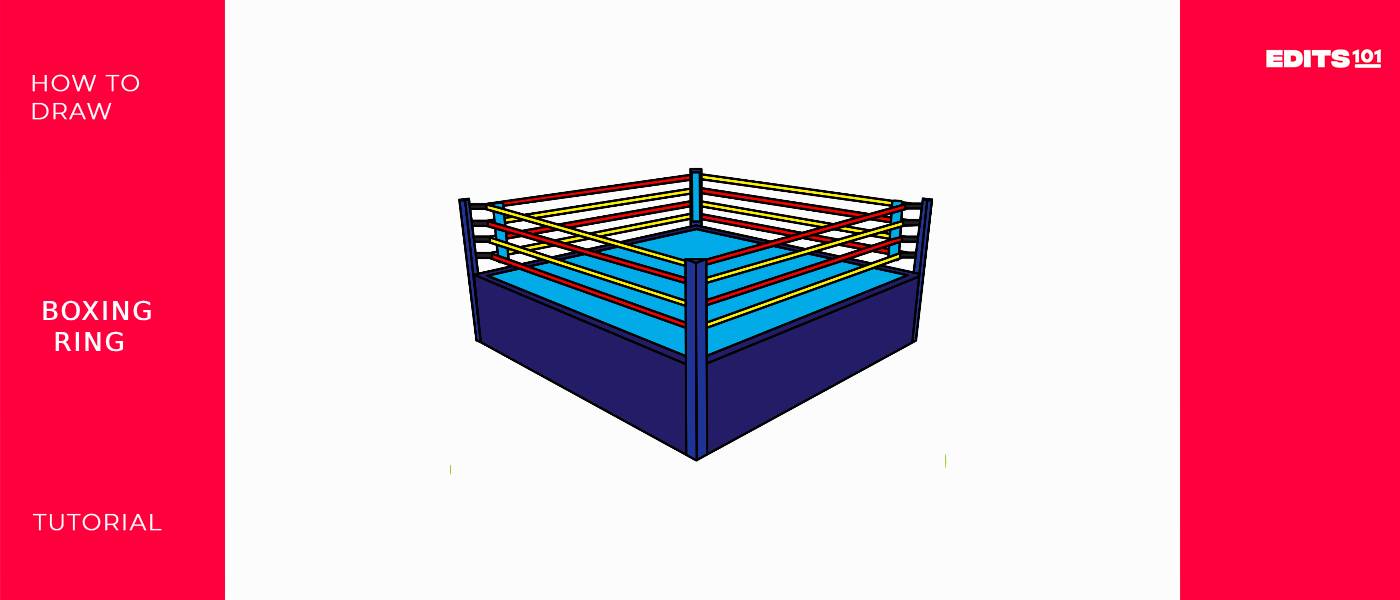
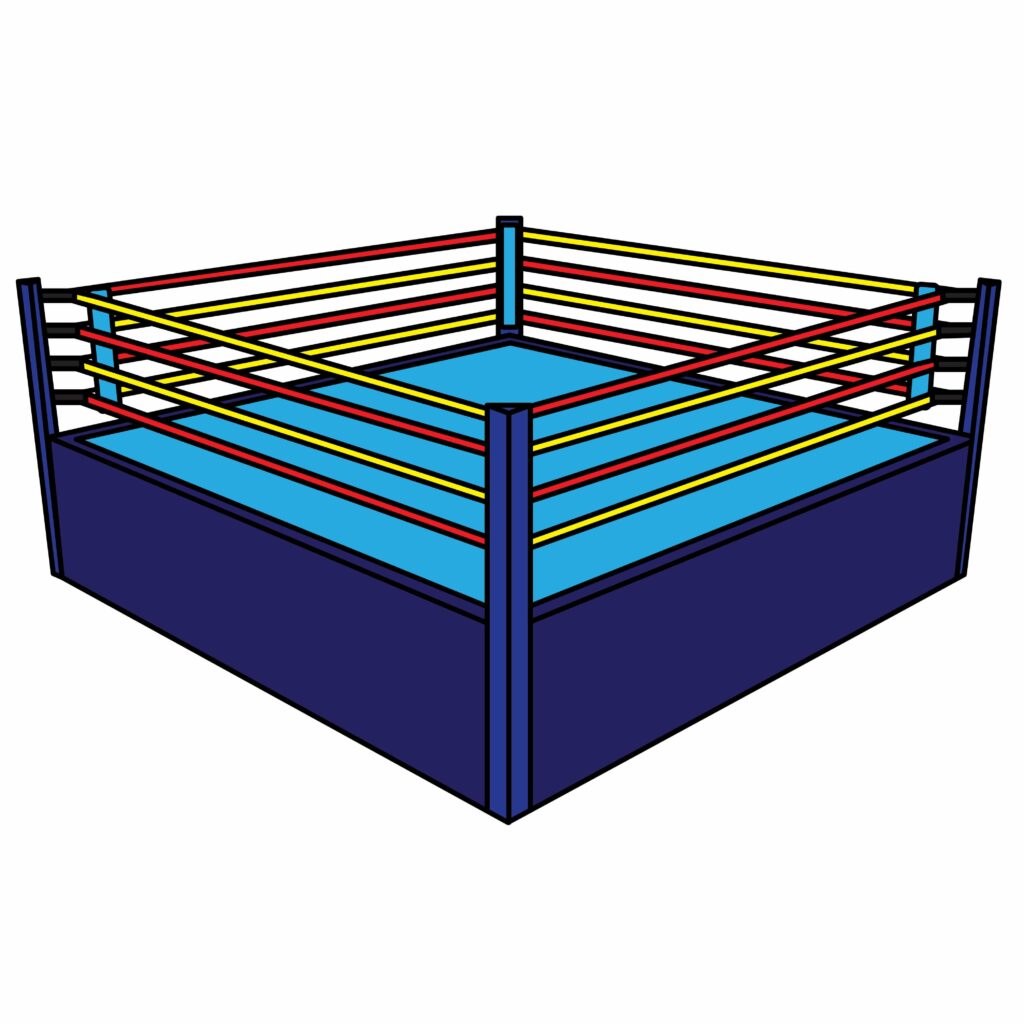
Step 7: Adding Color
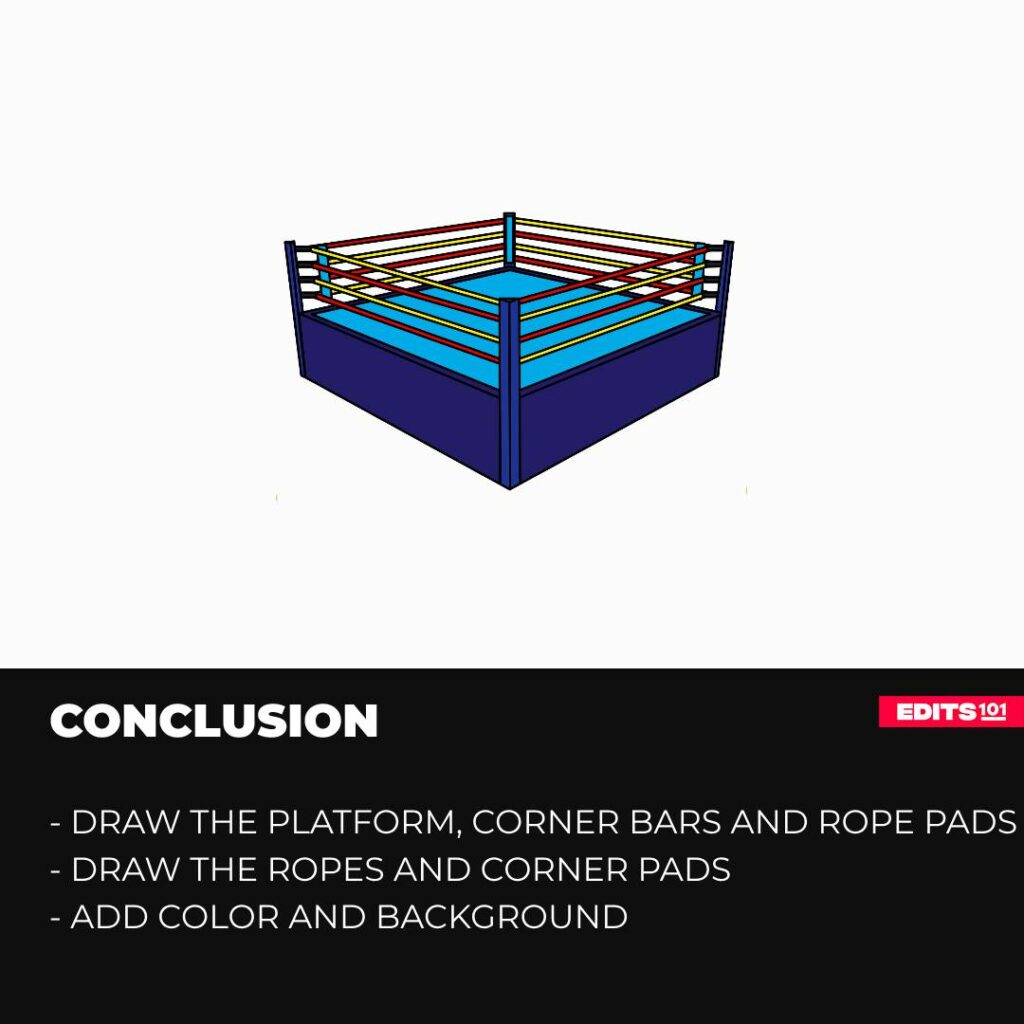
Consider incorporating a mix of bold and vibrant colors to create a visually appealing and dynamic boxing ring sketch. You could use shades of red and yellow for the ropes surrounding the ring to symbolize intensity.
For the floor mat inside the ring, you might want to add some contrast with a light blue to make it stand out.
Additionally, you can use neutral tones like gray or black for elements such as corner pads or rope posts to balance out the overall color scheme.
You’re also encouraged to use your favorite colors should you prefer. Just remain mindful that each element drawn requires a different color to highlight and compliment each part.
Bonus Tips
Experiment with different perspectives by drawing the boxing ring from above, below, or at an angle to heighten interest.
Utilize different pencil grades because varying the thickness of your lines can create more dynamic and visually appealing drawings.
Incorporate shadows and light sources for a realistic effect.
Add distinctive details of a boxing ring like a step ladder placed by the corner of the ring for boxers to walk onto the platform.
Watch YouTube videos related to boxing to gain a keen sense of knowledge and to interact with other budding artists intent on drawing a boxing ring.
Conclusion
Congratulations for making it to this part of the tutorial. If you have completed all of the steps and polished off your boxing ring drawing, we’d like to commend your hard work.
Drawing a 3D boxing ring is surely no easy feat and requires a lot of patience and practice, so well done for putting in the time and effort. Remember, drawing is a craft that is honed through constant practice, so push yourself even further by attempting new drawings and adding to your collection of art. You can only improve from here on out!
Thanks for reading & feel free to check out more of our articles!
Author Rating
Overall Rating
Summary
This tutorial will guide you through the steps of creating a fundamental representation of a boxing ring and then enhancing it to achieve a more realistic and detailed appearance.