
This guide will give you an overview of how color correction in Davinci Resolve works and what the big idea is if you’ve never done it before.
We will cover everything from basic color correction, such as adjusting blacks and whites, to advanced grading techniques, like correcting skin tones and exposure.
This guide jam packed with a lot of information, so get ready to learn amazing tools and techniques for color correcting in Davinci Resolve.
Why Color Correct Your Video In Davinci Resolve?
With color correction, all you’re really doing with color correction is solving a problem. Your video looks a certain way, and you want it to look different; that’s it.
- If you like how the video looks, you don’t need to do color correction; just move on to audio or something.
- If you want it to be different, the very first thing you have to ask is, what is wrong with the video, what do you want to change?
- When talking about a normal video, you want everything to be where it’s supposed to be, like it should look normal to your eye.
- If something looks black in real life, it should look black on video, if something is bright white in real life, it should look bright white in the video.
- If something is bright, the color should look bright on the video. So anytime a video is different from normal life, it will change the emotion of the video.
When colors aren’t normal, they convey an emotion; if it’s not the emotion you want, it’s not the color you want.
Things to Focus On While Color Correcting in Davinci Resolve
These are the most important things you should focus on while color correcting your video in Davinci
Resolve:
- Analyze the footage and ask yourself if there are things that you don’t like about it.
- Adjust the white balance to achieve accurate colors
- Make sure the black is pure black, and the white is pure white.
- Correct exposure levels to ensure proper brightness and contrast.
- Keep checking the scopes to make sure your video is exposed correctly.
- Apply secondary color correction to specific areas or objects.
- Utilize curves or color wheels for precise color adjustments.
Color Page In Davinci Resolve
If you want to make your color correction workflow in DaVinci Resolve faster and more effective, then you must know where to look for different panels on the color page.
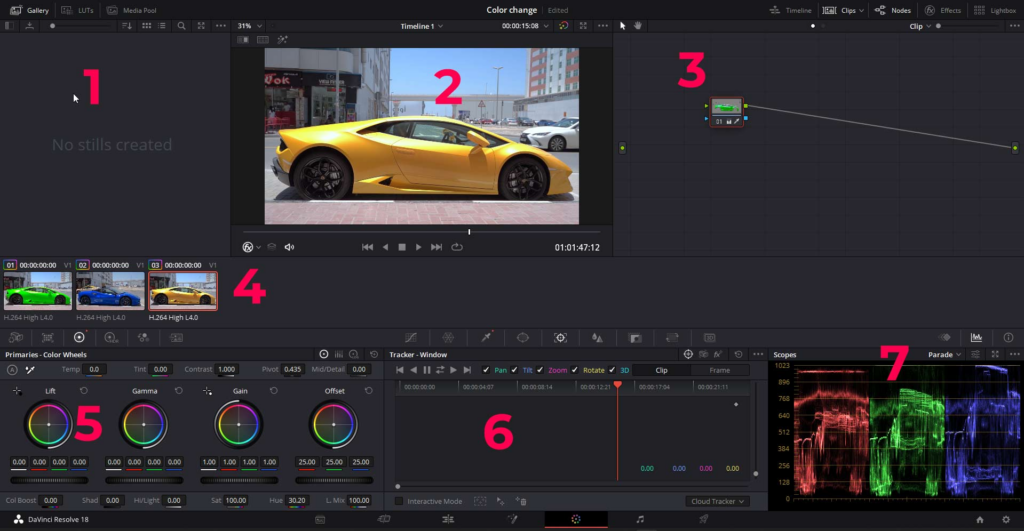
These are the main panels on the color page:
- Gallery
- Viewer
- Node Editor
- Clips
- Color wheels
- Center tools panel
- Scopes
For a detailed overview of the color page, read this detailed guide.
Detailed articel on the overview of the color page.
Color Wheels In Davinci Resolve
There are different color wheels on the color page which perform different functions.
Lift
The lift control adjusts shadows.
Gamma
Midtones can be adjusted using the gamma control.
Gain
The gain control adjusts highlights.
In a picture where the sky is the brightest part, and the person’s pants and headband are shadows, you can brighten the shadows by using the lift wheel controls.
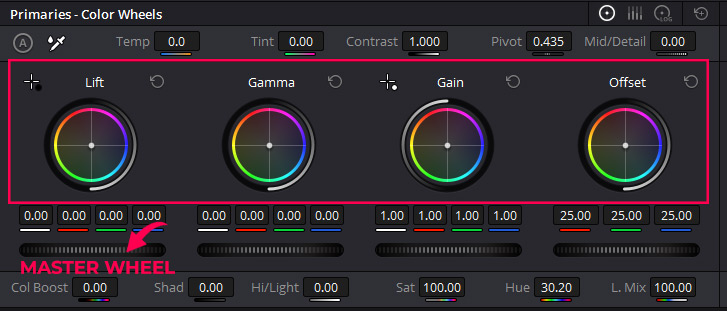
Master Wheel
Master wheels (located below the color wheels) fine-tune brightness in specific areas. In this case, you can drag the lift wheel to the right to brighten the shadows and make the person’s coat and trousers more visible (image in the next section).
Additional Options In the Wheels Panel In Davinci Resolve
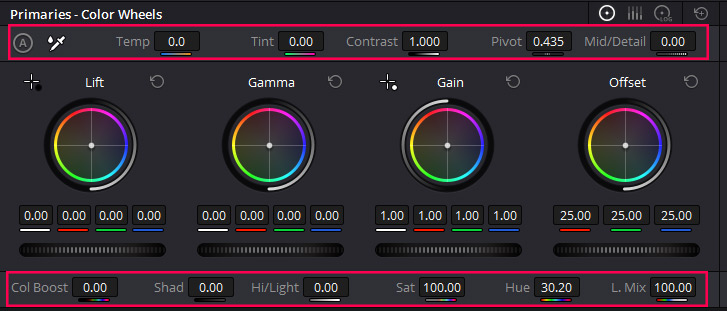
You will find additional options for adjusting colors at the top and bottom of each color wheel.
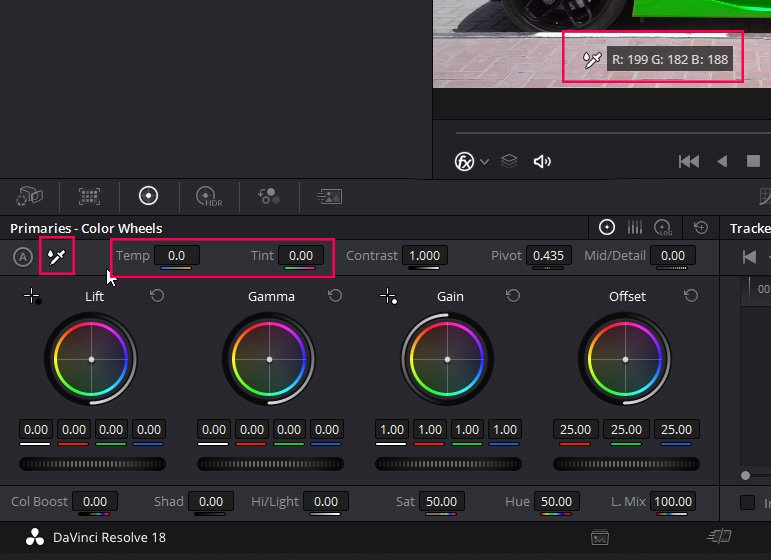
White Balance
The eyedropper icon represents the white balance. It corrects any strange color tones in your footage to make sure that white appears as true white.
Have you ever seen footage that looks excessively green or blue? This is often a result of an incorrect white balance. You can use both temperature and tint controls to fix this issue.
Contrast
Contrast enhances the difference between light and dark areas in your video, making them more distinct.
Pivot
The pivot setting adjusts the center point where contrast changes occur. It’s useful for fine-tuning your contrast adjustments.
MD (Mid/Detail)
With the MD slider, you can control the level of detail in your video’s mid tones. By using power windows, you can use this slider to smooth out the facial features.
Color Boost
The color boost slider allows you to enhance the vibrancy of your colors.
Shadows
This slider determines the brightness and contrast of the darker areas in your video.
Highlights
This slider affects the brightness and contrast of the brighter areas in your video.
Saturation
Saturation refers to the intensity of colors in your video. A desaturated video will appear black and white, while a highly saturated video will have vibrant and vivid colors.
Hue
Hue modifies the colors in your video, changing their appearance. For example, it can change reds to blues or blues to greens.
Color Correcting In DaVinci Resolve
In this section, we will color correct a video and guide you step by step on how you can apply the same steps for color correcting your videos in DaVinci Resolve.
Analyze the Video
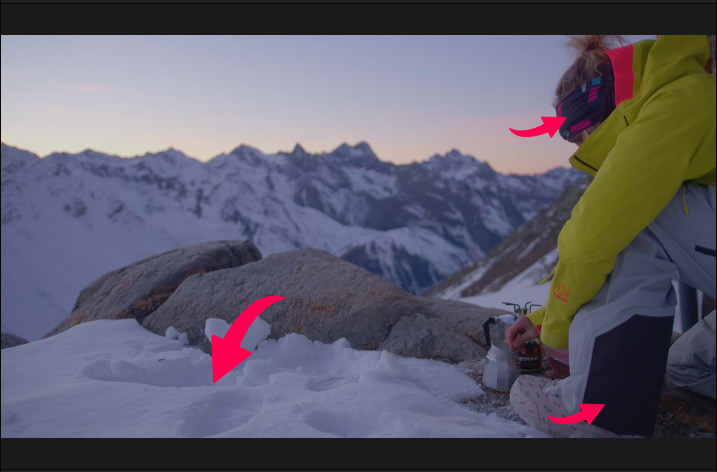
Here’s a video of a person sitting on a snowy mountain, you should always look at the Video and ask if there are things you don’t like about it.
The first thing we notice is that nothing looks really black. There are things we know are supposed to be black.
Things like the shadows and the part of the pants, some of the darker parts on the headband, but these parts are not black. It’s like kind of dark gray.
And the white snow does not look pure white, so we also need to fix that.
Create the Node Tree
Now we need to build the simple node tree which we will use in our color correction process inside Davinci Resolve.
Go to the nodes panel and create 3 nodes.
To create a node, right click inside the nodes panel, hover over the Add Node option, and then click on the corrector.
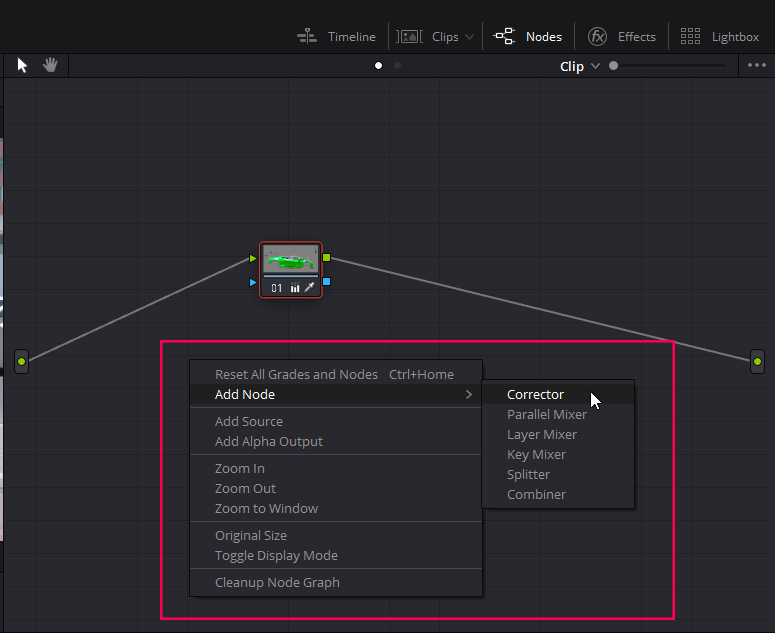
Create 3 nodes in total, and one node will already be there when you go to the color page. So create 2 more.
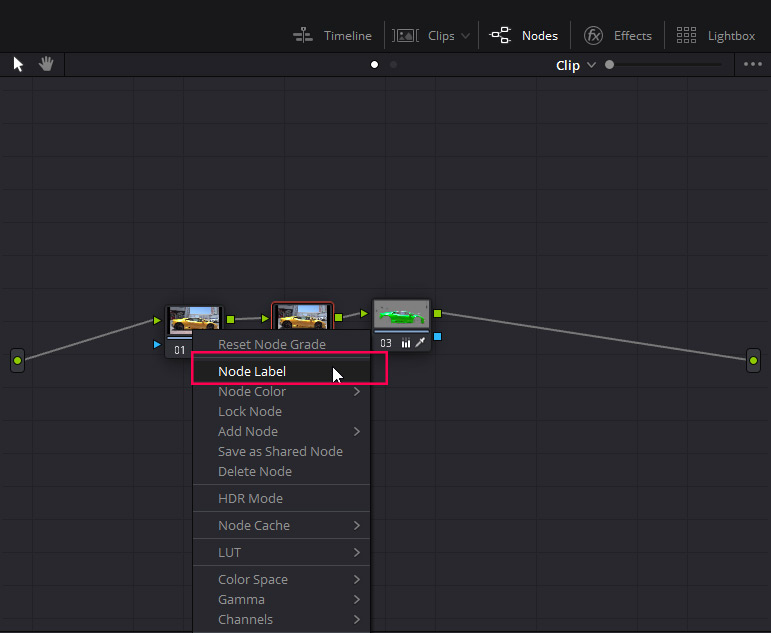
Name the first node color correction.
Name the second one, skin tones, and 3rd one as final or anything you want.
To change the name of the node, right click and choose node label.
Fixing White Balance
You can fix the white balance, click on the eyedropper icon, and then click on something that is pure white or gray in your video (click inside the viewer). The white balance will be corrected automatically.
You can adjust the white balance using the tint and temperature settings when your video has no white or grey colors.
Fixing Blacks and Whites
Now, we will fix the blacks and whites. Click on the first node.
Fixing Blacks
There’s nothing black, which means that the whole Video altogether needs to be a little bit darker.
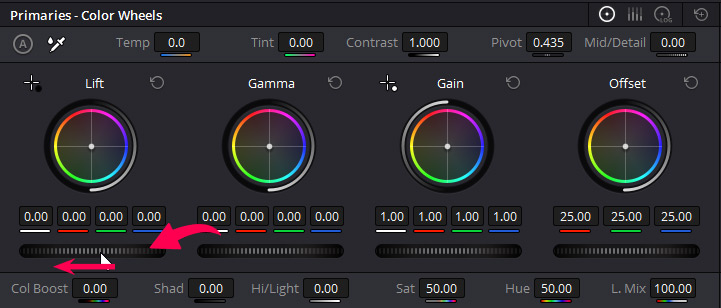
There are a couple of different ways to fix that, but the easiest way to darken the darkest parts of the video is with the lift, which is down in the lower left-hand corner in the color wheels section of Davinci resolve.
To Adjust the blacks, you need to click on the master wheel and drag toward the left, and it will make the video a bit darker, keep dragging until the black parts of the video look black.
Fixing Whites
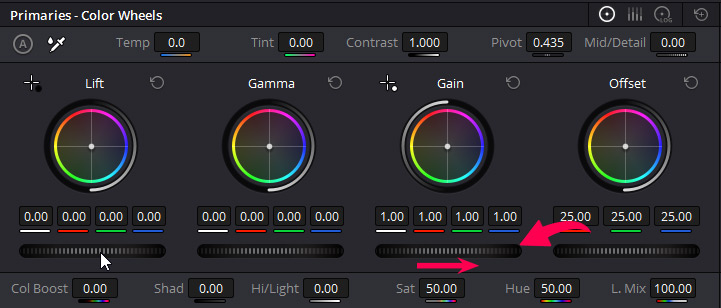
To fix the whites, we will use the Gain wheel.
Click on the wheel and drag toward the right until the whites in the video look pure white to your eye.
Fixing Saturation
When we adjust the whites and blacks in the video, the colors may not look as bright as they should be. So we need to fix that as well.
We will use the saturation control under the color wheels to adjust the color saturation.
Bring your cursor over the saturation control, and the shape of the cursor will change.
Click and drag toward the right to bring up the saturation.
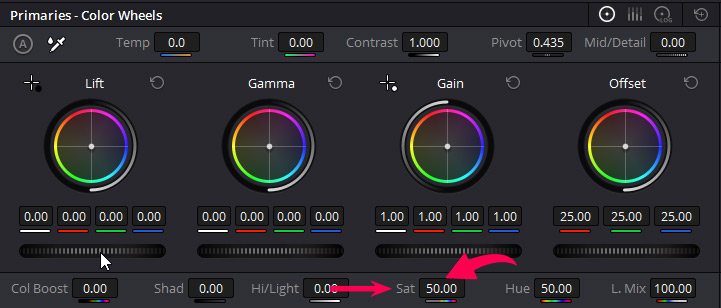
Don’t take it too far. Otherwise, the colors will look artificial and unnatural.
Adjusting the Exposure
When you make all the above changes while color correcting in Davinci Resolve, you might get an overexposed or under exposed video.
We need to use the Offset wheel to adjust the exposure, as it controls the video’s overall brightness.
Click on the master wheel under the offset wheel and drag it left or right, depending on whether you are reducing or increasing the exposure of the video.
Before and After
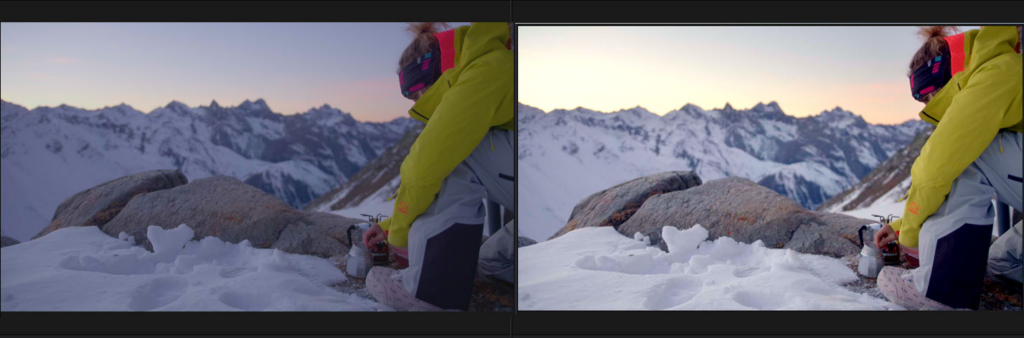
Now you can see that the blacks look black, and the whites look pure white.
How To Fix the Skin Tones In Davinci Resolve?
While doing color correction in Davinci Resolve, you need to keep an eye on the skin tones if the video has a person in it.
If the skin tones do not look natural, it does not matter how accurate other colors are.
So make sure the skin tones look natural while adjusting the saturation and other color correction settings.
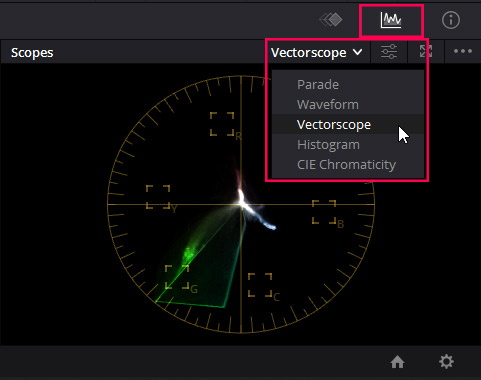
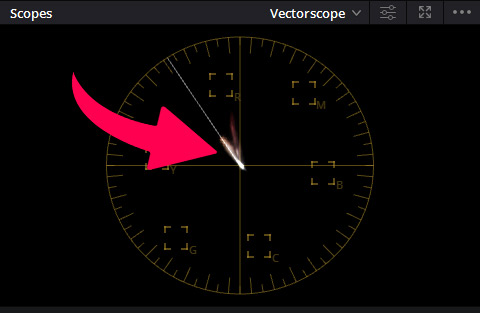
Use Vectroscope for the Skin Tones
Vectorscope has the option to see where the skin tones are. There is an indicator that shows where the skin tones should be.
- Shift from normal scopes to vectorscopes by going to the scopes panel.
- Click on the dropdown menu and choose Vectorscope.
Now you have to enable the skin tones indicator, which is turned off by default.
- Click on the filters menu.
- Click on the “Show skin tones indicator” check box, and now you will see a line in the vectorscope.
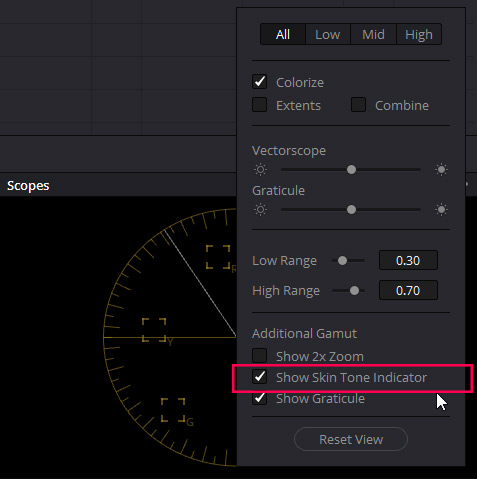
- Make sure your skin tones lie on that line otherwise, the skin will look unnatural.
Fixing the Skin Tones In Davinci Resolve
If you have bad skin tones, then you need to color correct the skin to make it look as natural as possible.
To fix the skin tones:
- Click on the node name skin tones.
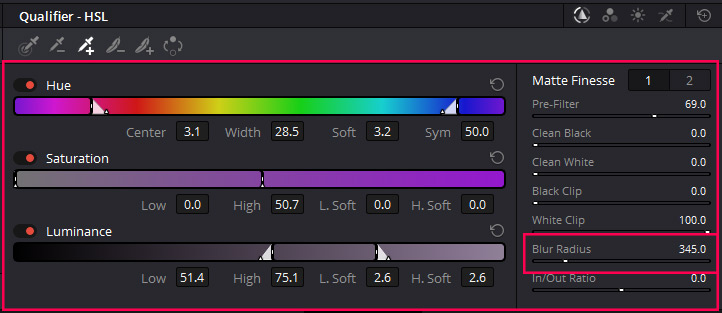
- Now go to the qualifiers panel and click on the eyedropper with a + icon.
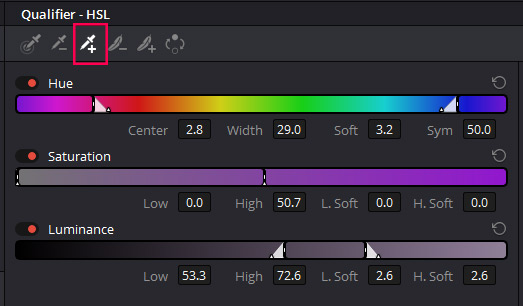
Click and drag over the skin tones to select only the skin tones.
- Now Use the keyboard shortcut Shift + H to see what is selected. Press it again to hide the selection.
- Use the qualifiers panel to refine the selection. If you want to exclude from the selection, use the eye dropper icon with a – icon.
- Use blur radius to avoid the chances of harsh edges.
Now go to the Gamma wheel (it represents the mid tones, that’s where the skin is in terms of color and brightness) and shift the colors by clicking and dragging the grey dot in any color’s direction (drag in the opposite direction of the color you want to remove).
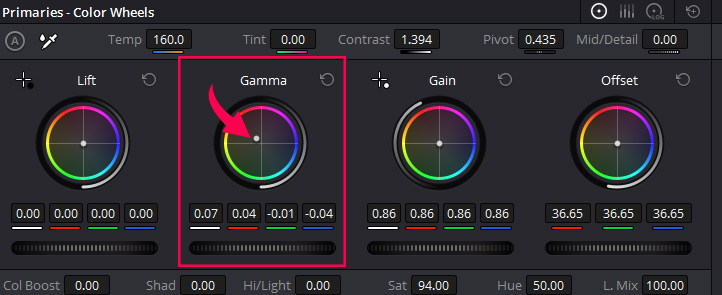
Keep an eye on the vectorscope and make sure that the colors remain on the skin tone line.
And now you must have a pretty good looking video.
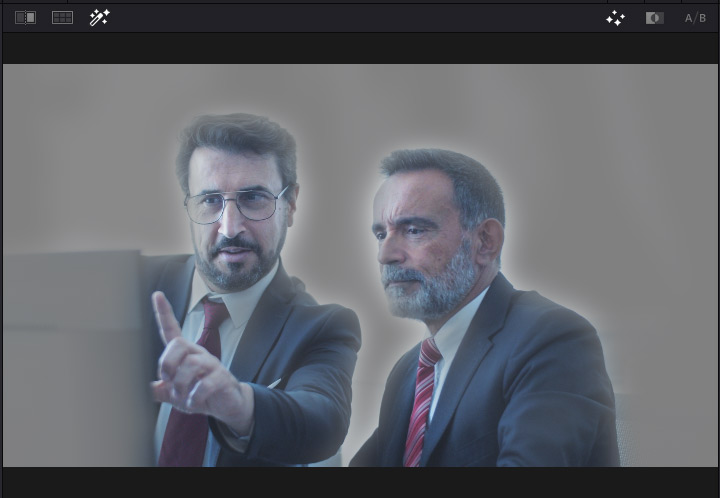
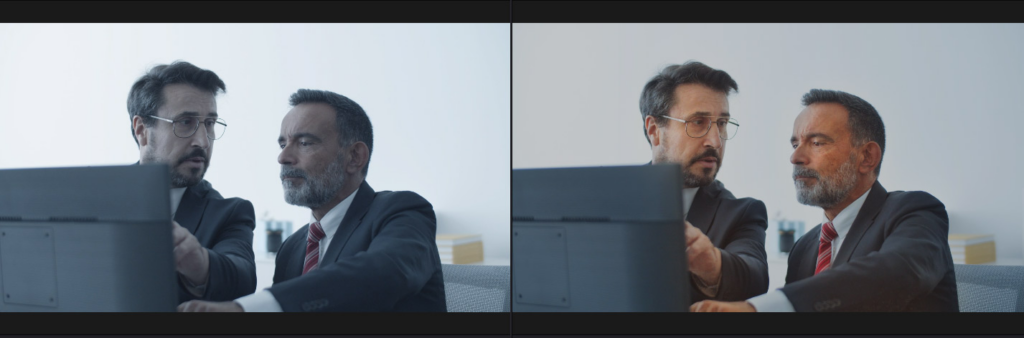
This is the before and after of skin tones. See how much difference it has made.
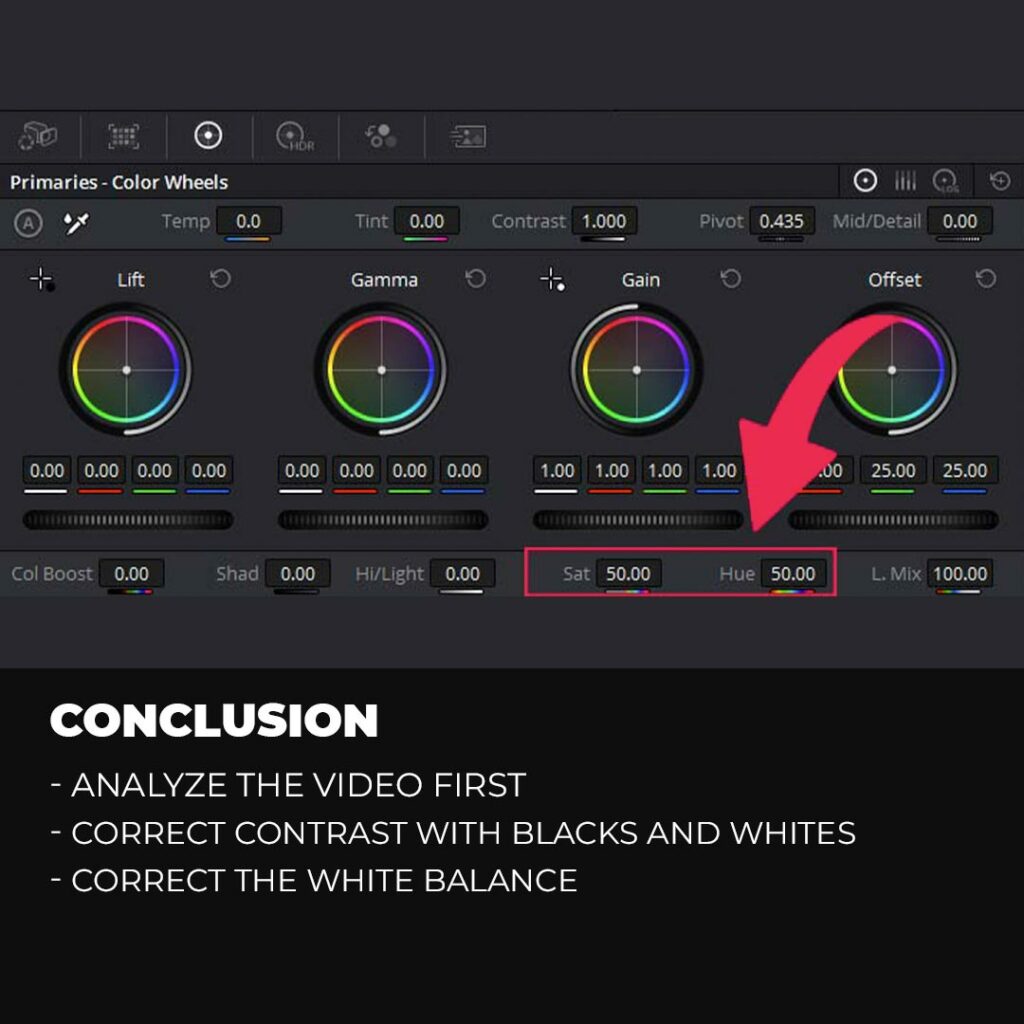
Conclusion
First of all, you need to find out what is wrong with the video and what needs to be color corrected in DaVinci Resolve.
Then go to the color page and create 3 nodes inside the nodes editor. Make the color corrections on the first one and adjust the skin on the second node. Use the vectorscope to see the skin tones and make sure they lie on the skin tone indicator inside the vectorscope.
Use the lift wheel to adjust the shadows and adjust the darker parts of the video.
Use the Gain wheel to adjust the whites in the video.
Make sure you dont overexpose your video by looking at the scopes.
Use the white balance dropper, click on anything that is pure white or gray in your video, and DaVinci Resolve will automatically adjust the white balance.
Use the final node to adjust anything that still feels wrong.
We hope you have learned everything you need to know to correctly color correct your videos in Davinci Resolve.
Thanks for reading & feel free to check out more of our articles!
Expert Rating
Summary
Learning how to color correct in DaVinci Resolve 18enables you to enhance the visual appeal of your videos. With its advanced color grading tools, you can easily adjust and manipulate colors, tones, and contrast to create a desired look and feel. DaVinci Resolve 18 is highly functional and scalable, allowing you to refine your color grading skills over time and achieve professional-level results.


