
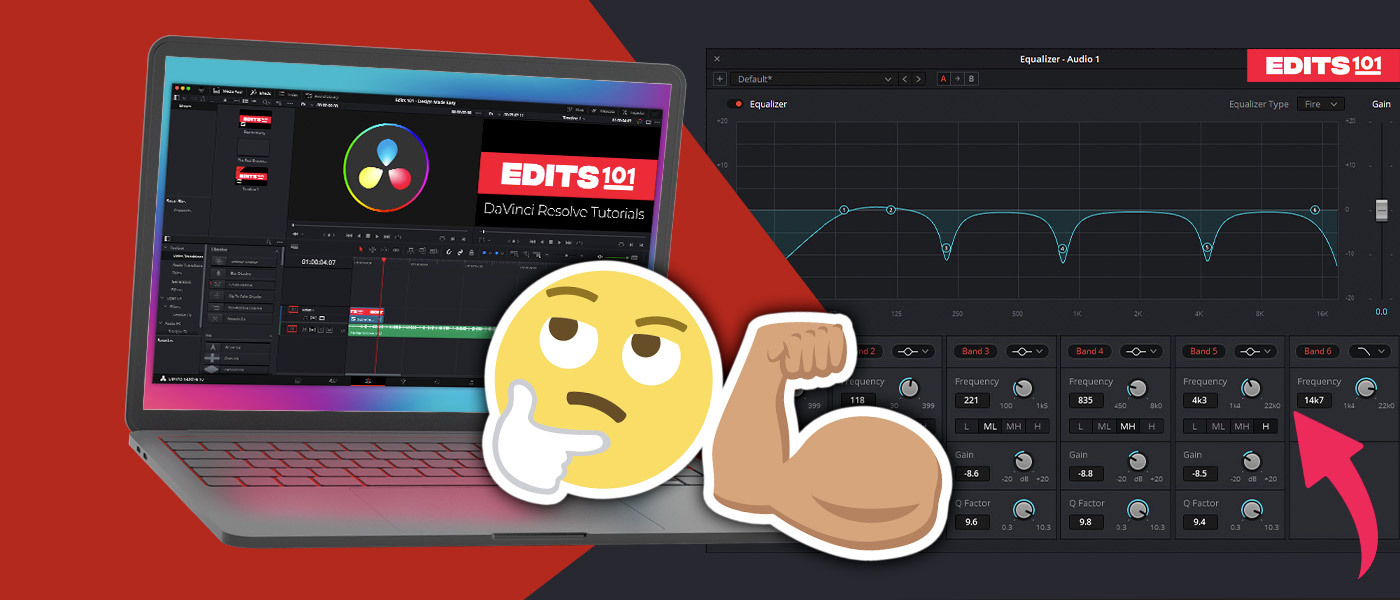
Getting good audio is tough, especially audio for videos. You can never be fully prepared for what kind of conditions and background noises you’ll have when recording an audio or capturing footage. Something we all have to deal with at some point is a room with bad acoustics and you have voices echoing all over the place. Or you are in a room with noise from the air conditioners or traffic from outside. You can also film outside in a busy environment and you cannot control any background noise.
DaVinci Resolve’s Fairlight page offers built-in tools and effects which can help you enhance your audio, particularly human voices and dialogues. So let’s jump on in and get started!
Note: These steps we are going to discuss will apply to dialogues. The settings may differ as your audio may be recorded in a different environment. Try to understand the process rather than the settings.
How to Enhance Voices In DaVinci Resolve 18
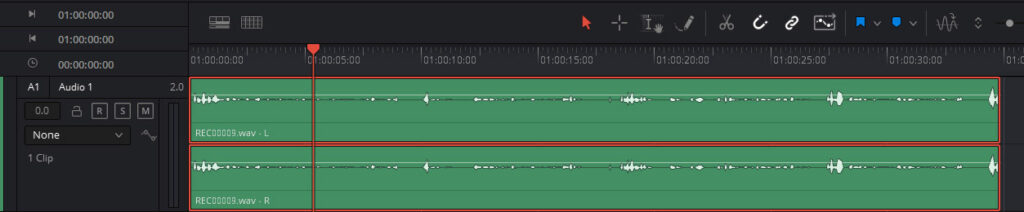
Show Audio Waveform
When you import media into the Resolve for the first time, the Audio Track may be hidden by default. If you want to edit your audio easily and efficiently, then you must have the Audio Track visible.
- Go to the Edit Page
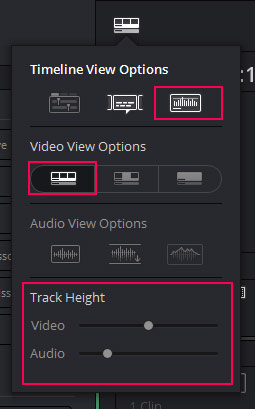
- Click on the Timeline View Options icon from the Toolbar.
- Choose the first option in the Video View Options.
- Click on the last option in the Audio View Options to turn on the Waveform Border view.
- You can also adjust the Audio Track Height to see the waveform more clearly.
- To increase or decrease the Audio or Video Track Height, use the sliders.
How To Convert Mono Audio To Stereo?
A common issue in DaVinci Resolve faced by most people is that the audio can only be heard from the left channel, which means it is mono.
There are two ways to convert it to stereo and start hearing from both channels.
- From the Timeline
- From the Media Pool
In The Timeline
This method is best for a single audio clip and if you want to convert multiple audio clips to stereo, then follow the second method.
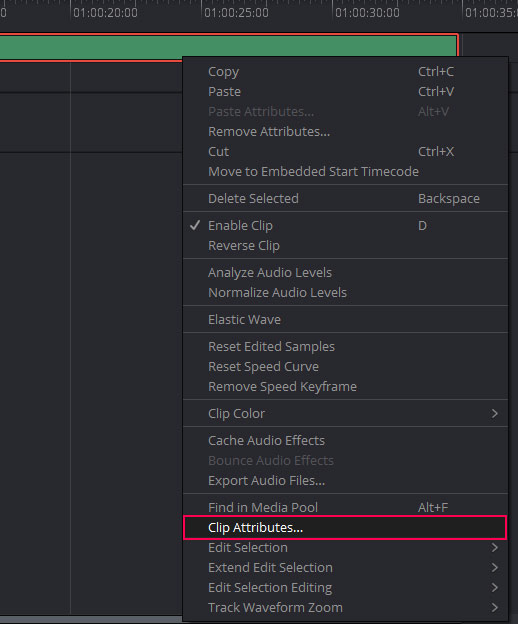
- Right-click on the Audio clip from the timeline.
- Click on the Clip Attributes.
- A new window will open up.
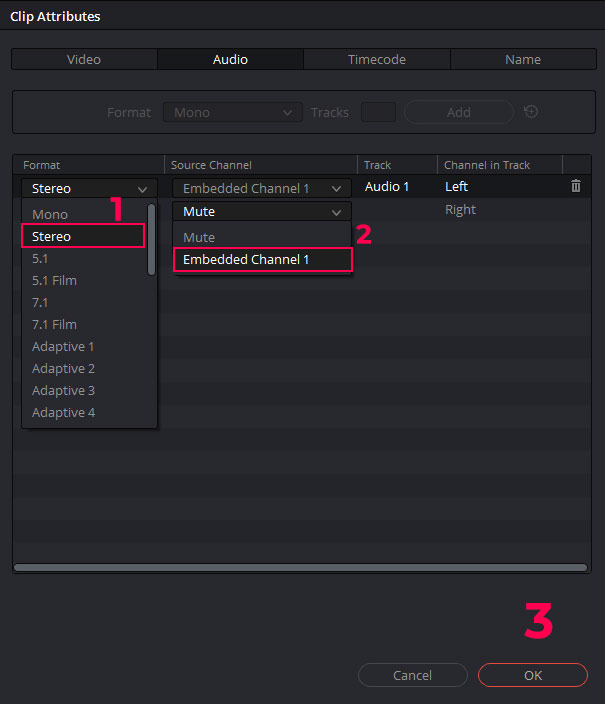
- Click on the Format drop-down menu where it says Mono and choose Stereo.
- Then go to the Source Channel and you will see the Mute Source Channel selected for theright audio channel. Change it to the same option as the left channel.
- And after doing all of the above steps, click OK.
Now the audio clip will converted from Mono to Stereo.
In the Media Pool
This method is helpful if you want to convert all or multiple audio clips to Stereo.
- Go to the Media Pool.
- Select the multiple audio clips you want to convert to Stereo.
- Alternatively, you can select multiple clips from the Timeline.
- Right-click and choose Clip Attributes.
The remaining process is similar to the section above.
- Choose Stereo in the first drop-down menu, and change the Mute option to the same Source Channels as the one of the left channel.
The audio can now be heard on the two channels in the timeline.
Normalize Your Audio
This is a very important step you should take when editing audio. If you don’t normalize your audio, you may not be able to hear the changes made. Your audio may be louder than it needs to be or is quieter.
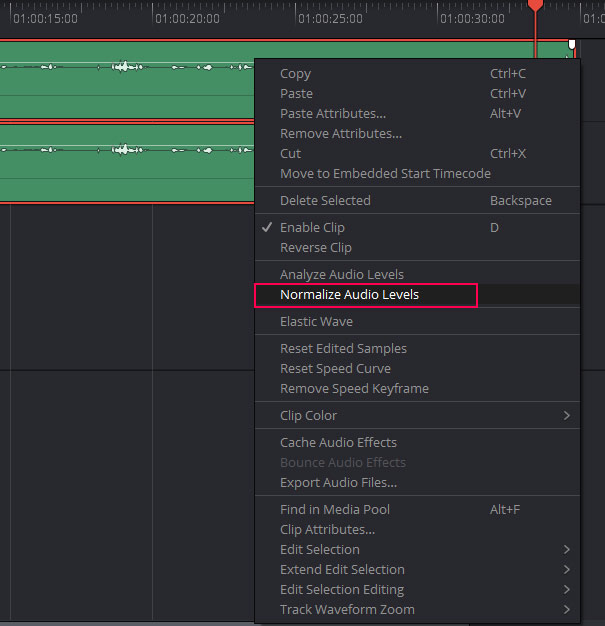
Just go ahead and select all the dialogue or voice-over audio clips.
- Right-click and then click on Normalize Audio Levels.
- This will normalize the audio levels to a more adequate decibel level.
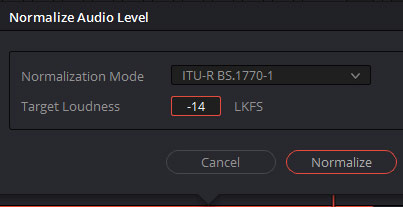
- A new window will open up, click on the drop-down menu and choose ITU-R BS.1770-1.
- The standard Target Loudness used to be -23 for sources like YouTube, but now the standard is around -14. When you’re ready click on Normalize.
And now that the audio is normalized, any defects and unwanted background noise will be more noticeable and therefore it will be easier to edit.
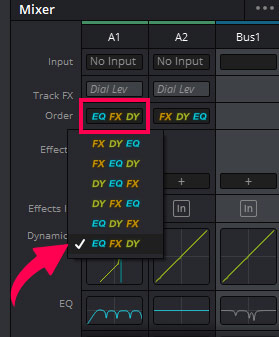
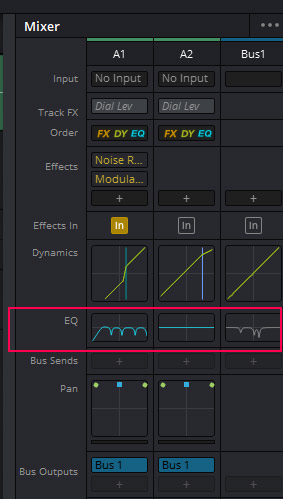
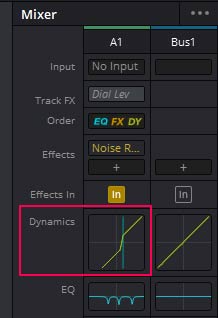
Change The Effects Order
There is an option to choose the order of the dynamics, EQ, and effects on the Fairlight page.
- Select the audio clips you want to improve.
- Click on the Fairlight page icon.
- Click on the Order option and choose EQ, FX, DY.
Remove Problematic Freqencies From the Audio Via EQ
If you want to make your audio sound more professional, then this is the panel you will spend most of your time on while editing your audio.
Where is the EQ Panel?
- You need to be on the Fairlight page.
- Make sure the Mixer Panel is visible.
- EQ is the third option from the bottom.
Double-click on the blue line right next to the word EQ and a panel will pop up.
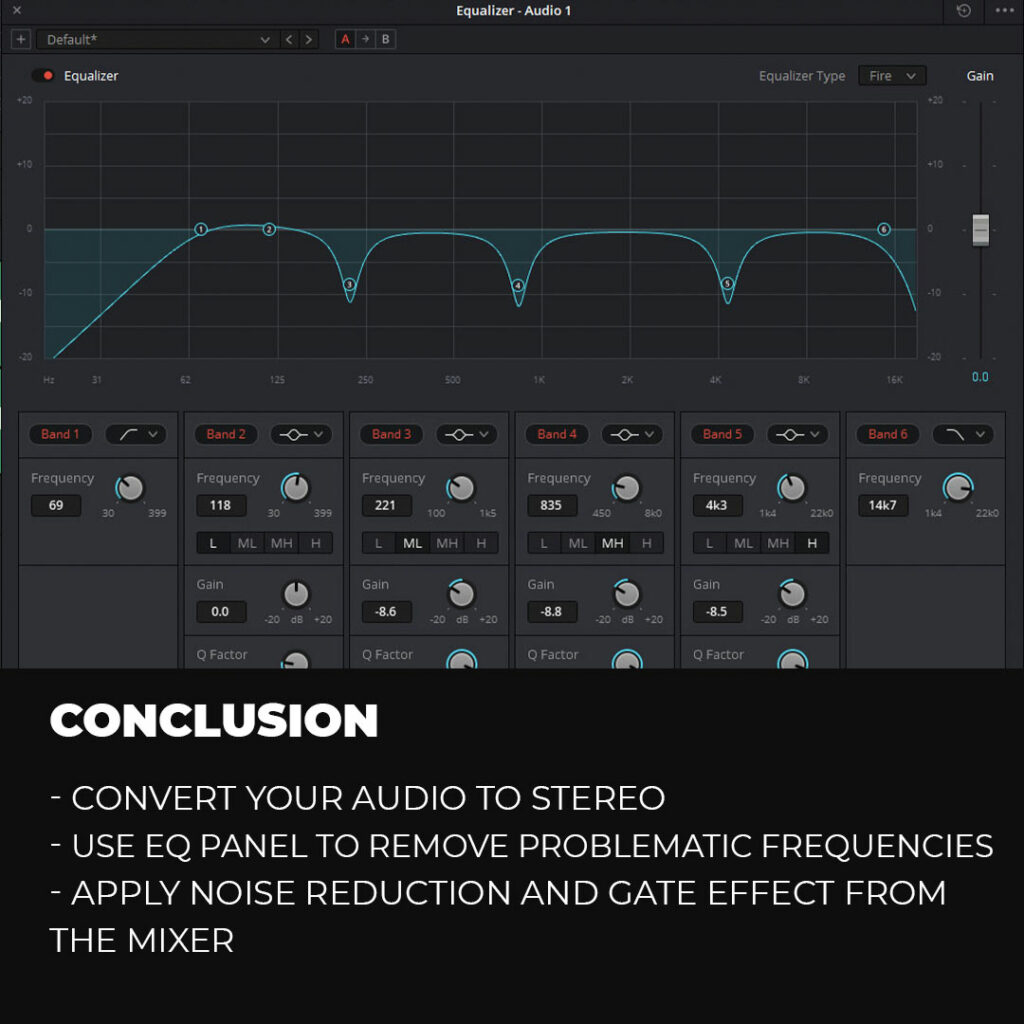
How EQ Panel Works?
This panel allows you do impressive improvements to your audio. For example. What you’re hearing when you hear an echo is obviously the voice bouncing off a wall or a surface and reverberating back.
Now the thing about that echo in general is that the human voice and the echo are on different frequencies, and in the EQ panel we can separate these frequencies.
So, this panel will pinpoint these frequencies and allows you to pull them down to eliminate the voice or the echo or any background noise.
High and Low Pass Filters
High pass and low pass filters allow you to get rid of unwanted frequencies and enhance other frequencies as desired. A High Pass filter is used to reduce low-frequency sounds while a Low Pass filter diminishes high-pitch frequencies from an audio signal.
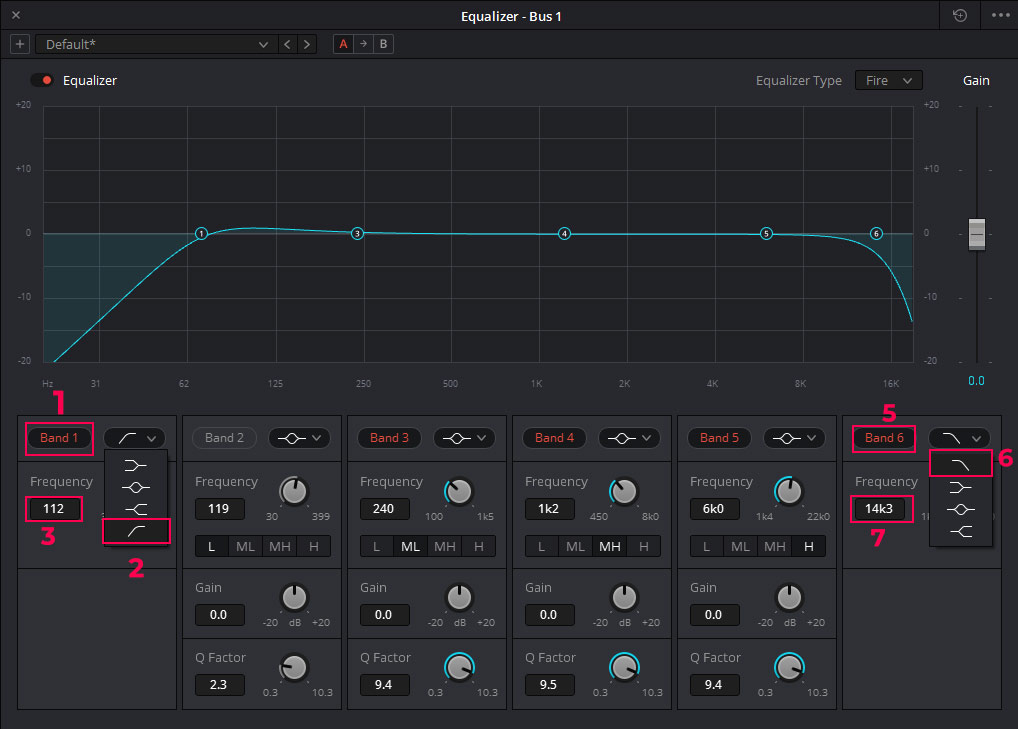
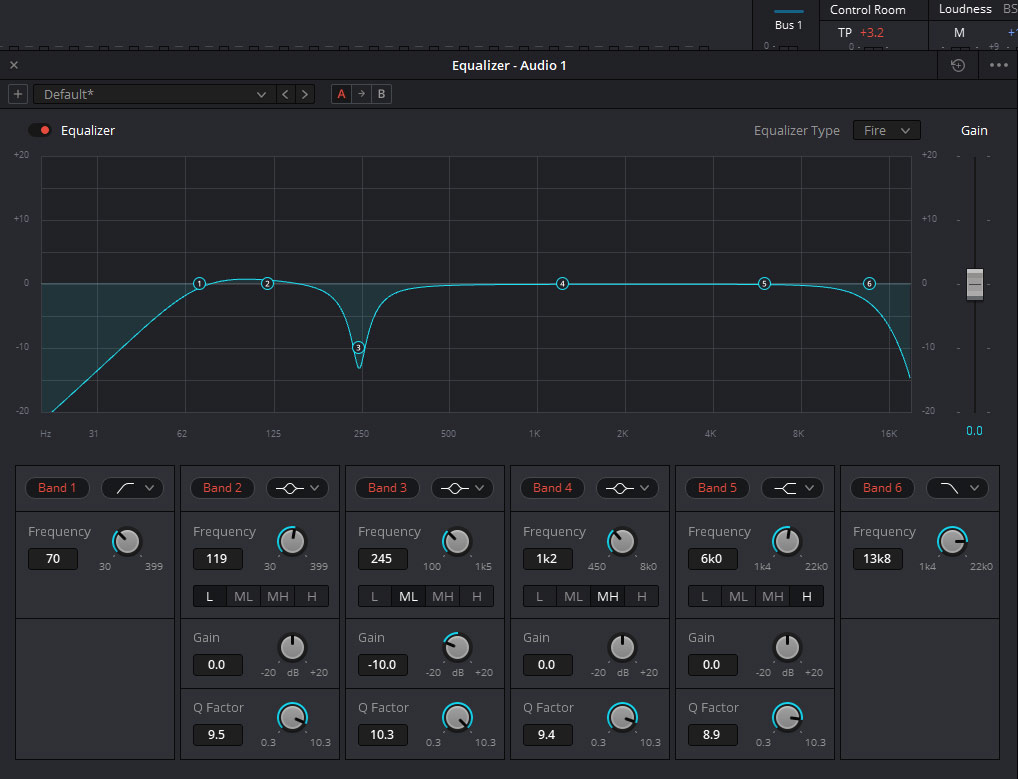
High Pass Filter
First, you need to apply the High pass filter.
- Go to the Fairlight page.
- Go to the Mixer and Click on EQ.
- To apply the High Pass Filter, first click on Band 1 to turn it on.
- Bring the Frequency to between 100 and 110.
This will cut off the frequencies below 100 Hz, which are usually what we don’t want in our dialogues.
Low Pass Filter
To apply the Low pass filter:
- Go to Band 6 and click on it to turn it on.
- Set the Frequency value between 14k to 15k.
This will remove the frequencies above 14k, and improve the human voice.
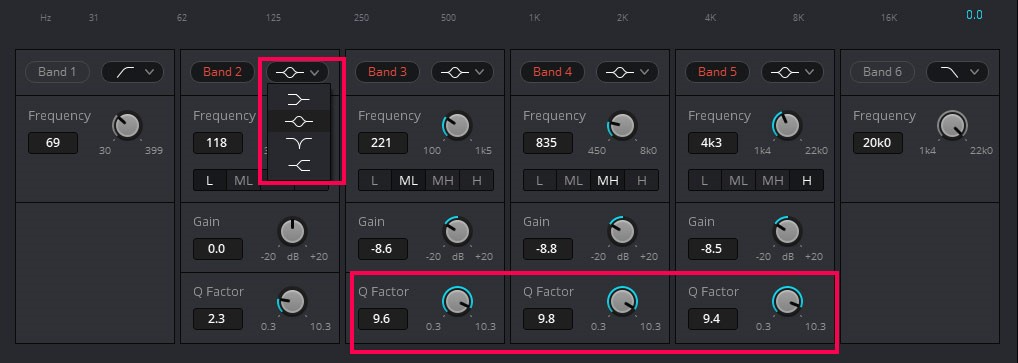
Eliminate the Problematic Frequencies
We will be using Band 3,4, and 5 to remove bad frequencies other than the human voice. Follow the steps below to eliminate such frequencies.
Curve Shape
Bell curves allow you to move a section of frequencies up or down. Go to Band 2 and set the Curve Shape to the Bell curve, the second option from the dropdown menu (see image below). Other curve shapes can also be used, but for dialogue audio, the bell-shaped curve works best.
Q Factor
The Q factor will determine the width of the bell curve. The higher the value of the Q factor, the narrower the curve will be. A narrow curve allows you to make precise adjustments.
We will set the value of the Q Factor of all 3 bands to values ranging between 9-10.
Remove The Frequencies
Grab the point above band 3 and drag it up. Play the audio, click and slide the point left to right until you hear the frequencies that do not make sense.
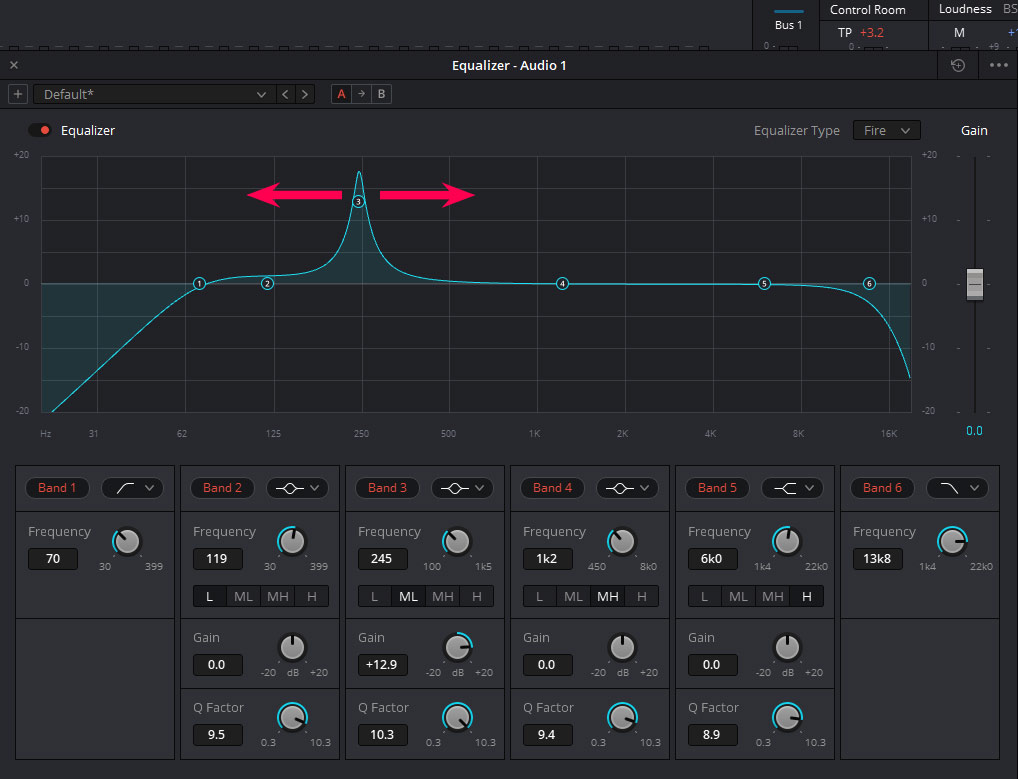
When you find such a bad sound, bring the gain value down by dragging point 3 down or by using the gain slider. Use the Gain Dial located on the right of the page for more precise editing.
Keep the gain value between -10 to -12 as if you take it way down, you may lose important details from the audio.
Repeat the Process
Repeat the process with bands 4 and 5 and remove the other problematic frequencies. Move the point up and play the audio, move the point left or right and you will definitely hear the frequencies which do not sound so good.
Bring the Gain down using the dial or by dragging the point..
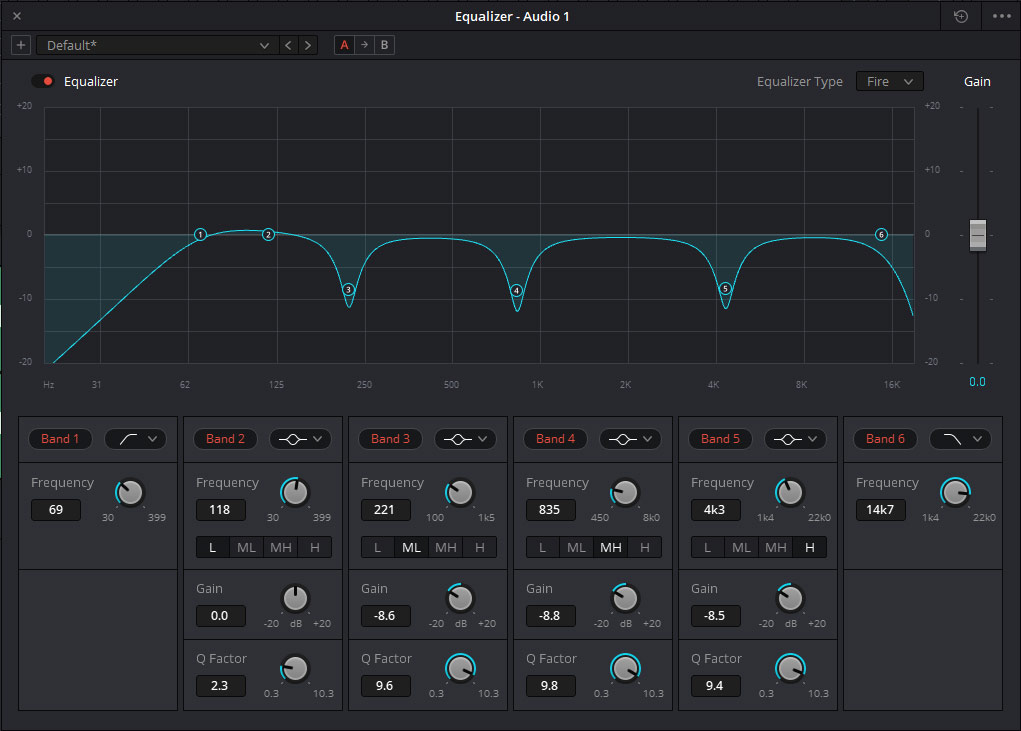
Now your audio will sound a lot cleaner and crisp.
Noise Reduction Effect
Up to this moment, your audio will sound much better. However, you may still be able to hear unwanted background noises due to environment you recorded the footage in.
We need to apply the Noise Reduction effect and adjust the setting to remove the noise.
- Click on the + icon next to Effects in the Mixer.
- Go to Restoration > Fairlight Fx > Noise Reduction.
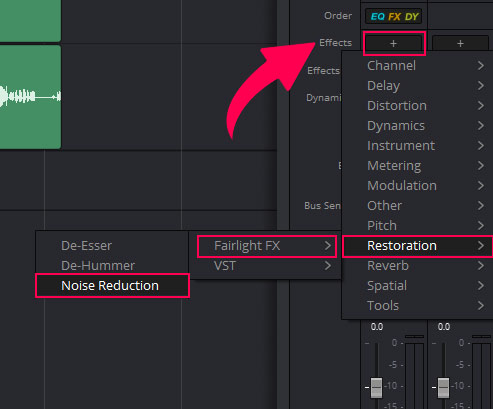
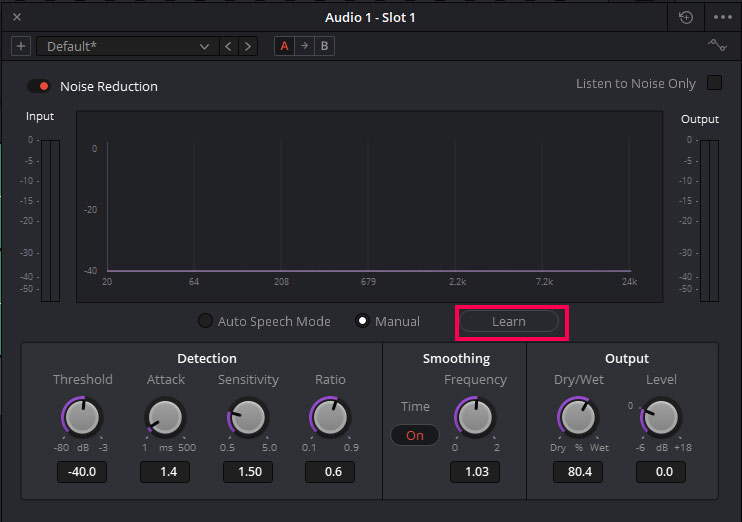
A new window will open when you click on Noise Reduction.
- There is an important tool in the noise reduction effect called Learn.
- You can use “Learn” to give Resolve a sample of noise from your audio with no dialogue.
- Click on Learn and play a part of your audio with no dialogue, and Resolve will take the sample of the noise and remove the background noise from the whole audio.
The Gate
The Gate will cut off the frequencies where the dialogue is not happening, and this is really helpful in case you want to remove unwanted background noises.
- Double-click on Dynamics.
- Toggle the switch next to the Expander and click on the Gate tab.
- Now listen to your audio and bring the Threshold slider up or down.
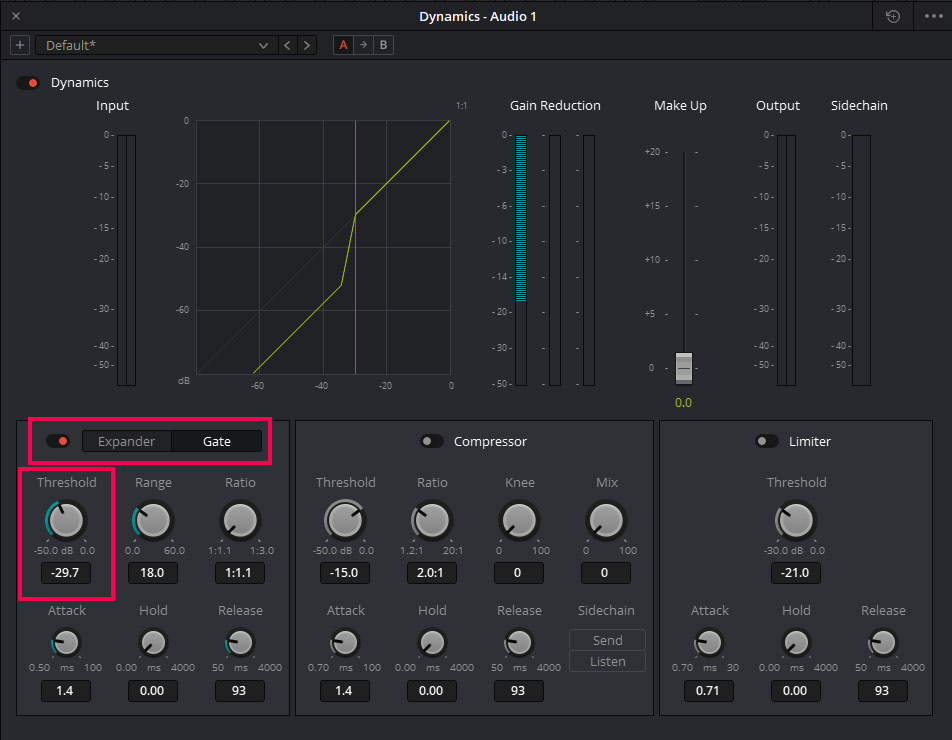
Note: Don’t keep the value too low, it will also cut a few words.
Conclusion
In this tutorial we have covered how to improve your audio, particularly human voices, in DaVinci Resolve 18. First, we explained how to make the Audio Track visible from the the Timeline View Options. The next section was dedicated to converting mono audio to stereo audio.
Next, we have shown how an audio can be normalized from the Clip Attributes. Next, we have looked at the EQ panel and how to eliminate unwanted frequencies using different bands. We also applied the Noise Reduction Effect and reduced the noise in the audio using the Learn option. Ultimately, we applied the Gate to further eliminate lower frequencies to clean the audio.
Mastering the Fairlight page and improving voices can be a bit tricky, but we hope that this tutorial has helped you to familiarise yourself with the multiple features and effects available!
Thanks for reading & feel free to check out more of our articles!
Expert Rating
Summary
Learning how to enhance human voices in DaVinci Resolve 18 can be extremely helpful for those who want to improve the audio quality of their video projects. By mastering voice enhancement tools such as noise reduction, equalization, and volume normalization, you can make their audio sound clearer and more professional. This can make a significant difference in the overall quality of their video projects, making them more appealing to viewers.


