How to Draw an Arrow Quiver | An Easy Step-by-Step Guide
An arrow quiver is a holding container for arrows that archers use to carry and transport their arrows. In normal archery practice, a quiver is typically worn on the hip or attached to the bow for easy access to arrows while shooting.
In competitive archery, such as in tournaments or Olympic events, specialized quivers may be used that are designed for quick and efficient access to arrows during fast-paced competitions.
Quivers come in different styles including hip quivers, back quivers, and bow-mounted quivers, each offering various advantages based on personal preference and shooting style.
In today’s tutorial, you will learn how to draw your very own back quiver in only 6 easy steps.
| Steps | Complexity Level |
| Pocket Hole | 1 |
| Quiver Body | 2 |
| Belt | 3 |
| Buckle And Strap | 3 |
What You Will Need
- Sketchpad or some blank paper
- Pencils (2b, 3b, or 5b)
- Eraser
- Ruler
- Colored pencils or markers
- 15-20 minutes
How to Draw An Arrow Quiver
Before we begin, make sure you have all of your drawing tools handy, some free time and a little bit of patience.
Check out the outline of all the steps you will be doing before you start – also steal a peak at how awesome the last one looks – and then without any further ado, jump right in!
Step 1: Draw the Pocket Hole
The pocket hole is the open top on the quiver where the arrows go in. This part will be the very top part of your drawing, so make sure you draw this on the upper section of your page to make room for the other steps you will draw later on!
First, draw a rectangular shape that slants sideways a bit. Keep your lines neat, however they can be slightly wavy, as well.
Remember that your pocket needs to look kind of 3D-like, so tilting your rectangle to the side will assist you in getting the dimensions right.
Next, draw a smooth curve on top of your rectangle, starting from one edge and ending at another.
The empty space in between your rectangle and curve should look like a thin, sharp oval. That’s the pocket hole where all the arrows are put in!
- Start by drawing a rectangle shape that slants slightly downward
- Draw a smooth curvy line starting from the top left side of the rectangle
- Connect the line with the top right corner of the rectangle
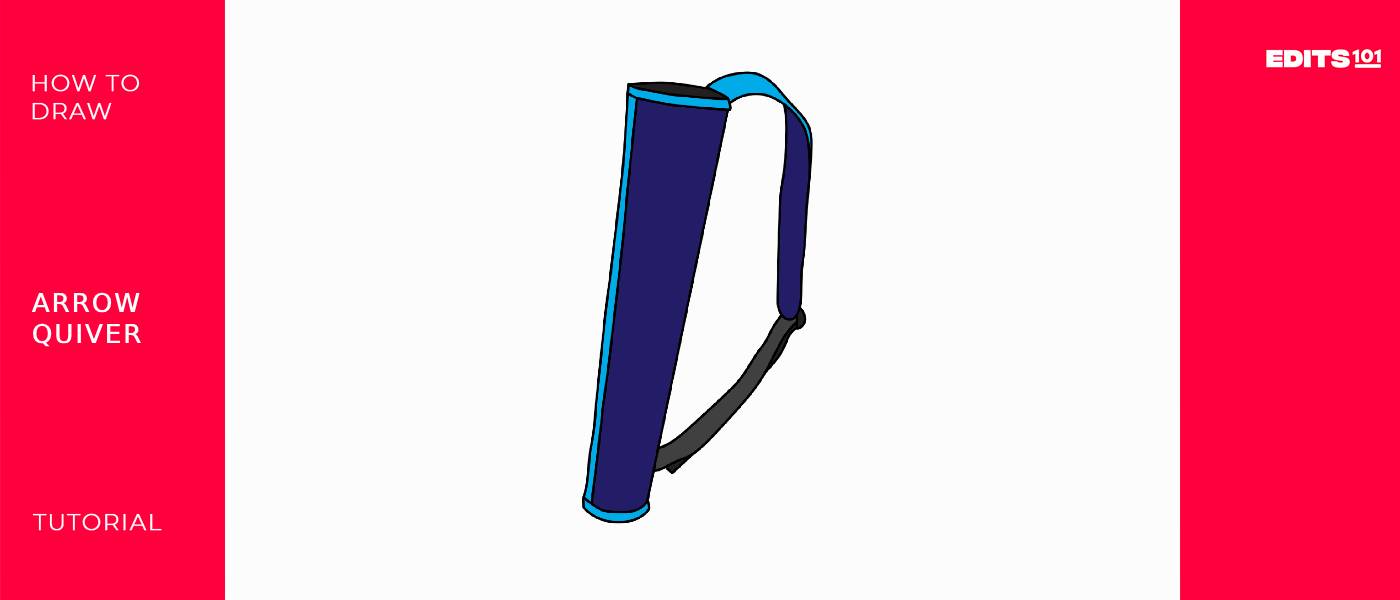
Step 2: Draw the Quiver Body
The quiver body is the biggest component of your drawing, because this is the container or holder that carries all of the arrows. It needs to be wide and long – not too much – but enough so that it resembles a realistic back quiver.
First, start by drawing a long vertical line from the bottom left edge of your pocket hole. Your line should slightly curve to the right as it reaches the bottom.
This is because you want your top part of the quiver to be wide and the bottom part to be narrow. It makes the drawing look more realistic.
Next, draw another vertical line directly next to the first one, with the same slight curve, and end it just a pinch lower than where the first line ends.
Now, going to the opposite side of your pocket hole, draw a vertical line from the right edge and end it roughly around the same place your first vertical line ended. Make this line super straight by using your ruler!
Finally, draw a thin curved horizontal rectangle under your lines. This represents the bottom seam that attaches the body of your quiver together.
- Draw a long rectangle starting from the bottom of the pocket hole
- Add a vertical line on the left side, within the rectangle
- Draw two curved lines at the bottom that attaches to the rectangle shape
- Make sure the quiver body is slightly curved to the left
Step 3: Draw the Belt
Your drawing now needs a belt attached to the body so that archers can throw the quiver over their shoulders and carry it on their backs!
First, start by drawing a line that curves up and then downward just shy of the top right corner of your pocket hole.
Once your line curves into a vertical one, run your pencil downward until it aligns with the middle of your quiver’s body.
Then curve the end of your line to the left and draw a vertical line running upward. End the line when it’s next to the rectangular shape of your pocket hole.
Next, starting from the side of the rectangular shape drawn on the pocket hole, draw a line that curves to the right and connect it with the curve of the first line along the top.
Before it connects, make sure it runs down the side of the line with a small space in between them.
- Draw lines that have a smooth, wide curve
- The lines should abruptly transform into vertical lines
- Make sure that lines do not overlap each other
- Check out the image below to ensure you’re drawing is on the right track
Step 4: Draw the Buckle and Strap
Your arrow quiver drawing is coming together beautifully! Our final step is adding a buckle and strap so that archers can adjust the fit of the quiver as it hangs from their shoulders. Similar to the belt, this step consists of drawing a few curved lines.
First, start by drawing a wavy line from the bottom left side of your belt and smoothly curve the line to the left until it connects to the right side of your quiver’s body.
Next, draw another wavy line starting from the bottom right side of your belt and smoothly curve the line to the left until it reaches the side of the quiver’s body, beneath the line you just drew.
Make sure that there’s a nice bit of space in between your lines. Start it off slightly narrow but end it off wide enough to resemble the width of your belt. These two lines together represent your strap.
Then, where the belt and strap meet, draw a small inverted “c” on the right side, and a small line that runs along the outer line of your strap. This is the buckle.
Finally, for an added touch of realism, draw a small inverted capital “L” along the outer line of your strap at the bottom.
Check out the image provided below to make sure your drawing matches.
- Start by drawing a curvy diagonal line from the bottom left part of the belt
- Draw another similar line starting from the bottom right part of the belt
- Add an inverted “C” on the side and a triangle at the bottom to represent the strap
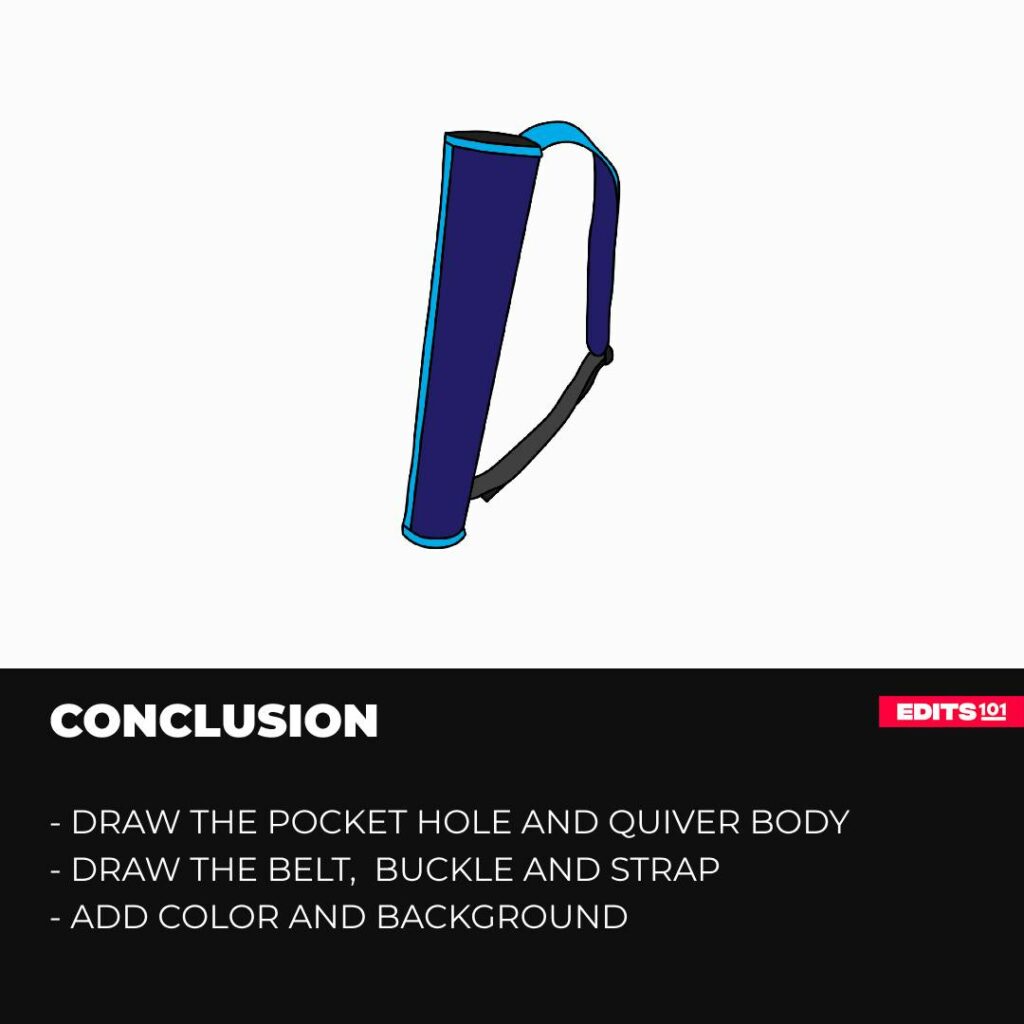
Congratulations! Your Arrow Quiver drawing is Complete
Let us know what your experience was like by reaching out and commenting on any one of our YouTube videos. Just be sure to state the name of the drawing you did (e.g, “I drew an arrow quiver and it was…”) within your comment. We’d love to hear from you!
Once you’re ready, check out your drawing to make sure you’re happy with the final product. If there are any parts you want to correct, do so now. Use your eraser and perfect any little inconsistencies that may stand out.
Taking your Drawing to the Next Level
While you’ve achieved an amazing thing by completing your new drawing, there are still ways to improve and make it even more better.
As the famous words of Henri Matisse go, “Don’t wait for inspiration. It comes while working.”
Push yourself even further by taking your drawing to the next level and adding in your own personalized touches. That’s the true spirit of creativity!
step 5: adding a background
Adding a background is fundamental in storytelling, because it opens up a scene and begins a narrative.
In art, it’s no different. A background behind a drawing tells a story that viewers can interpret in whatever way they desire. It takes a simple drawing of an object and boosts its overall quality by leaps and bounds.
There are numerous background ideas to play around with for an arrow quiver drawing.
Arrow quivers are directly related to the sport of archery, which is both played indoors and outside. You could choose a forest background, or an indoor target practice range for your setting.
Alternatively, you can think outside of the box and really let you creativity show. An arrow quiver on a canoe? What? Make people think. Sometimes it’s best to shock them with your art!
Step 6: adding color
Right now you have a black and white sketch on a piece of paper. While that’s enough to show off your drawing skills, adding color brightens up the whole drawing and makes it so much more eye-catching!
For our drawing, we’ve decided to choose blue for our archery quiver because we’re quite fond of the color. If you think it compliments the quiver well, you can use blue for yours too.
Just make sure the colors you pick differ in certain parts of your drawing, like the pocket hole, the seam along the side of your quiver’s body, the seam at the bottom, your belt and strap. This will make your drawing pop!
Bonus Tips
Add some shading along the side of the quiver’s body to make it even more three-dimensional by giving it a shadow!
Draw some other distinctive features of archery and add them to your background, like an arrow, a target face, or an archery bow.
Add your name to your page to personalize your work of art.
Conclusion
Your arrow quiver drawing is now completely done and dusted! If you’ve followed all the steps and made it this far, you did some great work. Job well done!
You have read and hopefully learnt so much from today’s tutorial; like how to draw a back quiver, some fun facts about quivers and the different types that’s on the market right now.
For that, be proud of yourself, and remember that there are many other drawing tutorials waiting for you. From Edits101 to you, see you next time.
Thanks for reading & feel free to check out more of our articles!
Author Rating
Overall Rating
Summary
Follow this arrow quiver tutorial as it leads you through sketching a fundamental design and then elevating its overall appearance for a more authentic and intricate look.