How to Draw an Ice Resurfacer | a Step-by-Step Guide
An ice resurfacer, also known as a Zamboni machine, is a vehicle designed to clean and smooth the surface of an ice rink.
Equipped with a large blade, an ice resurfacer shaves off the top layer of ice, followed by a wash water system that cleans the ice and then a towel-like mechanism that leaves behind a smooth sheet of fresh ice, ready for use!
If you’re an ice hockey or figure skating fan and you enjoy learning how to draw new things, this might be the perfect tutorial for you!
In today’s lesson, we’re going to be covering everything you need to know in order to draw an ice resurfacer in 9 easy-to-follow steps.
| Steps | Complexity Level |
| The Main Body | 1 |
| The Rear Details | 3 |
| The Water Conditioner | 2 |
| The Water Tank | 1 |
| The Driver’s Seat | 3 |
| The Front Blade | 3 |
| The Wheels | 2 |
What You Will Need
- A4 sheet of paper
- Pencils (2b, 3b or 5b)
- An eraser
- A ruler (optional)
- Drawing compass (optional)
- 40-45 minutes
How to draw an Ice Resurfacer
Drawing an ice resurfacer provides the opportunity to learn about technical details, shape, and form while also enhancing observational and artistic skills.
It may seem challenging at first, but with a little bit of pratice and patience, you can surely draw your very own ice resurfacer. Grab all of your drawing tools and follow the outline below to understand each step before you begin.

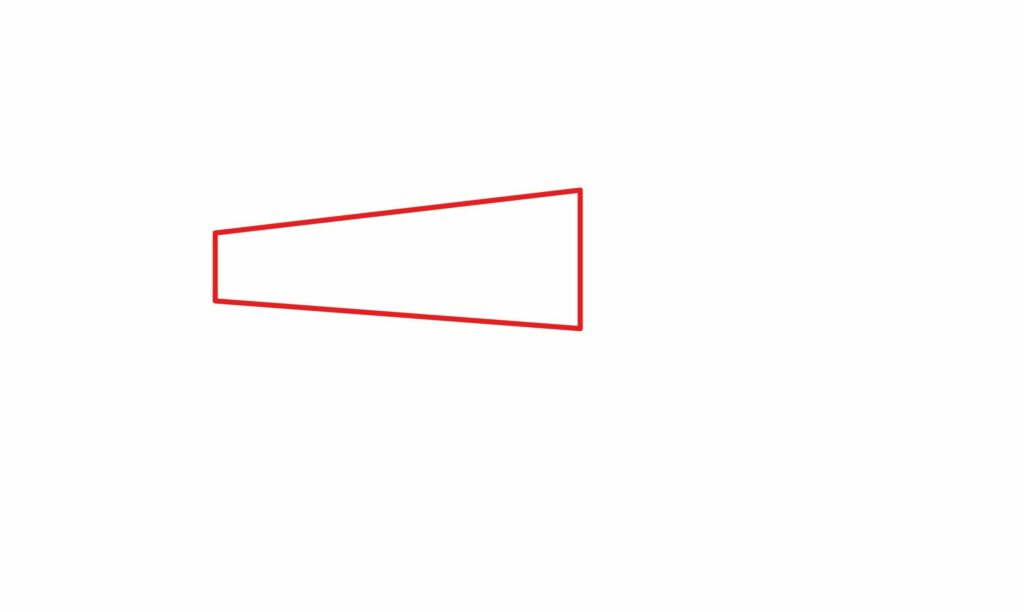
Step 1: Draw the Main Body
Draw a horizontal rectangle on the left side of your drawing paper. Erase the left side and replace the horizontal lines with diagonal lines. Also, ensure the vertical line on the left is shorter than the one on the right.
- Draw a slanted rectangle for the base
- Ensure one end is shorter than the other
- Use a ruler for precision and correct proportions
Step 2: Add the Rear Details
Draw a vertical rectangle attached to the right side of the body. Then, draw a wide semicircle at the bottom of the rectangle that extends inward, towards the body.
Complete the shape by drawing a horizontal line that curves into a vertical line when it’s aligned with the left side of the body.
- Draw a vertical rectangle on the left side of the main body
- Draw a semicircle at the bottom of the rectangular shape
- Connect the shapes together with a horizontal and vertical line

Step 3: Draw the Water Conditioner
Start by drawing a vertical rectangle attached to the right side of the resurfacer for the water conditioner.
Ensure the bottom is slightly longer than the rectangle added in step two. Then, draw a small horizontal rectangle on top of the vertical one, and add a tiny loop above for the handle.
- Start with a solid rectangle on the right side of the resurfacer
- Draw a small rectangle on top of the large one
- Add a little loop on top to resemble the handle

Step 4: Draw the water Tank
You can either start by drawing the curved lines or the horizontal one. Either way, you should have a curved rectangular shape extending from the right side of the resurfacer, that’s capped off with a horizontal line.
- Draw a curved rectangular shape extending from the right side
- Add a horizontal line on the top to connect the curved lines together
- Ensure the tank’s proportion matches the ice resurfacer

Step 5: Draw the Driver’s Seat
Above the horizontal line of the water tank, draw a thick inverted “L” shape for the outline of the seat. When you’re finished, add a small square on the horizontal portion of the “L” shape to resemble a seat cushion.
- Draw an inverted “L” on top of the water tank for the outline of the seat
- Add a small square on the horizontal portion of the “L” for the seat cushion

Step 6: Draw the Front Blade
Start by drawing a thin diagonal rectangle extending from the bottom-right side of the body. Then, add two horizontal rectangles directly below that, one that bears the standard rectangular shape and another that has a diagonal side.
- Draw a diagonal rectangle extending from the bottom-right side of the body
- Draw two horizontal rectangles directly beneath the diagonal one
- Ensure the bottom rectangle has a diagonal side

Step 7: Add the Wheels
Draw two circles on each side against the bottom of the resurfacer. The wheel on the right ought to fit nicely in the space created by the semicircle, and the one on the left should be drawn over the bottom of the resurfacer’s body.
Add a smaller circle within each big circle to finish off this step, and voila, a set of wheels, ready to go.
- Draw two circles at the bottom on each side of the body for wheels
- Add another smaller circle within each big circle to resemble life-like wheels
- Use round objects for tracing to achieve perfect wheels

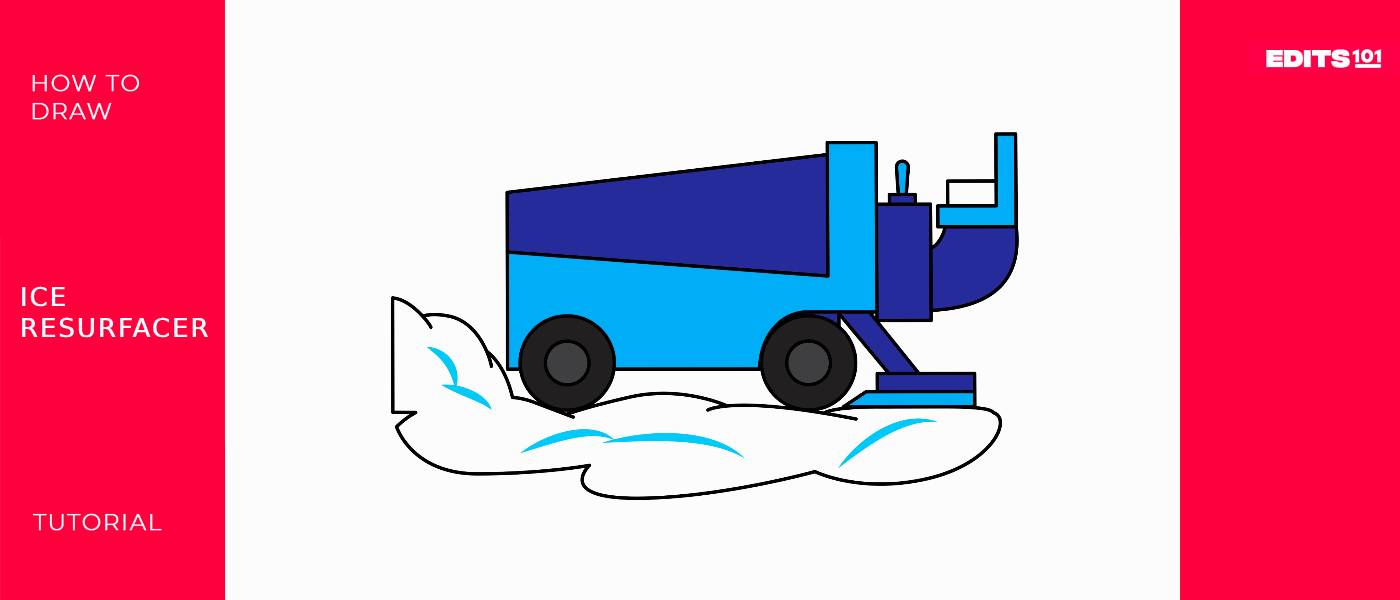
Congratulations! Your Ice Resurfacer drawing is Complete
Take a moment to assess your drawing. Does it resemble the drawing we have below? If not, take your time and refine some crucial details.
You may have noticed that you’ve only completed seven steps while we mentioned nine in the beginning of this lesson. That’s because it’s not exactly over yet.

Taking your Drawing to the next level
Now that you’ve drawn an ice resurfacer, make it even better by adding some color and background to your illustration.
Step 8: Adding a Background
Selecting the perfect background requires the use of imagination. First, you need to decide where you would like to your resurfacer to be.
Is it inside a bustling ice rink with skaters in the background, adding movement and activity to the scene? Or perhaps you have a snowy winter landscape with trees and mountains in the distance in mind.
Your ice resurfacer may even be complimented by a nighttime setting with bright stadium lights glowing overhead, highlighting the ice resurfacer as it prepares the ice surface for a late-night hockey game.
Whatever you decide, we’re sure your drawing will turn out great!

Step 9: Adding Color
Choose your favorite colors to make your ice resurfacer stand out among the rest. If you’re going for a realistic approach, then consider using the same colors you might have seen on a real-life Zamboni machine.
These machines are often dark blue and white, though if your drawing paper is white, be sure to use a light blue or creamy color to make it stand out. Color the wheels in black and use gray for the center of the wheels.

Bonus Tips
Interact with other budding artists on YouTube or visual learning platforms to gain a sense of community and for some extra insight on artistic pursuits.
Try using a light pencil first for rough sketches, so you can erase easily if you need to change anything.
If you need clarification on the shape, look at pictures of real ice resurfacers for reference.
Use shading to make parts of your ice resurfacer look three-dimensional and more lifelike.
Practice drawing circles and straight lines on a separate piece of paper to get better at the wheels and the body of the machine.
Conclusion
You’ve now learned how to draw an ice resurfacer in just a few simple steps, from the basic shape to adding important details and colors.
You created a complete picture by starting with the main body and adding elements like the driver’s seat, side panels, and the front blade.
Remember, each step will ultimately make your drawing look just like the real thing, and every time you practice, you get better. So keep on having fun by learning how to draw new things!

Thanks for reading & feel free to check out more of our articles!
Author Rating
Overall Rating
Summary
This tutorial is for young kids, teens and adults alike, aimed at teaching them how to draw an ice resurfacer and enhance it with a background and color in 9 easy step.