
Mask layers are essential features for almost any photo editing task at hand.
In this article, you will learn in-depth all you must know about Masking including its benefits. Then, we will take a look at how to add a mask and combine it with gradients and paint brushes as well.
Introduction to Masking in GIMP
Masking in GIMP is the process of controlling which portions of a layer are visible and hidden.
- Painting in white reveals pixels,
- Painting in black conceals them.
There are many different ways to mask in GIMP. The most common method is to use the Add Mask Layer option.
How Does Masking Work in GIMP?
When you add a mask over a layer, it is like a secondary layer over the current layer. It shows the layers which are visible on the pixel layer of the image. Generally, the alpha channel of the layer is altered based on the transparency of the layer.
- If you choose a white color paintbrush and paint it with white colour, the pixels colored in white is the visible area.
- If you pick a black color paintbrush and paint the pixels black, such pixels become transparent/hidden.

Parts painted in grey would be partially transparent. Depending on the lightness and darkness of the grey you choose, the visibility differs.
Importance of Masking in GIMP
When it comes to image editing, one of the most important things to know is how to use masks properly. Masks are used to isolate and protect certain areas of an image while you edit other portions.
Without a mask, you run the risk of accidentally altering or deleting parts of your image that you didn’t mean to.
Masking works non-destructively. Non-destructive functionality indicates that any editing made on the image doesn’t destroy the original pixel data. Therefore, any modifications are made dynamically over the images.
For example, if you wish to hide pixel data, simply hide them with masking. This avoids the risk of deleting any pixel data. If you need to edit a part of your image only, simply separate the overlay with masking.
Just in case you want to make some changes later, you can always go back to edit the mask layer. The underlying image pixels remain unchanged during the process masking. Masks also come in handy when you want to recolour or apply filters to a portion of your layer.
How to Mask in GIMP?
In this section, you will learn the basic way to add a layer mask over a layer easily.
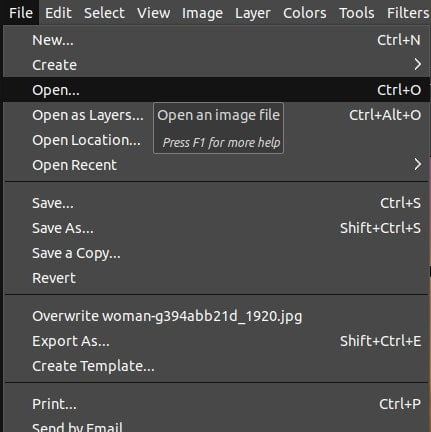
Step 01: Open an image
Start by opening the image you want to edit,
- Go to the File menu
- Then, choose Open.
- Alternatively, use the keyboard shortcut Ctrl/Cmd + O to open an image.
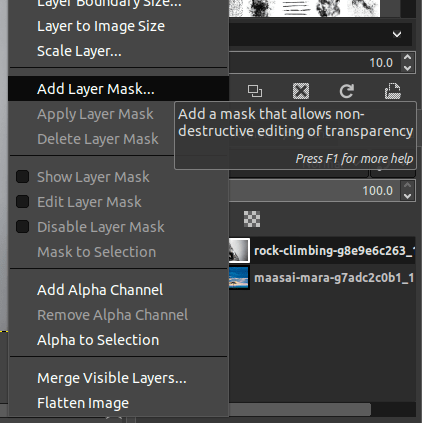
Step 02: Add the Layer Mask
To add the layer mask,
- Go to the Layers Dialog. The Layers Dialog displays the layers present in the image.
- Place the cursor over the image layer appearing at the top of the Layers Dialog, and right-click.
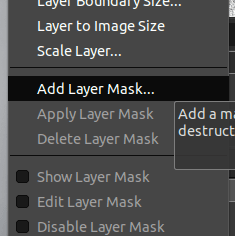
- Then, pick the option Add Layer Mask. A dialog with Add Layer Mask options appears.
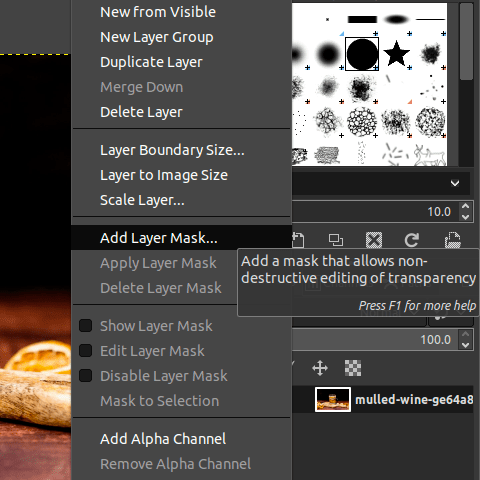
Alternatively, you have an icon to add a mask directly at the bottom right side of the screen. Simply click on that icon to pop up the Add Layer Mask dialog.
The Layers Dialog helps to manage and edit the layers effectively.
Step 03: Choose the appropriate option to apply the mask
A couple of options are displayed when you add a Mask to the Layer.
- Choose the preferred option, in this case we will choose White (full opacity).
- Next, click the Add button.
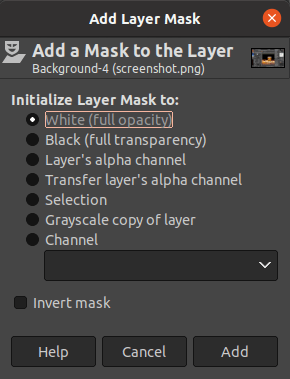
Each of these masking options has a unique feature.
For now, we need the White (full opacity) functionality to accomplish this task. You can also use Black (full transparency) to accomplish this based on your requirement.
How does the White (Full Opacity) option work?
The White (Full Opacity) helps to keep the complete layer visible. If you color the pixels black, the portions of the image which you don’t wish to keep become hidden.
How does the Black (Full Transparency) option work?
In Black (Full transparency), the entire layer is masked and hidden. It is pretty difficult to work with this option as the layer contents are invisible during painting the mask.
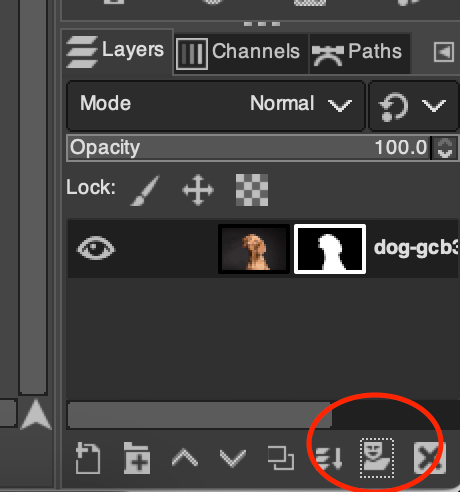
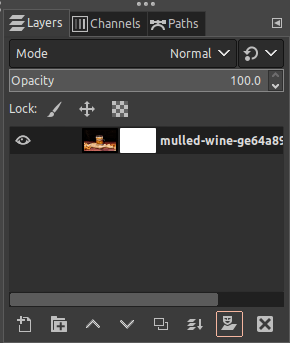
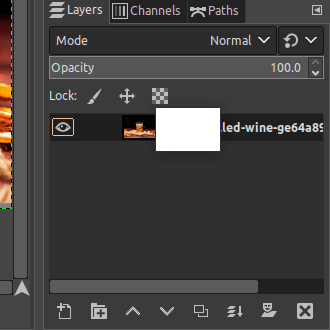
If a white layer is added, you can double-check it from the Layers Dialog. The Mask Layer will be displayed as a white colored square thumbnail adjacent to the image layer as follows:
Step 04: Activate the mask layer
Now, click on the mask thumbnail that appears in the Layers Dialog as follows. If you click on it, it will become active and pop out just like in the below image.
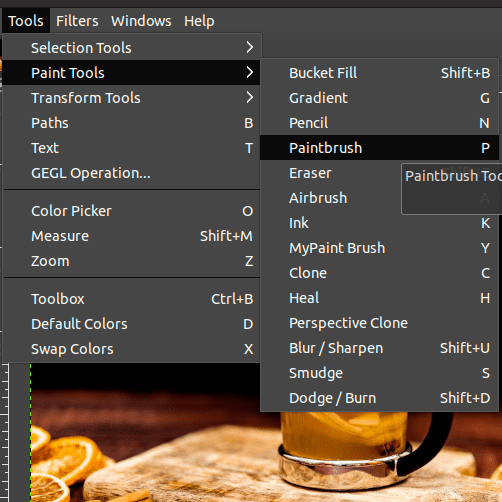
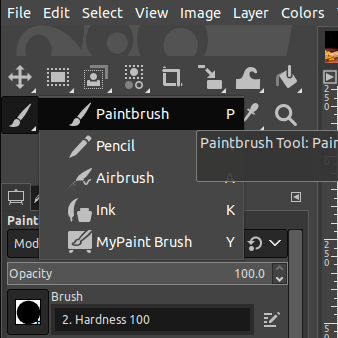
Step 05: Use the Paintbrush Tool (P)
Next, you can start painting the mask as per your requirement.
- Click on the Paintbrush tool that appears in the Toolbox as displayed below.
- You can also use the keyboard shortcut of the Paintbrush tool “P”.
- Alternatively, go to the Tools menu and select Paint tools. All the paint tools are displayed here. Then, choose the Paintbrush tool (check the second image).

Step 06: Set the foreground and background colors
We can use Black and White colors to separate the foreground and the background of the image. If you need to invert the colors, simply click on the arrow (see image below).
Click the ‘X’ key to switch between the foreground and background colors displayed. Make sure the foreground and background colors are black and white as displayed in the same order as follows:

For masking, we generally use Black, White, and Grey color. Each one has a unique functionality as described above.
Combining Images Using Masks in GIMP
GIMP allows you to combine images, change colour, change the background and so much more.mIn this section, we will blend two photos using layer masks. One image is displayed in front and the other image is placed behind it.
So, we will change the background of the front image with the scene from the other picture. This is quite tricky but very interesting.
Step 01: Add The Images You’d Like to Combine
First, open the image which you chose as the background,
- Go to File, to the image location and click on the image. Then, click Open.
- Alternatively, use the shortcut Ctrl/Cmd+O.
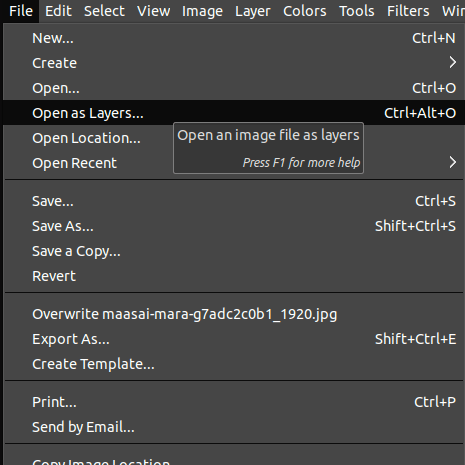
Open the second image as Layers
- Go to the File menu
- Choose the Open as Layers option. It would open the new image in the Layers Dialog.
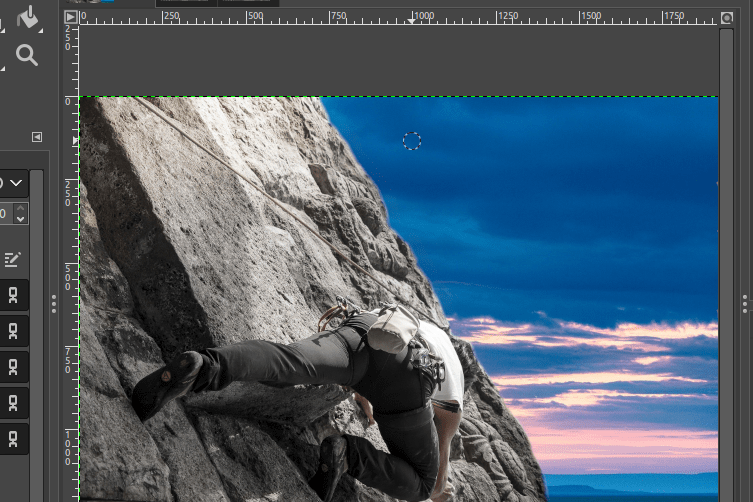
So here, the images in the Layers Dialog are displayed as follows:
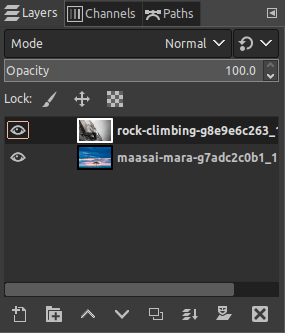
We are planning to transform the second image into a background for the front image (with the rock climber at the foreground) as displayed above.
If you’d like to learn more in-depth on how to remove a background in gimp, check out our detailed tutorial here.
Step 02: Add the Layer Mask
- Right-click on the top layer(rock image here).
- Choose Add Mask Layer.
Step 03: Choose the White (Full Opacity)
- Pick the White (Full Opacity) option as follows and add it.
- To add it simply click the Add button.
The mask layer is added and displayed in the layer. Now, check whether a white color box appears beside the top image where you added the Layer Mask.
If a white color box appears, you have successfully added the Mask layer. Then, click on the white color thumbnail to activate it.
Make sure that the foreground and background colors are displayed correctly as follows. Here, we would paint with the black color to reveal the background layer.

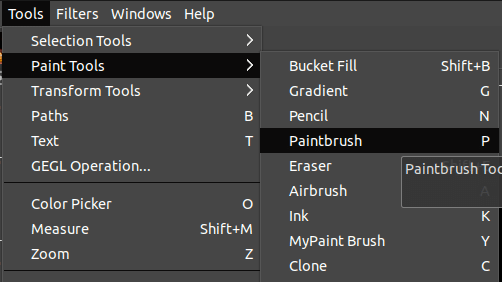
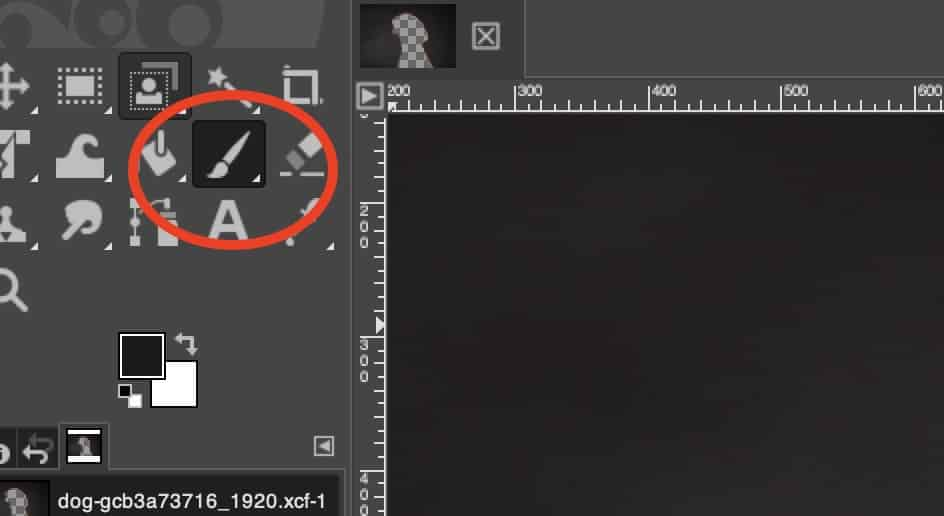
Step 04: Select the Paintbrush tool
You can activate the paintbrush tool as follows:
- Choose the Paintbrush tool from the Tools Menu.
- Simply press the shortcut “P”.
- Alternatively, go to the Toolbox and swipe through the Paint tools. Here, you can select the Paintbrush to activate it to paint over the Mask layer(second image).
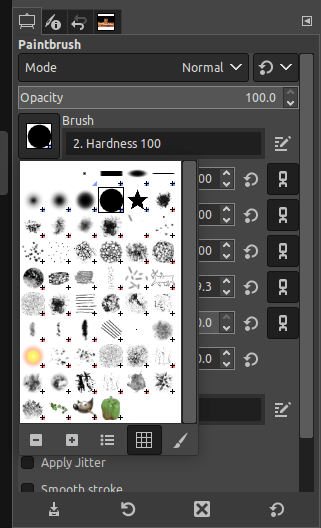
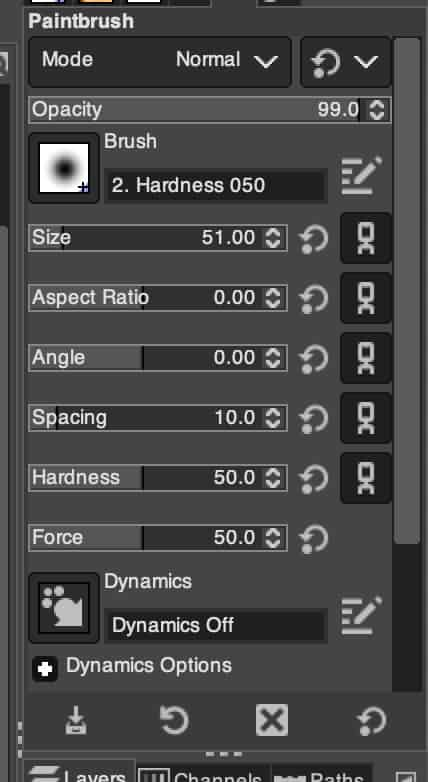
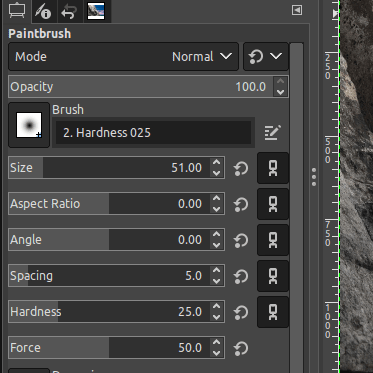
Adjust the brush settings
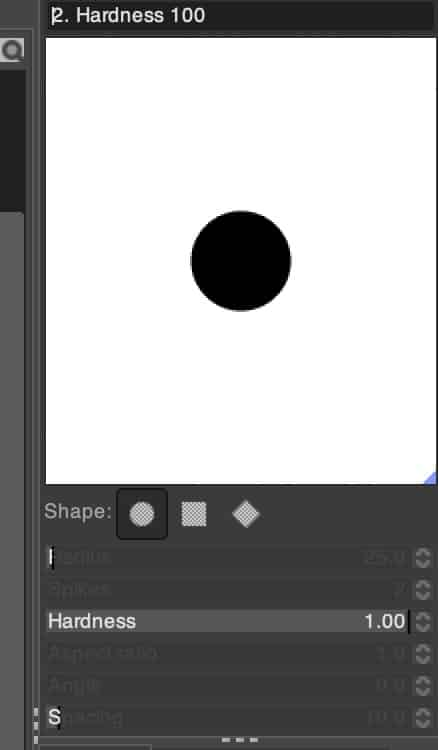
- Go to the Paintbrush Tool Options on the left-hand side, then click the brush icon. A couple of different types of brushes with various brush sizes are displayed.
- Choose the appropriate brush size with a hardness of 100 as follows. Once you click on each brush size, the hardness is displayed under the brush box as you can see follows.
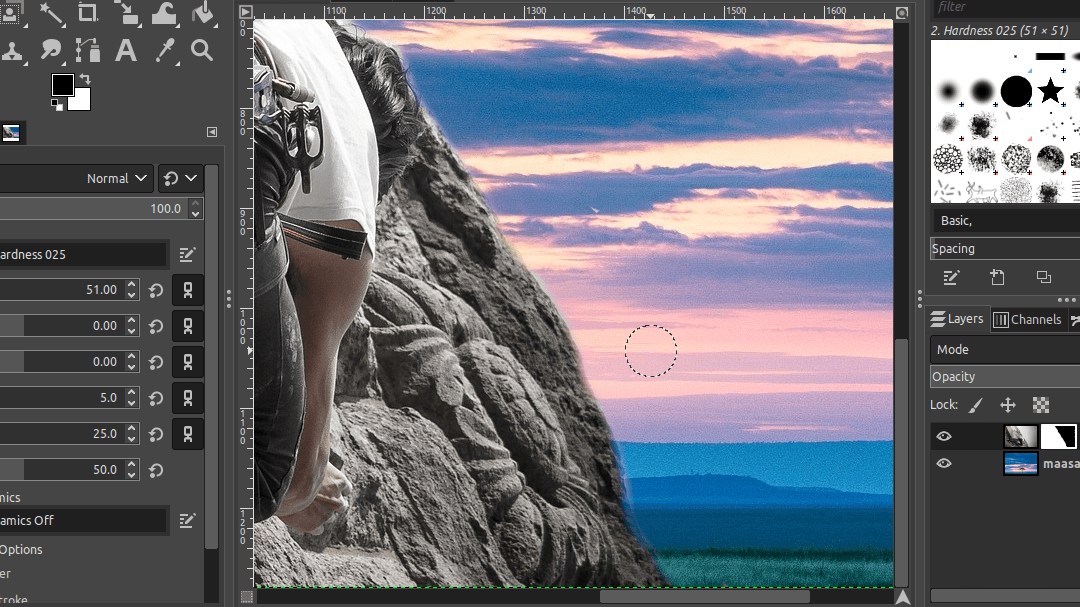
Then, start painting over the image on the top of the sections where you prefer to display the background. The black color brush would hide the top layer and display the bottom layer.
To Adjust the brush size use the “Curly Brackets” [] on your keyboard:
- [ = Brush Smaller
- ] = Brush Bigger
Keep painting until the background is displayed. If you need to undo any strokes you just painted, simply press Ctrl/Cmd+Z.
As you can see in the below image, I have erased the white sky portion of the first image using the black colored brush and displayed the sky background of the second image.
You might notice that the edges of the mask layer look jagged. If you blur the point where the first and second images intersect, a better result would be achieved.
How to open all brush settings in gimp
What do you do if you cannot view your brush settings?
- Select the Brush type from the brush panel on the right (as detailed above)
- Double click on the paintbrush tool from the toolbox on the left – to reveal the settings.
Step 05: Fine-tuning Mask
Moving to the next step,
- Go to the Paintbrush Tool Options on the left-hand side.
- Then choose the Brush with the hardness 25. This type of brush would blur the edges.
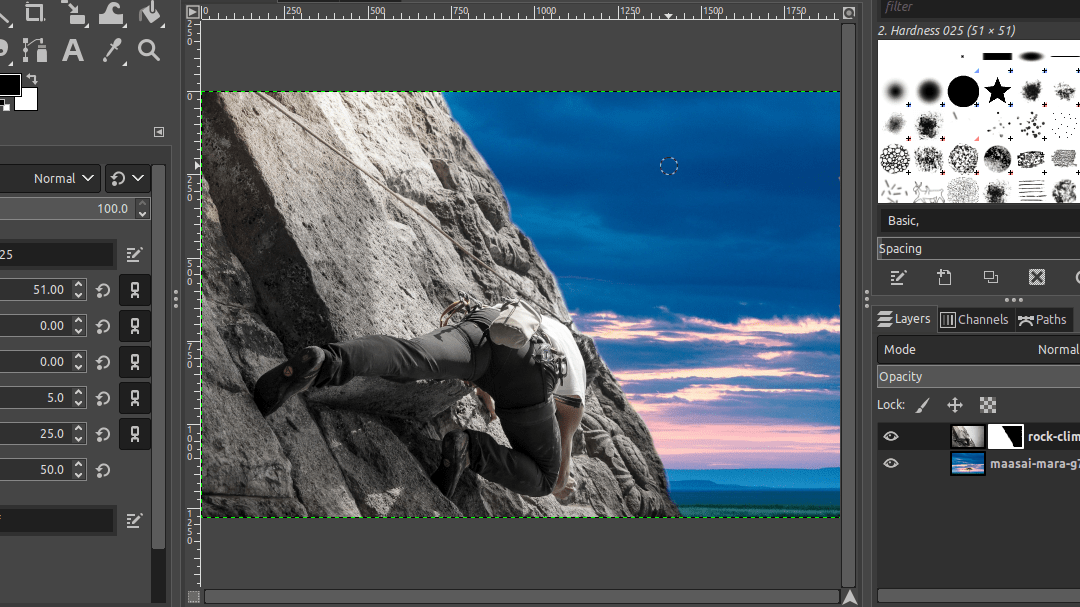
If you have a hard edge over the image, you can use the brush with hardness 25 to blur the edges and create a realistic effect. Now, zoom in on the image by pressing:
- Ctrl/Cmd and scroll the mouse wheel. This gives a clearer view of the missed sections to brush out.
Now, start painting over the edge where the first and second images intersect. Once you are done, zoom out (Press Ctrl/Cmd and scroll the mouse wheel) to preview:
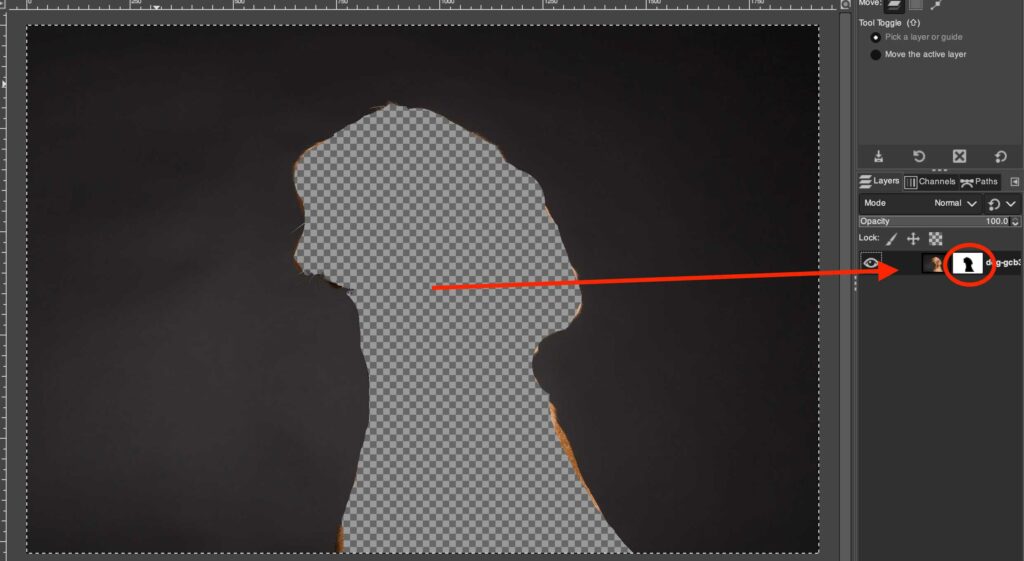
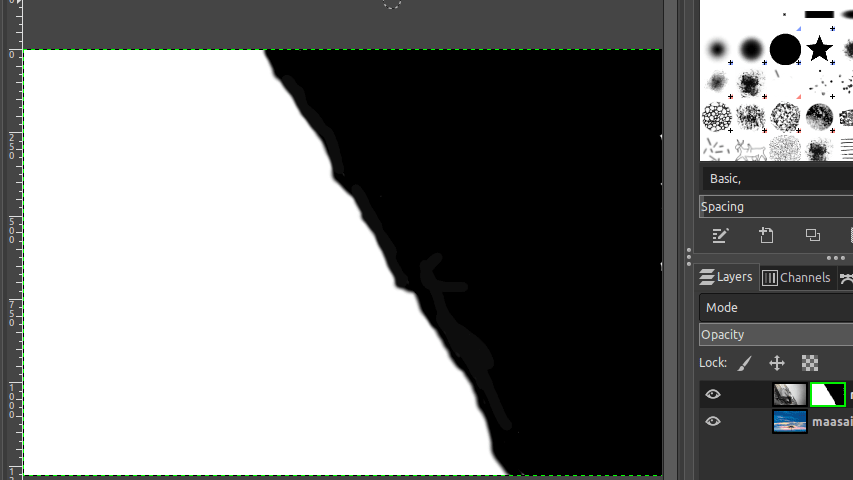
Display the Mask (Isolated Mask Preview)
- Right-click on the top layer (the image showing the rock climber) where you created the mask.
- Then, tick the check box Show Layer Mask.
Once you click it, the image is hidden and the mask layer is displayed as follows:
There might be sections on the black color side(transparent over the image) where you missed applying the black pixels. It might appear as spots on the image.
You can color over the image again with the brush of hardness 100 to remove the uncolored spots.
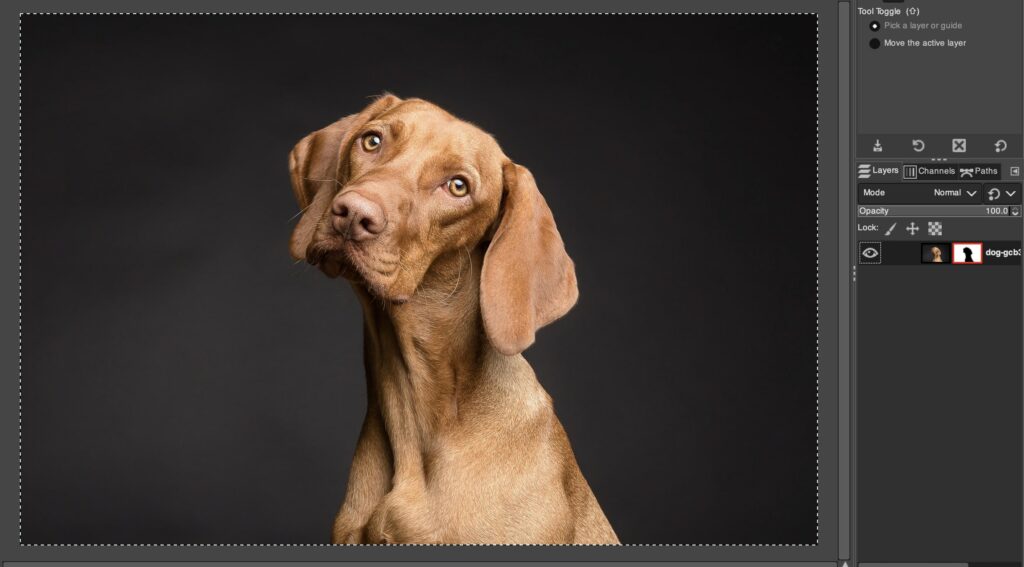
- Right-click on the same layer
- Remove the tick from the Show layer mask.
The image would be greatly improved and the resulting image would look more realistic. It requires a bit of patience and neatness.
How to add a Gradient in a Mask?
In this tutorial, we will use the Gradient tool and apply layer masks. We’ll be expanding on the same example as before.
Step 01: Add the Mask layer
Next, go to the Layers Dialog to apply the Mask layer by following the steps,
- Right-click on the layer appearing in the Layers Dialog.
- Click the option Add Mask Layer. It adds a mask layer over the current working image.
Choose the White (Full Opacity)
Once you click to Add Layer Mask, a dialog with a couple of options is displayed. Here, click the White (Full Opacity) option. Then, click the Add button.
When a white color box appears besides the selected image in the Layers Dialog, click on the white color thumbnail to activate it. You can also press “D” on your keyboard to automatically reset the foreground and the background colors respectively.
Make sure the foreground and background colors are displayed as follows. To invert the colours, use the arrow button.
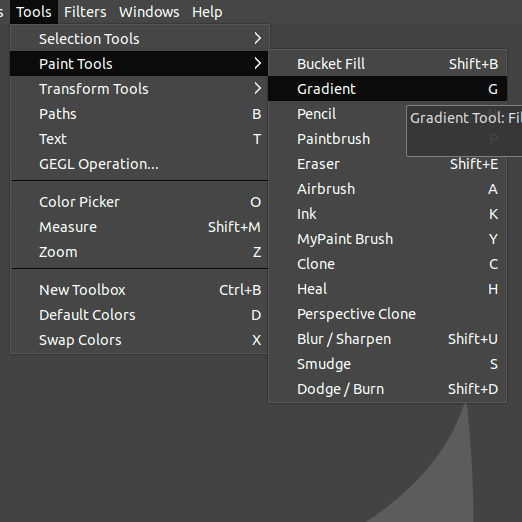
Step 02: Choose the Gradient tool.
Next, choose the Gradient tool by using any of the following methods,
- From the Toolbox on the left-hand side, click the Gradient tool as displayed in the below image.
- Alternatively, go to the Tools menu. Click on Paint tools and choose the Gradient tool.
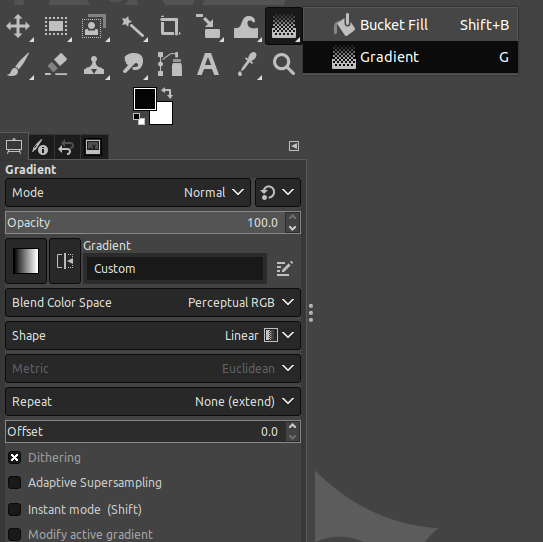
Step 03: Adjust the Gradient tool settings
Go to the Gradient Tool’s dialog at the left-hand side of the screen. Then, make the Gradient Selector option – “FG to BG(RGB)”. Set the Shape option as “Linear” as follows:
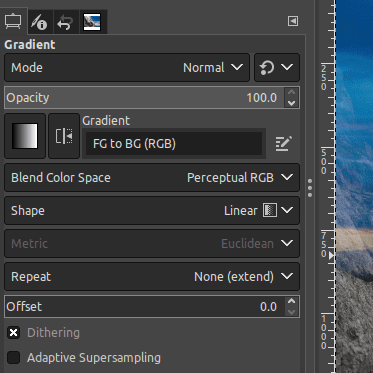
These are the two main settings to adjust in the Gradient Tool’s dialog.
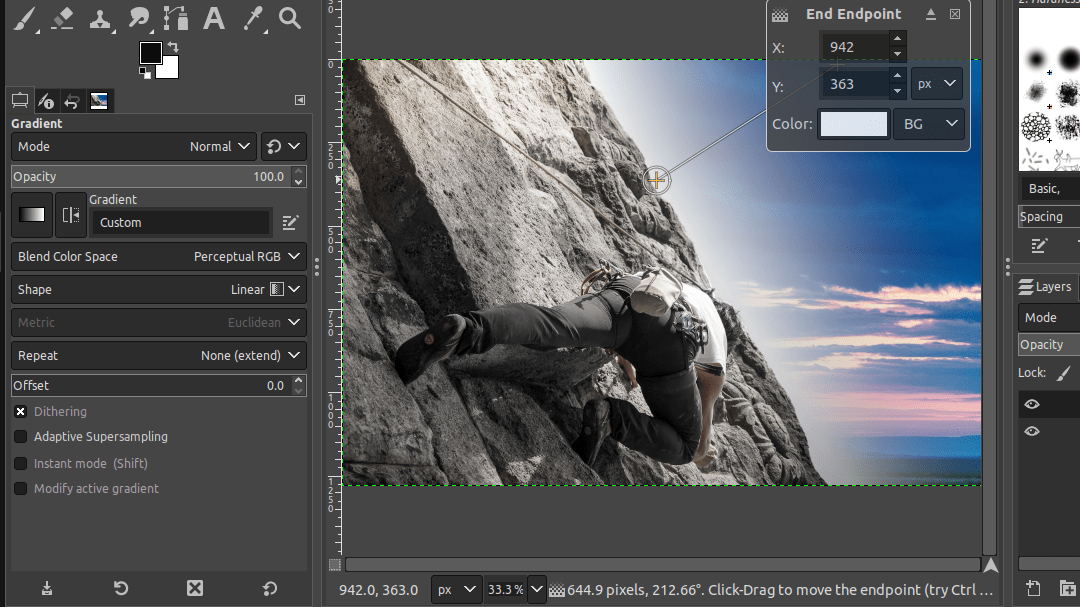
Apply Gradient on the Layer mask
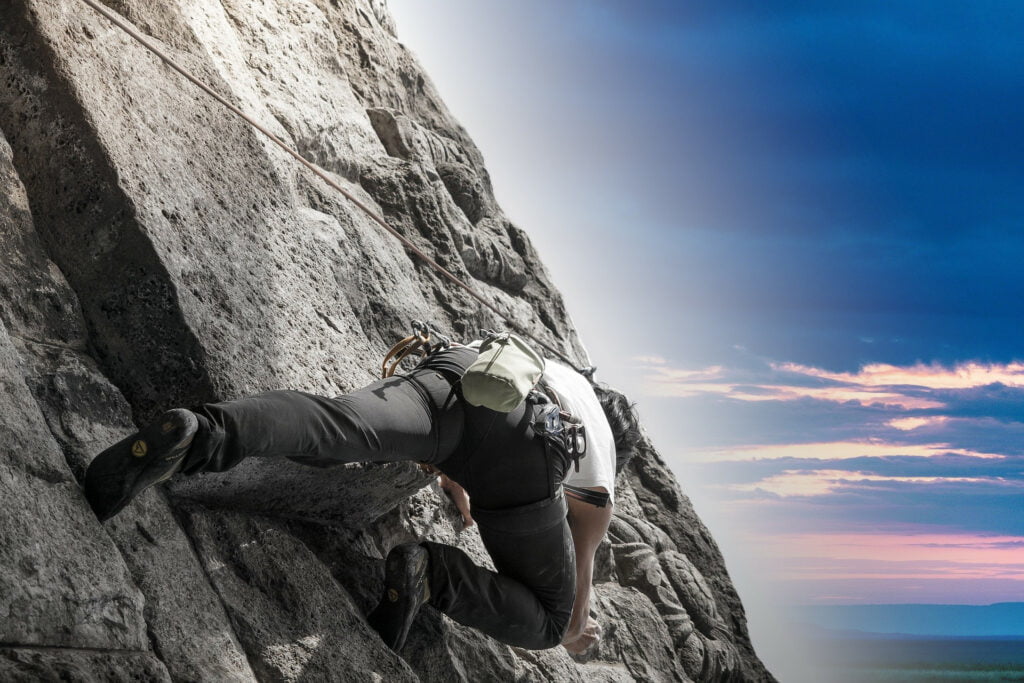
In this example, I placed the gradient on the rock edge and pulled upwards in line with the orientation of the rock-face. The aim is to give the image a more realistic touch by emphasizing the shadows and highlights of the rock-face.
The gradient effect will be applied across the rock-face where I clicked and dragged. In the Gradient Tool’s dialog, you will see a thumbnail preview showing the gradient, with the white parts transitioning to the black portion of the mask.
You can check out the following image to see how the effect is applied (follow the dotted handles).
You can repeat this step and modify the gradient as many times as you need. This is how my final image turned out.
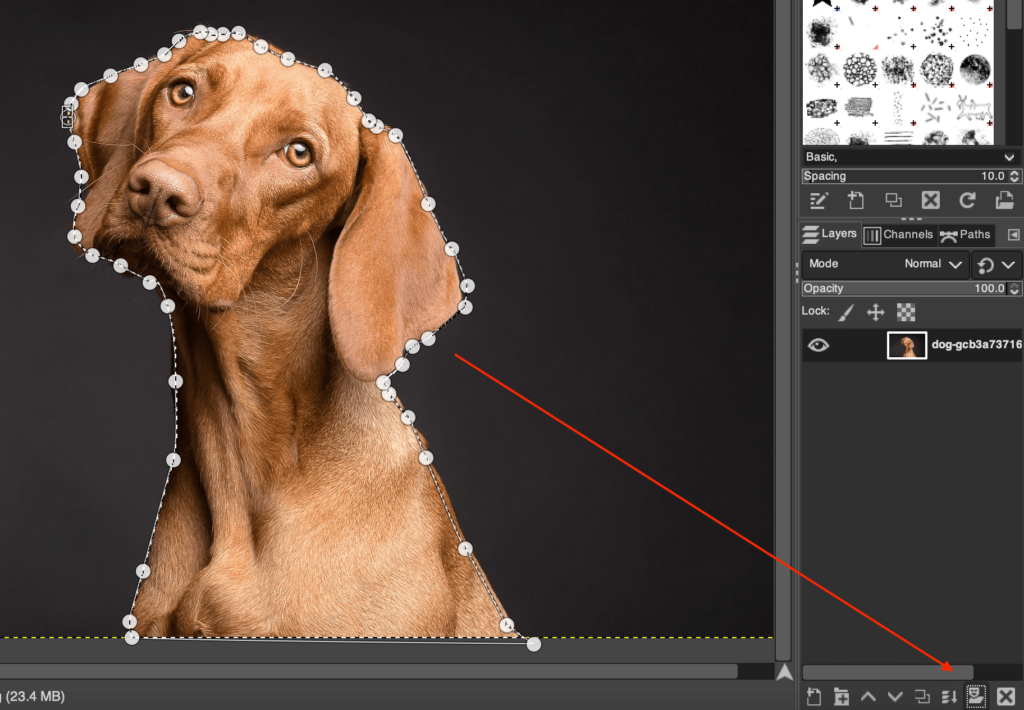
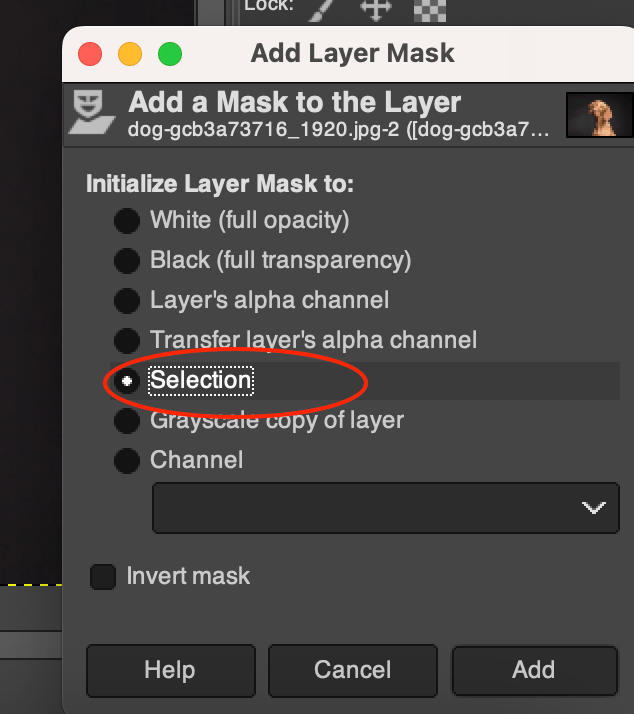
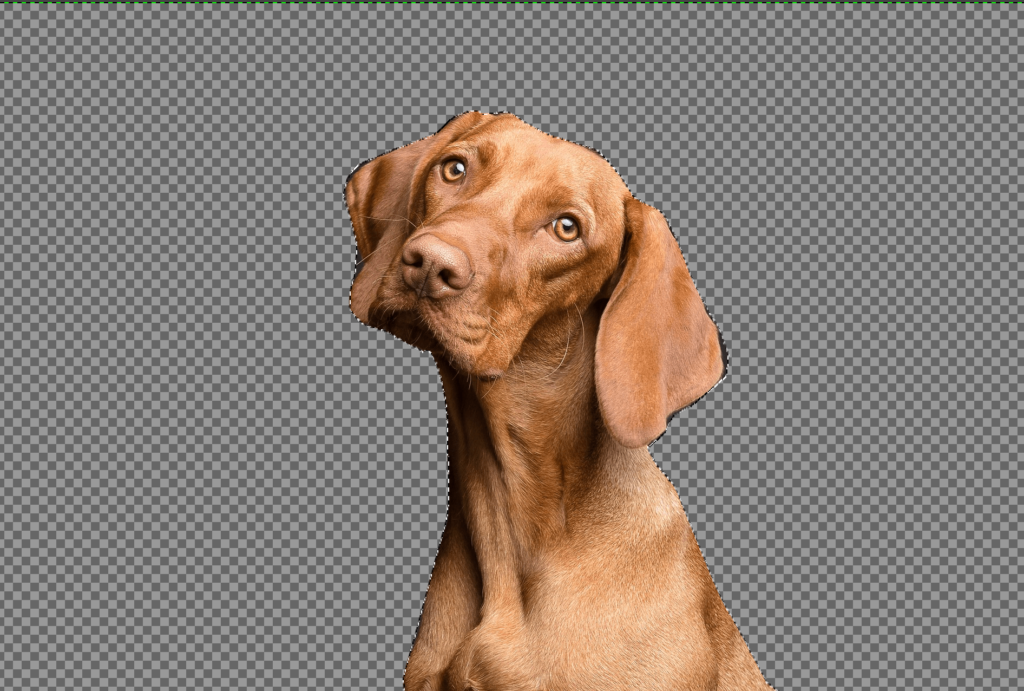
How to add a mask from selection?
If you’d like to make targeted masks (with detailed selections), you need to do the following:
- Choose a selection tool of your liking – Example: Paths tool, magic wand, Marquee Tool, etc.
- Draw your selection area around your subject.
- Select “Add Mask” from the Layers Panel or Layers Menu.
- Add Mask “From Selection”.
- De-select.
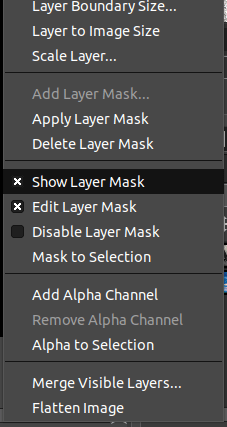
What are the Layer Mask Options in GIMP?
GIMP has a number of Layer Mask options for users. Each one has a distinct function for specific tasks. The following are the six key Mask options available in GIMP once you Add a Layer Mask:
- Apply Layer Mask
- Delete Layer Mask
- Show Layer Mask
- Edit Layer Mask
- Disable Layer Mask
- Mask to Selection
Apply Layer Mask
The Apply Layer Mask option combines the layer mask with the selected layer. So in this case, the mask becomes destructive.
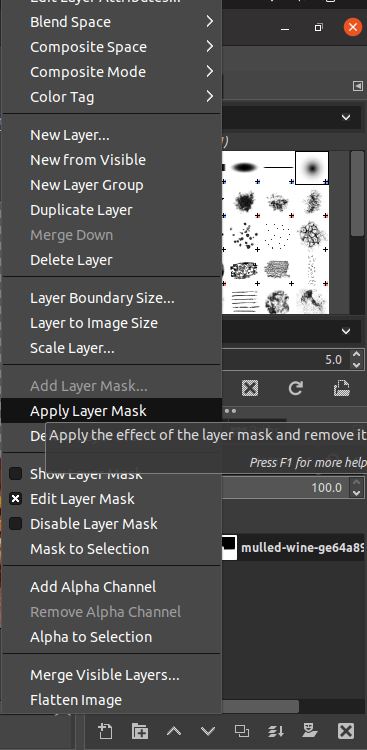
You can also note that once you apply this option, the layer mask thumbnail no longer appears in the Layers Dialog. If you prefer to add a layer mask again, you can add it over the Applied layer mask layer and add some new effects.
Delete Layer Mask
Delete Layer Mask deletes the layer mask applied over the current working layer. For example, you added a layer mask over an image. Now, if you want remove it, simply right-click on the current layer and choose Delete Layer Mask.
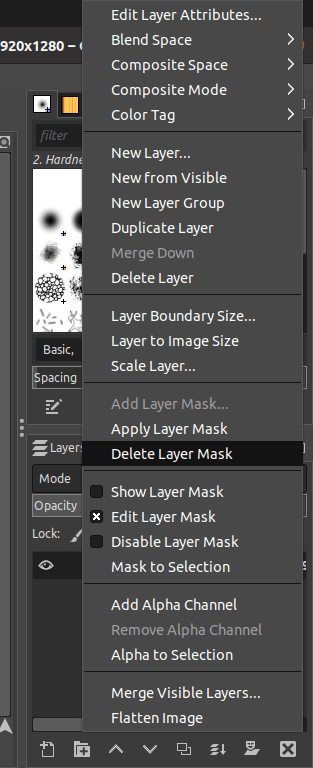
All the applied effects and the layer mask would be removed. Generally, the image is reverted to the original image.
Show Layer Mask
Show Layer Mask option displays the Layer mask applied to an image. For example, you added a layer mask onto an image and painted over it. If you want to display the painted area, simply right-click over the layer mask layer, and click on the checkbox of the Show Layer Mask option.
Then, once it is enabled, the image disappears and the painted mask layer is displayed as follows:

Edit Layer Mask
The Edit Layer Mask option allows you to edit the layer to which the Layer mask is applied to. Simply, right-click over the layer to which the Layer mask is applied to, then click on the checkbox of the Edit Layer Mask.
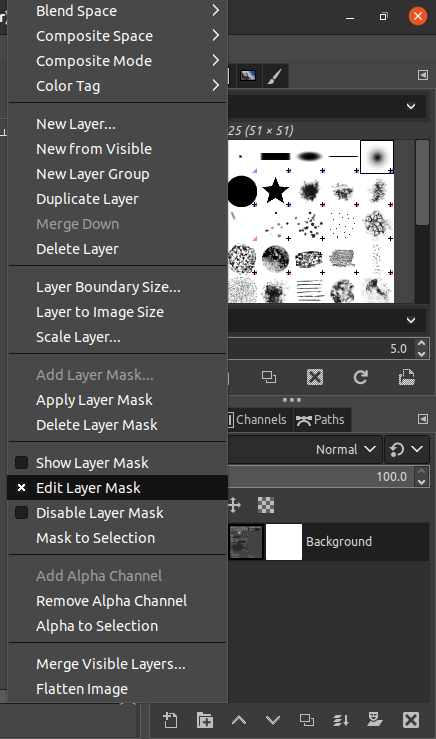
Then, the edits you make are also applied to the Layer mask. If you uncheck it, the changes you make are not applied to the Layer mask.
Disable Layer Mask
Disable Layer Mask makes the disables the mask applied to a layer. If this option is enabled (has the ‘x’ symbol over the checkbox), it would not be on. (CTRL/CMD + Click on the mask in the layer panel)
Redbox around the mask indicates that the mask is deactivated.
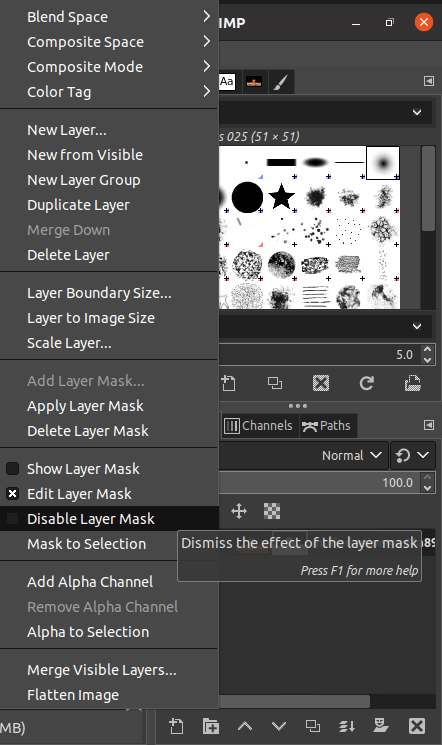
The applied mask would be disabled and the effects you apply would not affect the layer mask. You can disable/re-enable it at any point.
Mask to Selection
Mask to Selection selects the white portions of the mask layer. For example, if you had applied a mask over an image that consists of both black and white, the portions painted in white will be selected.
These are displayed in dotted lines in the image.
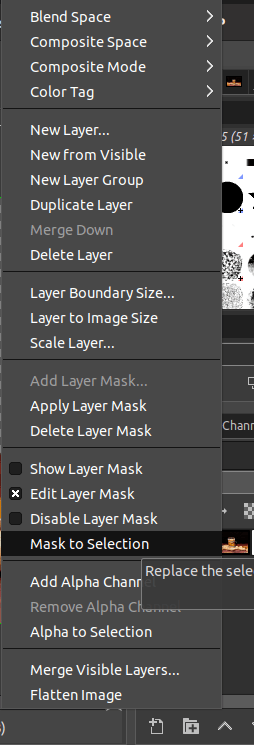
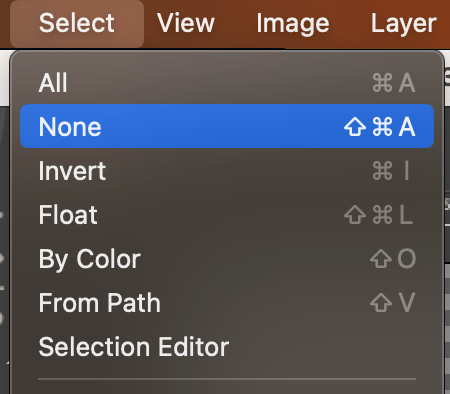
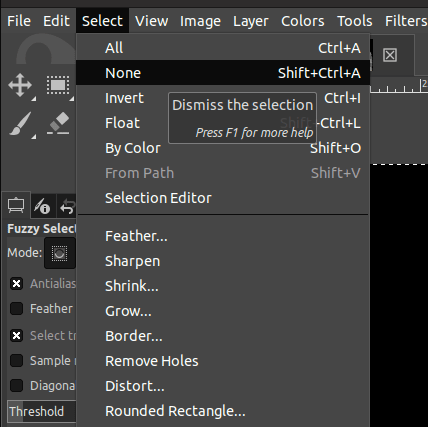
You can deselect this selection by,
- Going to the Select menu and Click None.
- Alternatively, use the shortcut Ctrl/Cmd+Shift+A.
Conclusion
In conclusion, you learned all the essentials of masking in GIMP. We have covered all the Layer mask options and how to apply masks with various effects.
Layer masks can be used for various purposes as described above. You can easily combine images and limit effects to portions of your image.
Thanks for reading & feel free to check out more of our articles!
Expert Rating
Summary
Know how to use masks properly, is one of the most important things when it comes to image editing. The versatility and multitude of ways in which layer masking can be used to aid in creating a high quality project, alone makes this a highly scalable as well as functional skill. While simple to understand the concepts of the tool, it does require some amount of practice to use effectively. While not the most difficult of skills to master, it is an intermediate level tool.


