How To Draw A Championship Belt | A Guide To Draw Like A Pro
A championship belt in wrestling is a highly symbolic and prestigious accessory awarded to the championship title winner in professional wrestling promotions.
Crafted with intricate design elements, these belts are typically made of metal with gold or silver plating, featuring engraved or embossed details that represent the identity of the wrestling promotion.
The front of the belt includes title plates displaying the championship’s name i.e. wrestler, the promotion’s logo, and sometimes the name of the current titleholder.
| Steps | Complexity level |
| Draw the middle part of the belt | 3 |
| Draw the left and right side | 2 |
| Draw the belt | 3 |
| Add details | 2 |
| Add details on the middle part | 3 |
What You Will Need
- Paper
- Pencils
- Eraser
- Colored pencils or markers
- Patience and enthusiasm
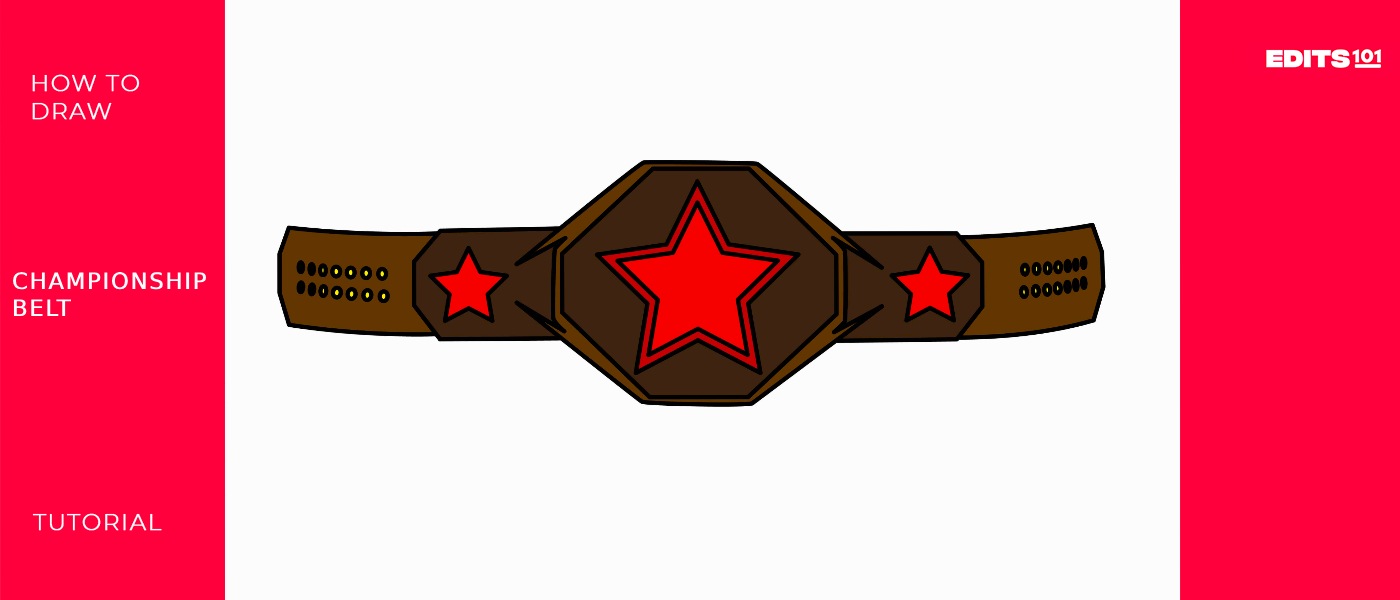
How to Draw a Championship Belt Step by Step
Wrestling is not just about the intense matches; it’s also about the iconic championship belts that symbolize victory and prestige. In this tutorial, we will guide you through drawing your championship belt.
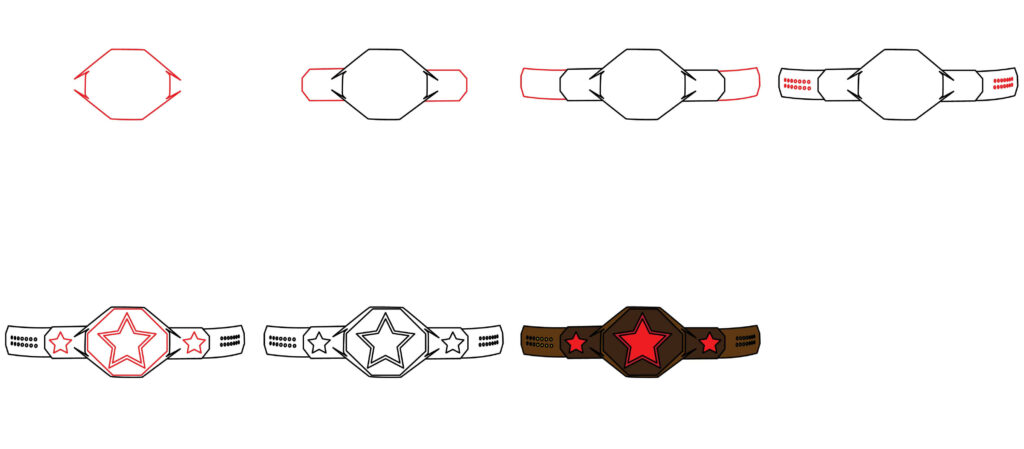
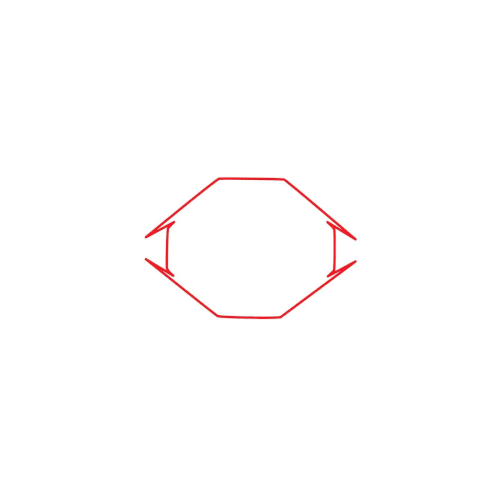
Step 1: Draw the Middle Part of the Belt
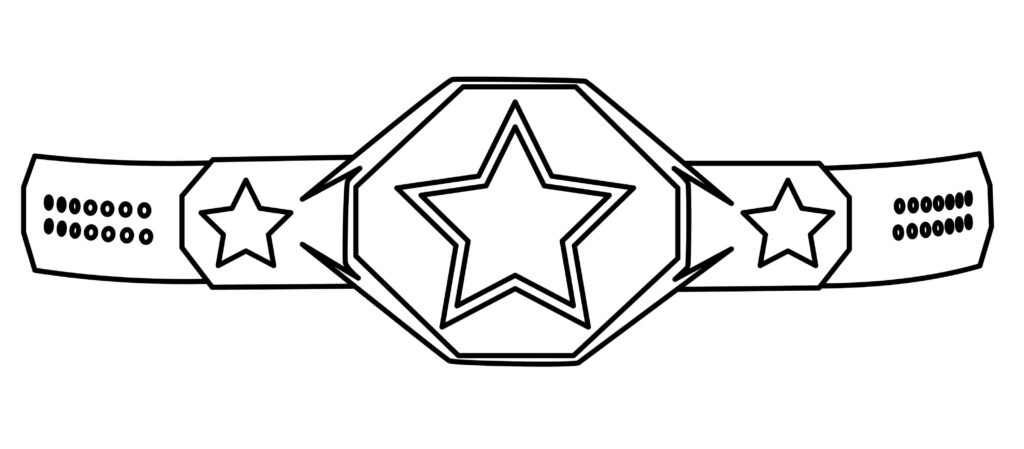
Start your championship belt by lightly sketching a horizontal rectangular shape near the top of your paper. This will become the central badge plate area. Make it appropriately proportional – wider than tall, occupying about 1/3 to 1/4 of the intended final belt length. Sketch angled trapezoid shapes connected on the left and right sides for depth.
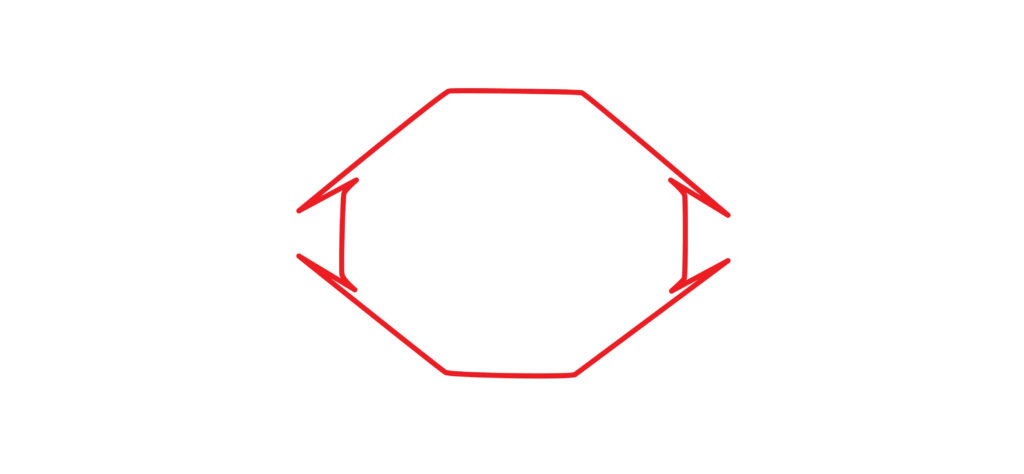
Use straight edges and symmetrical lines to begin establishing a structured mechanical feel. Consider adding a small circle in the exact middle to place your belt buckle, which will overlap and obscure parts of the middle zone.
Reinforce the rectangular proportion guidelines and efficiently handshake these initial belt identity elements across the blank space.
- Sketch central horizontal badge plate rectangle with connected angled side trapezoids.
- Include a small center circle for the median buckle
- Use straight, symmetrically aligned lines for compositional balance
Step 2: Draw the Left and Right Sides
Establish the extended side strap foundations once your championship belt’s central identifier layout is mapped. Sketch tapering band outlines on both the left and right external areas using spare straight marks that fade past the badge corners. Lean the bands slightly concavely to imply wrap-around curvature from front to back.
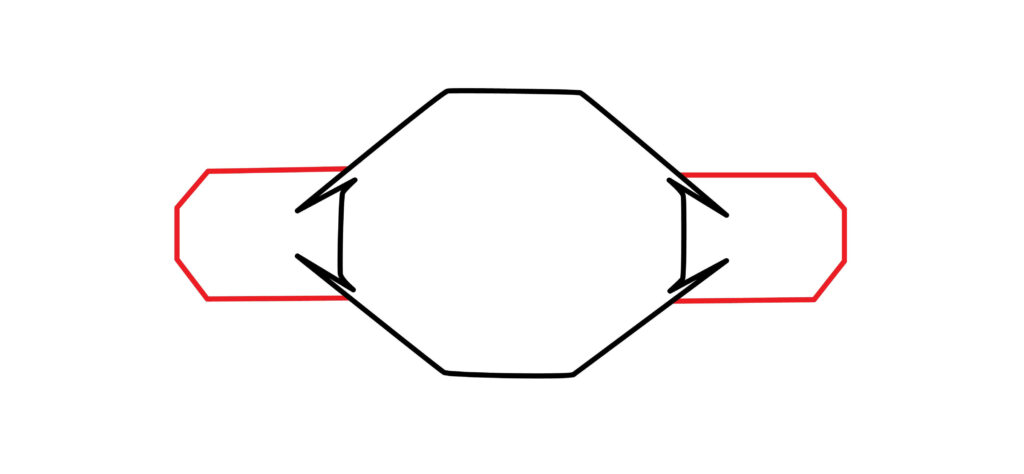
These floating extended bands balance the rectangular focal width and provisionally convey the looping around the waist hoop-like form. Make sure to cleanly lead the eye from badge peaks off into the side strap space rhythmically without interruption. Maintain straightness, spacing and parallel logic across both flanks for precision.
- Sketch straight line tapering side strap bands extending left/right externally
- Imply wrap curvature leaning bands slightly concavely
- Transition eye smoothly from badge peaks into bands symmetrically
Step 3: Draw the Belt
Having outlined the badge plate and side strap foundations, connect them to a cohesive curving banded belt structure. Use straight lines to draw the perimeter borders where the badge meets the straps, tidily bridging the existing space. Check angles match at the junctions. Use longer external lines on both straps ends to provision more buckling length adjustability and loose dangling style.

Apply parallel lines inwards to graft the strap and badge layers together neatly. Clean mechanical line quality maintains the championship belt’s iconic structural integrity. Refine jagged edges into one unified professional trophy accessory vision emerging!
- Bridge badge and straps using straight lines tidy junctions, and extending lengths
- Refine step-by-step into one smooth contoured mechanical belt form
Step 4: Add Details
With your championship belt’s overall form established, consider some opulent decorative detailing that gives it personality. For example, embed circular eyelet studs or glittering faux gems symmetrically along the external strap borders using light repeating outline dots. Intersperse extra supportive rectangular belt loops between.
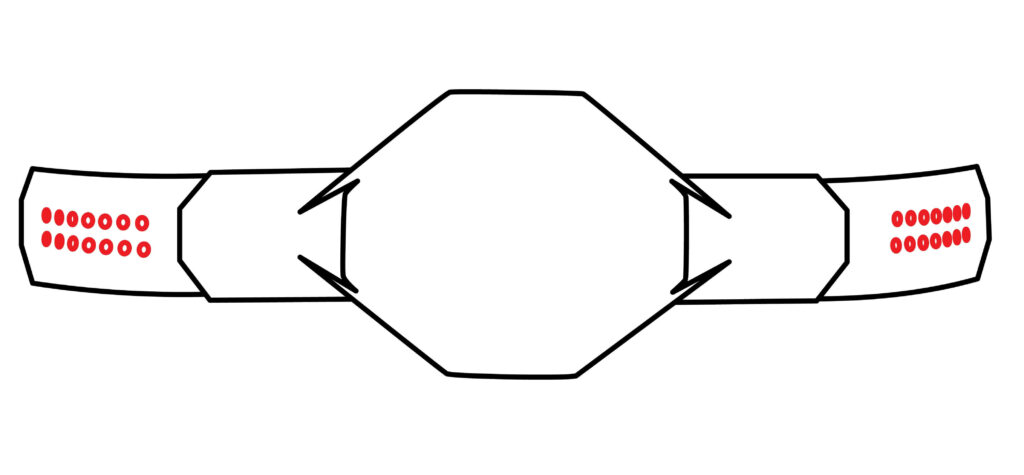
You could also sketch delicate embossed insignia patterns into the central badge plate rectangle to symbolize authority. Gradually evolve primary lines into prosperous showpieces full of character without overcrowding and clean structure!
- Add circular stud dots at borders, rectangular belt loops between
- Consider embossed decal patterns embedded in the central badge
Step 5: Add Details on the Middle Part
To make your belt design genuinely capture the spirit of victory, include celebratory icons on the central badge plate. Sketch a large central icon like a jewel crest or your own emblem. Integrate small sparkling stars floating around it to represent the shining champion status.
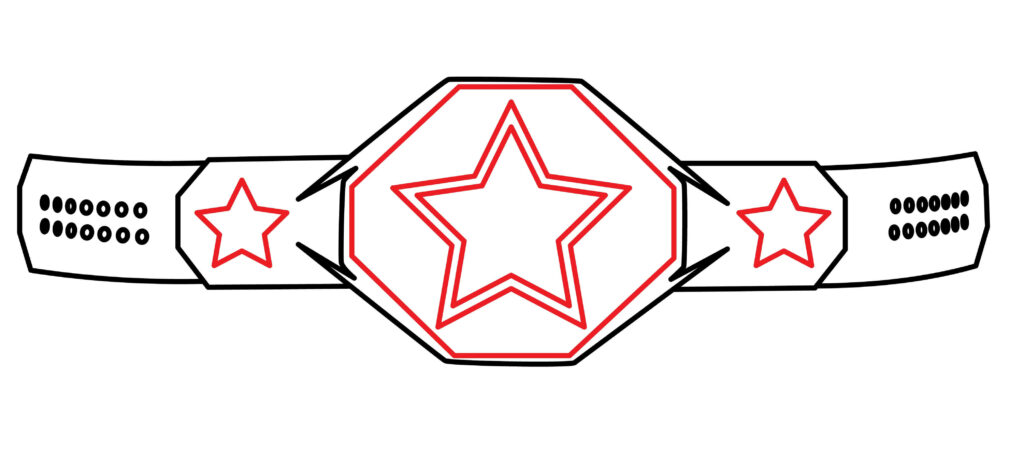
You could also add leafy laurels, decorative swirls, shields or banners with custom text elements like slogans. Keep the middle motif prominent but don’t overcrowd. Allow some negative space for it to command bold focus as the belt’s declarative centerpiece!
- Add a central victory emblem or jewel crest with floating stars
- Consider laurels, banners with text or other celebratory symbols
- Retain negative space around focal middle motif
Step 6: Congratulations! Your Championship Belt Drawing Is Complete.
Stand back and admire your work! You’ve successfully captured the essence of a championship belt. The strong lines, intricate details, and symbolic stars make your drawing a visual representation of victory.
Taking your Championship Belt to the next level
Like any other skill, sketching requires practice. Set aside time each day to sketch, even if it’s only for a little while. Be mindful of your surroundings. This enhances comprehension of details, dimensions, and forms. You can start with the basics and work up to more complex topics. Experiment with different drawing tools like charcoal, colored pencils, watercolors, markers, and pencils. Every medium has unique characteristics that could help you identify your preferences.
Adding Background
To contextualize your championship belt artwork within a grander victory narrative, consider loosely sketching dynamic background elements to set an atmospheric celebratory stage. For instance, very lightly outline the silhouette of a victorious wrestler proudly wearing the belt as they gesture to an applauding audience.
Surround them with visual accents like floating ribbon shapes, streaking motion lines to convey the triumphant energy, and confetti bursts or pyro explosions to denote an epic win. You might also indicate symbolic venues like a boxing ring, wrestling mat or championship podium underfoot to reinforce the competitive setting earned through immense skill and perseverance.
While composing your background visuals and implied vignettes, take care not to overdevelop these supportive aspects so that the focal championship belt retains clear spotlight emphasis. Use plenty of negative space around the belt to frame it effectively amidst the suggestive context. Allow the peripheral characters and stage to remain ghostly, blurred and desaturated so the saturated belt pops dynamically as the hard-won trophy centerpiece.
Adding Color
When applying color to your championship belt artwork, leverage bold complementary color combinations that make the trophy accessory really sing as the visual star of the composition. For example, render the central badge plate shape in vibrant anodized gold, encrusted with ruby red jewels and flashing white star accents. Make the bracketing side strap bands deep Championship Blue with metallic silver edges.

Use luminosity shifts to make the front-facing surfaces brighter, with shadows fading darker towards the sides and recesses. This conveys a compelling three-dimensional form. Consider outlining the key belt contours and focal design elements with high-contrast black lines edged with bright white accents for even greater visual intensity. This crisp definition ensures the belt imagery remains high-impact as the focal point.
In contrast, any background wrestler figures, venues, or embellishments should feel muted, blurred and significantly desaturated to recede behind that attention-grabbing championship belt palette occupying the spotlight. Maintaining this strategic color hierarchy strengthens the composition and dramatic visual storytelling.
Bonus Tips
To make your championship belt artwork feel even more personal and meaningful, consider the following customization ideas: prominently incorporate the champion’s name as engraved plate text or apply stickers/hang-tags. Use signature colors that reflect their brand identity and aesthetic.
Integrate iconography with symbolic meaning to them like zodiac signs, logos of supportive loved ones or hometown sports team visual callbacks. Capture a defining victorious career moment in the background illustration, like arms raised at the tournament-winning moment or emotional celebrations with coaches, family, and friends.
Conceptualize imaginative ornate belt designs unlike traditional company catalog offerings—really let your creative vision run wild! Sketch yourself proudly wearing the belt or gifting it to someone meaningful as a commemorative trophy celebrating monumental victories and rallying inspiration for future goals!
This tutorial’s core techniques equip you with solid skills to build upon in many diverse conceptual directions. By brainstorming unique backstories and personalization elements that make the championship memento feel distinctly yours or tailor-made for someone special, you can create significant illustrations infused with passion, personality and rich inspirational narratives through this artistic process!
Conclusion
In this visual demonstration of creating a championship belt artwork step-by-step, you have gathered some fundamental pencil illustration techniques from initial structure scaffolding through embellishing with thematic accents while maintaining clear visual hierarchy and purposeful negative space balance.
Building on these explored core methods, envision how you might leverage them as a springboard to take your drawings towards more elaborate imaginative personalization according to the stirrings of your creative vision!

Thanks for reading & feel free to check out more of our articles!
Author Rating
Overall Rating
Summary
This guide explains how to draw a wrestling championship belt.