
Have you ever wanted to recolour an object in Affinity Photo? Maybe you want it to be blue instead of green, or black instead of red. This is possible by adjusting the hue and saturation values with some easy tools!
In this blog post we will focus on the ways to use these features so your images are coloured just right!
Recolouring with an HSL Adjustment (Hue/Saturation/Lightness) in Affinity Photo
HSL Adjustments are one of Affinity Photo’s easiest and most powerful tools for recolouring or refining the colours in an image. These adjustments are handy to change the hue, saturation and lightness of a certain colour.
Like any other adjustment in Affinity Photo, an HSL adjustment works non-destructively. It indicates the original image is not changed as Affinity Photo automatically creates a new Adjustment Layer with its own layer mask. This allows you to go back and edit your changes, or even delete them if you don’t like how they turned out!
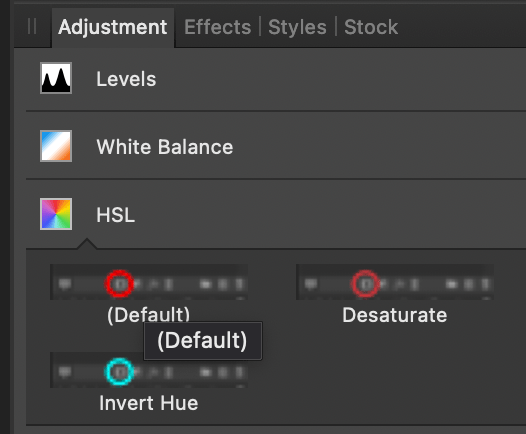
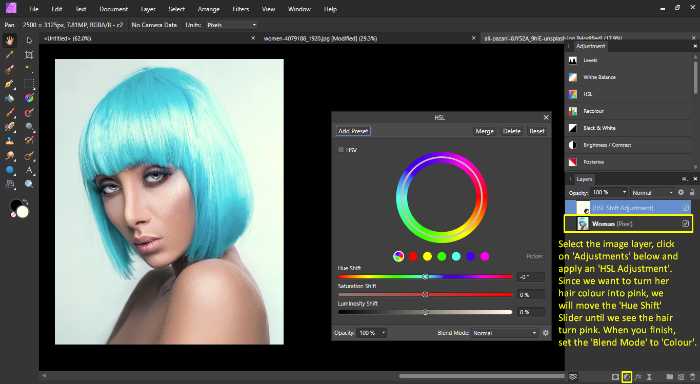
HSL Adjustments come with various settings that allow you to control the colours in your image. HSL Adjustment Panel contains a Hue, Saturation, and Luminosity Shift section with various sliders used for recolouring parts of an image.
a

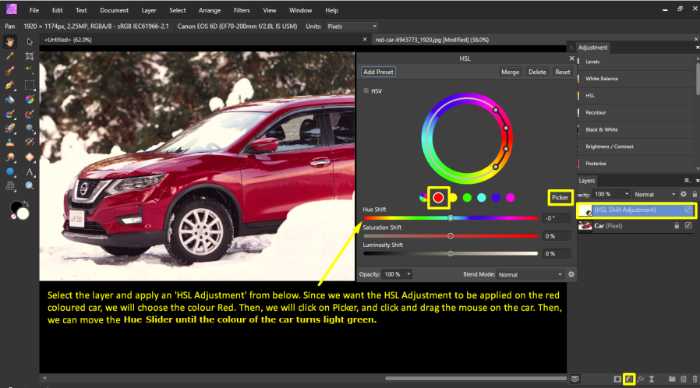
When picking a colour from the Colour Wheel, the changes made are applied to the particular colour. For example, choose the colour Red, only the red coloured parts of your image are affected.
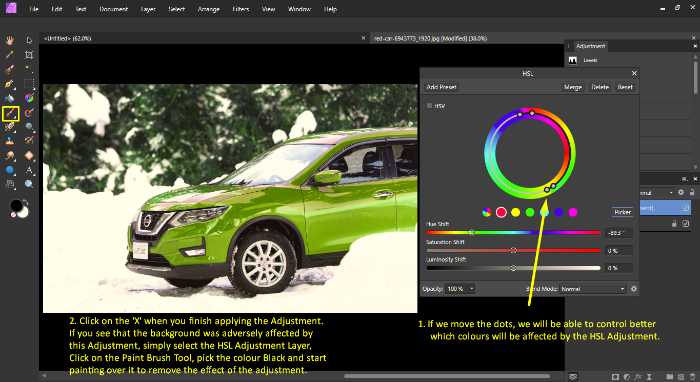
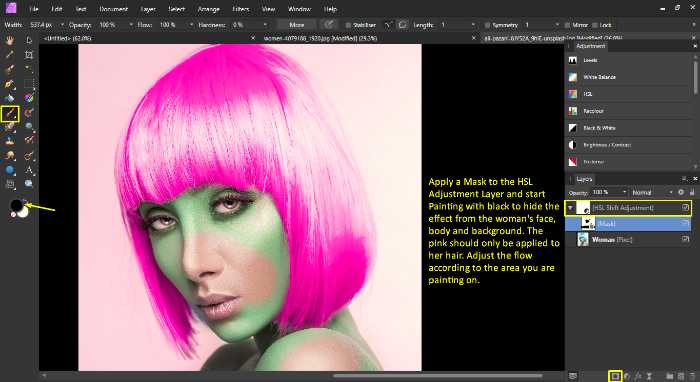
If you wish to limit the recolour to particular parts of the image only, you can paint over the mask and paint over areas where you want to hide the HSL Adjustment. Make sure you select the mask first.
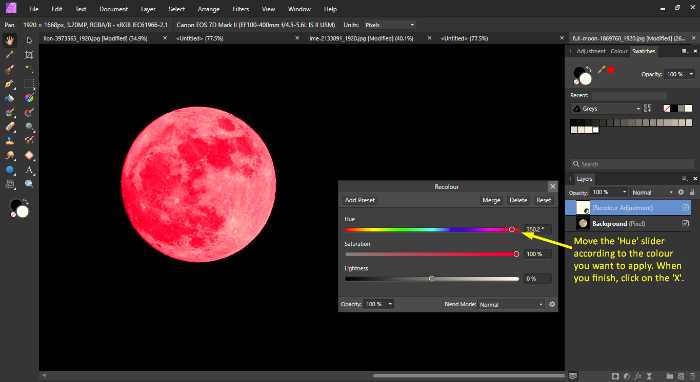
As you make changes Affinity Photo will show you a preview of how your image will look. When you finish, click on the ‘X’ to close the ‘HSL’ tab.
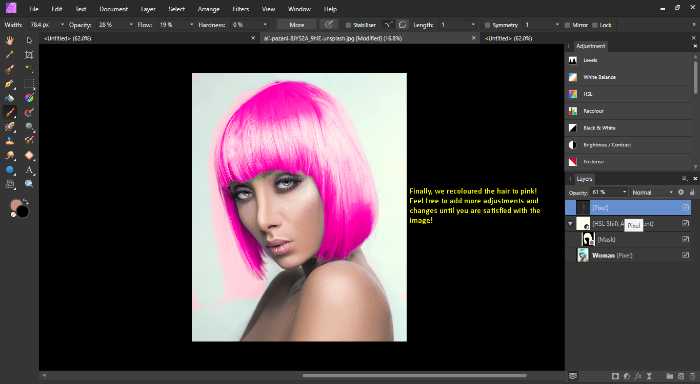
Take a look at these images to better understand how to recolour in Affinity Photo using an HSL Adjustment.
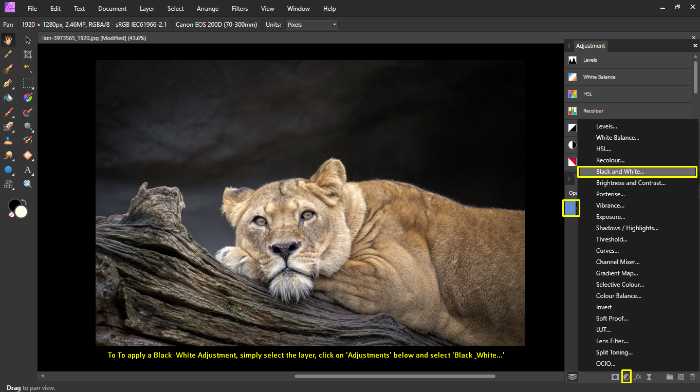
Applying a Black and White Adjustment in Affinity Photo
Affinity Photo also includes a Black and White Adjustment handy to turn your image from any colour into black and white.
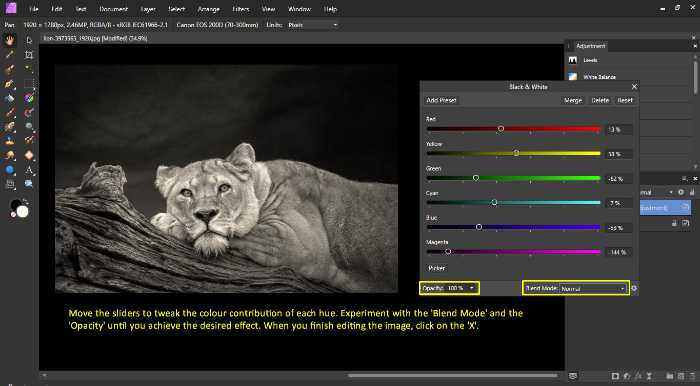
This adjustment is also non-destructive and equipped with a mask in case you wish to limit the adjustment to certain parts of the image only.

The Black and White Adjustment has various settings to change how your image looks. You will see that each slider represents a different colour: Red, Yellow, Green, Cyan, Blue and Magenta. This means, as the sliders move, the lightness value of these colours will be tweaked.
If the slider is moved to the right, the colour is lightened and if it is dragged to left, the colour is darkened.
There are a few ways to apply an Adjustment (Black & White in this case):
- Click on ‘Layer’ in the top menu, ‘New Adjustment Layer’ and ‘B &W…’
- Go to the ‘Adjustments’ Panel and Select ‘B&W…’.
- At the bottom of the “Layers” panel click the circle with is half-filled & a small popup will appear. Check screenshot below.
Use the various sliders to change how your image looks. Click on the ‘X’ when you finish applying the adjustment and adjusting the sliders. Experiment with the Black & White Adjustment Layer’s blend mode to create different effects.
As you can see in this example, applying a Black & White Adjustment is very simple!
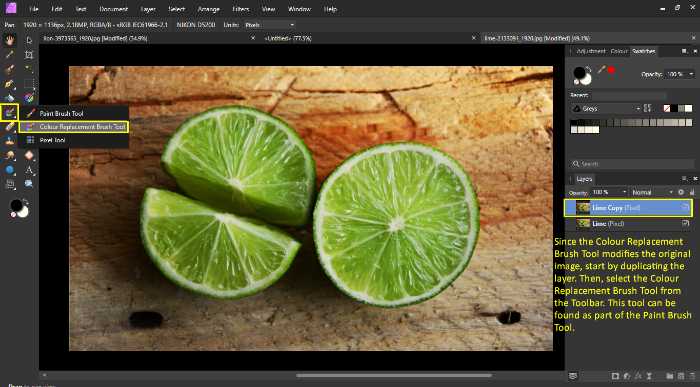
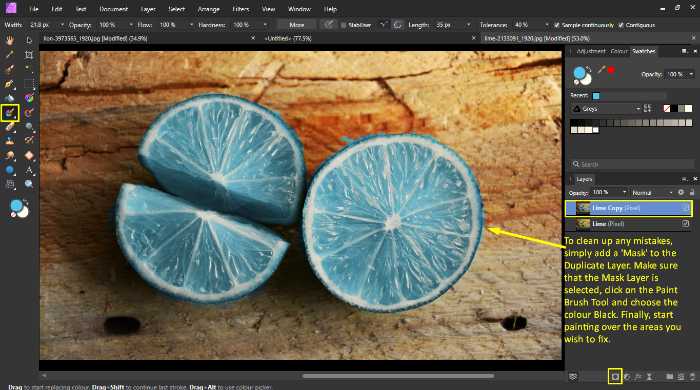
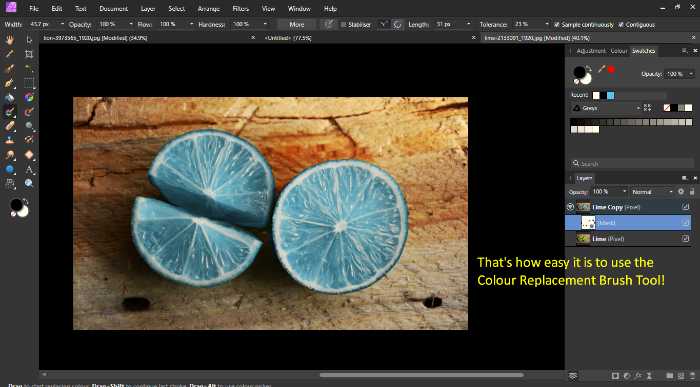
Quick recolouring using the Colour Replacement Brush Tool
This tool is Affinity Photo’s fast and easy way of recolouring an image. It is perfect for quickly changing the colours in a photo without having to use adjustments such as an HSL Adjustment.
Notably, the Colour Replacement Brush Tool not only changes a colour, but it also preserves details such as saturation, brightness as well as shadows and highlights of the original pixels.
The Colour Replacement Brush Tool is perfect for quickly changing a single colour in an image or small parts of an image.
The Colour Replacement Brush Tool works by sampling a colour from the image and then replacing all the colours in the image that are the same as the sampled colour with the new colour you choose.
It is similar to using a paint brush as you have to paint over the areas you wish to recolour.

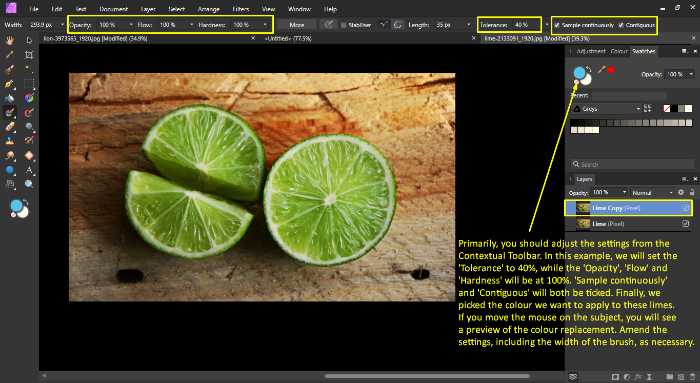
The Colour Replacement Brush Tool is found in the Paint Brush Tool menu from the toolbar at the left side of your screen. Click on the small white arrow at the bottom-right corner to show the Colour Replacement Brush Tool. Select it and then choose the colour you want to use instead of the existing one.
You can change the size of the brush by clicking and dragging on the Brush ‘Width’ slider, or by using the keyboard shortcuts: “[” and “]”. By lowering the Tolerance and ticking ‘Sample Continuously’, Affinity Photo will change the colour of the pixels that are closest in colour to the sampled colour.
This is perfect for when you want to change a specific shade of a particular colour. This ensures the details of the original image are not lost.
Take a look at these images to grasp how the Colour Replacement Brush Tool works.
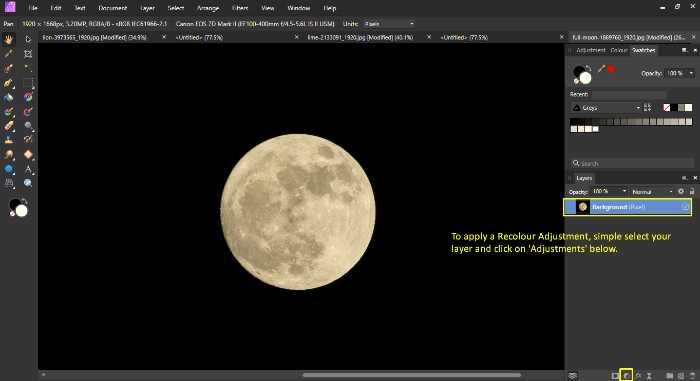
Applying a Recolour Adjustment Layer in Affinity Photo
Affinity Photo also offers a Recolour Adjustment Layer handy to change the colours in an image. This adjustment is non-destructive and equipped with a mask in case you wish to limit the adjustment to certain parts of the image only. This adjustment creates a monochrome image using the full spectrum of colours.
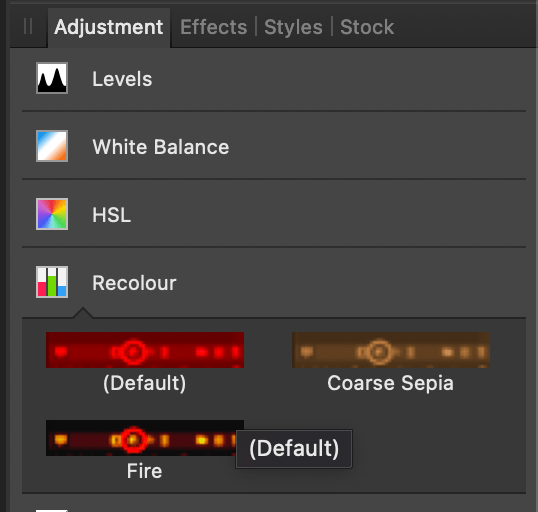
The Recolour Adjustment has three settings to change how your image looks. These sliders allow you to control the Hue, Saturation and Lightness. While it is very easy to apply, the details of the original colours are lost with this adjustment.
There are a few ways to apply an Adjustment (Recolour in this case):
- Click on ‘Layer’ in the top menu, ‘New Adjustment Layer’ and ‘Recolour…’
- Go to the ‘Adjustments’ Panel and Select ‘Recolour…’.
- At the bottom of the “Layers” panel click the circle with is half-filled & a small popup will appear. Check screenshot below.
Applying a Recolour Adjustment is super easy! See for yourself by looking at this example.
Changing the colour of a particular selection
There are a few different methods handy with their own benefits. Experiment with the different methods to find the one that works best for you.
To make a selection, simply use the Pen tool, the Selection Brush Tool, the Freehand Selection Tool, or any other tool you prefer. For a detailed explanation of making selections in Affinity Photo, please check out our other blog dedicated to selections.
Once you make the selection, simply choose one of the above adjustments or tools to change the colour. Affinity Photo will automatically apply the adjustment or tool to the selection only.
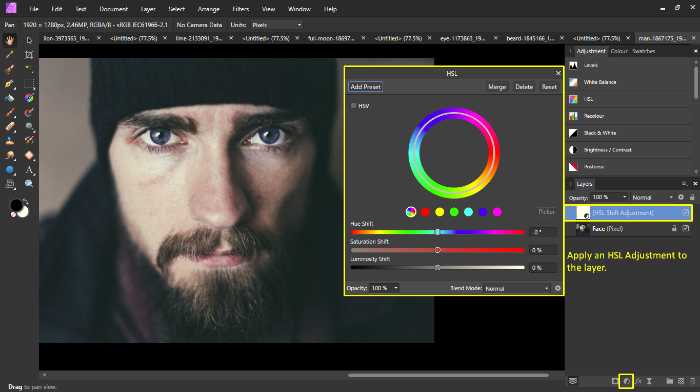
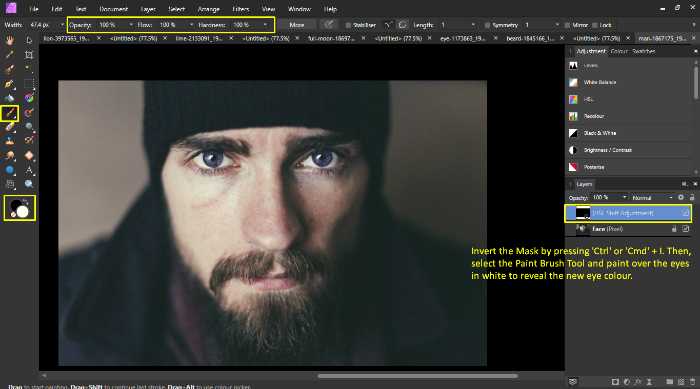
Changing eye colour in Affinity Photo
There are a few different methods to select the eyes. Experiment with the different methods to find the one that works best for you depending on the image you wish to edit.
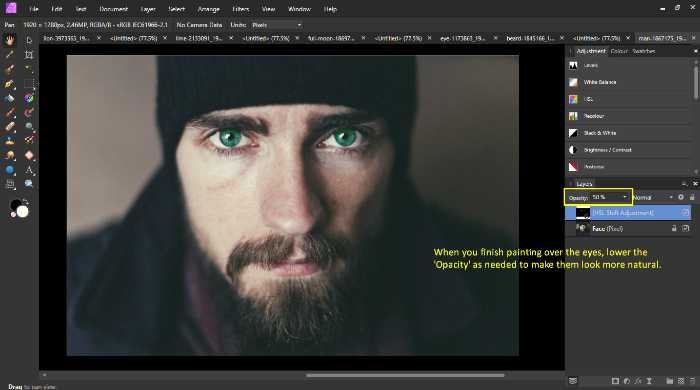
- One way to change eye colour is by using an HSL Adjustment. Once you have made the selection, you should apply an HSL Adjustment Layer and change the blend mode to ‘Colour’. This will give more control over the eye colour. You can reduce the Opacity.
- Apply a ‘Shadows/Highlights’, ‘Brightness/Contrast’ or ‘Levels‘ Adjustment to achieve a more natural look when needed.
Follow here to check out how to change eye colour with these provided images.
How to change hair colour in Affinity Photo
Affinity Photo offers a few different methods for changing hair colour. The most effective method will depend on the image you are editing, the current hair colour, the type of hair and the results you wish to achieve.
You can use any Adjustment or Tool discussed above, however, in my example I will be using the Recolour Adjustment. (Check out the recolour section above for more in-depth content)
Start by selecting the layer you want to edit, apply a Recolour Adjustment and picking the colour you want to target. Adjust the ‘Saturation’ and the ‘Lightness’ slider as required and click ‘X’ when you are ready.
Since we want to apply the effect only to the hair, select the provided ‘Mask’ on the Recolour Adjustment Layer and select the ‘Paint Brush Tool’. Pick the colour black and paint everywhere except for the hair (Mask will show all black apart from the white area – which is the hair). To include any flyaways, reduce the size of the brush and for tricky areas lower the ‘Flow’ percentage.
Another method would be to remove all the colours to start working on a clean slate. To do this, select the layer of the image and apply an ‘HSL Adjustment’ and bring the ‘Saturation Shift’ slider to -100%.
Since we only want this effect to apply to the hair, invert the mask by selecting the Mask on the ‘Adjustment Layer’ and pressing ‘Ctrl’ (Windows) or ‘Cmd’ (Mac) + ‘I’.
Now, to change the colour to red for example, simple hold ‘Ctrl’ (Windows) or ‘Cmd’ (Mac) and click on the HSL Adjustment Layer to load the hair as a selection.
In this example, we used an HSL Adjustment to change the hair colour.

Expert Rating
Summary
Recolouring takes form in multiple ways. It uses multiple techniques which might feel overwhelming to some. However, even-though it is not difficult to change colours it tends to be more difficult to make a colour change realistic.
Conclusion
We’ve covered multiple techniques & tools that make recolouring a breeze. The various tools available include HSL Adjustments, Black and White Adjustments, the Colour Replacement Brush Tool, Recolour Adjustments, among others.
Thank you for tuning in, feel free to check out more of our helpful tutorials!


