
This can be a confusing process, especially if you’re not sure what is the difference between “resizing the canvas” and “resizing the document”.
We will walk you through each step of the process and explain exactly what you need to do. We’ll also show you how to use the crop tool in order to resize your documents. We’ll also provide some tips for making the resizing as smooth and seamless as possible. Let’s get started!
What is a canvas and what happens when you resize it?
Canvas is the working area in Affinity Photo where you can add, edit, and manipulate your images. The size of the canvas is determined by the dimensions of the document.
The document is effectively the same size as the canvas after the document has been opened. When you resize the canvas, you’re altering the document’s size.
There are two ways to resize the canvas:
- Resize Canvas: This option allows you to increase or decrease the size of the canvas without changing the size of the document.
- Resize Document: This option automatically resizes both the canvas and the document to match the new dimensions that you specify.
What is the difference between Resizing the Canvas and Resizing the Document?
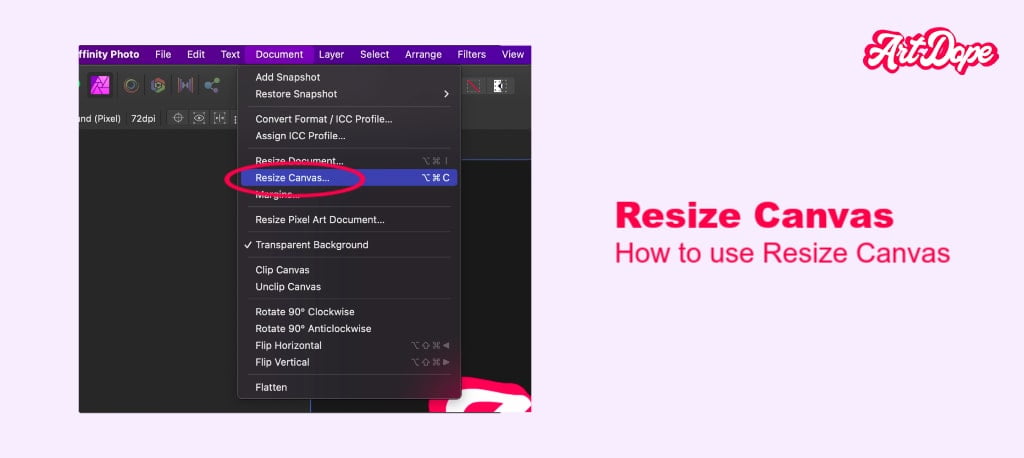
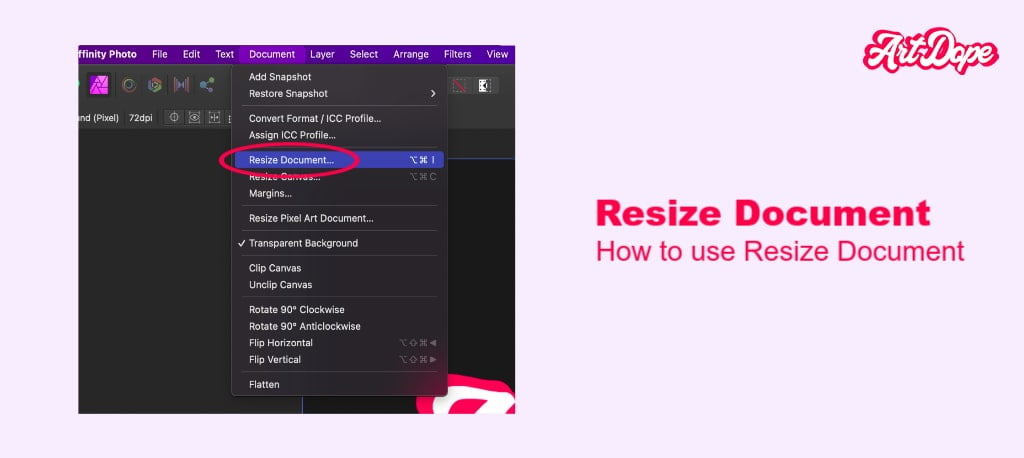
From the Document menu, you will find these two options:
- Resize Document
- Resize Canvas
This is only accessible in the Photo Persona. If you’re using one of the other Affinity Personas, the Document menu won’t appear.
Here’s a quick overview of what happens when you resize using each option:
If you choose Resize Canvas, you can add or remove pixel data from your image. The canvas has the same dimensions as the image by default, so the picture hides and covers it. Nevertheless, we can modify the Canvas Resize option to resize the canvas separately from the image.
If you choose Resize Document, you can change the document size by scaling and/or resampling. While scaling doesn’t affect the pixel dimensions, it sets the print resolution to a specific DPI. On the other hand, resampling decreases or increases the number of pixels in the image.
How to resize the canvas
There are two ways to resize the canvas in Affinity Photo:
- By entering specific dimensions
- By using the Crop Tool
Inputting the dimensions
Step 1
To resize the canvas, go to Document > Resize Canvas.
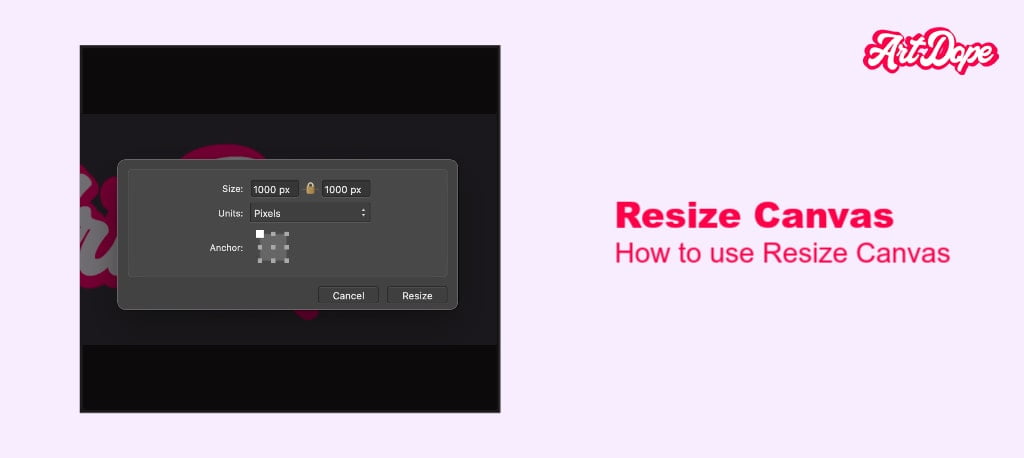
A new dialog box appears with a couple of options,
- In the first row of the new window, you can see the option Size which is used to adjust the width and the height.
- Below the Size option, we have the Units option which allows choosing the desired unit option such as pixels, inches, etc.
- The last option is Anchor. It resizes the canvas by adjusting alignment options.
Step 2
The padlock in between the Size option will lock the aspect ratio between the dimensions. If you click it, it switches between the lock and unlocks while changing the dimensions.
If it’s in unlock mode, changing the width or the height will not affect the other dimension but in lock mode, if you change the height or the width it will cause to change the other dimension.
Step 3
Setting the Anchor point option decides where to anchor or place the image. You can change the anchor point by clicking on one of the nine boxes in the Anchor section. The default anchor point is set to the centre.
If the Anchor option is set to the centre, the image will be positioned in the centre of the canvas which shows around the edges. If it’s set to any of the other eight points, the image will be positioned in that location with respect to the canvas.
The following are the nine anchor points:
- Top Left
- Top Centre
- Top Right
- Middle Left
- Middle Centre
- Middle Right
- Bottom Left
- Bottom Centre
- Bottom Right
Step 4
In the dialogue box that appears, you can enter the new width and height of the canvas under the Size option. Keep in mind that the dimensions you enter here will be in pixels.
If you want to change the units, you can use the drop-down menu next to the Units option. Other units include inches, centimeters, and millimeters.
After setting all the options, click on the Resize button to resize the canvas. You will notice that the document’s width and height have changed and transparent areas have been added to the document.
To stretch the image to fill the transparent areas of the canvas, make a selection of the part you wish to extend using one of Affinity Photo’s selection tools. Duplicate the selection by pressing ‘Ctrl (Windows) or Cmd (Mac) + J’ and deselect by pressing pressing ‘Ctrl (Windows) or Cmd (Mac) + D’. Then, click on the Move Tool and stretch the layer by clicking and dragging the handles.
This is how easy it is to resize the canvas in Affinity Photo by adding precise dimensions!
Crop Tool
Instead of using the Resize Canvas option, you can easily achieve the same resizing task with the Crop Tool. The Crop Tool is located in the Tools Panel.
To use the Crop Tool,
- Select the Crop Tool.
- Drag the control handles until you are satisfied with the size of the canvas.
- Then, click Apply.
- You can see the selected area will be expanded.
Fill in the transparent area using the same method we talked about in the previous section.
This is how you can use Affinity Photo’s Crop Tool to resize the canvas!
Helpful Tips
Moving on to some helpful tips, we will check out the ways you can remove unwanted canvas areas and the way to expand the canvas to fit the layer content.
Removing an unwanted canvas area is removing the content which is irrelevant to the design or a portion that makes the look of the image quite unessential.
Let’s check out how easy it is to remove unwanted canvas areas:
- In the Document menu, select Clip Canvas.
Expanding the canvas to fit the layer comes in handy when we want to make a specific area look expanded, clearer or zoomed.
Let’s check out how to expand the canvas to fit layer content:
- In the Document menu, select Unclip Canvas.
Creating borders
A border is an essential part of the design as it makes the design more complete, finished and polished. It also helps in adding more space around the content for better focus. By resizing the canvas, you can create versatile frames and borders!
Adding a border is an easy task and can be done with a few clicks in Affinity Photo.
Here’s how to add a border:
- Select Edit Menu and select Matte to fill any transparent areas in the image as a colour. A window to select the desired colour will appear. The border will be created!
- You can select a primary or secondary colour or a custom colour and Click Apply. And the border will be created!
You can also create borders without altering the image by:
- Going to the Layer menu.
- Click on New Fill Layer.
- Drag the transparent border beneath the image layer.
A blog dedicated solely to frames and borders can be found here.
Expert Rating
Summary
Resizing is quite simple and straight to the point. You simply need to understand how dimensions work, and some definitions like “resolutions, dpi, etc” are. As per scalability, you won’t be using this function too much (as per my past experience), nor too much scale to it either. Not difficult & doesn’t require much practice either.
Conclusion
This concludes our Affinity Photo tutorial on how to resize the canvas. We have also looked at the difference between resizing the canvas and resizing the document.
Thanks for reading & feel free to check out more of our articles!


